| C H A P T E R 5 |
|
Connecting to the Service Processor For Configuration |
This chapter describes how to connect to the Sun Fire X4140, X4240, or X4440 server’s Integrated Lights Out Manager (ILOM) service processor (SP), and how to perform initial network configuration.
The ILOM provides a connection to the system console and can be used to perform network management and configuration functions. It can be used when the system is powered off, as long as the AC power is connected.
This chapter describes how to connect to the service processor to ensure that it is working correctly and to configure its network settings. You can configure the service processor to use DHCP or a static IP address. If you configure it to use a static IP address, you must enter the network address settings.
The service processor is described fully in the Sun Integrated Lights Out Manager User's Guide.
The ILOM provides two control interfaces; the command-line interface (CLI), and the web GUI.
The connections appear in FIGURE 2-14 and FIGURE 2-16.
Either method can be used to configure your network settings. However, to use SSH or the web GUI, you must already know your service processor’s IP address.
Use the procedure that you prefer:
Use this procedure to establish a serial connection to the ILOM, then to perform initial network configuration.
This procedure assumes that you have already completed the hardware setup and have applied standby power to your server.
1. Verify that your terminal, laptop, or terminal server is operational.
2. Configure the terminal device or the terminal emulation software running on a laptop or PC to the following settings:
3. Connect a serial cable from the RJ-45 SER MGT port on the server’s back panel to a terminal device. See FIGURE 1-6 or FIGURE 1-8.
4. Press Enter on the terminal device to establish a connection between the terminal device and the ILOM.
The SP displays its login prompt: login
a. Type the default user name: root
b. Type the default password: changeme.
Once you have successfully logged in, the SP displays its default command prompt:
You can now use the SP’s command line interface (CLI).
6. Configure the server’s network settings:
a. Navigate to the CLI’s network settings. Type:
b. Type the following commands to configure the network settings:
set pendingipaddress=xxx.xxx.xx.xx
set pendingipnetmask=yyy.yyy.yyy.y
set pendingipgateway=zzz.zzz.zz.zzz
Where xxx.xxx.xx.xx, yyy.yyy.yyy.y and zzz.zzz.zz.zzz are the IP address, netmask, and gateway for your ILOM and network configuration.
7. (Optional) Start the serial console.
8. When you are done, type exit.
9. After configuring the ILOM, continue with Chapter 3.
where ipaddress is the ILOM IP address.
2. When prompted, enter the default password, changeme.
Once you have successfully logged in, the SP displays its default command prompt:
You can now use the SP’s command-line interface (CLI).
3. Configure the server’s network settings:
a. Navigate to the CLI’s network settings. Type:
b. Type the following commands to configure the network settings:
set pendingipaddress=xxx.xxx.xx.xx
set pendingipnetmask=yyy.yyy.yyy.y
set pendingipgateway=zzz.zzz.zz.zzz
Where xxx.xxx.xx.xx, yyy.yyy.yyy.y and zzz.zzz.zz.zzz are the IP address, netmask, and gateway for your ILOM and network configuration.
4. (Optional) start the serial console.
5. When you are done, type exit.
6. After configuring the ILOM, continue with Chapter 3.
To access the full range of ILOM functionality such as the graphical user interface (GUI), you must connect a LAN to the Ethernet port and access the ILOM web GUI.
| Note - This procedure assumes that you have already completed the hardware setup and have applied standby power for your server. It also assumes that you know the ILOM’s IP address. |
1. If you are going to use DHCP, ensure that your DHCP server is configured to accept new media access control (MAC) addresses by checking with your system administrator.
2. Connect an Ethernet cable to the server’s RJ-45 NET MGT Ethernet port. See See FIGURE 1-6 or FIGURE 1-8.
3. If you do not know the ILOM IP address, use the procedure in Using the CLI to find it.
4. Type the ILOM IP address in a web browser window.
5. Enter the default user name and password, root and changeme.
The ILOM web GUI page appears.
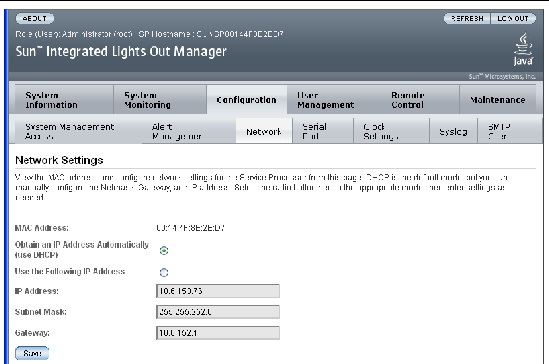
6. To configure the network settings, select the Configuration tab and its Network tab.
The current network settings appear. See FIGURE 5-1.
7. Select and configure the IP address:
a. To use DHCP, select the radio button next to Obtain an IP Address Automatically (use DHCP).
b. To use a static IP address:
i. Select the radio button next to Use the Following IP Address.
ii. Enter the IP address, subnet mask, and gateway IP address in the corresponding fields.
FIGURE 5-1 Integrated Lights Out Manager Network Settings Page

8. Click Save when you are done.
9. Continue with Chapter 3.
For detailed instructions on configuring your system, see the Sun Integrated Lights Out Manager User's Guide.
Copyright © 2009 Sun Microsystems, Inc. All rights reserved.