| Sun Integrated Lights Out Manager 2.0 Supplement for Sun Fire X4140, X4240, and X4440 Servers |
| C H A P T E R 2 |
|
Firmware Update Procedures |
This chapter explains how to update the Sun Fire X4140, X4240, or X4440 server with firmware that resides in the following locations:
This chapter contains the following sections:
The Integrated Lights Out Manager (ILOM) firmware and the server’s system BIOS are always updated together. You update both ILOM and BIOS firmware even if one of their versions has not changed since the last software update.
Update the ILOM/BIOS using the following process:
1. Obtain the IP address of the Service Processor.
See Obtaining the Service Processor’s IP Address.
2. Log on to the Service Processor ILOM to check the versions of firmware you have. See Identifying Current Firmware Versions.
3. Use the ILOM to download the new versions of firmware.
See Downloading New Firmware.
4. Use the ILOM (or the Sun xVM Ops Center, (if supported) to install the new firmware.
See Flashing the ILOM/BIOS Firmware.
5. Reset the Service Processor.
See Resetting the Service Processor.
| Note - For alternate methods to download firmware, refer to the Sun Installation Assistant for Windows and Linux User’s Guide (820-3557). |
The Sun Fire X4140, X4240, or X4440 server includes an on-board LSI disk controller. The LSI disk controller’s firmware should be updated at the same time as the BIOS and ILOM. The LSI firmware can be updated before or after the BIOS and ILOM firmware.
The final section of the chapter explains how to update the LSI disk controller firmware. See Updating Your LSI Firmware.
You must use the Service Processor (SP) to update the firmware on your server, and you need an IP address to access the SP.
If you do not already know the Service Processor’s IP address, use one of the following methods to locate ILOM SPs and their IP addresses.
1. DHCP server. Refer to the ILOM documentation for your ILOM version for instructions on how to determine the IP address of an SP.
2. Linux and Solaris open-source nmap command. Use the open-source nmap command, with a -p port option, to scan for port 623, and quickly detect IPMI-enabled devices (such as your server’s SP) on a network. For example:
nmap -p 623 10.6.154.1/24 Interesting ports on net.address (623 10.6.154.1/24): PORT STATE SERVICE 623/tcp closed unknown |
Choose one of the following procedures to identify the current firmware versions on your Sun Fire X4140, X4240, or X4440 server:
To identify current firmware versions using the CLI, through the management ethernet port:
1. Connect an RJ-45 Ethernet cable to the NET MGT Ethernet port on the .
2. Establish an SSH connection by typing the following command:
where sp_ip is the IP address of the server’s Service Processor.
3. Type the default password changeme when you are prompted:
After you have successfully logged in, the SP displays a default command prompt: ->
4. Type the version command. Text displays similar to the following:
-> version SP firmware version: 2.0.2.5 SP firmware build number: 35303 SP firmware date: Tue Jul 29 22:53:53 EDT 2008 SP filesystem version: 0.1.16 |
The ILOM (SP) firmware version and build number are listed above. Refer to the server’s ILOM documentation for additional information.
To identify current firmware versions using the CLI, through the serial port:
1. Configure your terminal device or the terminal emulation software running on a laptop or PC to the following settings:
2. Connect a serial cable from the RJ-45 SER MGT port on the to your terminal device or PC.
3. Press Enter on the terminal device to establish a connection between that terminal device and the server’s SP.
The SP displays a login prompt.
For example, 0003BA84D777 is the Ethernet MAC address of the SP. The address is different for each server.
4. Log in to the ILOM SP and type the default user name (root) with the default password (changeme).
After you have successfully logged in, the SP displays a default command prompt: ->
5. Type the version command, which returns output similar to the following:
-> version SP firmware version: 2.0.2.5 SP firmware build number: 35303 SP firmware date: Tue Jul 29 22:53:53 EDT 2008 SP filesystem version: 0.1.16 |
The ILOM firmware version and build number are listed above.
To identify current firmware versions using the CLI, through the Web interface:
1. Connect to the ILOM Web interface by typing the IP address of the server’s SP in your browser’s address field. Use https://. For example:
2. Log in to the ILOM SP and type the default user name (root) with the default password (changeme).
The screen shows the System Information -> Versions page, which includes the firmware version and build number.
FIGURE 2-1 ILOM Versions Window

To download the flash image .pkg file:
1. Access the web page http://www.sun.com/download/ from your browser.
2. Locate the Hardware Drivers section.
3. Click the X64 Servers and Workstations.
4. Click the link for the Sun Fire X4140, X4240, or X4440 server software release version that you want.
6. Enter your Username and Password.
If you do not have a Username and Password, you can register free of charge by clicking Register Now.
7. Click Accept License Agreement.
8. Click the appropriate firmware image file name:
Choose one of the following procedures to flash the ILOM/BIOS firmware on your Sun Fire X4140, X4240, or X4440 server:

1. Log into the ILOM GUI by pointing your browser at the IP address of the Service Processor. Use https://. For example:
2. Select the Maintenance tab.
3. Select the Firmware Upgrade tab.
4. Click the Enter Upgrade Mode button.
5. Browse for the flash image file.
FIGURE 2-2 Firmware Upgrade Screen
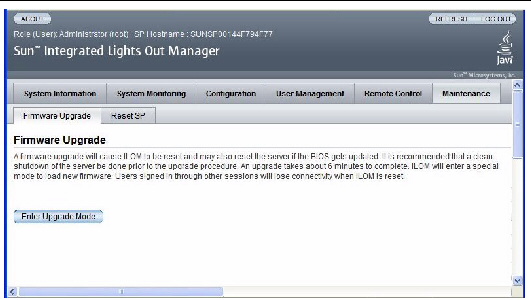
| Note - Using the Web GUI, you also can specify a local URL for the .pkg file, to let the SP fetch it for itself, instead of browsing and uploading the file. |
1. Log onto the ILOM CLI through the Management Ethernet Port (see Using the CLI Through the Management Ethernet Port) or the serial port (see Using the CLI Through the Serial Port).
2. From the ILOM CLI, use the following command:
load -source tftp://tftpserver/ilom.firmware.pkg
where tftpserver is the trivial file-transfer protocol (TFTP) server that contains the update and ilom.firmware.pkg is the firmware image file, for example:
In Sun xVM Ops Center, the Provisioning feature implements flashing capability.
Online documentation for Sun xVM Ops Center can be found at:
http://wikis.sun.com/display/xvmOC1dot1/Home
Using the Web GUI, you also can specify a local URL for the .pkg file, to let the SP fetch it for itself, instead of browsing and uploading the file.
If you cannot see output on your serial console after the flash upgrade, you might have to clear CMOS settings. This is because your default CMOS settings might have been changed by the new BIOS upgrade.
To clear CMOS settings, type the following commands (in this example, the default username, root, are used). Type the default password, changeme when you are prompted:
ipmitool -U root -H SP-IP chassis power off ipmitool -U root -H SP-IP chassis bootdev disk clear-cmos=yes |
where SP-IP is the IP address of the service processor.
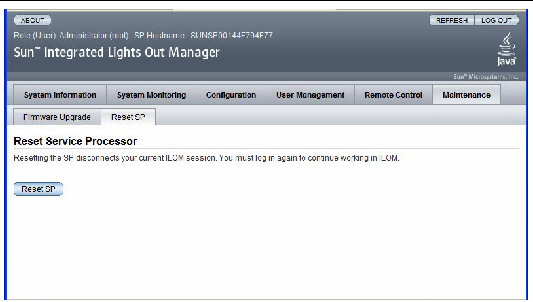
After flashing the ILOM/BIOS firmware, you must reset the ILOM SP.
To reset the ILOM SP, you can do any of the following:
FIGURE 2-3 ILOM Reset Service Processor Window
ipmitool -U root -P password -H SP-IP bmc reset cold
where SP-IP is the IP address of the service processor.
For more details, refer to the ILOM documentation for your server.
Should you use this update and later find that you need to downgrade to a previous release, you may need perform the flash downgrade twice to reformat the flash layout to the old format. If so, a message will prompt you. This is not a failure. Just repeat the procedure as instructed and the process will succeed.

|
Caution - During an update, never power off the system. |
To update the LSI firmware, you must boot the server from a special DVD/CD or DVD/CD image. Choose one of the following ways to update the LSI firmware:
| Note - These instructions assume you are logging in to the ILOM GUI from a system running Windows. |
1. Using a web browser, connect to the ILOM and open the ILOM Web interface. Use https://:
where sp_ip_address is the IP address of the service processor.
3. Select the Redirection tab.
FIGURE 2-4 ILOM Launch Redirection Window
5. Click the Launch Redirection button.
6. At the login prompt for the JavaRconsole window, type root, and then type the root password (changeme).
| Note - Do not attempt to use the mouse in the JavaRconsole window, as you will then need to use the keyboard shortcuts to access the JavaRconsole menus. |
7. In the JavaRconsole window, select the Devices menu.
FIGURE 2-5 JavaConsole Devices Menu

8. Highlight CD-ROM Image and click Enter.
9. In the dialog box that opens, select the location of the LSI firmware update CD-ROM Image (ISO).
A check mark is displayed on the drop-down menu selection.
11. Select the Remote Control tab, then the Remote Power Control tab.
12. Select Reset from the Select Action drop-down list box.
13. When the system reboots, select “1” (Perform the Update) from the JavaRconsole window.
The update proceeds. When complete, the console responds with a new prompt.
14. In the JavaRConsole window select the Devices and highlight the CD-ROM Image menu item. Click Enter to detach the LSI firmware update ISO file.
15. Select the JavaRConsole Keyboard menu and choose Control Alt Delete.
16. On system boot, you will notice the new LSI firmware version.
1. Download the LSI firmware ISO file from the Sun Fire X64 servers Web site and burn it to a bootable DVD/CD.
| Note - The bootable CD will appear blank when viewed using the operating system. This is expected behavior. |
2. Use the server’s CD_ROM drive or a CD-ROM drive connected to the server.
3. Insert the bootable CD and reboot the server.
For additional information about the LSI firmware and BIOS, refer to the documentation files that accompany the LSI download.
| Sun Integrated Lights Out Manager 2.0 Supplement for Sun Fire X4140, X4240, and X4440 Servers | 820-5754-11 |
Copyright © 2009 Sun Microsystems, Inc. All rights reserved.
