| Sun Fire X4600 Server Product Notes |
| C H A P T E R 1 |
|
Firmware and BIOS Issues |
This chapter describes the LSI firmware, Sun Integrated Lights Out Manager (ILOM) service processor (SP), and BIOS issues related to the Sun Fire X4600 server. The numbers given in the section titles are internal tracking numbers for change requests related to the issues.
This chapter includes the following topics:
In Software 1.3, using any SunCFG with any ILOM options causes the system to hang. There is no workaround.
If a hard disk is removed from a system, the service processor neither logs an event nor provides a visual alert. This is expected behavior because the service processor does not receive events from the LSI SAS controller when a disk drive is hot-plugged and visual alerts do not occur.
None. This is expected behavior.
There is no version checking from the Sun Fire X4600 firmware, so it is possible to flash the wrong platform firmware onto the server. If you do this, the server will not reboot at the end of the process.
Verify the server hardware version with the following command:
ipmitool -H SP_IP_address -U username -P password fru
The command returns output similar to the following:
FRU Device Description : p0.card.fru (ID 10)
Board Product         : ASSY,CPU BOARD,X4600 M2
Board Serial          : 002555
Board Part Number     : 501-7321-03
Board Extra           : 01
Board Extra           : G4_F_CPU
If the Board Product field lists something other than ASSY,CPU BOARD,X4600, then you have flashed a wrong firmware image by mistake on X4600. For example if it lists ASSY,CPU BOARD,X4600 M2, you have accidentally flashed the Sun Fire X4600 M2 firmware onto the Sun Fire X4600.
The system will not reboot, but the service processor is still functional so that you can return to the Sun Fire X4600 firmware. Use the following procedure:
1. Download and flash the server to the latest version of the Sun Fire X4600 firmware.
At the end of the flash process, the following message might be displayed, which indicates that you are changing to a different platform firmware.
Firmware image verification is complete.
Image compatibility check is complete.
Image is not compatible with this target.
If incompatibility is caused by hardware replacement, type "y" to
continue.
If unsure type "n".
Do you wish to continue ([n]/y)?
Type y at this prompt to continue.
2. Type y at the prompt to continue.
4. Verify the server hardware version with the following command:
ipmitool -H SP_IP_address -U username> -P password fru
FRU Device Description : p0.card.fru (ID 10)
Board Product : ASSY,CPU BOARD,X4600
Board Serial : 002555
Board Part Number : 501-7321-03
Board Extra : 01
Board Extra : G4_CPU
The Board Extra field should list G4_CPU, and the Board Product field should list ASSY,CPU BOARD,X4600.
The following traps are currently not supported:
The SNMP agent does not handle SETs for the Entity and Sun Platform MIBs. This causes compliance tests involving SETs to fail. Use other services to perform the needed tasks.
After a downgrade, you might not be able to login to the ILOM web interface. This problem occurs because the web interface for ILOM in Software 1.0 does not understand browser cookies generated for ILOM in Software 1.1.1.
Remove the ILOM web cookie. The easiest way to do this is to restart the web browser.
The ILOM CLI sometimes reports an internal error for a command that attempts to set multiple properties.
Set properties one at a time.a
If overheating forces a system shutdown, the system might power off during reboot.
After a thermal shutdown, be sure to give the system enough time to cool off (up to 30 minutes). If the system still powers down, power it back up. It might take 2 or 3 tries to reboot.
The ILOM CLI cannot set the ntp server address to an IP address with a 0 as the second or third octet, such as 10.13.0.20 or 10.0.60.20. These addresses are rejected as invalid.
Use the WebGUI to set the ntp server address.o
An attempt to set the syslog IP address fails if the address contains an octet of 0. For example, 10.10.10.10 and 100.100.100.100 works, while 19.52.0.17 does not work.d
The DIMM fault LEDs are designed to light the ejector levers of the paired DIMM slots that contain a faulty DIMM. However, because the DIMM failure event is not being correctly interpreted in the code that turns on the DIMM fault LED at this time, the wrong DIMM fault LEDs might be lit.
Do not rely on the DIMM fault LEDs to isolate a faulty DIMM; use IPMItool instead.
Some LEDs on the system have a blinking state, for example, the Locate LEDs. ILOM query commands entered through the CLI report the LED state as either asserted or deasserted, depending on whether the ILOM finds the blinking LED on or off. For example, if you type the show /SYS command multiple times, you might see the LED as in either asserted or deasserted state, depending on whether the LED was blinking on or blinking off at the time.
Do not rely on the CLI commands to query blinking LED states; use IPMItool commands instead. For example, to query the LED states on a server with default username root and default password changeme, use this command:
ipmitool -U root -P changeme -H SP_IP_address sunoem led get
The ILOM GUI does not show the correct status of the Locate LED. If you log in to the SP as root from a web browser, then click on System-Monitoring-->Locator-Indicator, the current status of the Locate LED always shows OFF.
Also, the Locate LED state can be turned to ON from the ILOM GUI, but it cannot be turned to OFF from the ILOM GUI.
Do not rely on the ILOM GUI to read the state of the Locate LED, use IPMItool instead.
Although you can use the ILOM GUI to turn the Locate LED on, to turn it off, use IPMItool or the Power button on the chassis.
Misleading error message may be displayed when an SNMP user is being deleted. For example, you might see the message Target cannot be deleted when a user is being deleted soon after another activity. In general, these messaged can be ignored. However, scripted commands might not succeed.
The sysUpTime value might be incorrect. For example, a system that has been online only a few days might show an uptime of 51 days.
Under some circumstances, JavaRConsole fails to launch when the user clicks on the “Launch Redirection” link in the Web GUI.
1. Right-click the “Launch Redirection” link and choose “Save link as...”
2. A file save dialog appears, offering to save a file with a .jnlp extension. Save the file, being careful to note its name and location.
"C:\Program Files\Java\jre1.5.0\javaws.exe" javarconsole.jnlp
If your password contains exactly 16 characters, you will not be able to log in to the ILOM SP using either the ILOM web GUI or command-line interface (CLI).
Choose a password containing fewer than 16 characters.
Hardware component data for field-replaceable units (FRUs) is not reported consistently when queried from the ILOM command-line interface (CLI) and from IPMItool. FRU data returned by CLI commands is sometimes incomplete. FRU data read from IPMItool is correct and complete.
Do not rely on FRU data returned by CLI commands; use IPMItool to view FRU data instead.
A change in the sytem BIOS, introduced after Software 1.3a, changes the way the system enumerates PCIe cards in slots 5, 6, and 7, as well as the devices connected to these cards. Upgrading the BIOS can cause the names of disk partitions and network interfaces to change.
BIOS 51, included with Software 1.5, contains a workaround for this problem. After flashing new system firmware, but before starting the host operating system, disable the following options in the system BIOS:
The BIOS option ROM space is 128 KB. Of these 128 KB, approximately 80 KB are used by the VGA controller, the LSI controller, and the NIC. Approximately 48 KB remain for other option ROMs.
Depending on the number of PCI devices that are installed and being used for PXE booting, the option ROM space can be exhausted before the on-board NICs, the SAS controller, or the PCI cards installed late in the boot order can be scanned by the BIOS. This is expected behavior.
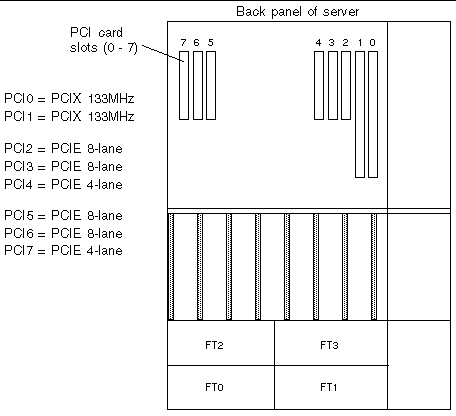
The devices and PCI slots are detected by the BIOS during startup in the following order (also see FIGURE 1-1 for the placement of the PCI slots):
7. On-board LSI SCSI controller
There are two possible workarounds to ensure that you have enough option ROM space to PXE boot from your devices as desired.
Option 1: Disable option ROM scanning on all devices that do not need to PXE boot. This will preserve the option ROM space for the devices that you do want to PXE boot. Use the following procedure.
1. Enter the BIOS Setup utility by pressing the F2 key while the system is booting up and performing POST.
2. On the BIOS Main Menu screen, select the PCIPnP tab to open the PCI/PnP Settings screen.
3. Change the fields to Disabled for those PCI cards or NICs that will not be PXE booted.
4. Press and release the right arrow key until the Exit menu screen is displayed.
5. Follow the instructions on the Exit menu screen to save your changes and exit the Setup utility.
Option 2: Manually set the BIOS boot order so that the devices that you want to PXE boot from are early enough in the boot order to be scanned before the option ROM space is exhausted. Use the following procedure:
1. Enter the BIOS Setup utility by pressing the F2 key while the system is booting and performing POST.
2. On the BIOS Main Menu screen, select the Boot tab to open the Boot menu main screen.
3. Select Boot Device Priority, or select Hard Disk Drives from the list to change hard-disk drives.
4. Change the selections for the boot devices or hard-disks drives to set the required device order.
5. Press and release the right arrow key until the Exit menu screen is displayed.
6. Follow the instructions on the Exit menu screen to save your changes and exit the Setup utility.
The server BIOS can scan up to 12 devices, but depending on what is installed in the server, this limit can be exceeded before all devices in the server can be scanned. For example, if you install an HBA with an attached disk array into a PCI slot that is scanned before the on-board LSI SAS controller, the internal HDDs might not be scanned if the HBA and its attached HDDs exceed the 12-device limit.
This is expected behavior. Devices in excess of the 12-device limit will be seen at the OS level, but are not scanned by the BIOS during POST.
The BIOS scans devices in ascending order (from low PCI address to high PCI address). The scanning priority is:
7. On-board LSI SCSI controller
Refer to FIGURE 1-1 for the locations of the PCI slots.
FIGURE 1-1 Sun Fire X4600 Designation and Speeds of PCI Slots
Perform Option 1 below so that the device appears in the list, then perform Option 2 to change the scanning order.
Option 1: Disable option ROM scanning on all devices that do not need to PXE boot. This will preserve the option ROM space for the devices that you do want to PXE boot. Use the following procedure.
1. Enter the BIOS Setup utility by pressing the F2 key while the system is booting up and performing POST.
2. On the BIOS Main Menu screen, select the PCIPnP tab to open the PCI/PnP Settings screen.
3. 3. Change the fields to Disabled for those PCI cards or NICs that will not be PXE booted.
4. Press and release the right arrow key until the Exit menu screen is displayed.
5. Follow the instructions on the Exit menu screen to save your changes and exit the Setup utility.
Option 2: Manually set the BIOS boot order so that the devices that you want to PXE boot from are early enough in the boot order to be scanned before the option ROM space is exhausted. Use the following procedure:
1. Enter the BIOS Setup utility by pressing the F2 key while the system is booting and performing POST.
2. On the BIOS Main Menu screen, select the Boot tab to open the Boot menu main screen.
3. Select Boot Device Priority, or select Hard Disk Drives from the list to change hard-disk drives.
4. Change the selections for the boot devices or hard-disks drives to set the required device order.
5. Press and release the right arrow key until the Exit menu screen is displayed.
6. Follow the instructions on the Exit menu screen to save your changes and exit the Setup utility.
After removing or installing a supported host bus adapter (HBA) card, the HDD order in the BIOS might be changed. A possible impact is that you might not be able to boot the system to OS level from an internal HDD if the HDDs that are attached to an HBA are scanned first.
The BIOS scans devices in ascending order (from low PCI address to high PCI address). The scanning priority is:
7. On-board LSI SCSI controller
Refer to FIGURE 1-1 for the locations of the PCI slots.
This is expected behavior. After installing or removing any supported HBA card that is connected to an external storage device, there are two possible workarounds to ensure that you can boot from your devices as desired.
Option 1: Disable option ROM scanning on all devices that do not need to PXE boot. This will allow the device you want to boot from to appear in the list. Use the following procedure.
1. Enter the BIOS Setup utility by pressing the F2 key while the system is booting up and performing POST.
2. On the BIOS Main Menu screen, select the PCIPnP tab to open the PCI/PnP Settings screen.
3. Change the fields to Disabled for those PCI cards or NICs that will not be PXE booted.
4. Press and release the right arrow key until the Exit menu screen is displayed.
5. Follow the instructions on the Exit menu screen to save your changes and exit the Setup utility.
Option 2: Manually set the BIOS boot order so that the devices that you want to PXE boot from are early enough in the boot order to be scanned before the option ROM space is exhausted. Use the following procedure:
1. Enter the BIOS Setup utility by pressing the F2 key while the system is booting and performing POST.
2. On the BIOS Main Menu screen, select the Boot tab to open the Boot menu main screen.
3. Select Hard Disk Drives from the list.
4. Change the selections for the boot devices to set the order of boot devices that you require.
5. Press and release the right arrow key until the Exit menu screen is displayed.
6. Follow the instructions on the Exit menu screen to save your changes and exit the Setup utility.
When the BIOS setup utility is used to query the system serial number, “Not available” is reported.
Use IPMI to query the system serial number.
To create a RAID volume, the firmware and BIOS must write metadata at the end of the hard-disk drive (HDD). At least 64 Mbytes of unpartitioned hard-disk space are required.
In servers shipped with the preinstalled Solaris 10 1/06 (and later) OS, the preinstall image includes more than 64 Mbytes of unpartitioned hard disk space for metadata. No further action is required.
If the system is rebooted during disk resynchronization, resynchronization restarts from the beginning.
This is expected behavior. Avoid rebooting during resynchronization.
| Sun Fire X4600 Server Product Notes | 819-4347-19 |
Copyright © 2009 Sun Microsystems, Inc. All rights reserved.