| Sun Fire X4600 M2 Server Product Notes |
| C H A P T E R 2 |
|
Firmware and BIOS Issues |
This chapter describes the LSI firmware, Sun Integrated Lights Out Manager (ILOM) service processor (SP), and BIOS issues related to the Sun Fire X4600 M2 server. The numbers given in the section titles are internal tracking numbers for change requests related to the issues. These issues are divided into the following topics:
The following are current issues.
Mouse Pointers Out of Sync on Windows 2003 at High Resolution (6669368)
Special Character in FTP Password Disables Snapshot Feature (6674741)
Service Processor Does Not Log Event or Provide Visual Alert After Hard Disk Is Removed
Recovery For Accidentally Flashing Wrong Platform Firmware on Sun Fire X4600 M2 Server
When you upgrade the system firmware, use the load command with the -f option. This upgrades the ILOM as well.
See the ILOM documentation collection for additional details.
If you see OEM error messages in the event log, contact Oracle Customer Support.
The following table shows an example of OEM error messages in the event log:
When JavaRConsole is used to access Windows 2003, and the remote display resolution is greater than 1024x768, the local mouse pointer goes out of sync with the remote mouse pointer. This occurs because the resolution directly supported by JavaRConsole is 1024x768; the Windows display driver detects this, and simulates the larger display using panning. This confuses the local mouse driver.
Simply ignore the local mouse pointer while interacting with the remote system. Alternately, you can use a display resolution of 1024x768 or less.
The ILOM snapshot feature does not work if an FTP password with special characters is used. For example, suppose an FTP account on server “ftp” has a user name of “user”, a password of “abc@123”. You should be able to specify that account as a snapshot with the following command:
set dump_uri=ftp://user:abc%40123@ftp/
In this URI, the “%40” represents the “@” character. This syntax is not interpreted correctly, and the FTP login fails.
If a hard disk is removed from a system, the service processor (SP) neither logs an event nor provides a visual alert. This is expected behavior because the service processor does not receive events from the LSI SAS controller when a disk drive is removed and visual alerts do not occur.
If you accidentally flash the wrong platform firmware onto a Sun Fire X4600 M2 server, use IPMItool to verify the hardware version. For example, if the SP IP address is 10.0.0.13 and the root password is “changeme”, you might enter the command as follows (boldface indicates user input):
If the Board Product line lists something other than ASSY,CPU BOARD,X4600 M2, then the server has the wrong firmware. For example, if it lists ASSY,CPU BOARD,X4600, then you have accidentally flashed the Sun Fire X4600 firmware onto the Sun Fire X4600 M2.
|
The system will not reboot, but the service processor is still functional; you can return to the Sun Fire X4600 M2 firmware.
1. Download and flash upgrade the server to the latest version of the Sun Fire X4600 M2 firmware.
3. Use IPMItool to verify the hardware version, as shown above.
If the Board Product line includes X4600 M2, then the server has the correct firmware.
The following traps are currently not supported:
The SNMP agent does not currently handle SETs for the Entity and Sun Platform MIBs. This causes compliance tests involving SETs to fail. Use other services to perform the needed tasks.
To establish a secure HTTPS connection to the ILOM, you must upload an SSL certificate and a private key into the ILOM. When the certificate is uploaded through the web, it is put in /conf/actualcert.pem on the SP. Similarly, the private key is put in /conf/actualprivkey.pem. The SP must be reset for the update to be applied. See the Integrated Lights-Out Manager (ILOM) Administration Guide (819-1160) for more information on updating SSL certificates.
After the SP resets, a pop-up message should inform the user that the keys have changed and prompt whether to accept them for a one-time login, or permanently. However, this pop-up message is not displaying for Sun Fire X4600 M2 servers.
|
To view whether the SSL certificate and key were updated, use the following procedure:
1. Quit and restart your browser.
2. Use the browser to connect to the server’s IP address (using HTTPS).
3. Accept a pop-up message that indicates that the URL does not match the hostname in the certificate.
4. Click the View Certificate button to see the SSL certificate version that the server is using.
After the Web interface is used to change the service processor network settings, the Web GUI might hang.
On systems running Service Processor firmware 1.1.1, the power supply fault LED is lit when the system is powered down, even if there is no power supply problem. The LED behaves correctly when the system is powered up.
JavaRConsole continues to work (for example, redirecting a CD-ROM image) even after it is disconnected from the service processor. When the service processor is reset, the user is not informed that the connection has been lost until the service processor is finished rebooting.
When a service processor is reset, or its network configuration changes, restart the client application or the browser running the Web GUI.
The system might hang during POST. Often the system freezes shortly after the console displays the manufacturer’s logo. This problem is caused by a a bug in the ILOM software that supports configuring the Serial Management port. This problem can be triggered by referencing the /SP/serial part of the ILOM object tree from the ILOM command line. Avoid commands such as these:
Also avoid using the Configuration/Serial Port tab in the ILOM Web interface.
To work around this problem, clear the internal software state that causes it. Use any of the following methods:
An attempt to set the syslog IP address fails if the address contains an octet of 0. For example, 10.10.10.10 and 100.100.100.100 works, while 19.52.0.17 does not work.
The ILOM CLI sometimes reports an internal error for a command that attempts to set multiple properties.
The ILOM CLI cannot set the ntp server address to an IP address with a 0 as the second or third octet, such as 10.13.0.20 or 10.0.60.20. These addresses are rejected as “invalid.”
Use the Web interface to set the ntp server address.
If the SSL certificate is uploaded without the key, it causes 443 to not open.
Errors uploading the SSL certificate can disable the https interface. Use the CLI or ipmi to reflash the ILOM SP. Do not preserve the configuration.
Close the CLI session and open a new one.
The ILOM SP always reports a non-zero fan speed, even when the fan has failed or been removed.
Use the fan RPM level and the lower non-recover IPMI event in the IPMI sel log to determine that a fan has failed or been removed.
If overheating forces a system shutdown, the system might power off during reboot.
After a thermal shutdown, be sure to give the system enough time to cool off (up to 30 minutes). If the system still powers down, power it back up. It might take 2 or 3 tries to reboot.
The Web interface does not update the PWROK and VINOK indicators when power is lost.
Use IPMItool output to detect loss of power.
When the Web interface is used to changes the service processor’s static IP address, the Web GUI might hang.
Reset the service processor to reestablish the connection. To avoid this problem, do not use the Web GUI to change the IP address; use IPMItool or the CLI instead.
The ipgateway target cannot be set to 0.0.0.0. Attempting to do so may cause existing network settings to be lost.
Changing the network setting can cause the Web interface to become temporarily unavailable for up to 20 minutes. The ILOM’s web server process blocks, and web client requests are not honored.
Kill and restart the Web interface process.
The ILOM may be unable to start services when the maximum number of users or communities are configured, or multiple commands are issued in a short period.
Do not configure the maximum number of users or communities. Wait several seconds between configuration commands.
The host console can be viewed remotely using the following ILOM CLI command:
If the host console is opened this way while the system is being powered up, pressing Control-S, Control-E, Control-P, or Control-N during the POST scan of the onboard NIC can cause the system to hang.
The following are current issues.
Upgrade Past Software 2.2 Causes Device Enumeration For PCI Slots 5, 6, and 7 to Change (6719935)
Cannot Boot From Internal Disk With Sun Multithreaded 10 GbE Card in Slot 2, 3, or 4 (6711405, 6764001)
Erroneous Report that PowerNow! Not Supported (6768326)
Abnormal and Intermittent Delays on Boot on 6P and 8P Systems (6734988)
Option ROM Space For PXE Booting Can Be Exhausted Before All Devices Can Be Scanned (6453144, 6403173, 6272514, 6393809, 6439856, 6462303)
Twelve-Boot-Device Limitation Can Be Exceeded Before All Devices Can Be Scanned By BIOS (6268877, 6439856)
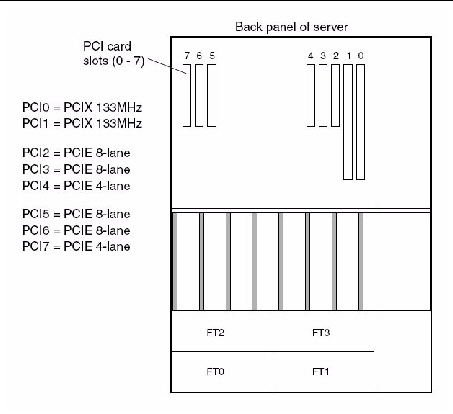
A change in the system BIOS, introduced after Software 1.3, changes the way the system enumerates PCIe cards in slots 5, 6, and 7, as well as the devices connected to these cards. Upgrading the BIOS can cause the names of disk partitions and network interfaces to change.
BIOS 126, included with Software 2.3, contains a setting that restores the old device enumeration. After flashing new system firmware, but before starting the host operating system, enable the following system BIOS option:
| Note - Do not enable this option if you are already running a BIOS later than BIOS 50 (included in Software 1.3). |
A system with a Sun Multithreaded 10Gb Ethernet card (X1027A-z or X1107A-z) in slot 2, 3, or 4 is unable to boot from the local disk. This problem occurs because the Ethernet card has a large option ROM. When the Ethernet card is scanned first before the embedded HBA, there is not enough space left to load the HBA option ROM, and the internal disks become inaccessible.
The Red Hat Enterprise Linux 5.2 XEN kernel reports the following in the system event log:
powernow-k8: Your BIOS does not provide _PSS objects. PowerNow! does not work on SMP systems without _PSS objects. Complain to your BIOS vendor. |
This message is not correct and can be safely ignored.
A system with 6 or 8 CPU modules normally experiences a delay of 1 to 2 minutes between power-on or reset and the appearance of the first BIOS messages on the console display. Some systems experience intermittent delays beyond 2 minutes. These are the symptoms:
If the console remains blank for 4 minutes or more, reset the system. In most cases it will take one reset to get past the delay; in a few cases it will take two.
The amount of BIOS option ROM space is limited and can be exhausted when many option cards are installed in the system.
The devices and PCI slots are detected by the BIOS during startup in the following order (also see FIGURE 2-2 for the placement of the PCI slots):
7. On-board LSI SCSI controller
There are two possible workarounds to ensure that you have enough option ROM space to PXE boot from your devices as desired.
|
Disable option ROM scanning on all devices that do not need to PXE boot. This will preserve the option ROM space for the devices that you do want to PXE boot. Use the following procedure.
1. Enter the BIOS Setup utility by pressing the F2 key while the system is booting up and performing POST.
2. On the BIOS Main Menu screen, select the PCIPnP tab to open the PCI/PnP Settings screen.
3. Change the fields to Disabled for those PCI cards or NICs that will not be PXE booted.
4. Press and release the right arrow key until the Exit menu screen is displayed.
5. Follow the instructions on the Exit menu screen to save your changes and exit the Setup utility.
|
Manually set the BIOS boot order so that the devices that you want to PXE boot from are early enough in the boot order to be scanned before the option ROM space is exhausted. Use the following procedure:
1. Enter the BIOS Setup utility by pressing the F2 key while the system is booting and performing POST.
2. On the BIOS Main Menu screen, select the Boot tab to open the Boot menu main screen.
3. Select Boot Device Priority, or select Hard Disk Drives from the list to change hard-disk drives.
4. Change the selections for the boot devices or hard-disks drives to set the required device order.
5. Press and release the right arrow key until the Exit menu screen is displayed.
6. Follow the instructions on the Exit menu screen to save your changes and exit the Setup utility.
FIGURE 2-1 PCI Designation and Speeds of PCI Slots
The server BIOS can scan up to 12 devices, but depending on what is installed in the server, this limit can be exceeded before all devices in the server can be scanned. For example, if you install an HBA with an attached disk array into a PCI slot that is scanned before the on-board LSI SAS controller, the internal HDDs might not be scanned if the HBA and its attached HDDs exceed the 12-device limit.
This is expected behavior. Devices in excess of the 12-device limit will be seen at the OS level, but are not scanned by the BIOS during POST.
The BIOS scans devices in ascending order (from low PCI address to high PCI address). The scanning priority is:
7. On-board LSI SCSI controller
Perform Option 1 below so that the device appears in the list, then perform Option 2 to change the scanning order.
|
Disable option ROM scanning on all devices that do not need to PXE boot. This will preserve the option ROM space for the devices that you do want to PXE boot. Use the following procedure.
Enter the BIOS Setup utility by pressing the F2 key while the system is booting up and performing POST.
1. On the BIOS Main Menu screen, select the PCIPnP tab to open the PCI/PnP Settings screen.
2. Change the fields to Disabled for those PCI cards or NICs that will not be PXE booted.
3. Press and release the right arrow key until the Exit menu screen is displayed.
4. Follow the instructions on the Exit menu screen to save your changes and exit the Setup utility.
|
Manually set the BIOS boot order so that the devices that you want to PXE boot from are early enough in the boot order to be scanned before the option ROM space is exhausted. Use the following procedure:
1. Enter the BIOS Setup utility by pressing the F2 key while the system is booting and performing POST.
2. On the BIOS Main Menu screen, select the Boot tab to open the Boot menu main screen.
3. Select Boot Device Priority, or select Hard Disk Drives from the list to change hard-disk drives.
4. Change the selections for the boot devices or hard-disks drives to set the required device order.
5. Press and release the right arrow key until the Exit menu screen is displayed.
6. Follow the instructions on the Exit menu screen to save your changes and exit the Setup utility.
Quad-Core System Won’t Boot When Hypertransport Coherent Link Widths Are Set To 2 Bits (6710259)
Uncorrected ECC Error Reported on Wrong DIMM Pair on 8-DIMM CPU Module (6509975)
Random Panics Might Occur When HPET Timer is Enabled (6478355)
If the BIOS settings for Hypertransport Coherent Link Width are 2 bits, then a system with quad-core processors
In BIOS setup, set each of the Hypertransport Coherent Link Widths to a value other than “2” or “4”.
IO address conflicts might occur in systems with 2 PCI-X and 6 PCI-E slots populated, with a Sun PCI-E Quad Gigabit Ethernet Card (X4446A-Z) in slot 5, 6, or 7. Systems running Solaris OS might reset before the boot sequence is complete, leading to a reboot cycle.
Move the Quad Gigabit Ethernet Card to slot 2, 3, or 4.
When an uncorrected ECC error occurs on an 8-DIMM CPU module, the error might be reported on the lowest-numbered DIMM pair (the pair closest to the CPU) regardless of where the error actually occurred. For example, in a fully-populated module, an error in Pair 3 (DIMM7 and DIMM6), Pair 2 (DIMM5 and DIMM4), or Pair 1 (DIMM3 and DIMM2) may be reported as occurring in Pair 0 (DIMM1 and DIMM0).
This problem can cause the system to reboot repeatedly, with no output on the video display. If this occurs, check the ILOM System Event Log for frequent ECC errors in a lowest-numbered pair.
The interaction of some operating systems with the high-performance event timer (HPET) on this server might result in system panics (reboots). When this happens, the following message appears after the last POST window during a boot process, and in the /var/log/messages file:
MT-BIOS bug: 8254 timer not connected to IO-APIC
|
If this problem occurs, you can disable the HPET timer. This setting is in the BIOS Configuration Utility’s Advanced menu, on the ACPI Configuration Screen.
1. Enter the BIOS Setup utility by pressing the F2 key while the system is booting up and performing POST.
2. On the BIOS Main Menu screen, select the Advanced tab to open the Advanced menu screen.
3. On the Advanced menu screen, select ACPI Configuration.
4. On the ACPI configuration screen, select Advanced ACPI Configuration.
5. Change the field to Disabled for ACPI HPET Support.
6. Press and release the right arrow key until the Exit menu screen is displayed.
7. Follow the instructions on the Exit menu screen to save your changes and exit the Setup utility.
In testing, error messages appeared for disk swaps on a RAID1 or RAID1E array created using the onboard LSI controller BIOS:
This message does not reflect a real RAID problem and can be safely ignored.
To create a RAID volume, the firmware and BIOS must write metadata at the end of the hard-disk drive (HDD). At least 64 Mbytes of unpartitioned hard-disk space are required.
In servers shipped with the preinstalled Solaris 10 1/06 (and later) OS, the preinstall image includes more than 64 Mbytes of unpartitioned hard disk space for metadata. No further action is required.
| Sun Fire X4600 M2 Server Product Notes | 819-5032-24 |
Copyright © 2010, Oracle and/or its affiliates. All rights reserved.
 Recovery Steps