| C H A P T E R 1 |
|
Introduction |
The Sun Control Station is a software package that allows administrators to take control of their hosts: tracking and applying software updates, deploying new services, monitoring the health and performance of hosts. More than just a typical "systems" management device, the Sun Control Station is a platform that will help you in the "life-cycle" management of your hosts, from initial setup through eventual redeployment at the end of useful life. As an added benefit, customers can continue to use third-party or homegrown software in conjunction with the Sun Control Station.
The Sun Control Station consists of two parts: a core framework that is the engine for executing control modules, and the built-in control modules themselves. These control modules can come from Sun Microsystems, Inc., from third-party vendors or from your own in-house design team. The Sun Control Station ships with five pre-installed modules: Performance Monitoring, Inventory, Software Management, Health Monitoring and Lights Out Management (LOM).
Through the Sun Control Station, you can fully control the distribution of software payloads, offering customized and tailor-made services to downstream and end-user customers. Service Providers can offer unique payloads, data or software monitoring services. By leveraging the Sun BlueLinQ technology, all available software updates and patches can be accessed and distributed to your managed hosts, as designated by the Administrator. Custom-built and third-party software can also be distributed. Furthermore, software packages can be "published" so that BlueLinQ-enabled clients--including other Sun Control Stations--can view and download these packages.
The Sun Control Station can manage the following Sun servers and Sun Cobalt server appliances. At the time of printing, this list was complete.
 V60x servers and Sun Fire V65x servers
 T1 servers (Solaris
 Operating System 8 and Solaris OS 9)
 1 servers (Solaris OS 8 and Solaris OS 9)
 4 server appliances, English
Here is a sample of what you can do with the Sun Control Station:
These services can be used within an extranet or an intranet environment, or across the Internet.
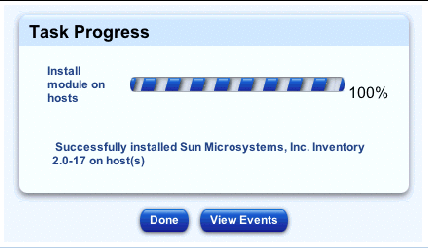
When you launch a task (for example, when creating a backup file for the Sun Control Station or adding a control module), a Task Progress dialog appears in the user interface (UI). This dialog has a Status field indicating the current status of the task and a progress bar. When the progress bar displays 100%, the task has completed.
See FIGURE 1-1 for a sample.
If you want to perform another task in the UI while the current task is underway, you can put the Task Progress dialog in the background. Simply click the button labelled Run Task In Background below the progress bar.
To return to the Task Progress dialog, select Administration > Tasks on the left. The Task table appears. If the task is still underway, a status message is displayed in the Duration column. Click on the progress-bar icon in this column to re-display the Task Progress dialog for this task.
Once the task is complete and the progress bar displays 100%, two buttons appear below the Task Progress dialog: Done and View Events.

The Schedule feature (also referred to as the Scheduler) allows you to schedule a task or tasks to be performed at a later time.
Many of the tasks on the Sun Control Station can be scheduled. In this case, a button labelled Schedule appears in the table or selector window of the final step.
The Scheduler works in the same way for any task:
1. Fill in the necessary fields for the task.
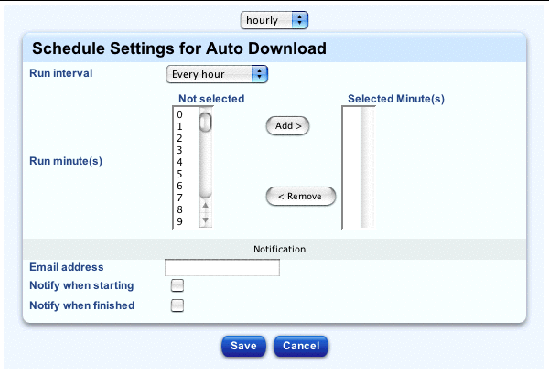
The Schedule Settings For <Task> appears; see FIGURE 1-2 for a sample.
3. Configure the schedule settings.
The following settings are available for any scheduled task:
You can also click the calendar icon next to this field. A separate browser window opens. Choose the date and time for the scheduled task. Hit the Enter (or Return) key on your keyboard. The date and time now appear in the field.
4. For some functions, you can set the frequency of the task with a pull-down menu above the table (for example, hourly or daily).
If you click Cancel, the scheduled task is not saved. The Scheduled Tasks table appears, but without the task you just cancelled.
If you click Save, the scheduled task is added to the list of scheduled tasks. The Scheduled Tasks table appears with the new task.
6. In this table, you can view details for, modify or delete a scheduled task.
To view the details of a scheduled task, click the magnifying-glass icon.
To modify a scheduled task, click the pencil icon.
To delete a scheduled task, click the delete icon.

To access the PDF file for a user manual, click on the Online Documentation icon in the top-right corner. A separate browser window opens displaying a list of PDF files available. Click the link for a PDF file; you can open the PDF file in the browser window or save it to your personal computer.
If you have installed third-party software on the Sun Control Station, the relevant documentation is also available here.
There are two icons in the top-right corner of the UI:
 You can access the user manuals in PDF format from the UI.
 You Click the Logout icon to log out of the system.
|
Note - This procedure only resets the Administrator password for logging in to the Sun Control Station UI. |
To reset manually the Administrator password for logging in to the UI:
1. ssh in to the control station.
2. If you are not currently root, become root.
su -
3. Generate an encrypted password for the user name admin and password admin.
/usr/bin/htpasswd -n -s -b admin admin
admin:{SHA}0DPiKuNIrrVmD8IUCuw1hQxNqZc=
4. Copy the entire string following admin:{SHA}.
0DPiKuNIrrVmD8IUCuw1hQxNqZc=
5. Paste this string into the password attribute for the user tag in the following file.
/var/tomcat4/webapps/sdui/WEB-INF/database.xml
6. Stop and then restart tomcat.
dtomcat4 stop
dtomcat4 start
You can now log in to the control station UI as the user name admin with the password admin.
To change the Administrator password through the UI, see Password.
Copyright © 2003, Sun Microsystems, Inc. All rights reserved.