| C H A P T E R 2 |
|
Station Settings |
This chapter describes the station settings on the server running the Sun Control Station software. The Administrator, with the user name admin, has full control of the control station. The Administrator can:
The following bullet items represent the fully expanded menu on the left side of Station Settings screen. These are the functions and services that the Administrator can manage from this screen. They are explained in this chapter.
Active Monitoring is a cron job that runs on the system every 10 minutes to update the status of the services and system components.
If one of the services or system components monitored by Active Monitoring changes to a yellow or red status, a Status message ("Check Alerts") appears in the left menu bar with an icon below it.
When you click the icon, the Active Monitoring status tables appear.
If an email address for receiving Active Monitoring alerts has been entered under Settings, an email is sent to that address; see Settings.
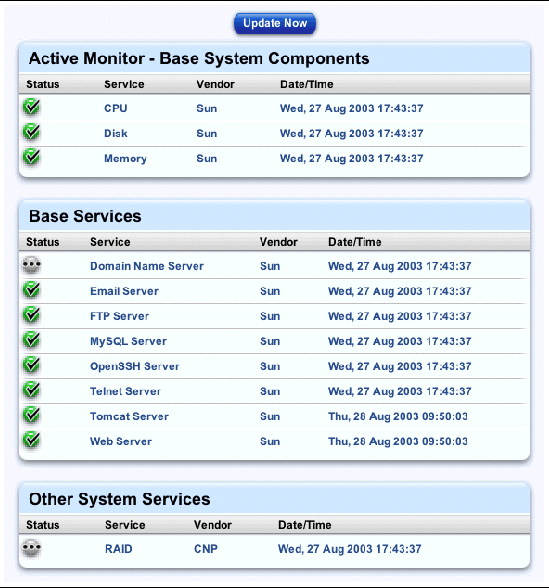
The status of each service or hardware component is indicated by a colored circle and icon--grey with dotted line, green with checkmark, yellow with exclamation mark or red with X mark--beside each item. The colors have the following significance:
 Grey with dotted line--No information is available, or the service or the monitoring feature is not enabled on the host.
 Green with checkmark--The service or component is functioning normally.
 Yellow with exclamation mark--There is moderate use on the host or a component is recovering.
 Red with X--There is heavy use on the host or a failure.
The thresholds for the Active-Monitoring alarms for are as follows:
For example, a value of 80 means that a yellow alarm is generated when the 80% of the capacity of the hard disk drive is used.
For example, a value of 90 means that a red alarm is generated when the 90% of the capacity of the hard disk drive is used.
For example, a value of 50 means that a yellow alarm is generated when the 50% of the memory is in use.
For example, a value of 75 means that a red alarm is generated when the 75% of the memory is in use.
You are likely to receive a yellow or red alarm for hard-disk-drive usage if you select to download automatically any available package files from a BlueLinQ server. For more information, see "BlueLinQ Server Settings" in the PDF Software Management Module.
You can log in to the control station and verify the disk usage. The Active Monitoring cron job verifies only the root, /var and /home directories.
To remove the alarm condition from the UI, clean up the files in your partition(s) and then update the Active Monitoring information.
1. ssh in to the Sun Control Station server.
su -
3. Run the following command to check the root, /var and /home partitions.
df / /var /home
The information for each partition is displayed:
If the value for "Use %" is higher than the threshold value, an alarm is generated.
4. Clean up the files in your partitions.
5. In the control station UI, select Station Settings > Active Monitoring.
The Active Monitoring status tables appear.
6. Click Update Now above the tables to begin updating the system and service status information immediately.
The status should return to normal (green circle with checkmark).
To view the Active Monitoring information for the server on which the Sun Control Station software is running:
1. Select Station Settings > Active Monitoring.
The Active Monitoring status tables appear; see FIGURE 2-1.
2. You can click Update Now above the tables to begin updating system and service status information immediately.
This may take as long as several minutes and proceeds in the background.

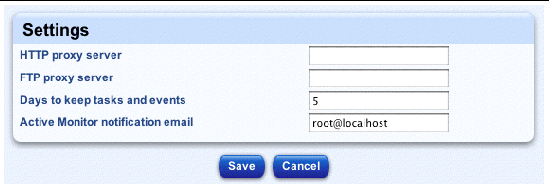
You can configure the settings for an HTTP or FTP proxy server, and the number of days to retain tasks and events. You can also enter an email address that will receive Active Monitoring alerts.
Each of these settings is optional.
1. Select Station Settings > Settings.
The Settings table appears; see FIGURE 2-2.
2. Configure the following settings.

The Backup Administration table allows you to back up and restore a Sun Control Station.
You can perform both scheduled backups and manual backups on the Sun Control Station.
You can back up your control station using either Windows File Sharing (SMB) or Network File Sharing (NFS). You can also save the backup file to the local server but this is not recommended: if the hard disk drive fails, you will lose the backup files along with the rest of the server data.
The backup file name uses the following format:
bk_YYYYMMDD_hhmm.scs
where YYYYMMDD_hhmm represents the Year Month Day Hour Minute.
For example, the file name bk_20030426_1745.scs indicates that the backup was created at 17:45 on April 26, 2003.
|
Note - For a Scheduled Backup, ensure that the target location is available and has enough disk space to hold the backup archive. Failure to do this may result in zero-length or truncated archives. |
To create a backup of the data on the Sun Control Station:
1. Select Station Settings > Backups.
The Backup Administration table appears; see FIGURE 2-3.
2. Enter a path in the field Backup File Path.
The default path is /scs/backups on the the local server.
We recommend that you not back up to the local server; you should back up to a different server.
You can mount an external filesystem to which to write the backup file (either a Windows File Sharing (SMB) server or Network File Sharing [NFS] server).
The Task Progress dialog appears.
|
Note - You can also schedule the creation of a backup file. For more information, see Schedule. |

To modify the settings for a scheduled backup task:
1. Select Administration > Schedule.
The Schedule Administration table appears.
2. Click the pencil icon next to the backup task that you want to modify.
The Scheduled Settings For Create Backup table appears, showing the details about the backup job.
4. Click Cancel to return without saving the changes or click Save to save the changes.
The Scheduled Settings For Create Backup table appears.
To delete a scheduled backup task:
1. Select Administration > Schedule.
The Schedule Administration table appears.
2. Click the delete icon next to the backup task that you want to delete.
A confirmation dialog verifies the deletion.
The Schedule Administration table appears, with the scheduled backup task removed.
|
Note - Ensure that you maintain up-to-date backup files. Any modifications made to the server since creating the backup file from which you are restoring the server will be lost. |
When a backup task runs, it creates a new file in the location specified in the Backup File Path field in the Backup Administration table; see Creating a backup. The file name is the time and date at which the backup was started and has the form: Year Month Day Hour Minute. For example, the file name bk_20030426_1745.scs indicates that the backup was run at 17:45 on April 26, 2003.
To restore your Sun Control Station, you first prepare the backup file for the restore operation. You then log out of the control station UI and run a command-line script to restore the data to your server.
|
Note - You can perform the Prepare Restore step at anytime in advance of running the script. |
1. Select Station Settings > Backups.
The Backup Administration table appears.
2. Click Restore From Backup... above the table.
The Restore Administration table appears; see FIGURE 2-4.
3. Click the radio button for the method by which to specify the location of the backup file:
4. To cancel this restore, click Cancel below the table.
5. To restore this backup file, click Prepare Restore below the table.
The Task Progress dialog appears. Once completed, a dialog box confirms that the restore script is ready to be run.
|
Note - At this point, you have not yet begun to restore the data. This occurs when you run the restore script. |
6. Log out of the control station UI.
su root
9. From the directory /root, run the restore.sh script.
/root/restore.sh
A number of messages display in the terminal window. The final message is "All Done".
10. Log back in to the control station UI and verify that the restore operation was successful.

To restore your Sun Control Station to a known state after a disaster:
1. Restore the server to a factory-fresh state with the CD-ROMs for your operating system.
2. Re-install the Sun Control Station software on your server.
You can now use a backup file to restore the control-station information to the server.
3. In the Sun Control Station UI, select Station Settings > Backups.
The Backup Administration table appears.
4. Follow the restore process as described in Restore.
To view information about your Sun Control Station, select
Station Settings > Information. The System Information table appears and contains the following information:
Below the System Information table are two buttons: Register Now and Sun Microsystems, Inc. Web Site.
http://www.sun.com/hardware/serverappliances/
To register your Sun Control Station software:
1. Select Station Settings > Information.
The System Information table appears.
2. Click Register Now below the table.
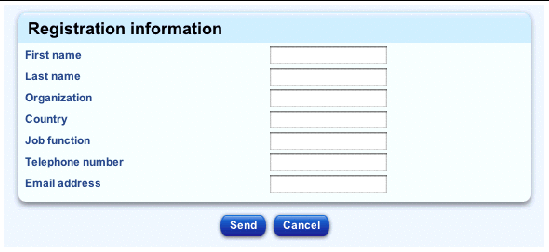
The Registration Information table appears; see FIGURE 2-5.
3. Fill in the following information.
The System Information table re-appears.

To change the password for the Administrator:
1. Select Station Settings > Password.
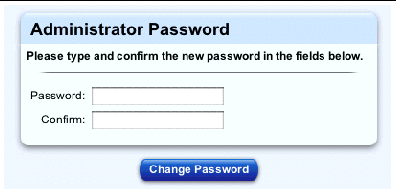
The Administrator Password table appears; see FIGURE 2-6.
Enter the password twice for confirmation.
For more information on choosing a password, see Password guidelines.
The system saves the configuration, refreshes the screen and displays the message "Password changed successfully".

Use the following guidelines when choosing a password:
1. Use between three and sixteen alphanumeric characters. The valid characters include: a-z A-Z 0-9 % ! @ $ ^ & * - _ = \ | . , / ? ; : +
2. Use both upper- and lower-case letters.
4. Do not use a word found in a dictionary.
6. Do not use a UNIX® command word.
7. Do not use a string of consecutive keys on a keyboard (for example, "qwerty").
Copyright © 2003, Sun Microsystems, Inc. All rights reserved.