| C H A P T E R 3 |
|
Administration Functions |
This chapter describes the Administration functions. The Administrator can:
The Sun Control Station ships with six pre-installed modules:
Each module is explained in detail in its own PDF document, available online through the UI or on the software CD. For more information, see Online Documentation.
A number of functions in the Sun Control Station use a selector window. This section describes the selector.
In the selector window, depending on the control module that you are using, you select the managed hosts upon which to perform various tasks, for example:
There are two options in the top frame of the selector:
To select a host or hosts on which to perform a task, click on the items in the list or click Select All at the top. You can also select all hosts within a group by clicking on the group name.
A single selected item is highlighted in blue; if a single host within a group is selected, the group name is highlighted in grey. If all hosts within a group are selected, the group name is highlighted in dark blue.
To de-select a host or hosts, click on the highlighted host or click Deselect All at the top. You can also de-select all the hosts within a group by clicking on the group name.
Once you have selected the host(s), click the button at the bottom for the task that you want to perform. In the top right corner, the selector displays the number of hosts selected (for example, 3 of 10 items).
|
Note - The control modules also appear in the menu on the left side of the Control Modules screen.
|
The functions and services available to the Administrator for managing the hosts, modules and tasks are grouped together under the menu item labelled Administration. These functions and services are explained in this chapter.
Operations performed on the Sun Control Station are called tasks and events.
A task is an executed operation that has a determined start and end point, such as adding a host or uploading a control module. A task is invoked by a user.
Invoking a task generates one or more events. An event is a notification message providing information on one part of a task. A task can comprise several events. An event is generated by the control station or by an agent on a managed host.
You will find that, as a matter of convenience, you can perform a given task from different locations in the Sun Control Station UI. For example, you can create a group of hosts from the Managed Hosts table, as well as from the
Administration > Groups menu item on the left. The Schedule option appears on a number of different screens or you can launch it from the Administration > Schedule menu item. As well, you can launch control-module tasks from the Managed Hosts table, rather than having to select that particular module from the menu on the left.
When there is a Task Progress dialog on the screen (for example, when adding a host or updating the Inventory information), you can put this dialog in the background. Simply click Run Task In Background below the dialog. You can then move to another task in the UI while this task continues to run.
To return to the Task Progress dialog, select Administration > Tasks. The Task table appears. If the task is still underway, a status message is displayed in the Duration column. Click on the progress bar icon in this column to re-display the Task Progress dialog for this task.
The Schedule feature (also referred to as the Scheduler) allows you to schedule a task or tasks to be performed at a later time.
If a task can be scheduled by the Sun Control Station, a button labelled Schedule appears in the table or selector window.
Some of the tasks that you can schedule include: update information in the Appliance Inventory or Performance modules; install a new control module; add a new host(s) (individually or from a file).
For more information on Schedule, see Schedule.
The Hosts menu item allows you, as the Administrator, to add, remove or modify hosts to be managed by the Sun Control Station. You can also create groups of managed hosts, administer the control modules on the control station, view scheduled tasks or schedule new tasks, and view tasks and events that have occurred on the control station.
To view the hosts that are currently managed by the control station, select
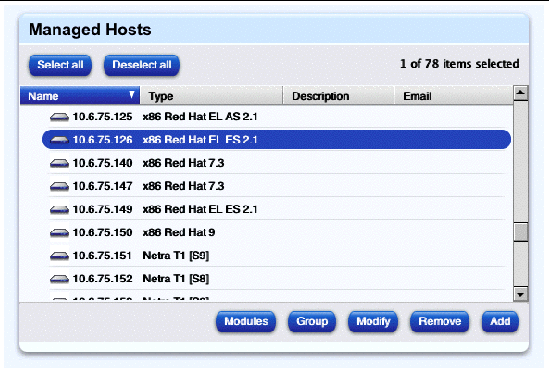
Administration > Hosts. The Managed Hosts table appears in the selector window; see FIGURE 3-1.
You can add a host to the Sun Control Station in two ways:
1. Select Administration > Hosts.
The Managed Hosts table appears in the selector window; see FIGURE 3-1 for an example.
2. Click Add in the bottom right corner of the Managed Hosts table.
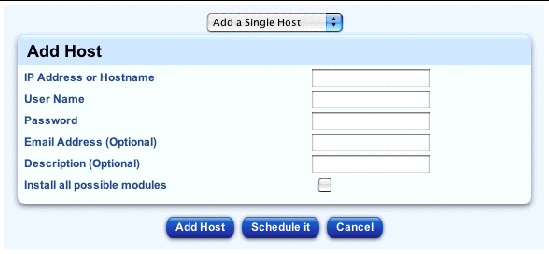
The Add Host table appears; see FIGURE 3-2.
3. Configure the following settings:
|
Note - The host name of the host that you enter must be resolvable by a Domain Name System (DNS) server that your Sun Control Station accesses. |
The Task Progress dialog appears.
|
Note - You can also schedule the addition of the host(s) for a later time. For more information, see Schedule. |
For more information on creating the list of hosts, see Creating a list of hosts.
To add a list of hosts from a file:
1. Select Administration > Hosts.
The Managed Hosts table appears in the selector window.
2. Click Add in the bottom right corner of the Managed Hosts table.
The Add Host table appears; see FIGURE 3-2.
3. From the pull-down menu above the table, select Add Hosts From A File.
The Add Hosts From A File table appears; see FIGURE 3-3.
4. Click Choose File or Browse... to locate the file.
5. Enable the check box Install All Possible Modules if you want the control station to install all control modules that these hosts are eligible to receive.
The Task Progress dialog appears.
|
Note - You can also schedule the addition of a list of hosts for a later time. For more information, see Schedule. |

You can create a file containing a list of hosts, and then import this file into the Sun Control Station.
The first step in importing a list of hosts is to generate a text file in the required format. The order of the data fields is the following (enter the data on one continuous line):
<hostname_or_IP_address>|<username>|<admin_password>|<email_address>|<description>
The following criteria explain the structure of the file.
1. Include the following data for each host
a. host name or IP address of the host
b. user name for the Administrator
d. an email address for notifications (optional)
e. a description of the host (optional)
2. Use one line for each host in the file.
3. Separate the data fields with the "|" character. Do not insert a space before or after the "|" character. You can use commas or tabs in the data string.
4. You must terminate each field with a "|" character, even if you leave the field blank. This does not apply to the final field.
5. The control station does not verify that an email address is valid.
6. Save the file in plain-text format.
An example file with seven hosts might look like this:
raq4|admin|abc123||
raq3|admin|abc123|joe@asdfg.com
10.9.32.100|admin|abc123||
10.9.32.111|admin|abc123|joe@asdfg.com
10.9.32.114|admin|abc123|joe@asdfg.com|Sun Cobalt Qube 3 at home
10.9.32.115|admin|abc123||x86 RH7.3 server on top shelf
10.9.32.116|admin|abc123||Sun Fire V60x in my office
10.9.32.117|root|abc123|joe@asdfg.com|Ultra 80 in hardware lab
You can modify the email address for notifications or the description of a host.
1. Select Administration > Hosts.
The Managed Hosts table appears in the selector window.
2. In the selector, click to highlight the host(s) you want to modify. You can also click Select All at the top to choose all hosts in the list.
3. Click Modify in the bottom right corner.
The Modify Host table appears.
4. You can modify the following settings:
5. To cancel the task and return to the previous list, click Cancel.
6. To proceed with the task, click Save.
The Managed Hosts table appears displaying the modified information.
To create a group of managed host(s) from the Managed Hosts table:
1. Select Administration > Hosts.
The Managed Hosts table appears in the selector window.
2. In the selector, click to highlight the host(s) you want to include in the new group. You can also click Select All at the top to choose all hosts in the list:
3. Click Group in the bottom right corner.
The Create A New Group table appears; see FIGURE 3-4.
4. Configure the follow settings:
5. To cancel the task and return to the Managed Hosts table, click Cancel.
6. To proceed with the task, click Save.
The Groups table appears with the new group.
In the Groups table, you can view details for, modify or delete the group. You can also add or remove hosts to or from the group. For more information, see Groups.

You can view a report on the installed control modules for a host(s) selected in the Managed Hosts table.
In the resulting table, you can launch control-module tasks for a given host without having to select that control module from the menu on the left.
To view the installed-modules report for a host(s):
1. Select Administration > Hosts.
The Managed Hosts table appears in the selector window.
2. In the selector, click to highlight the host(s) for which you want to run a control-module task. You can also click Select All at the top to choose all hosts in the list:
3. Click Modules at the bottom.
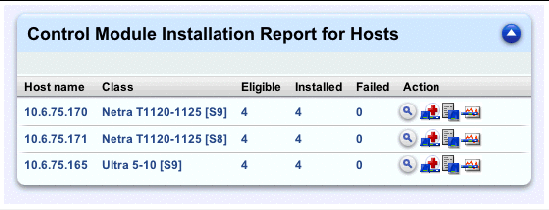
The Control Module Installation Report For Hosts table appears; a sample table appears in FIGURE 3-5.
This table displays the host(s) that you selected and the following information:
If the client-side components of a module are installed on the host, you can remove these components by clicking on the minus icon in the Action column; If the client-side components are not installed, you can install these components by clicking on the plus icon.
For more information, see Installing client-side components to selected hosts and Removing client-side components from selected hosts.
4. Click the up-arrow icon in the top right corner to return to the Managed Hosts table.
1. Select Administration > Hosts.
The Managed Hosts table appears in the selector window.
2. In the selector, click to highlight the host(s) you want to remove. You can also click Select All at the top to choose all hosts in the list:
3. Click Remove at the bottom.
A confirmation table appears, asking you to confirm the removal of the selected host(s).
4. To cancel the task and return to the selector, click Cancel.
5. To proceed with the task, click Remove Host.
The Task Progress dialog appears.
To view the control modules installed on the Sun Control Station, select
Administration > Modules. The Control Modules table appears; see FIGURE 3-7 for a sample table.
In this table, you can add the client-side components of the control module to a host or remove them from a host, view the details on a particular control module, or remove the control module from the Sun Control Station (along with the client-side components from all hosts).
The Installed Control Modules table has seven columns:
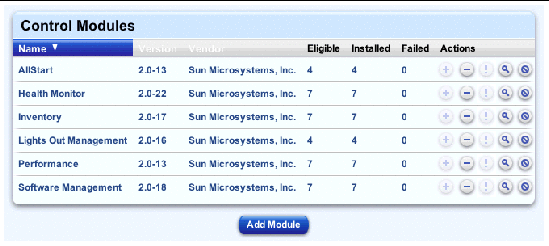
You can sort the list of control modules according to the name of the module, the version number, the vendor, the number of hosts that are eligible for the module, or the number of hosts on which the module successfully installed or failed to install, in ascending or descending order.
Ascending order means from lowest value to the highest value (a-z or 1-9). Descending order means from highest value to the lowest value (z-a or 9-1). By default, the Control Modules table is sorted by module name in ascending order.
In the heading of the column which has been sorted, a triangle icon points down (ascending order) or up (descending order).
When you add a control module to the control station, a menu item for this new module appears in the list on the left side of the UI.
1. Select Administration > Modules.
The Control Modules table appears.
2. Click Add Module at the bottom of the table.
The Add Module table appears; see FIGURE 3-8.
3. Click one of the radio buttons and enter the location from which the control module package is obtained.
4. Enable the check box Install On All Eligible Hosts if you want to install, in this same procedure, the client-side components on all eligible hosts.
If you do not want to, you can select at a later time the hosts on which to install the module components.
The Task Progress dialog appears.
|
Note - You can also schedule the installation of a new control module for a later time. For more information, see Schedule. |
|
Note - If the newly added control module does not appear in the menu on the left, refresh your browser window. |
If there is documentation available for this module, it is added to the list of online documentation. For more information, see Online Documentation.

To view the details for a control module:
1. Select Administration > Modules.
The Control Modules table appears.
2. Locate in the list the module for which you want to view the details.
3. Click the magnifying glass icon in the Actions column.
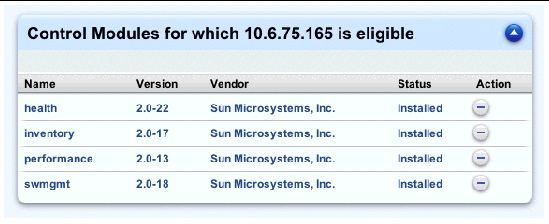
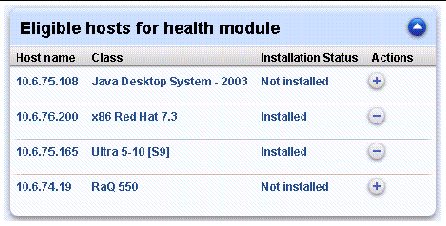
The Eligible Hosts For <Control Module> table appears; see FIGURE 3-9.
The table shows the IP address or host name of the host(s) on which the module has been installed, the class of host and the installation status of the module for each host.
If the client-side components of a module are installed on the host, you can remove these components by clicking on the minus icon in the Actions column; If the client-side components are not installed, you can install these components by clicking on the plus icon.
For more information, see Installing client-side components to selected hosts and Removing client-side components from selected hosts.
4. Click the up-arrow icon in the top right corner to return to the Control Modules table.
If you have added a control module but not installed the client-side components on the eligible hosts, you can install the client-side components to selected hosts.
You can install the client-side components to a single host or a number of hosts:
1. Select Administration > Modules.
The Control Modules table appears.
2. Locate in the list the module for which you want to install the client-side components.
If there are eligible hosts that do not have the module, the plus icon is active in the Actions column.
The eligible hosts appear in the selector window; see FIGURE 3-9.
4. In the selector, click to highlight the host(s) on which you want to install the client-side components. You can also click Select All at the top to choose all hosts in the list.
5. Click Install Now at the bottom.
The Task Progress dialog appears.
|
Note - You can also schedule the installation of the client-side components for a later time. For more information, see Schedule. |
6. If you click the magnifying glass icon, the Eligible Hosts For <Control Module> table appears.
7. Click the plus icon next to the host on which you want to install the client-side components for the module.
The Task Progress dialog appears.
You can remove the client-side components from a single host or from a number of hosts.
1. Select Administration > Modules.
The Control Modules table appears.
2. Locate in the list the module for which you want to remove the client-side components.
If there are eligible host(s) that have the module, the minus icon is active in the Actions column.
|
|
The eligible hosts appear in the selector window; see FIGURE 3-9.
4. In the selector, click to highlight the host(s) from which you want to remove the client-side components. You can also click Select All at the top to choose all hosts in the list:
5. Click Uninstall Now at the bottom.
The Task Progress dialog appears.
|
Note - You can also schedule the removal of the client-side components for a later time. For more information, see Schedule. |
6. If you click the magnifying glass icon, the Eligible Hosts For <Control Module> table appears.
7. Click the minus icon next to the host from which you want to remove the client-side components for the module.
The Task Progress dialog appears.
The client-side components of a control module may not always install successfully on a host and this is indicated in the Control Modules table. The number of hosts on which the install task failed appears in the Failed column. You can view a list of these hosts and try to install the components again.
To try to install the client-side components again:
1. Select Administration > Modules.
The Control Modules table appears.
2. Locate in the list the module for which you want to view the failed-installation report.
3. Click the exclamation-mark icon in the Actions column.
The hosts on which the client-side components failed to install appear in the selector window.
4. In the selector, click to highlight the host(s) on which you want to try to install again the client-side components. You can also click Select All at the top to choose all hosts in the list:
5. Click Retry Now in the bottom right corner.
The Task Progress dialog appears.
|
Note - You can also schedule the re-installation of client-side components for a later time. For more information, see Schedule. |
|
Note - If you remove one of the five pre-installed control modules (for example, Health Monitoring), you cannot re-install it later from the Sun Control Station (the modules are not stored on the control station).
|
1. Select Administration > Modules.
The Control Modules table appears.
2. Locate in the list the control module that you want to remove.
3. Click the delete icon in the Actions column.
The Confirm Removal Of Control Module table appears, asking you to confirm the removal.
The Control Modules table appears with the updated information.
This removal task removes all server-side components from the Sun Control Station and, if the managed host is accessible, all client-side components from the host(s) on which the module was installed.
You can group together a number of hosts under a single group name. Groups can help you manage your hosts according to, for example, geographical location or class of host.
The Groups table has four columns; FIGURE 3-10 shows an example of the table.
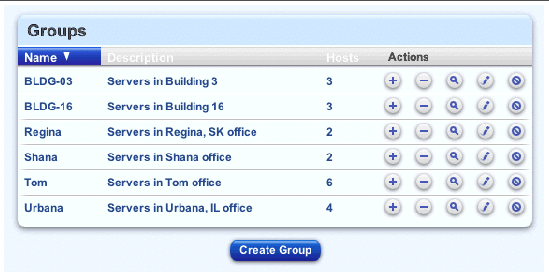
You can sort the list of groups according to the name of the group, the description of the group or the number of hosts in a group, in ascending or descending order.
Ascending order means from lowest value to the highest value (a-z or 1-9). Descending order means from highest value to the lowest value (z-a or 9-1). By default, the List Groups table is sorted by group name in ascending order.
In the heading of the column which has been sorted, a triangle icon points down (ascending order) or up (descending order).
Once a group is created, you can perform various operations on that group. These operations are found in the Actions column of the List Groups table and are explained further along in this section.
To create a group of managed hosts:
1. Select Administration > Groups.
2. Click Create Group at the bottom of the table.
The Create A New Group table appears; see FIGURE 3-11.
3. Fill in the following fields:
If you did not click the check box Choose Hosts To Add, the Groups table appears with the new group; the new group contains no hosts.
If you did click the check box Choose Hosts To Add, the selector appears, displaying the list of managed hosts.
5. In the selector, click to highlight the host(s) you want to add to the group. You can also click Select All at the top to choose all hosts in the list.
6. Click Add in the bottom right corner.
The Groups table appears with the new group added. The groups are sorted by group name in ascending order.

You can change the name or the description for a group.
1. Select Administration > Groups.
2. Locate in the list the group that you want to modify.
3. Click the pencil icon in the Action column.
The Modify Group table appears.
4. You can modify the group name or the description of the group. The Description field is optional.
The Groups table appears with the modified information.
You can see which hosts belong to a given group.
To view the details for a group:
1. Select Administration > Groups.
2. Locate in the list the group for which you want to view the details.
3. Click the magnifying glass icon in the Action column.
The selector appears, displaying the list of managed hosts within that group.
You can perform tasks from the Actions column.
4. To return to the list of groups, click the up-arrow icon in the top-right corner.
You can add a host or hosts to an existing group.
1. Select Administration > Groups.
2. Locate in the list the group to which you want to add a host.
3. Click the plus icon in the Actions column.
The selector appears, displaying the list of managed hosts on the Sun Control Station.
4. In the selector, click to highlight the host(s) you want to add to the group. You can also click Select All at the top to choose all hosts in the list.
You can select a host in another group to add to the current group. The host will then appear as a member of both groups.
5. Click Add in the bottom right corner.
The Groups table appears with the updated information. The groups are sorted by group name in ascending order.
You can remove a host or hosts from an existing group.
1. Select Administration > Groups.
2. Locate in the list the group from which you want to delete a host.
3. Click the minus icon in the Actions column.
The selector appears, displaying the list of managed hosts that belong to the group.
4. In the selector, click to highlight the host(s) you want to remove from the group. You can also click Select All at the top to choose all hosts in the list.
5. Click Remove in the bottom right corner.
The Groups table appears with the updated information. The groups are sorted by group name in ascending order.
You can remove an existing group.
|
Note - Removing a group does not remove the managed hosts in that group from the Sun Control Station.
|
1. Select Administration > Groups.
2. Locate in the list the group that you want to remove.
3. Click the delete icon in the Actions column.
The Confirm Group Removal table appears, asking you to confirm the removal.
The Groups table appears with the updated information.
For an explanation of tasks and events on the Sun Control Station, see Tasks and events.
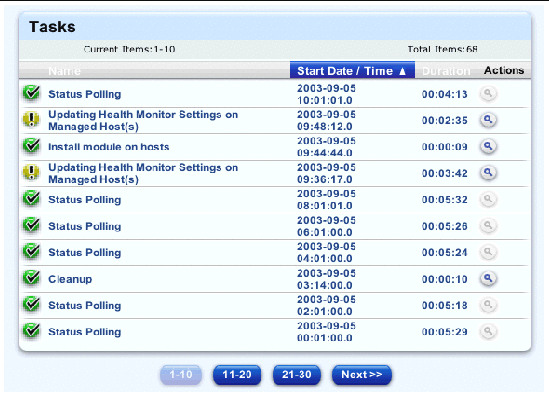
The Tasks table has five columns; FIGURE 3-12 shows an example of the table.
|
Note - If there are more than 10 entries in the Tasks table, the table lists the first 10 entries. There are buttons at the bottom of the table with which to choose different ranges of entries. |
 Select Administration > Tasks.
The Tasks table appears. The columns are:
You can sort the list of tasks according to the name of the task, the
start date/time of the task, or the duration of the task, in ascending or descending order.
Ascending order means from lowest value to the highest value (a-z or 1-9). Descending order means from highest value to the lowest value (z-a or 9-1). By default, the Tasks table is sorted by start date and time in ascending order.
In the heading of the column which has been sorted, a triangle icon points down (ascending order) or up (descending order).
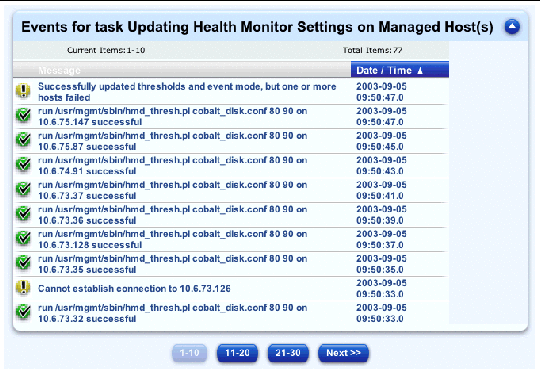
You can view a list of the events generated for a given task in the system.
FIGURE 3-13 shows an example of the table.
|
Note - If there are more than 10 entries in the Events table, the table lists the first 10 entries. There are buttons at the bottom of the table with which to choose different ranges of entries. |
1. Select Administration >Tasks.
The Tasks table appears. The columns are:
2. To view the events for a particular task, click the magnifying glass icon in the Actions column.
The Events For <Task> table appears. The columns are:
You can sort the list of tasks according to the message or the start date/time of the event.
Ascending order means from lowest value to the highest value (a-z or 1-9). Descending order means from highest value to the lowest value (z-a or 9-1). By default, the Tasks table is sorted by start date and time in ascending order.
In the heading of the column which has been sorted, a triangle icon points down (ascending order) or up (descending order).
3. Click the up-arrow icon in the top-right corner to return to the Tasks table.
For an explanation of the Schedule feature, see Schedule.
To view the Schedule table, select Administration > Schedule. See FIGURE 3-14 for a sample table.
The Schedule table has four columns:
For certain tasks, you can also use the plus icon or the minus icon to add or remove hosts to or from the scheduled task.

You can sort the list of scheduled tasks according to the name of the task, the type of task or the settings for the task, in ascending or descending order.
Ascending order means from lowest value to the highest value (a-z or 1-9). Descending order means from highest value to the lowest value (z-a or 9-1). By default, the Scheduled Tasks table is sorted by module name in ascending order.
In the heading of the column which has been sorted, a triangle icon points down (ascending order) or up (descending order).
Cleanup is a built-in scheduled task that allows you to clean up the list of tasks and events retained by the Sun Control Station. The Cleanup task runs once per day.
|
Note - You cannot delete the Cleanup task from the table and you cannot disable it. |
To configure the Cleanup task:
1. Select Administration > Schedule.
2. In the Action column, next to the Cleanup task, click the pencil icon.
The Schedule Settings For Cleanup table appears.
3. Configure the following settings:
The format is hh:mm (24-hour format).
The Schedule table appears with the updated settings.
To view the details of a scheduled task:
1. Select Administration > Schedule.
2. Click the magnifying glass icon next the task for which you want to see the details.
The Tasks table appears. For more information on this table, see Tasks table.
3. Click the up-arrow icon in the top-right corner to return to the Scheduled Tasks table.
To modify the settings for a scheduled task:
1. Select Administration > Schedule.
2. Click the pencil icon next to the task you want to modify.
The Schedule Settings for <Task> table appears.
The Schedule table appears with the updated settings for that task.
1. Select Administration > Schedule.
2. Click the delete icon next to the task that you want to delete.
A confirmation table appears, asking you to confirm the removal of the scheduled task.
3. To cancel the task and return to the selector, click Cancel.
4. To proceed, click Remove Schedule.
The Schedule table appears, with the scheduled task removed from the table.
Copyright © 2003, Sun Microsystems, Inc. All rights reserved.