| C H A P T E R 1 |
|
Setting Up the Sun Blade 1500 Workstation |
This chapter includes information about the following topics:
Read the document, Important Safety Information for Sun Hardware Systems (816-7190). The document is included with the Sun Blade 1500 workstation.
More safety and compliance information can be found in the Sun Blade 1500 Safety and Compliance Guide (817-5130). This guide is available online at:
http://www.sun.com/documentation/
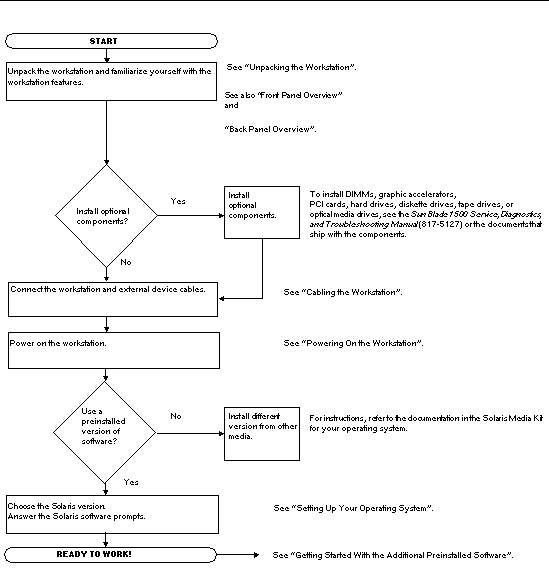
Use the following flowchart as a process tool to assist you with installation of the Sun Blade 1500 workstation.

|
Note - Solaris 8 2/04 or Solaris 9 9/04 and several additional software applications are preinstalled on your hard drive. See Setting Up the Preinstalled Solaris Operating System Software. |
Carefully unpack all workstation components from the packing cartons. Your workstation configuration might not contain all the components shown in FIGURE 1-2.
FIGURE 1-6 illustrates the cable connections for the workstation.
Connect the workstation and external devices in this order (FIGURE 1-6):
1. Connect the workstation power cord to a grounded electrical outlet.
2. Connect the keyboard and mouse to the on-board USB 1.1 connectors (the connectors near the fan FIGURE 1-4).
3. Connect the monitor power cord to a grounded electrical outlet.
4. Connect the monitor cable to the video connector on the filler panel of the graphics accelerator.
|
Note - Your workstation might contain a different graphics accelerator than the one shown in FIGURE 1-6. Read the Sun Blade 1500 Product Notes (817-5131) to determine if your graphics accelerator must be installed in a specific PCI slot. |
|
Note - Monitors that have 13W3 connectors require a Sun 13W3-to-VGA adapter cable for proper connection. This adapter cable (Sun store part no. X471A) can be obtained from your Sun sales representative or the Sun store at: http://store.sun.com/
|
5. Connect the Ethernet cable to the TPE connector.
6. Connect any additional external devices to the workstation's other connectors.
Attaching USB devices or USB extension cables with total cable lengths greater than 2.5 m (8.25 ft) to the front panel or rear panel USB 1.1 connectors might provide unsatisfactory performance. If you must use longer cables, use powered USB hubs.
1. Turn on power to the monitor and to all external devices.
2. Press and release the workstation Power button on the front panel (FIGURE 1-3).
3. After several seconds, verify that the power-indicator LED on the Power button lights.
The power-indicator LED on the Power button lights after the workstation begins the internal booting process (FIGURE 1-3).
If you experience problems during power on, see Troubleshooting the Sun Blade 1500 Workstation.
|
Tip - After you power on the workstation for the first time, you are ready to set up the preinstalled Solaris 8 2/04 or Solaris 9 9/04 Operating System software. Go to Planning the Installation Process for the Solaris Operating System. |
TABLE 1-1 describes two methods for powering off the workstation.
|
|
|
|
Note - After powering off the workstation, always wait at least four seconds before powering on the workstation again. |
Copyright © 2004, Sun Microsystems, Inc. All Rights Reserved.