| Sun Ultra 45 and Ultra 25 Workstations Service and Diagnostics Manual |
| Sun Ultra 45 and Ultra 25 Workstations Service and Diagnostics Manual |
| C H A P T E R 3 |
|
Replacing the Motherboard and Associated Components |
This chapter describes the removal and installation procedures for the Sun Ultra 45 and Ultra 25 motherboard and associated components.
|
Note - Only Sun authorized service providers should perform the procedures described in Replacing the Motherboard. |
This chapter contains the following topics:

|
Caution - To prevent equipment damage, review the safety requirements, safety symbols, and safety precautions in Preparing to Replace Componentsbefore you perform any replacement procedure. Additional cautions, warnings, and instructions are provided in the Sun Ultra 45 and Ultra 25 Workstations Safety and Compliance Guide, 819-2785. The document is available from:
|
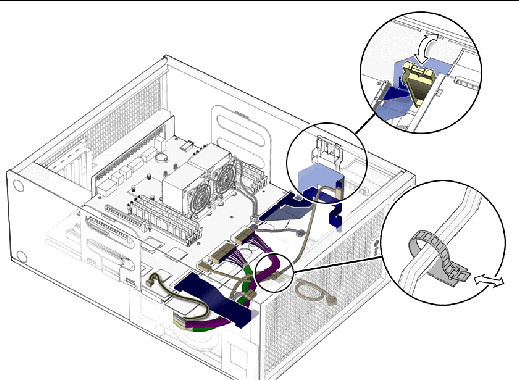
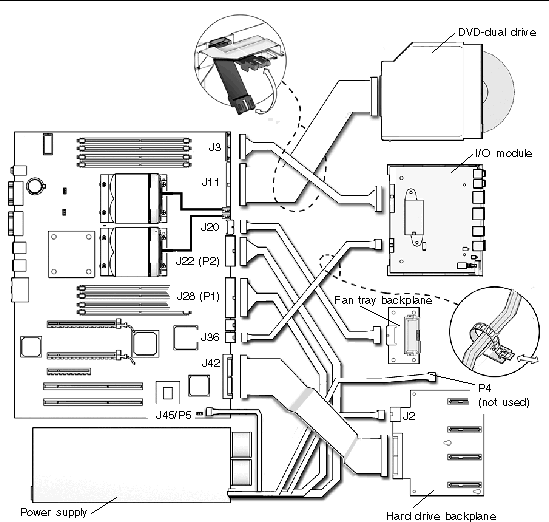
FIGURE 3-1 and FIGURE 3-2 show the connections for some cables and devices that connect to the motherboard.

This section describes removal and installation of the memory modules.

|
Caution - DIMM memory is installed in pairs. If you replace a single DIMM, the new DIMM must be identical to the DIMM that you removed. |
Sun Ultra 45 or Ultra 25 workstation memory is installed as matched pairs of DDR-1 SDRAM 266-MHz DIMMs. Within a matched pair, DIMMs must be identical. They must be from the same manufacturer with the same type and number of memory devices, the same amount of memory per device, and the same memory speed.
When the workstation boots, the OpenBoot PROM checks for compatible memory modules. See OpenBoot PROM Memory Message for additional information.
Before replacing Sun Ultra 45 and Ultra 25 memory, verify that the latest versions of OpenBoot PROM, system firmware, and recommended system patches are installed on your system. If necessary, check the Sun System Handbook at SunSolve Online:
http://sunsolve.sun.com/handbook_pub/
|
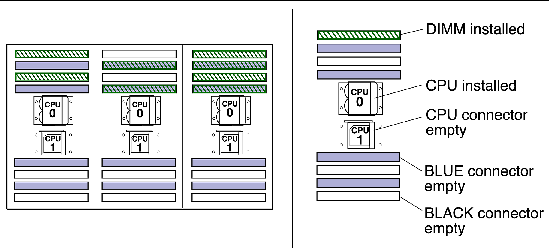
Note - The Ultra 25 workstation has one CPU (CPU0) and one bank of four DIMM slots on the motherboard. |

During workstation startup, OpenBoot PROM checks for DIMM type and DIMM manufacturer. TABLE 3-1 shows some checks and the actions taken by the OpenBoot PROM.
|
Note - If you only have one DIMM pair installed and those DIMMs have different architectures, the OpenBoot PROM displays a message, and powers off. |
Each CPU has four memory slots. The two blue slots make up physical bank 0 and the two black slots make up physical bank 1 (FIGURE 3-4).
If a problem is found, OpenBoot PROM references memory by bank, for example:
The preceding message means that each of the two DIMMs in the bank 0 slots comes from a different manufacturer. The workstation still attempts to use the DIMMs.
This message means that each of the two DIMMs in the black slots has a different internal memory layout. The workstation does not use the DIMMs.
The workstation must have at least one functional pair of DIMMs to display a message. A workstation with more than one pair of DIMMs might display more than one message.
1. Power off the system and attach an antistatic wrist strap. Open and position the chassis, and remove the access panel.
Refer to Powering Off the Workstation.
2. Release the DIMM by simultaneously pressing down on both ejector levers at the ends of the DIMM slot (FIGURE 3-5).
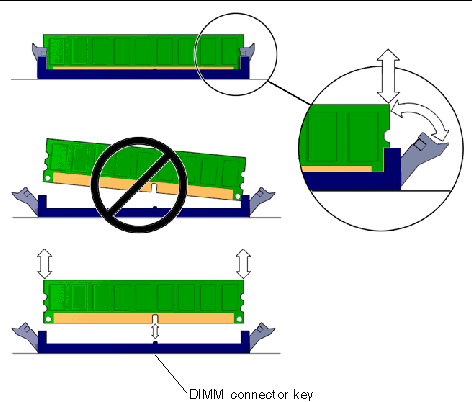
3. Lift the DIMM straight out of the DIMM slot (FIGURE 3-5).

|
Caution - Do not lift the DIMM out of the DIMM slot at an angle. This can damage the edge connector for the DIMM or the DIMM slot. |
4. Set the DIMM aside on an antistatic mat.
5. Repeat Step 2 through Step 4 until you have removed all relevant DIMMs.

|
Caution - If you are installing additional memory, remember that DIMMs must be installed in matched pairs of DIMMs (FIGURE 3-4). The workstation requires a minimum of one pair of matching DIMMs. |
The minimum OpenBoot Prom level for the Sun Ultra 45 or Ultra 25 workstations is OpenBoot 4.21.x. Before installing Sun Ultra 45 and Ultra 25 memory, verify that the latest versions of OpenBoot PROM, system firmware, and recommended system patches are installed on your system. If necessary, check the Sun System Handbook at SunSolve Online:
http://sunsolve.sun.com/handbook_pub/

|
Caution - Do not remove any DIMM from its antistatic package until you are ready to install it. |
1. Power off the system, attach an antistatic wrist strap, open and position the chassis, and remove the access panel.
Refer to Powering Off the Workstation.
2. Remove the new DIMM from its antistatic container.

|
Caution - Handle DIMMs only by the edges. Do not touch DIMM components or metal parts. Always wear an antistatic wrist strap when handling DIMMs. |
3. Review the recommended DIMM installation and configurations before installing the DIMM.
See Replacing the DIMMs.
|
Caution - If you replace a single DIMM, the replacement DIMM must be identical to the DIMM that you removed. |
4. Align the DIMM notch to the DIMM connector key (FIGURE 3-5).
5. Using both thumbs, press the DIMM straight down into the DIMM connector slot until both ejector levers close (FIGURE 3-5).
The DIMM is seated when you hear a click and the ejector levers are in the vertical position.
6. Repeat Step 4 through Step 5 until all DIMMs are installed.
7. Verify that all DIMM ejector levers are upright, seated, and tight.
8. Reassemble the workstation, power on the system, and verify the DIMM installation.
Refer to Reassembling the Workstation and Verifying Component Installation. You also might want to review the information in OpenBoot PROM Memory Message.
This section describes removal and installation of the battery. TABLE 3-2 lists the battery specifications.
1. Power off the system and attach an antistatic wrist strap. Open and position the chassis, and remove the access panel.
Refer to Powering Off the Workstation.
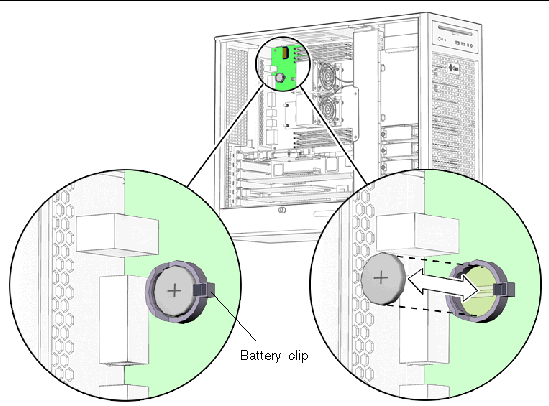
2. Release the battery by pressing the battery clip away from the battery until the battery shifts out of the battery socket (FIGURE 3-6).
|
Note - The workstation does not function without the battery. |
The battery fits directly into a socket on the motherboard. There are no additional fasteners or cables.
1. Position the battery over the battery socket with the plus (+) side up (FIGURE 3-6).
2. Press the battery down into the socket until the battery clicks into place.
3. Reassemble the workstation, power on the system, and verify the battery installation.
Refer to Finishing Component Replacement and Verifying Component Installation.
This section describes removal and installation of the nonvolatile random access memory (NVRAM).
|
Note - If you are replacing a motherboard and you have software that is licensed to the HostID or Ethernet address, you should install the old NVRAM on the new motherboard. |
1. Power off the system and attach an antistatic wrist strap. Open and position the chassis, and remove the access panel.
Refer to Powering Off the Workstation.
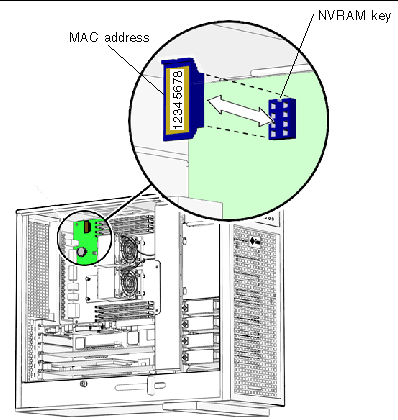
2. Pull the NVRAM straight up from the motherboard connector (FIGURE 3-7).
3. Set the NVRAM aside on an antistatic mat.
The NVRAM installs directly onto the motherboard. There are no additional fasteners or cables.
1. Power off the system and attach an antistatic wrist strap. Open and position the chassis, and remove the access panel.
Refer to Powering Off the Workstation.
2. Align the NVRAM key to the NVRAM connector key on the motherboard (FIGURE 3-7).
3. Press the NVRAM down into the connector.
4. Ensure that the NVRAM is tight in its connector.
5. If you are finished working, reassemble the workstation, power on the workstation, and verify the NVRAM installation.
Refer to Finishing Component Replacement and Verifying Component Installation.
This section describes removal and installation of PCI cards in the workstation.
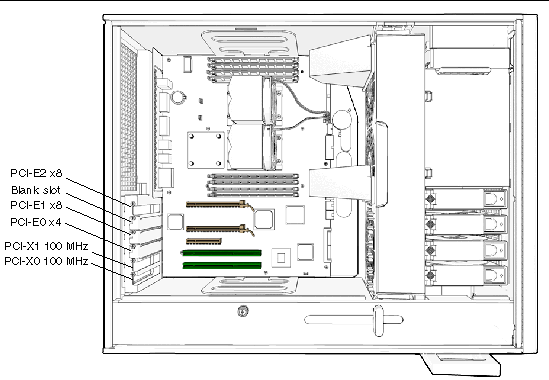
There are five PCI connectors on the system motherboard. Two connectors are PCI-X, and three connectors are PCI-Express (FIGURE 3-8). The long PCI-E connectors are x16 physical lanes long and operate at x8 lanes. The short PCI-E connector is x8 lanes long and operates at x4 lanes.
1. Power off the system and attach an antistatic wrist strap. If necessary, disconnect external cables. Open and position the chassis, and remove the access panel.
Refer to Powering Off the Workstation.
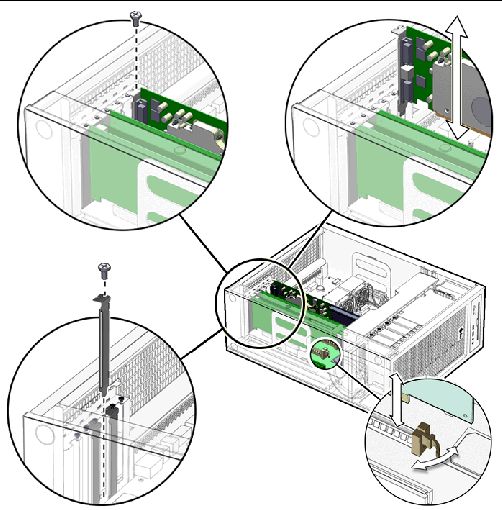
2. Using a No. 2 Phillips screwdriver, remove the screw that secures the PCI card retainer to the chassis rear panel (FIGURE 3-9).
Set the screw aside in a container.

|
Caution - If you are removing a graphics accelerator from a PCI-Express connector, be sure that you release the PCI-E connector latch (FIGURE 3-9). |
3. Gently rock the PCI card forward, then lift it straight out of the PCI card slot, and set it aside on an antistatic mat.
4. If you are not installing another PCI card in the empty slot, insert a filler panel into the rear panel slot.
The rear panel slot must be closed with a filler panel to meet system Electromagnetic Interference (EMI) and airflow requirements.
The total power consumption of all installed PCI cards must not exceed 400 Watts.
PCI-E 2 is the default console display. If there is no graphics accelerator installed into PCI-E 2, consider the probe order shown in TABLE 3-3.
During the boot sequence, device nodes are probed. The PCI slots are probed in the order described in TABLE 3-3.
Unless you reconfigure the default, the first graphics accelerator occurring in the probe order is designated the default console display and assigned the aliases screen and /dev/fb.
You can configure the OpenBoot PROM to designate a different graphics accelerator as the console display. Use the show-displays utility, the nvalias command, and the output-device parameter to make this change. For the following example, a Sun XVR-2500 graphics accelerator is installed in physical slot PCI-E 2 as the default console display and a Sun XVR-100 graphics accelerator is installed in slot PCI-X 0. This example configures the Sun XVR-100 graphics accelerator to be the new console display.
2. Display the device nodes for the installed graphics accelerators.
ok show-displays a) /pci@1f,700000/SUNW,XVR-2500@0 b) /pci@1e,600000/pci@0/pci@9/pci@0,2/SUNW,XVR-100@2 q) NO SELECTION |
3. Select the graphics accelerator to be the new console display by typing its respective letter.
The utility ends and the device node path is loaded into a text buffer.
4. Make an alias for the device node path.
Type a space, hold down the Control key, and press the Y key.
5. Configure the output-device parameter for the new console display.
The system now uses the Sun XVR-100 graphics accelerator as the new console display.
|
Note - The default console display, the first graphics accelerator found in probe order, is still aliased to screen. If you want to check the new console display, type: test newconsoledisplay |
1. Power off the system and attach an antistatic wrist strap. If necessary, disconnect external cables. Open and position the chassis, and remove the access panel.
Refer to Powering Off the Workstation.
2. Locate the available PCI card slots.
You might have to remove a second chassis filler panel for some PCI cards that use two PCI card slots. Read the documentation that came with the PCI card and see General PCI Card Guidelines.

3. Using a No. 2 Phillips screwdriver, remove the chassis filler panel from the PCI card slot and set the screw aside in a container (FIGURE 3-10).
Remove a second filler panel if needed for dual-width PCI cards.
4. Remove the new PCI card from its antistatic container.

|
Caution - Handle the PCI card along the outside edges. Do not handle the PCI card along the contact edge. If you are installing a long PCI-E card, be sure to engage the PCI-E connector latch. |
5. Position the PCI card so that the PCI bracket aligns with the chassis rear panel slot and the PCI card edge aligns with the motherboard PCI card connector.
6. Insert the PCI card into the PCI card slot.
If you are installing a long PCI-Express card, be sure to engage the PCI-E connector latch (FIGURE 3-10).
7. Firmly press the PCI card straight down into the PCI card slot until it is fully seated in the slot.
8. Use a No. 2 Phillips screwdriver to fasten the screw that secures the PCI card retainer (FIGURE 3-10).
9. Inspect the PCI card fasteners to verify that:
10. If you are finished working, reassemble the workstation, power on the workstation, and verify the PCI card installation.
Refer to Finishing Component Replacement.
|
Note - Boot the system with the -r option, so that the Solaris Operating System can reconfigure itself for the new component. See Finishing Component Replacement. |
This section describes removal and installation of the motherboard.

|
Caution - This procedure is intended for Sun authorized service providers only. |
The motherboard, CPU, and NVRAM are a single replaceable unit.
1. Power off the system and attach an antistatic wrist strap. Disconnect all external cables; open and position the chassis, and remove the access panel.
Refer to Powering Off the Workstation.
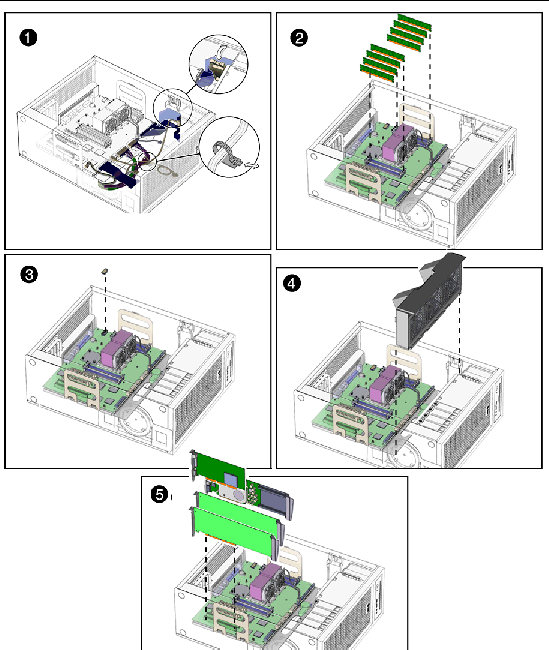
2. If necessary, remove the PCI cards and DIMMs (FIGURE 3-11).
Set these components onto an antistatic mat (FIGURE 3-11).
4. (Optional) If you want to use the same Ethernet address and system ID for the new motherboard, remove the NVRAM and place it on an antistatic mat.
Refer to Removing the NVRAM.
|
Note - If you have software that is licensed to the HostID or Ethernet address, you should install the old NVRAM on the new motherboard. |
5. Remove all cables from the cable clips (FIGURE 3-11).

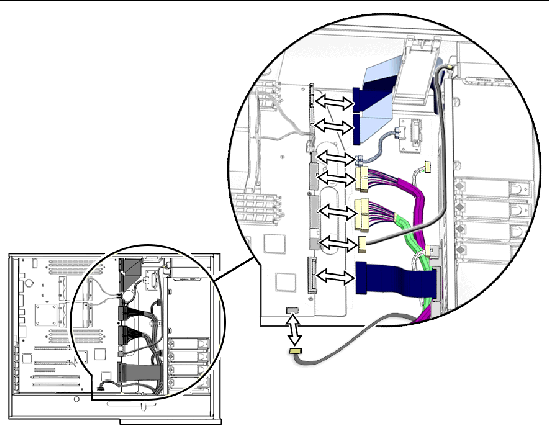
6. Disconnect the following power and signal cables from the motherboard (FIGURE 3-12):
7. Turn the motherboard latch 90 degrees counterclockwise (FIGURE 3-13).

8. Move the cables out of the way.
9. Using the motherboard handles, tilt the motherboard to one side and lift it until it is free of the chassis (FIGURE 3-13).
10. Set the motherboard down onto the antistatic mat.
1. Remove the new motherboard from its antistatic package and place it on an antistatic mat.
2. Move all cables out of the way.
3. Align the motherboard rear panel connectors with the matching holes in the rear panel (FIGURE 3-13).
4. Gently lower the motherboard while tilting it down (FIGURE 3-13).
5. Align the motherboard so that the hooks fit into the holes of the motherboard tray.
|
Caution - Ensure that the hooks are located in the holes. Improper alignment can damage the motherboard. |
6. Turn the motherboard latch 90 degrees clockwise to secure the motherboard.
Ensure that the motherboard connector panel aligns with the chassis rear panel.
7. Connect the cables to the corresponding motherboard connectors (FIGURE 3-14):
8. Secure the cables into the cable clips (FIGURE 3-14).
9. If necessary, install the old NVRAM onto the new motherboard (FIGURE 3-15).
Refer to Replacing the NVRAM.
|
Note - If you have software that is licensed to the HostID or Ethernet address, you should install the old NVRAM on the new motherboard. |
10. Install the PCI cards and the DIMMs.
11. Inspect the motherboard to verify that:
12. Reassemble the workstation, power on the system, and verify the motherboard installation.
Refer to Finishing Component Replacement.
| Sun Ultra 45 and Ultra 25 Workstations Service and Diagnostics Manual | 819-1892 |
Copyright © 2006, Sun Microsystems, Inc. All Rights Reserved.


