Closing the Workstation and Preparing for Operation
This section describes how to prepare for service and install the left-side access panel and the front bezel.
 Close the Workstation and Prepare of Operation
Perform the following steps after installing a workstation component.
-
Ensure that all the components are removed, replaced, or installed as described in the removal and replacement procedures.
-
Ensure that all cables are secure and do not block the internal airflow or touch components on the motherboard.
-
Remove tools and debris from the interior of the workstation.
-
Install the front bezel as described in the procedure, Install the Front Bezel.
-
Install the left-side access panel as described in Install the Left-Side Access Panel.
-
Connect all external cables to the system, and then connect the AC power cord.
-
Power on the workstation.
 Install the Front Bezel
-
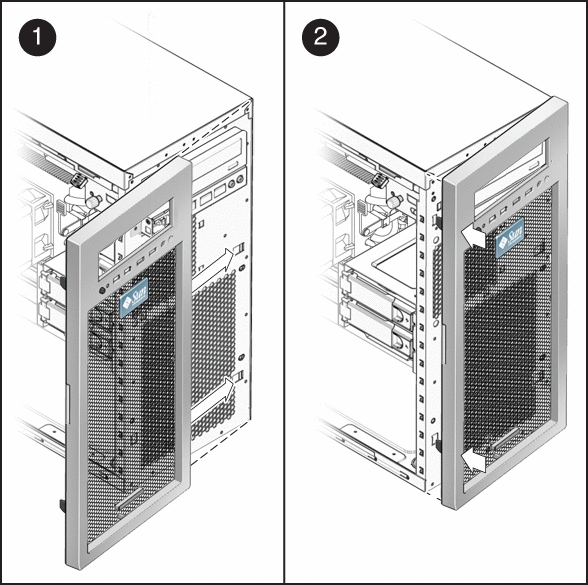
Insert the right side bezel hooks into the right side chassis slots. See Figure 3–3.
-
Insert the left-side bezel tabs into the chassis slots, and gently press the left side of the bezel toward the chassis until the tabs lock.
 Caution –
 Use care when installing the bezel. The bezel tabs and the chassis hooks might break if you apply too much force or attempt to swing the bezel closed.
Figure 3–3 Installing the Front Bezel

 Install the Left-Side Access Panel
Install the left-side access panel after you finish inspecting or installing components.
-
If necessary, install the front bezel (see Install the Front Bezel).
-
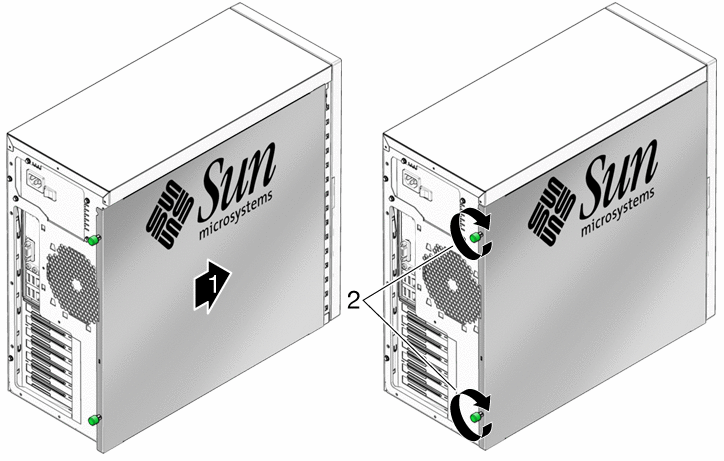
Position the access panel so that the lip on the inside bottom of the panel fits over the bottom chassis rail.
-
Press gently against the side of the access panel and slide the panel toward the front of the chassis. See Figure 3–4.
The access panel lies flat against the chassis, with no gaps between the two.
-
Tighten the two captive thumbscrews located on the rear lip of the panel.
The access panel is installed flat against the chassis with the thumbscrews tightened.
Figure 3–4 Installing the Left-Side Access Panel

- © 2010, Oracle Corporation and/or its affiliates
