| C H A P T E R 5 |
|
Device Driver Installation |
This chapter describes how to install and configure the driver software, including:
Before installing the SunSAI/P driver software, you must first remove any previous version of the SunSAI/P software that may be present on your system. If you attempt to add the new software packages over existing SunSAI/P packages, the installation will fail.
2. Check for existing SunSAI/P software packages on your system:
If you find any SunSAI/P packages, you must remove them.
3. Remove any existing SunSAI/P software packages:
To install the driver software, you will first need to mount the CD-ROM on your system. You can then install the driver itself.
|
1. Log onto your system console as superuser (root).
2. Insert the SunSAI/P CD into your system's CD-ROM drive.
3. Start the software installation by adding the patch appropriate to your operating environment, as follows:
# pkgadd -d /cdrom/cdrom0/sunsaip_2.0_u1/Solaris_2.5.1/Packages SUNWsaip SUNWsaipu or /Solaris_2.6/ or /Solaris_7/ or: # pkgadd -d /cdrom/cdrom0/sunsaip_3.0/Solaris_8/Packages SUNWsaip SUNWsaipu |
|
Note - For more information about the pkgadd utility, refer to the pkgadd(1m) man page or the Solaris documentation. |
You will see the following, or similar, output:
4. Answer yes (y) when asked to allow scripts to be run as superuser on your system.
This package contains scripts which will be executed with super-user permission during the process of installing this package. Do you want to continue with the installation of <SUNWsaip> [y,n,?] y |
After several status messages, you will see the following, or similar, output:
|
Note - For SAI/P 3.0, the fourth line in the code above reads;
|
5. Answer yes (y) when asked to allow scripts to be run as superuser on your system.
This package contains scripts which will be executed with super-user permission during the process of installing this package. Do you want to continue with the installation of <SUNWsaipu> [y,n,?] y |
The driver installation will continue automatically. You will see the following message when the driver software is successfully installed on your system.
6. Unmount and eject the SunSAI/P CD.
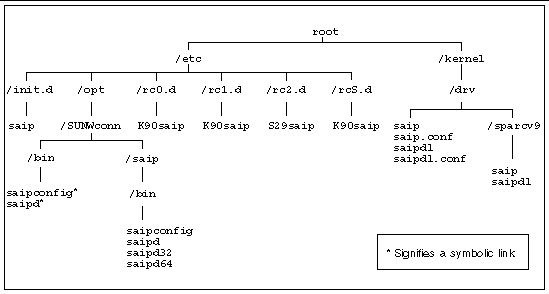
FIGURE 5-1 shows the /etc and /kernel directory structure of the SunSAI/P software after it has been installed on your system.

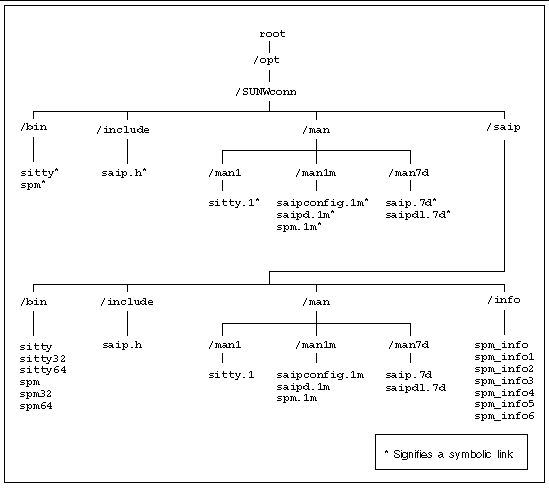
FIGURE 5-2 shows the /opt directory structure of the SunSAI/P software after it has been installed on your system.

To install the driver software, first mount the CD-ROM on your system.
|
1. Log onto your system console as superuser (root).
2. Insert the SunSAI/P CD into your system CD-ROM drive.
3. Start the software installation by adding the appropriate package to your Solaris 9 operating environment as follows:
4. Answer yes (y) when asked to allow scripts to be run as superuser on your system.
The driver installation continues automatically. You will see the following message when the driver software is successfully installed on your system.
5. Unmount and eject the SunSAI/P CD-ROM.
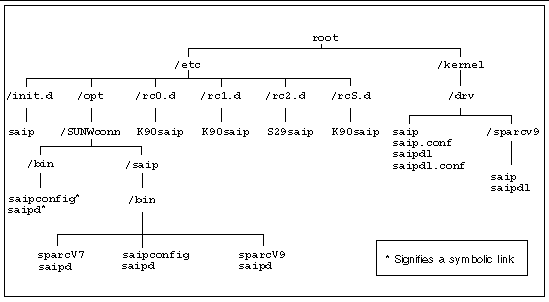
FIGURE 5-3 show the /etc and /kernel directory structure of the SunSAI/P software after it has been installed on your system.

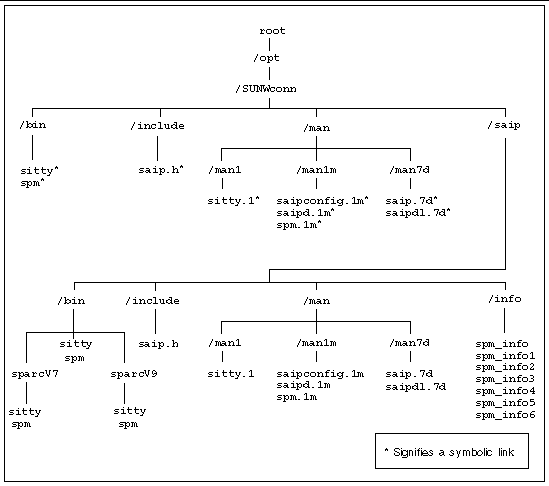
FIGURE 5-4 shows the /opt directory structure of the SunSAI/P software after it has been installed on your system.

The SAI/P driver is automatically loaded once you complete the software installation. When the driver loads, you see the following (or similar) message:
If there is a problem with the board or the driver configuration, you may see error messages after this screen. See Appendix A for explanations of the error messages.
sitty options set from a run control (rc) script must be set after the download program has run and must wait for the board to boot before running.
sitty options should be added to the end of /etc/rc2.d. This can be done by giving it a name such as "S99saip" or "S99sittystuff", where the "S" must be a capital letter, and the greater the number, the later the script is run.
In some circumstances, you may want to configure the SunSAI/P device driver manually. For example, you may want to use more adapters than are currently loaded in the system, or you may need to change the default configuration. After you have installed the driver software, use the saipconfig utility to configure it.
The saipconfig utility can be used to configure up to 16 adapters. However, you should not install more adapters in your system than are suggested in TABLE 2-1.
If you have installed additional boards since you have installed the driver software, perform a reconfiguration boot before using the saipconfig utility.
1. Shut down your system and display the OpenBootTM prompt (ok) using the procedures described in the Solaris Handbook for Sun Peripherals or your system service manual.
For example, you can shut down the system using the shutdown command:
Refer to the shutdown(1m) man page for more information.
2. Perform a reconfiguration boot by typing the following at the OpenBoot prompt:
The saipconfig utility to enables you to configure the SunSAI/P interfaces on your system automatically.
1. Log onto your system console as superuser (root).
2. Start the saipconfig utility:
3. Answer yes (y) to accept the default configuration.
The installation has detected 1 SunSAI/P serial adapter. Would you like to automatically install the default configuration? y |
At this point, the saipconfig utility will configure the SunSAI/P interfaces automatically. When saipconfig has finished configuring the interfaces, you will see this message:
|
Note - Since the last printing of the SunSAI/P User's Guide, the saipconfig procedure for manually configuring the driver software has changed. Please see the section below for the correct procedure. |
Use the saipconfig utility to configure the SunSAI/P adapters on your system manually. The utility will ask you a series of questions about how you want to customize the adapters. After you have answered these questions, the utility will reconfigure the driver software.
1. Become superuser, or log onto to your system console as root.
2. Start the saipconfig utility:
3. To configure the adapters manually, answer no (n) to this question:
The installation has detected 1 SunSAI/P serial adapter. Would you like to automatically install the default configuration? n |
4. Decide whether you want to select your own instance number:
In this example, we have answered y, so saipconfig will prompt us for instance numbers later in the procedure. If we answered n, then the utility would not prompt us for instance numbers.
The saipconfig utility will ask you questions about how you want to configure the SunSAI/P interfaces.
5. Press the Return key to configure your driver software.
6. Type the number of SunSAI/P adapters you want to configure on your system:
NOTE: Although (0-51) instances are allowed, this driver only supports 16 actual adapters at one time. How many adapters do you wish to install (1-16)? |
For each adapter that you specified in Step 6, you will be asked the questions shown in Step 7 through Step 9.
7. Decide if you want to enable interrupts on the SunSAI/P adapter.
Type "y" to disable interrupts (the default value), or type "n" to enable interrupts, on the adapter.
|
Note - We recommend that you use the default setting of disabled interrupts. |
8. If you answered y to Step 4, you will be prompted for the instance number of the adapter:
The saipconfig utility will then display the selected configuration of the adapter.
9. Type "y" if you are satisfied with this adapter's configuration.
Type "n" if you are not satisfied with the configuration.
Press the Return key to return to Step 7.
After answering these questions for all of the SunSAI/P adapters on your system, saipconfig will configure the interfaces automatically. When saipconfig has finished configuring the interfaces, you will see this message:
Devices are created in /dev, giving the operating system the information to use the additional ports.
The device driver will support up to 16 SunSAI/P adapters, depending upon your system.
The devices are named according to the convention:shown in TABLE 5-1
|
Port Number. For example, for the first board, the module letter and port numbers will be a000 - a007. For the second board, they will be b000 - b007. |
|
Note - See Chapter 6 for more information about TTY device names. |
Refer to the Peripheral Setup section of the Solaris System Administration Guide for details on how to enable serial ports.
|
Note - The System Administration Guide is shipped with the Solaris operating environment and is also available at the http://docs.sun.com/ website. |
The following example shows how to set up serial ports for use with terminals:
|
1. Connect terminals to the ports (using a null modem, if necessary) and test the connections to each terminal by entering the following command for each port added:
(The command above assumes the terminal is connected to a000.)
Note that the date command is used as a simple test, to provide text output that can be redirected; there is no other significance to date in this test.
Once you can redirect output to a terminal with the test above, perform the following steps to enable that port:
2. Log onto the console as superuser (root).
3. Type (on a single command line):
# pmadm -a -p zsmon -s a000 -fu -i root -v `ttyadm -V` \ -m "`ttyadm -d /dev/cua/a000 -l 9600 -s /usr/bin/login`" |
This will enable the port suitably for a terminal.
|
Note - Ports may also be enabled through the Solaris admintool program. Refer to the System Administration Guide for more information. |
The SunSAI/P man pages are installed in the /opt/SUNWconn/man/ directory. Before you can view the man pages, you must add this directory to your MANPATH environment variable. The location of the MANPATH variable will depend on which UNIX shell you are using.
|
1. Examine your $HOME/.login and $HOME/.cshrc files to locate the MANPATH variable.
2. Using a text editor, add the following line to the end of the file that contained the MANPATH variable:
If neither of these files contain this variable, add the following line to the end of one of the files, or contact your system administrator for assistance:
3. Use the source command on the file you edited to make the changes effective in your current window.
For example, if you added the MANPATH line to the .login file, you would type:
|
Note - If you log out and log back into your system, you will update the MANPATH variable in all command windows and shells. |
|
1. Using a text editor, add the following two lines to the end of the $HOME/.profile file:
If this file did not already contain this variable, add the following lines to the end of the file, or contact your system administrator for assistance:
2. Make the changes effective in your current window:
|
Note - If you log out and log back into your system, you will update the MANPATH variable in all command windows and shells. |
Once you have added the /opt/SUNWconn/man/ directory to your MANPATH variable, you can use the /usr/man command to view these SunSAI/P man pages:
|
Enter the following commands to uninstall the device driver software:
1. Log onto the console as superuser (root).
2. Enter the following command:
This package contains scripts which will be executed with super-user permission during the process of removing this package. Do you want to continue with the removal of this package [y,n,?,q] y |
Answer y. The packages containing the driver and associated utilities will now be removed from the system. In the event that some of the ports were open when pkgrm was initiated, the unloading of the driver will fail. In this case, reboot your system to complete the driver removal.
Copyright © 2007, Sun Microsystems, Inc. All Rights Reserved.