|
| |
| Sun Java[TM] System Identity Manager 7.1 Admininstration | |
Chapter 5
AdministrationThis chapter provides information and procedures for performing a range of administrative-level tasks in the Identity Manager system, such as creating and managing Identity Manager administrators and organizations. It also provides an understanding of how you can use roles, capabilities, and administrative roles in Identity Manager.
The information is grouped in the following topics:
Understanding Identity Manager AdministrationIdentity Manager administrators are users with extended Identity Manager privileges. You establish Identity Manager administrators to manage:
Identity Manager differentiates administrators from users through the direct or indirect assignment of:
- Capabilities. A set of permissions granting access rights to Identity Manager users, organizations, roles, and resources.
- Controlled organizations. Once assigned to control an organization, the administrator can manage objects in that organization and in any organizations below that organization in the hierarchy.
Delegated Administration
In most companies, employees with administrative tasks to perform hold specific and varied responsibilities. In many cases, an administrator needs to perform account management tasks that are transparent to other users or administrators, or that are limited in scope.
For example, an administrator might be responsible only for creating Identity Manager user accounts. With that limited scope of responsibility, the administrator likely does not need specific information about the resources on which he creates user accounts, or about the roles or organizations that exist within the system.
Identity Manager supports separation of responsibility and this delegated administration model by allowing administrators to view and manage only those objects within a specific, defined scope.
Identity Manager implements the ability to delegate individual system activities to administrators by:
You can specify delegation for a user from the Create User page when you set up a new user account, or when you edit a user account.
You can also delegate work items, such as requests for approvals, from the Work Items tab. See Delegating Work Items for details.
Creating AdministratorsYou create an Identity Manager administrator by extending the capabilities of a Identity Manager user. When creating or editing a user, you can give him administrative control by:
- Designating organizations that he can manage
- Assigning capabilities within the organizations he manages
- Selecting the form he will use when creating and editing Identity Manager users (if capabilities are assigned that allow him to perform those actions)
- Selecting an approver to receive pending approval requests (if capabilities are assigned that allow him to approve requests)
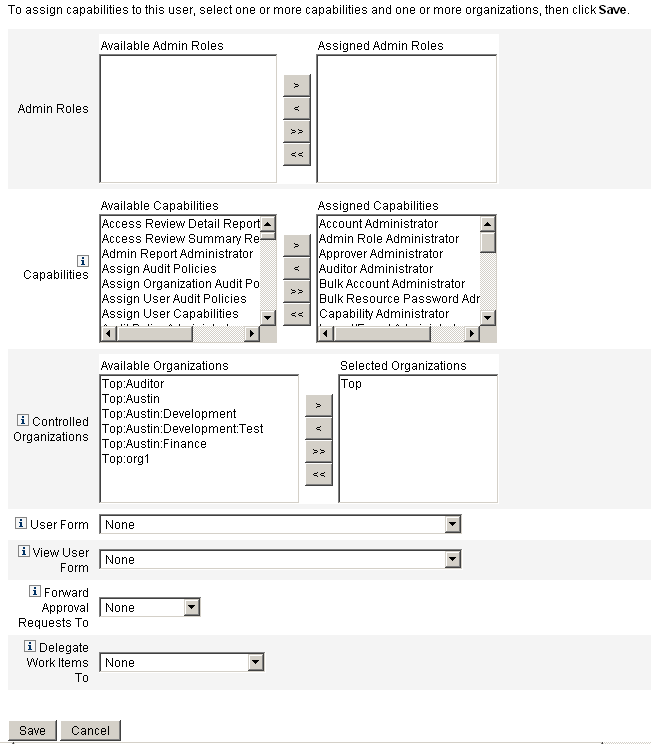
To give a user administrative privileges, select Accounts in the menu bar to go to the Identity Manager Accounts area. For a new user, select the Security tab from the Create User page to assign administrator attributes.
To assign administrator attributes to an existing user, select the user in the Accounts list and edit the user’s capabilities by selecting Edit User Capabilities from the User Actions list. The Security form that opens is illustrated in the following figure:
Figure 5-1 User Account Security page: Specifying Administrator privileges
Make one or more selections to establish administrative control:
- Controlled Organizations — Select one or more organizations. The administrator can control objects in the selected organization and in any organizations beneath it in the hierarchy. The scope of his control is further defined by his assigned capabilities. You must make a selection in this area.
- Capabilities — Select one or more capabilities this administrator will have within the organizations he controls. For more information and descriptions of Identity Manager capabilities, read Chapter 4, "Configuration".
- User Form — Select the user form that this administrator will use when creating and editing Identity Manager users (if that capability is assigned). If you do not directly assign a user form, the administrator will inherit the user form assigned to the organization he belongs to. The form selected here supersedes any form selected within this administrator's organization.
- Forward Approval Requests To — Select a user to forward all current pending approval requests to that user. This administrator setting also can be set from the Approvals page.
- Delegate Work Items To — If available, use this option to specify delegation for the user account. You can specify your IDMManager, one or more selected users, or use a delegate approvers rule.
Filtering Administrator Views
By assigning user forms to organizations and administrators, you establish specific administrator views of user information. Access to user information is set at two levels:
- Organization — When you create an organization, you assign the user form that all administrators in that organization will use when creating and editing Identity Manager users. Any form set at the administrator level overrides the form set here. If no form is selected for the administrator or the organization, Identity Manager inherits the form selected for the parent organization. If no form is set there, Identity Manager uses the default form set in the system configuration.
- Administrator — When you assign a user administrative capabilities, you can directly assign a user form to the administrator. If you do not assign a form, the administrator inherits the form assigned to his organization (or the default form set in the system configuration if no form is set for the organization).
Chapter 4, "Configuration," describes built-in Identity Manager capabilities that you can assign.
Changing Administrator Passwords
Administrator passwords may be changed by an administrator with administrative password change capabilities assigned, or by the administrator-owner.
Administrators can change another administrator’s password through:
An administrator can change his own password from the Passwords area. Select Passwords, and then select Change My Password to access self-service password fields.
Challenging Administrator Actions
You can set an option to require that an administrator be challenged for his Identity Manager login password before processing certain account changes. If the password fails, then the account action does not succeed.
Identity Manager pages that support this option are:
Set these options as described in the following sections:
Edit User Challenge Option
Set this option in the account/modify.jsp page as follows:
requestState.setOption(UserViewConstants.OP_REQUIRES_CHALLENGE, "email, fullname, password");
where the value of the option is a comma-delimited list of one or more of these user view attribute names:
Change User Password and Reset User Password Challenge Option
Set this option in the admin/changeUserPassword.jsp and admin/resetUserPassword pages as follows:
requestState.setOption(UserViewConstants.OP_REQUIRES_CHALLENGE, "true");
where the value of the option can be true or false.
Changing Answers to Authentication Questions
Use the Passwords area to change the answers you have set for account authentication questions. From the menu bar, select Passwords, and then select Change My Answers.
For more information about authentication, see User Authentication.
Customizing Administrator Name Display in the Administrator Interface
You can display an Identity Manager administrator by attribute (such as email or fullname) rather than accountId in some Identity Manager Administrator interface pages and areas, such as the following areas:
To configure Identity Manager to use a display name, add to the UserUIConfig object:
<AdminDisplayAttribute>
<String>attribute_name</String>
</AdminDisplayAttribute>For example, to use the email attribute as the display name, add the following attribute name to UserUIconfig:
<AdminDisplayAttribute>
<String>email</String>
</AdminDisplayAttribute>
Understanding Identity Manager OrganizationsOrganizations allow you to:
By creating organizations and assigning users to various locations in an organizational hierarchy, you set the stage for delegated administration. Organizations that contain one or more other organizations are called parent organizations.
All Identity Manager users (including administrators) are statically assigned to one organization. Users also can be dynamically assigned to additional organizations.
Identity Manager administrators are additionally assigned to control organizations.
Creating OrganizationsCreate organizations in the Identity Manager Accounts area. To create an organization, use the following steps:
- From the menu bar, select Accounts.
- Select New Organization from the New Actions list on the Accounts page.
Figure 5-2 illustrates the Create Organization page.
Figure 5-2 Create Organization Page
Assigning Users to Organizations
Each user is a static member of one organization, and can be a dynamic member of more than one organization. Organizational membership is determined by:
- Direct (static) assignment — Assign users directly to an organization from the Create or Edit User page. (Select the Identity form tab to display the Organizations field.) A user must be directly assigned to one organization.
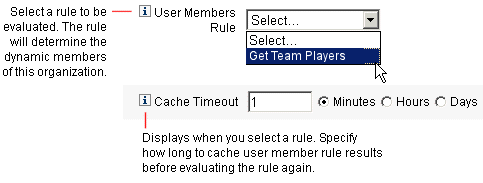
- Rule-driven (dynamic) assignment — Dynamically assign users to an organization by assigning a rule to the organization that, when evaluated, returns a set of member users. Identity Manager will evaluate the user member rule when:
Select a user members rule from the User Members Rule field on the Create Organization page. Figure 5-3 shows an example of a user member rule.
Figure 5-3 Create Organization: User Members Rule Selections
The following example shows how you might set up a user members rule that can dynamically control an organization’s user membership.
Note
For information about creating and working with rules in Identity Manager, see Identity Manager Deployment Tools.
Key Definitions and Inclusions
- For a rule to appear in the User Member Rule option box, its authType must be set as authType=’UserMembersRule’.
- The context is the currently authenticated Identity Manager user's session.
- The defined variable (defvar) Team players gets the distinguished name (dn) for each user that is a member of the Windows Active Directory organization unit (ou) Pro Ball Team.
- For each user found, the append logic will concatenate the dn of each member user of the Pro Ball Team ou with the name of the Identity Manager Resource prefixed by a colon (as in :smith-AD).
- The results returned will be a list of dn’s concatenated with the Identity Manager resource name in the format dn:smith-AD.
The following is an example of the syntax for a sample user member rule.
Assigning Organization Control
Assign administrative control of one or more organizations from the Create or Edit User page. Select the Security form tab to display the Controlled Organizations field.
You can also assign administrative control of organizations by assigning one or more admin roles, from the Admin Roles field.
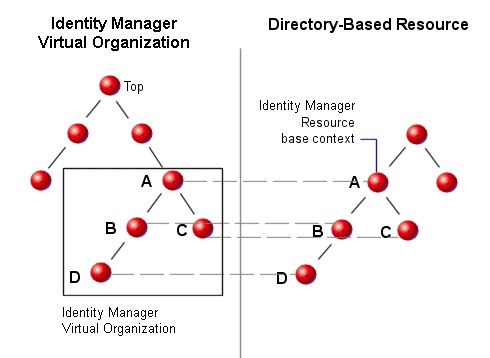
Understanding Directory Junctions and Virtual OrganizationsA directory junction is a hierarchically related set of organizations that mirrors a directory resource’s actual set of hierarchical containers. A directory resource is one that employs a hierarchical namespace through the use of hierarchical containers. Examples of directory resources include LDAP servers and Windows Active Directory resources.
Each organization in a directory junction is a virtual organization. The top-most virtual organization in a directory junction is a mirror of the container representing the base context defined in the resource. The remaining virtual organizations in a directory junction are direct or indirect children of the top virtual organization, and also mirror one of the directory resource containers that are children of the defined resource’s base context container. This structure is illustrated in Figure 5-4.
Figure 5-4 Identity Manager Virtual Organization
Directory junctions can be spliced into the existing Identity Manager organizational structure at any point. However, directory junctions cannot be spliced within or below an existing directory junction.
Once you have added a directory junction to the Identity Manager organizational tree, you can create or delete virtual organizations in the context of that directory junction. In addition, you can refresh the set of virtual organizations comprising a directory junction at any time to ensure they stay synchronized with the directory resource containers. You cannot create a non-virtual organization within a directory junction.
You can make Identity Manager objects (such as users, resource, and roles) members of, and available to, a virtual organization in the same way as an Identity Manager organization.
Setting Up Directory Junctions
You set up directory junctions from the Identity Manager Accounts area:
- From the Identity Manager menu bar, select Accounts.
- Select an Identity Manager organization in the Accounts list, and then select New Directory Junction from the New Actions list.
The organization you select will be the parent organization of the virtual organization you set up.
Identity Manager displays the Create Directory Junction page.
- Make selections to set up the virtual organization:
- Parent organization — This field contains the organization you selected from the Accounts list; you can, however, select a different parent organization from the list.
- Directory resource — Select the directory resource that manages the existing directory whose structure you want to mirror in the virtual organization.
- User form — Select a user form that will apply to administrators in this organization.
- Identity Manager account policy — Select a policy, or select the default option (inherited) to inherit the policy from the parent organization.
- Approvers — Select administrators who can approve requests related to this organization.
Refreshing Virtual Organizations
This process refreshes and re-synchronizes the virtual organization with the associated directory resource, from the selected organization down. Select the virtual organization in the list, and then select Refresh Organization from the Organization Actions list.
Deleting Virtual Organizations
When deleting virtual organizations, you can select from two delete options:
Select an option, and then click Delete.
Understanding and Managing CapabilitiesCapabilities are groups of rights in the Identity Manager system. Capabilities represent administrative job responsibilities, such as resetting passwords or administering user accounts. Each Identity Manager administrative user is assigned one or more capabilities, which provide a set of privileges without compromising data protection.
Not all Identity Manager users need capabilities assigned; only those who will perform one or more administrative actions through Identity Manager. For example, an assigned capability is not needed to enable a user to change his password, but an assigned capability is required to change another user’s password.
Your assigned capabilities govern which areas of the Identity Manager Administrator Interface you can access. All Identity Manager administrative users can access certain areas of Identity Manager, including:
Capabilities Categories
Identity Manager defines Capabilities as:
Built-in capabilities (those provided with the Identity Manager system) are protected, meaning that you cannot edit them. You can, however, use them within capabilities that you create.
Protected (built-in) capabilities are indicated in the list with a red key (or red key and folder) icon. Capabilities that you create and can edit are indicated in the capabilities list with a green key (or green key and folder) icon.
Working with Capabilities
Create a Capability
To create a capability, click New. Name the new capability and then select the capabilities, assigners, and organizations to which this capability will be available. You must select at least one organization.
Note
The set of users from which you can make assigner selections are those who have been assigned the Assign Capability right.
Edit a Capability
To edit a non-protected capability, right-click it in the list, and then select Edit.
You cannot edit built-in capabilities; however, you can save them with a different name to create your own capability, or use them in capabilities that you create.
Save and Rename a Capability
To clone a capability (save it with a different name to create a new capability):
You can edit the new capability, even if the copied capability is protected.
Assigning Capabilities
Assign capabilities to a user from the Create and Edit User page. You can also assign capabilities to a user by assigning an administrator role, which you set up through the Security area in the interface. See Understanding and Managing Admin Roles for more information.
Capabilities Hierarchy
Task-based capabilities fall within the following functional capabilities hierarchy:
Account Administrator
Admin Role Administrator
Auditor Administrator
Auditor Report Administrator
- Access Review Detail Report Administrator
- Access Review Summary Report Administrator
- Audit Policy Scan Report Administrator
- Audited Attribute Report Administrator
- AuditPolicy Violation History Administrator
- Organization Violation History Administrator
- Policy Summary Report Administrator
- Resource Violation History Administrator
- Run Auditor Report
- Separation of Duties Report Administrator
- User Access Report Administrator
- Violation Summary Report Administrator
Bulk Account Administrator
Bulk Change Account Administrator
Bulk Resource Password Administrator
Capability Administrator
Change Account Administrator
Configure Certificates
Import/Export Administrator
License Administrator
Login Administrator
Meta View Administrator
Organization Administrator
Password Administrator (Verification Required)
Policy Administrator
Reconcile Administrator
Remedy Integration Administrator
Report Administrator
Resource Administrator
Resource Object Administrator
Resource Password Administrator
Role Administrator
Security Administrator
Service Provider Administrator
Service Provider Admin Role Administrator
User Account Administrator
View Organizations
View Resources
Waveset Administrator
Capabilities Definitions
Table 5-1 describes each of the task-based capabilities and highlights the tabs and subtabs accessible with each capability. The capabilities are listed in alphabetical order by name.
All capabilities grant the user or administrator access to the Passwords > Change My Password and Change My Answers tabs.
Table 5-1 Identity Manager Capabilities Descriptions
Capability
Allows the Administrator/User to:
Can Access These Tabs and Subtabs:
Access Review Detail Report Administrator
Create, edit, delete, and execute Access Review Detail Reports
Reports > Run Reports tab, View Reports tab- Access Review Detail Reports only
Reports > View Dashboards
Access Review Summary Report Administrator
Create, edit, delete, and execute Access Review Summary Reports
Reports - Access Review Summary Reports only
Reports > View Dashboards
Account Administrator
Perform all operations on users, including assigning capabilities. Does not include bulk operations.
Accounts - List Accounts, Find Users, Extract to File, Load from File, Load from Resource tabs
Passwords - All subtabs
Work Items - Approvals subtab
Tasks - All subtabs
Admin Report Administrator
Create, edit, delete, and run administrator reports.
Reports - Manage Reports, Run Reports subtabs (Administrator report only)
Admin Role Administrator
Create, edit, and delete admin roles.
Security - Admin Roles subtab
Approver Administrator
Approve or reject requests initiated by other users.
Default only
Assign Audit Policies
Assign audit policies to user accounts and organizations.
Accounts - Edit User Audit Policy from the User Actions list.
Accounts - Edit Organization Audit Policy from the Organization Actions list.
Assign Organization Audit Policies
Assign audit policies to organizations only.
Accounts - Edit Organization Audit Policy from the Organization Actions list; List Accounts tab
Assign User Audit Policies
Assign audit policies to users only.
Accounts - Edit User Audit Policy from the User Actions list; List Accounts tab; Find Users tab
Assign User Capabilities
Change user capabilities assignments (assign and unassign).
Accounts - List Accounts (Edit only), Find Users subtabs.
Must be assigned with another user administrator capability (for example, Create User or Enable User).
Audit Policy Administrator
Create, modify, and delete audit policies.
Compliance - Manage Policies
Audit Policy Scan Report Administrator
Create, modify, delete, and execute the Audit Policy Scan Report.
Reports - Audit Policy Scan reports only
Audit Report Administrator
Create, modify, delete, and execute audit reports.
Reports - Audit report only
Audited Attribute Report Administrator
Create, modify, delete, and execute the Audited Attribute Report.
Reports - Audited Attribute reports only
AuditLog Report Administrator
Create, modify, delete, and execute the AuditLog Report.
Reports - AuditLog reports only
Auditor Access Scan Administrator
Create, edit, and delete Periodic Access Review scans
Compliance - Manage Access Scans
Auditor Administrator
Set up, manage, and monitor audit policies, audit scans and user compliance.
Compliance - All subtabs
Reports - Run Reports, View Reports, and manage Auditor Reports
Accounts - Edit User Audit Policies and Edit Organization Audit Policies actions.
Auditor Attestor
Required to attest other users’ attestations while organization security is enabled.
Default only
Auditor Periodic Access Review Administrator
Manage Periodic Access Reviews (PAR), manage access scans, manage attestations, manage PAR reports.
Compliance - Manage Access Scans, Access Review subtabs
Auditor Remediator
Remediate, mitigate, and forward audit policy violations.
Remediations - All subtabs
Auditor Report Administrator
Create, modify, delete, and execute any of the Auditor Reports.
Reports - all actions on auditor reports
Auditor View User
View compliance information associated with user.
Accounts - List Accounts, Find Users tabs
AuditPolicy Violation History Administrator
Create. modify, delete, and execute the AuditPolicy Violation History report.
Reports - AuditPolicy Violation History reports only
Bulk Account Administrator
Perform regular and bulk operations on users, including assigning capabilities.
Accounts - All subtabs
Passwords - All subtabs
Approvals - All subtabs
Tasks - All subtabs
Bulk Change Account Administrator
Perform regular and bulk operations except delete on existing users, including assigning capabilities.
Accounts - List Accounts, Find Users, Launch Bulk Actions subtabs. Cannot create or delete users.
Passwords - All subtabs
Approvals - All subtabs
Tasks - All subtabs
Bulk Change User Account Administrator
Perform regular and bulk operations except delete on existing users.
Accounts - List Accounts, Find Users, Launch Bulk Actions subtabs. Cannot create, delete, or assign capabilities to users.
Passwords - All subtabs
Tasks - All subtabs
Bulk Create User
Assign resources and initiate user create requests (on individual users and by using bulk operations).
Accounts - List Accounts (Create only), Find Users, Launch Bulk Actions subtabs
Tasks - All subtabs
Bulk Delete User
Delete Identity Manager user accounts; deprovision, unassign, and unlink resource accounts (on individual users and by using bulk operations).
Accounts - List Accounts (Create only), Find Users, Launch Bulk Actions subtabs
Tasks - All subtabs
Bulk Delete IDM User
Delete existing Identity Manager user accounts (on individual users and by using bulk operations).
Accounts - List Accounts (Delete only), Find Users, Launch Bulk Actions subtabs
Tasks - All subtabs
Bulk Deprovision User
Delete and unlink existing resource accounts (on individual users and by using bulk operations).
Accounts - List Accounts (Deprovision only), Find Users, Launch Bulk Actions subtabs
Tasks - All subtabs
Bulk Disable User
Disable existing users and resource accounts (on individual users and by using bulk operations).
Accounts - List Accounts (Disable only), Find Users, Launch Bulk Actions subtabs
Tasks - All subtabs
Bulk Enable User
Enable existing users and resource accounts (on individual users and by using bulk operations).
Accounts - List Accounts (Enable only), Find Users, Launch Bulk Actions subtabs
Tasks - All subtabs
Bulk Unassign User
Unassign and unlink existing resource accounts (on individual users and by using bulk operations).
Accounts - List Accounts (Unassign only), Find Users, Launch Bulk Actions subtabs
Tasks - All subtabs
Bulk Unlink User
Unlink existing resource accounts (on individual users and by using bulk operations).
Accounts - List Accounts (Unlink only), Find Users, Launch Bulk Actions subtabs
Tasks - All subtabs
Bulk Update User
Update existing users and resource accounts (on individual users and by using bulk operations).
Accounts - List Accounts (Update only), Find Users, Launch Bulk Actions subtabs
Tasks - All subtabs
Bulk User Account Administrator
Perform all regular and bulk operations on users.
Accounts - All subtabs
Passwords - All subtabs
Tasks - All subtabs
Capability Administrator
Create, modify, and delete capabilities.
Configure - Capabilities subtab
Change Account Administrator
Perform all operations except delete on existing users, including assigning capabilities. Does not include bulk operations
Accounts - All subtabs. Cannot delete users.
Passwords - All subtabs
Approvals - All subtabs
Tasks - All subtabs
Reports - Create admin and user reports, run and edit admin reports, run auditlog reports in scope. Cannot run admin and user reports on out-of-scope organizations.
Change Active Sync Resource Administrator
Change active sync resource parameters.
Tasks - Find Tasks, All Tasks, Run Tasks subtabs
Resources - For Active Sync resources: Edit actions menu, Edit Active Sync Parameters
Change Password Administrator
Change user and resource account passwords.
Accounts - List Accounts, Find Users subtabs (Change Password only)
Passwords - All subtabs
Tasks - All subtabs. Export Password Scan task only (from Run Tasks subtab)
Change Password Administrator (Verification Required)
Change user and resource account passwords following successful validation of the user's authentication question answers.
Accounts - List Accounts, Find Users subtabs (Change Password only; verification required before action)
Passwords - All subtabs
Tasks - All subtabs. Export Password Scan task only (from Run Tasks subtab)
Change Resource Password Administrator
Change resource administrator account passwords.
Tasks - All subtabs
Resources - List Resources subtab. Change resource password only (from Manage Connection-->Change Password in the actions menu)
Change User Account Administrator
Perform all operations except delete on existing users. Does not include bulk operations
Accounts - List Accounts, Find Users subtabs. Cannot create, delete, or assign capabilities to users.
Passwords - All subtabs
Tasks - All subtabs
Configure Audit
Configure the events and configuration groups audited in the system.
Configure - Audit Events subtab
Configure Certificates
Configure trusted certificates and CRLs.
Security - Certificates subtab
Control Active Sync Resource Administrator
Control Active Sync resource state (such as start, stop, and refresh)
Tasks - Find Tasks, All Tasks, Run Tasks
Resources - For Active Sync resources: Active Sync actions menu (all selections)
Create User
Assign resources and initiate user create requests. Does not include bulk operations
Accounts - List Accounts (Create only), Find Users subtabs
Tasks - All subtabs
Delete User
Delete Identity Manager user accounts; deprovision, unassign, and unlink resource accounts. Does not include bulk operations.
Accounts - List Accounts (Delete only), Find Users subtabs
Tasks - All subtabs
Delete IDM User
Delete Identity Manager user accounts. Does not include bulk operations.
Accounts - List Accounts (Delete only), Find Users subtabs
Tasks - All subtabs
Deprovision User
Delete and unlink existing resource accounts. Does not include bulk operations.
Accounts - List Accounts (Deprovision only), Find Users subtabs
Tasks - All subtabs
Disable User
Disable existing users and resource accounts. Does not include bulk operations
Accounts - List Accounts (Disable only), Find Users subtabs
Tasks - All subtabs
Enable User
Enable existing users and resource accounts. Does not include bulk operations
Accounts - List Accounts (Enable only), Find Users subtabs
Tasks - All subtabs
Import User
Import users from defined resources.
Accounts - Extract to File, Load from File, Load from Resource subtabs
Import/Export Administrator
Import and export all types of objects.
Configure - Import Exchange File subtab
License Administrator
Set the Identity system product license
Provides lh license command access. (No Administrator Interface tabs provided by this capability.)
Login Administrator
Edit the set of login modules for a given login interface.
Configure - Login subtab
Meta View Administrator
Modify the Identity Attributes configuration
Meta View - Identity Attributes tab
Organization Administrator
Create, edit, and delete organizations.
Accounts - List Accounts subtab (Edit and create organizations and directory junctions, delete organizations only)
Organization Approver
Approve requests for new organizations.
Work Items - Approvals subtab
Organization Violation History Administrator
Create. modify, delete, and execute the Organization Violation History report.
Reports - Organization Violation History reports only
Password Administrator
Change and reset user and resource account passwords.
Accounts - List Accounts (list, change, and reset passwords only), Find Users subtabs
Passwords - All subtabs
Tasks - All subtabs
Password Administrator (Verification Required)
Change and reset user and resource account passwords following successful validation of the user's authentication question answers.
Accounts - List Accounts (list, change, and reset passwords only; verification required before action succeeds), Find Users subtabs
Passwords - All subtabs
Tasks - All subtabs
Policy Administrator
Create, edit, and delete Policies.
Configure - Policy subtab
Policy Summary Report Administrator
Create, modify, delete, and execute the Policy Summary Report.
Reports - Policy Summary reports only
Reconcile Administrator
Edit reconciliation policies and control reconciliation tasks.
Server Tasks - All subtabs (View reconcile task).
Resources - List Resources subtab
Reconcile Report Administrator
Create, edit, delete, and run reconciliation reports.
Reports - Run Reports (Account Index report only), Manage Reports subtabs
Reconcile Request Administrator
Manage reconciliation requests.
Tasks - All subtabs
Resources - List Resources subtab (list and reconciliation features only)
Remedy Integration Administrator
Modify Remedy integration configuration.
Tasks - All subtabs (view tasks, run role synchronization)
Configure - Remedy Integration subtab
Rename User
Rename existing users and resource accounts.
Accounts - List Accounts subtab (list all accounts in scope, rename users)
Report Administrator
Configure audit settings and run all report types.
Tasks - All subtabs (view tasks, run role synchronization)
Reports - All subtabs
Reset Password Administrator
Reset user and resource account passwords.
Accounts - List Accounts, Find Users subtabs (Reset Password only)
Passwords - All subtabs
Tasks - All subtabs. Export Password Scan task only (from Run Tasks subtab)
Reset Password Administrator (Verification Required)
Reset user and resource account passwords following successful validation of the user's authentication question answers.
Accounts - List Accounts, Find Users subtabs (Reset Password only; verification required before action succeeds)
Passwords - All subtabs
Tasks - All subtabs. Export Password Scan task only (from Run Tasks subtab)
Reset Resource Password Administrator
Reset resource administrator account passwords.
Tasks - Find Tasks, All Tasks, Run Tasks subtabs
Resources - List Resources subtab. Reset resource password only (from Manage Connection
-->Reset Password in the actions menu)Resource Administrator
Create, modify, and delete resources.
Reports - Resource user report, resource group report returns error on out-of-scope resources.
Resources - List Resources subtab (edit global policy, edit parameters, resource groups. Cannot manage connection or resource objects).
Resource Group Administrator
Create, edit, and delete resource groups.
Resources - List Resource Groups subtab
Resource Object Administrator
Create, modify, and delete resource objects.
Tasks - Find Tasks, All Tasks, Run Tasks subtabs (view tasks involving resource objects).
Resources - List Resources subtab (list and manage resource objects only)
Resource Password Administrator
Change and reset resource proxy account passwords.
Tasks - Find Tasks, All Tasks, Run Tasks subtabs
Resources - List Resources subtab. Change resource password only (from Manage Connection-->Change Password in the actions menu)
Resource Report Administrator
Create, edit, delete, and run resource reports.
Reports - All subtabs (resource reports only)
Resource Violation History Administrator
Create. modify, delete, and execute the Resource Violation History report.
Reports - Resource Violation History reports only
Risk Analysis Administrator
Create, edit, delete, and run risk analysis.
Risk Analysis - All subtabs
Role Administrator
Create, modify, and delete roles.
Tasks - Find Tasks, All Tasks, Run Tasks subtabs (synchronize roles)
Roles - All subtabs
Role Report Administrator
Create, edit, delete, and run resource reports.
Reports - Role reports only
Run Access Review Detail Report
Run the Access Review Detail Report
Reports - Access Review Detail Report only
Run Access Review Summary Report
Run the Access Review Summary Report
Reports - Access Review Summary Report only
Run Admin Report
Run administrator reports.
Reports - Admin reports only
Run Audit Policy Scan Administrator
Run and manage the Audit Policy Scan Report
Reports - Audit Policy Scan report only
Run Audit Policy Scan Report
Run the Audit Policy Scan Report.
Reports - Audit Policy Scan reports only
Run Audit Report
Run audit reports.
Reports - AuditLog and Usage reports only
Run Audited Attribute Report
Execute the Audited Attribute Report.
Reports - Audited Attribute reports only
Reports > View Dashboards
Run Auditor Report
Run any Auditor Report.
Reports - any auditor report
Reports > View Dashboards
Run AuditLog Report
Execute the AuditLog Report.
Reports - AuditLog reports only
Run AuditPolicy Violation History
Execute the Organization Violation History report.
Reports - AuditPolicy Violation History reports only
Reports > View Dashboards
Run Policy Summary Report
Execute the Policy Summary Report.
Reports - Policy Summary reports only
Run Organization Violation History
Execute the Organization Violation History report.
Reports - Organization Violation History reports only
Reports > View Dashboards
Run Reconcile Report
Run reconciliation reports.
Reports - AuditLog and Usage reports only
Run Resource Report
Run resource reports.
Reports - AuditLog and Usage reports only
Run Resource Violation History
Execute the Resource Violation History report.
Reports - Resource Violation History reports only
Run Risk Analysis
Run risk analysis.
Reports - Run Risk Analysis, View Risk Analysis subtabs
Run Role Report
Run role reports.
Reports - Role reports only
Run Task Report
Run task reports.
Reports - Task reports only
Run User Access Report
Execute the Detailed User Report.
Reports - User Access reports only
Reports > View Dashboards
Run User Report
Run user reports.
Reports - User reports only
Run Violation Summary Report
Execute the Violation Summary report.
Reports - Violation Summary reports only
Reports > View Dashboards
Security Administrator
Create users with capabilities; manage encryption keys, login configuration, and policies.
Accounts - List Accounts (delete, create, update, edit, change and edit passwords), Find Users subtabs (audit report)
Passwords - All subtabs
Tasks - Find Tasks, All Tasks, Run Tasks subtabs
Reports - All subtabs
Resources - List Resources (list and control resource objects)
Security - Policies, Login subtabs
Separation of Duties Report Administrator
Create, edit, run, and delete a Separation of Duties Report.
Reports - all actions for Separation of Duties Report only
Run Separation of Duties Report
Run a Separation of Duties Report
Reports - Separation of Duties Report only
Reports > View Dashboards
Service Provider Admin Role
Manage Service Provider Admin Roles and the associated rules.
Security - Admin Roles tab
Service Provider Administrator
Create, edit, and manage service provider users and transactions; configure the transaction database and tracked events.
Accounts - Manage Service Provider Users subtab
Server Tasks > Service Provider Transactions tab
Reports > View Dashboards tab
Reports > Dashboard Configuration tab
Service Provider - all subtabs
Service Provider Create User
Create user accounts for service provider (extranet) users.
Accounts - Manage Service Provider Users subtab
Service Provider Delete User
Delete a service provider user account.
Accounts - Manage Service Provider Users subtab
Service Provider Update User
Update a service provider user account.
Accounts - Manage Service Provider Users subtab
Service Provider User Administrator
Manage service provider (extranet) users.
Accounts > Manage Service Provider Users - all subtabs
Service Provider View User
View service provider (extranet) user account information.
Accounts - Manage Service Provider Users subtab
SPML Access
Allows access to the Service Provisioning Markup Language (SPML) features in Identity Manager.
Security - Capabilities subtab
Task Report Administrator
Create, edit, delete, and run task reports.
Reports - Task Report only.
Unassign User
Unassign and unlink existing resource accounts. Does not include bulk operations.
Accounts - List Accounts (Unassign only), Find Users subtabs
Tasks - All subtabs
Unlink User
Unlink existing resource accounts. Does not include bulk operations.
Accounts - List Accounts (Unlink only), Find Users subtabs
Tasks - All subtabs
Unlock User
Unlock existing user’s resource accounts that support unlock. Does not include bulk operations.
Accounts - List Accounts (Unlock only), Find Users subtabs
Tasks - Find Tasks, All Tasks, Run Tasks subtabs
Update User
Edit existing users and initiate user update requests.
Accounts - Edit and update users
Tasks - Manage existing tasks (from the All Tasks subtab)
User Access Report Administrator
Create, run, edit, and delete a User Access Report
Reports - User Access Report only
Reports > View Dashboards
User Account Administrator
All operations on users.
Accounts - List Accounts, Find Users, Extract to File, Load from File, Load from Resource subtabs. Cannot assign user capabilities (Security form tab on List Accounts subtab).
Tasks - Find Tasks, All Tasks, Run Tasks subtabs
User Report Administrator
Create, edit, delete, and run user reports.
Reports - Run user reports.
View User
View individual user details.
Accounts - Select users from the list to view individual user account information. No change actions allowed.
Violation Summary Report Administrator
Create. modify, delete, and execute the Violation Summary report.
Reports - Violation Summary reports only
Reports > View Dashboards
Waveset Administrator
Perform system-wide tasks, such as modification of system configuration objects.
Server Tasks - All subtabs. Synchronize roles, edit source adapter template, and schedule reports
Reports - All subtabs
Resources - List Resources (list only; no change actions allowed)
Configure - Audit, Email Templates, Form and Process Mappings, and Servers subtabs
Understanding and Managing Admin RolesAdmin Roles enable the assignment of a unique set of capabilities and scope of control, or managed organizations, to one or more administrators. A single administrator can be assigned more than one admin role. This enables an administrator to have one set of capabilities in one scope of control and a different set of capabilities in another scope of control.
For example, one admin role might grant the administrator the right to create and edit users that are members of the controlled organizations specified in the admin role. Another admin role assigned to the same administrator might grant only the right to change users’ passwords in the controlled organizations specified by that admin role.
It is recommended that admin roles be used to grant administrator privileges instead of directly assigning capabilities and controlled organizations to users. Admin roles enable reuse of capabilities and scope or control pairings as well as simplify the management of administrator privileges across a large number of users.
The assignment of capabilities or organizations (or both) to an admin role can be either direct of indirect (dynamic):
- Direct — Using this method, capabilities and/or controlled organizations are explicitly assigned to the admin role. For example, an admin role might have the User Report Administrator capability and Top as the controlled organization assigned.
- Dynamic (indirect) — This method uses the assignment of capabilities and controlled organizations rules.The rules are evaluated each time an administrator assigned the admin role logs in to dynamically determine the explicit set of capabilities and/or controlled organizations based on the authenticating administrator.
For example, when a user logs in:
- If his Active Directory (AD) user title is manager, then the capabilities rule might return Account Administrator as the capability to be assigned.
- If his Active Directory (AD) user department is marketing, then the controlled organizations rule might return Marketing as the controlled organization to be assigned.
Assigning admin roles to administrators can be either direct or indirect (dynamic):
- Direct — Explicitly assign the admin role to an administrator (user account).
- Indirect (dynamic) — Use an admin role rule to assign the admin role. Identity Manager evaluates the rule each time an administrator logs in to determine if the admin role is to be assigned to the authenticating administrator.
For example, a rule might return true when a user logs in and his Active Directory (AD) user city is Austin and state is Texas. Therefore, the admin role is assigned.
Note
The dynamic assignment of admin roles to users can be enabled or disabled for each login interface (for example, the User interface or Administrator interface) by setting the system configuration attribute to security.authz.checkDynamicallyAssignedAdminRolesAtLoginTo.logininterface to true or false. The default for all interfaces is false.
Admin Role Rules
Identity Manager provides sample rules that you can use to create the rules for Admin Roles. These rules are available in the Identity Manager installation directory in sample/adminRoleRules.xml. Table 5-2 provides the rule names and the authType you must specify for the rule.
Table 5-2 Admin Role Sample Rules
Rule Name
authType
Controlled Organizations Rule
ControlledOrganizationsRule
Capabilities Rule
CapabilitiesRule
User Is Assigned Admin Role Rule
UserIsAssignedAdminRoleRule
Note
For information about the sample rules provided for service provider users admin roles, see Delegated Administration in the Service Provider Administration chapter.
The User Admin Role
Identity Manager includes a built-in admin role, named User Admin Role. By default, it has no assigned capabilities or controlled organization assignments. It cannot be deleted. This admin role is implicitly assigned to all users (end-users and administrators) at login time, regardless of the interface they log in to (for example, user, administrator, console or IDE).
Note
For information about creating an admin role for service provider users, see Delegated Administration in the Service Provider Administration chapter.
You can edit the User Admin Role through the Administrator interface (select Security, and then select Admin Roles).
Because any capabilities or controlled organizations that are statically assigned through this admin role are assigned to all users, it is recommended that the assignment of capabilities and controlled organizations be done through rules. This will enable different users to have different (or no) capabilities, and assignments will be scoped depending on factors such as who they are, which department they are in, or whether they are managers, which can be queried for within the context of the rules.
The User Admin Role does not deprecate or replace the use of the authorized=true flag used in workflows. This flag is still appropriate in cases where the user should not have access to objects accessed by the workflow, except when the workflow is executing. Essentially, this lets the user enter a run as superuser mode.
However, in cases where a user should have specific access to one or more objects outside of and potentially inside of workflows, then dynamic assignment of capabilities and controlled organizations via the User Admin Role enables dynamic, fine-grain authorization to those objects.
Creating and Editing Admin Roles
To create or edit an admin role, you must be assigned the Admin Role Administrator capability.
To access admin roles in the Administrator interface, click Security, and then click the Admin Roles tab. The Admin Roles list page allows you to create, edit, and delete admin roles for Identity Manager users and for service provider users.
To edit an existing admin role, click a name in the list. Click New to create an admin role. Identity Manager displays the Create Admin Role options (illustrated in Figure 5-5). The Create Admin Role view presents four tabs that you use to specify the general attributes, capabilities, and scope of the new admin role, as well as assignments of the role to users.
Figure 5-5 Admin Role Create Page: General Tab
:
General Tab
Use the General tab of the create admin role or edit admin role view to specify the following basic characteristics of the admin role:
Select Identity Objects if you are creating an admin role for Identity Manager users (or objects). Select Service Provider Users if you are creating the admin role to grant access to service provider users.
Note
For information about creating an admin role to grant access to service provider users, see Delegated Administration in the Service Provider Administration chapter.
If no users are selected, the only user who will be able to assign the admin role is the one that created it. If the user who created the admin role does not have the Assign User Capabilities capability assigned, then select one or more users as Assigners to ensure that at least one user can assign the admin role to another user.
Scope of Control
Use this tab (shown in Figure 5-6) to specify organizations that members of this organization can manage, or to specify the rule that determines the organizations to be managed by users of the admin role, and to select the user form for the admin role.
Figure 5-6 Create Admin Role: Scope of Control
- Controlled Organizations — Select from the Available Organizations list the organizations that this admin role has the rights to manage.
- Controlled Organizations Rule — Select a rule that will be evaluated, at user login, to zero or more organizations to be controlled by a user assigned this admin role. The selected rule must have the ControlledOrganizationsRule authType. By default, no controlled organization rule is selected.
- Controlled Organizations User Form — Select a user form that a user who is assigned this admin role will use when he creates or edits users who are members of this admin role’s controlled organizations. By default, no Controlled Organizations User Form is selected.
Assigning Capabilities
Capabilities assigned to the admin role determine what administrative rights users assigned the admin role have. For example, this admin role might be restricted to creating users only for the controlled organizations of the admin role. In that case, you assign the Create User capability.
On the Capabilities tab, select the following options:
- Capabilities — These are specific capabilities (administrative rights) that the users of the admin role will have for their controlled organizations. Select one or more capabilities from the list of available capabilities and move them to the Assigned Capabilities list.
- Capabilities Rule — Select a rule that when evaluated at user login, will determine the list of zero or more capabilities granted to users assigned the admin role. The selected rule must have the CapabilitiesRule authType.
Assigning User Forms to an Admin Role
You can specify a user form to for the members of an admin role. Use the Assign To Users tab on the create admin role or edit admin role view to specify the assignments.
The administrator assigned the admin role will use this user form when he creates or edits users in the organizations controlled by that admin role. A user form assigned through an admin role overrides any user form that is inherited from the organization of which the admin is a member. It does not override a user form that is directly assigned to the admin.
The user form that will be used when editing a user is determined in this order of precedence:
- If no user form is assigned directly to the admin, or assigned indirectly through an admin role, then the user form assigned to the admin’s member organizations (starting with the admin’s member organization and going up to just below Top) is used.
- If none of the admin’s member organizations are assigned a user form, then the default user form is used.
If an admin is assigned more than one admin role that controls the same organization but specifies different user forms, then an error is displayed when he attempts to create or edit a user in that organization. If an admin attempts to assign two or more admin roles that control the same organization but specify different user forms, then an error is displayed. Changes cannot be saved until the conflict is resolved.
Managing Work ItemsSome workflow processes generated by tasks in Identity Manager create action items or work items. These work items might be a request for approval or some other action request assigned to an Identity Manager account.
Identity Manager groups all work items in the Work Items area of the interface, enabling you to view and respond to all pending requests from one location.
Work Item Types
A work item might be one of the following types:
- Approvals — Requests for approvals of new accounts or changes to accounts.
- Attestations — Requests to review and approve user entitlements.
- Remediations — Requests to remediate or mitigate user account policy violations.
- Other — Action item request for other than one of the standard types. This might be an action request generated from a customized workflow.
To view pending work items for each work item type, click the Work Items tab in the menu bar. You can access your work items to manage requests from this tab or you can select one of the work item types to list requests for that type.
Note
If you are a work item owner with pending work items (or delegated work items), then your Work Items list is displayed when you log into the Identity Manager User interface.
Working With Work Item Requests
To respond to a work item request, click one of the work item types in the Work Items area of the interface. Select items from the list of requests and then click one of the buttons available to indicate the action you want to take. The work item options vary depending on the work item type.
For more information about responding to requests, see the following topics:
Viewing Work Item History
Use the History tab in the Work Items area to view the results of previous work item actions. Figure 5-7 displays a sample view of Work Item history.
Figure 5-7 Work Items History View
Delegating Work Items
Work item owners can manage work loads by delegating work items to other users for a specified period of time. You can use the Work Items > Delegate My Work Items page to delegate future work items (such as requests for approval) to one or more users (delegates). Users do not need approver capabilities to be delegates.
Note
The delegation feature applies only to future work items. Existing items (those listed under My Work Items must be selectively forwarded through the forwarding feature.
You also can delegate work items from the Delegations form tab of the Create and Edit User pages, and from the User Interface main menu.
Delegates can approve work items on your behalf during the effective delegation period. Delegated work items include the name of the delegate.
Any user can configure delegation for their future work items. Administrators who can edit a user can also configure delegation on the user’s behalf.
Audit Log Entries
Audit log entries for approved and rejected work items include your (the delegator) name if the request was delegated. Changes to a user's delegate approver information will be logged in the detailed changes section of the audit log entry when a user is created or modified.
Viewing Current Delegations
From the Work Items tab, select Delegate My Work Items. Identity Manager displays the Current Delegations page, where you can view and edit delegations currently in effect.
Viewing Previous Delegations
From the Work Items tab, select Delegate My Work Items, and then select Previous. Identity Manager displays previously delegated work items that can be used to set up new delegations.
Creating Delegations
To create a delegation, select Delegate My Work Items, and then select New. Make these selections:
Default work item types are:
- Approvals
- Organization Approvals
- Resource Approvals
- Role Approvals
- Attestation
- Review
- Access Review Remediation
Note
If you are not an approver on at least one role, then you cannot delegate work items of type Role Approval. Similarly, you cannot delegate Resource Approval work items if not an approver on at least one resource, nor delegate Organization Approval work items if not an approver on at least one organization.
If you select Organization Approval, Resource Approval, or Role Approval, then the page re-displays with selection areas for the associated object type. The roles, resources, and organizations that are listed in the selection lists include only those for which you are an approver.
This allows you to delegate, for example, resource approvals for only one of the resources for which you are an approver.
Click OK to save selections and return to the list of work items awaiting approval.
Ending Delegations
To end one or more delegations:
Account ApprovalsWhen a user is added to the Identity Manager system, administrators who are assigned as approvers for new accounts must validate account creation. Identity Manager supports three categories of approvals, applied to these Identity Manager objects:
- Organization — Approval is needed for the user account to be added to the organization.
- Role — Approval is needed for the user account to be assigned to a role.
- Resource — Approval is needed for the user account to be given access to a resource.
Note
You can configure Identity Manager for digitally signed approvals. For instructions see Configuring Digitally Signed Approvals and Actions.
Setting Up Approvers
Setting up approvers for each of these categories is optional, but recommended. For each category in which approvers are set up, at least one approval is required for account creation. If one approver rejects a request for approval, the account is not created.
You can assign more than one approver to each category. Because only one approval within a category is needed, you can set up multiple approvers to help ensure workflow is not delayed or halted. If one approver is unavailable, others are available to handle requests. Approval applies only to account creation. By default, account updates and deletions do not require approval; however, you can customize this process to require it.
Identity Manager illustrates the approval process and the status of an account creation request as a workflow diagram. You can customize the workflow by using the Identity Manager IDE to change the flow of approvals, capture account deletions, and capture updates.
For more information about the IDE, workflows, and an illustrated example of altering the approval workflow, see Identity Manager Workflows, Forms, and Views.
Figure 5-8 illustrates the Account Creation Workflow and where approvals fit into the workflow process.
Figure 5-8 Account Creation Workflow
Identity Manager Approvers can either approve or reject an approval request. To approve an account using a digital signature, you must first set up the digital signature as described in Configuring Digitally Signed Approvals and Actions.
You can view pending approvals and manage your approvals from the Work Items area of the Identity Manager interface. From the Work Items page, click My Work Items to view pending approvals. Click the Approvals tab to manage approvals.
Signing Approvals
Follow these steps to sign an approval.
- From the Identity Manager Administrator interface, select Work Items.
- Click the Approvals tab.
- Select one or more approvals from the list.
- Enter comments for the approval, and then click Approve.
Identity Manager prompts you and asks whether to trust the applet.
- Click Always.
Identity Manager displays a dated summary of the approval.
- Enter or click Browse to locate the keystore location (this location is set during the signed-approval configuration, as described in Step 10m in the procedure Client-Side Configuration for Signed Approvals.).
- Enter the keystore password (this password is set during the signed-approval configuration, as described in Step 10l of the procedure Client-Side Configuration for Signed Approvals).
- Click Sign to approve the request.
Signing Subsequent Approvals
After signing an approval, subsequent approval actions require only that you enter the keystore password and then click Sign. (Identity Manager should remember the keystore location from the previous approval.)
Configuring Digitally Signed Approvals and Actions
Use the following information and procedures to set up digital signing. You can digitally sign:
The topics discussed in this section explain the server-side and client-side configuration required to add the certificate and CRL to Identity Manager for signed approvals.
Server-Side Configuration for Signed Approvals
To enable server-side configuration, follow these steps:
- In the system configuration, set security.nonrepudiation.signedApprovals=true
- Add your certificate authority (CA)’s certificates as trusted certificates. To do this, you must first obtain a copy of the certificates.
For example, if you are using a Microsoft CA, follow steps similar to these:
- Add the certificate to Identity Manager as a trusted certificate:
- From the Administrator interface, select Configure, and then select Certificates. Identity Manager displays the Certificates page.
Figure 5-9 Certificates
- In the Trusted CA Certificates area, click Add. Identity Manager displays the Import Certificate page.
- Browse to and then select the trusted certificate, and then click Import.
The certificate now displays in the list of trusted certificates.
- Add your CA's certificate revocation list (CRL):
- In the CRLs area of the Certificates page, click Add.
- Enter the URL for the CA's CRL.
Note
- The certificate revocation list (CRL) is a list of certificate serial numbers that have been revoked or are not valid.
- The URL for the CA’s CRL may be http or LDAP.
- Each CA has a different URL where CRLs are distributed; you can determine this by browsing the CA certificate’s CRL Distribution Points extension.
- Click Test Connection to verify the URL.
- Click Save.
- Sign applets/ts1.jar using jarsigner.
Note
Refer to http://java.sun.com/j2se/1.4.2/docs/tooldocs/windows/jarsigner.html for more information. The ts1.jar file provided with Identity Manager is signed using a self-signed certificate, and should not be used for production systems. In production, this file should be re-signed using a code-signing certificate issued by your trusted CA.
Client-Side Configuration for Signed Approvals
To enable the client-side configuration, follow these steps:
Prerequisites
Your client system must be running a Web browser with JRE 1.4 or higher.
Procedure
Obtain a certificate and private key, and then export them to a PKCS#12 keystore.
For example, if using a Microsoft CA, you would follow steps similar to these:
- Using Internet Explorer, browse to http://IPAddress/certsrv, and then log in with administrative privileges.
- Select Request a certificate, and then click Next.
- Select Advanced request, and then click Next.
- Click Next.
- Select User for Certificate Template.
- Select these options:
- Click Submit, and then click OK.
- Click Install this certificate.
- Select Run —> mmc to launch mmc.
- Add the Certificate snap-in:
- Select Console—>Add/Remove Snap-in.
- Click Add...
- Select Computer account.
- Click Next, and then click Finish.
- Click Close.
- Click OK.
- Go to Certificates—>Personal—>Certificates.
- Right-click Administrator All Tasks—>Export.
- Click Next.
- Click Next to confirm exporting the private key.
- Click Next.
- Provide a password, and then click Next.
- File CertificateLocation.
- Click Next, and then click Finish. Click OK to confirm.
Viewing the Transaction Signature
Follow these steps to view the transaction signature in an Identity Manager AuditLog report.
- From the Identity Manager Administrator interface, select Reports.
- On the Run Reports page, select AuditLog Report from the New... list of options.
- In the Report Title field, enter a title (for example, “Approvals”).
- In the Organizations selection area, select all organizations.
- Select the Actions option, and then select Approve.
- Click Save to save the report and return to the Run Reports page.
- Click Run to run the Approvals report.
- Click the details link to see transaction signature information, including:

 Task-based. These are capabilities at their simplest task level.
 Functional. Functional capabilities contain one or more other functional or task-based capabilities.