Creating Partner Link Types Using the Partner View
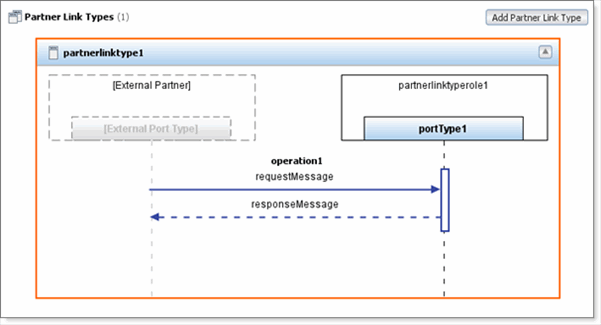
The Partner Link Types area in the Partner view contains one configuration box for each partner link type in the WSDL file.

A partner link type can have one role or two roles. The first role appears in the right side of the configuration box. If included, the second role appears in the left side of the configuration box.
The role's port type appears below the role. A port type has one or more operations, which are illustrated in the area below the port types. A solid horizontal arrow indicates an input message. A dashed horizontal arrow indicates an output message.
If the operation is a request-response operation, then you can optionally add a fault. A dashed horizontal arrow indicates a fault message.
The configuration box resembles a sequence diagram in Unified Modeling Language (UML).
Partner link types from imported WSDL files do not appear in the Partner view.
 To create a partner link type with one role
-
If the WSDL file contains a port type that is not associated with a partner link type, then the Auto Create button appears in the Partner Link Types area. To generate a partner link type that references the port type, click Auto Create.
-
Do one of the following:
-
Click Add Partner Link Type.
-
Drag the Partner Link Type icon from the Palette onto a blank portion of the Partner Link Types area.
-
Right-click a blank portion of the Partner Link Types area and choose Add PartnerLinkType.
The configuration box for the partner link type appears. The partner link type contains a default role.
-
-
In the right side of the configuration box, specify the port type that the service will use to receive messages. To create a new port type, double-click Enter or Select a Port Type and enter the name. To use an existing port type, click Enter or Select a Port Type and select the port type from the drop-down menu.
-
If you created a new port type, or if you want to add one or more operations to an existing port type, then do the following:
-
Drag one or more operations from the Palette onto the dashed vertical line that extends below the port type.
-
For each operation, select the messages. You can double-click <No Message Selected> and select a message from the drop-down list. Alternately, you can drag a message from the Navigator window onto <No Message Selected>.
-
 To add a second role to a partner link type
-
In the left side of the configuration box, double-click [External Partner] and enter the role name.
-
In the left side of the configuration box, specify the port type that the service will use to receive messages. To create a new port type, double-click Enter or Select a Port Type and enter the name. To use an existing port type, click Enter or Select a Port Type and select the port type from the drop-down menu.
-
If you created a new port type, or if you want to add one or more operations to an existing port type, then do the following:
-
Drag one or more operations from the Palette onto the dashed vertical line that extends below the port type.
-
For each operation, select the messages. You can double-click <No Message Selected> and select a message from the drop-down list. Alternately, you can drag a message from the Navigator window onto <No Message Selected>.
-
 To add a fault to a request-response operation
- © 2010, Oracle Corporation and/or its affiliates
