Partner View
This section contains the following topics
The Partner view of the WSDL Editor represents the abstract elements of a WSDL file as interactions between partners.
The abstract elements include partner link types, roles, port types, operations, and messages.
A partner link type characterizes the conversational relationship between two services. A role describes the function that a service has in the relationship.
A partner link type can have one role or two roles.
-
Client/Server — In this type of interaction, the partner link type has one role. The role represents the server. The server can be invoked by one or more unspecified clients.
-
Peer to Peer — In this type of interaction, the partner link type has two roles. Each role represents a peer service.
A role must specify the port type that the service will use to receive messages. A port type contains one or more related operations that the web service can perform.
The WSDL Editor supports the following categories of operations:
-
Request-response — Request-response. The operation receives a message as input, and sends a message as output.
-
One-way — One-way. The operation receives a message as input.
The concrete elements of a WSDL file (that is, bindings and services) describe how to invoke the functionality defined by the abstract elements. Creating a WSDL file that contains only abstract elements is an effective design approach. You can define the concrete elements at deployment time by using the Composite Application Service Assembly (CASA) editor. Thus, if you need to change the bindings at some point, you can do so without modifying the project.
Strategies for Defining the Abstract Elements
In the Partner view of the WSDL Editor, you can define the abstract elements by starting with the partner interactions or by starting with the messages that are exchanged by the partners.
 To define the abstract elements by starting with the
partner interactions
-
Create a partner link type. The partner link type contains a default role, which appears on the right. If you want to define a peer-to-peer interaction, then you must add a second role on the left.
-
Choose or create the port types and operations.
-
Create the messages that will be sent from one partner to another.
-
Assign the messages to the partner link type's operations.
-
Specify the data types for the message parts. Note that you can create or import an XML schema by using the Navigator window, and then drag the schema elements or types into the messages.
 To define the abstract elements by starting with the
messages
-
Create or import an XML schema by using the Navigator window.
-
Create the messages that will be sent from one partner to another. Note that you can drag the schema elements or types from the Navigator window into the messages.
-
Create a partner link type. The partner link type contains a default role, which appears on the right. If you want to define a peer-to-peer interaction, then you must add a second role on the left.
-
Choose or create the port types and operations.
-
Assign the messages to the partner link type's operations.
Partner View Layout
The Partner view of the WSDL Editor has the following components:
-
Toolbar — The toolbar is located at the top of the Partner view, just below the tab for the WSDL file.
-
Partner Link Types area — Contains one configuration box for each partner link type in the WSDL file.
-
Messages area — Contains one configuration box for each message in the WSDL file.
-
Palette — Contains partner link type, operation, and message icons. To display the Palette, choose Window -> Palette from the IDE's main menu.
You can expand or collapse the configuration boxes. When a box is collapsed, click the downward arrow to expand the box. When a box is expanded, click the upward arrow to collapse the box.
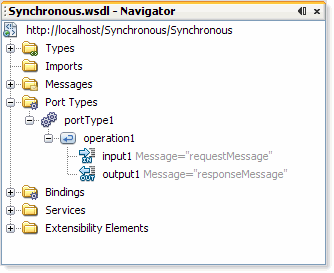
The IDE's Navigator window provides a compact view of the currently selected file and simplifies navigation between different parts of the file. For WSDL files, the Navigator has two views: WSDL and XML.
The WSDL view of the Navigator window is identical to the WSDL view of the WSDL Editor.

To display the Navigator, choose Window -> Navigator from the IDE's main menu.
Navigating in the Partner View
You can perform the following tasks from the toolbar of the Partner view:

-
Set the magnification. The lowest magnification is 33 percent. The highest magnification is 200 percent.
-
To display entire diagram within the viewable area, click the Fit Diagram icon.
-
To display the width of the diagram fits within the viewable area, click the Fit Width icon.
-
To set the magnification to 100 percent, click the 100% icon.
-
To display a predefined percentage of the diagram, select the percentage from the drop-down box.
-
To display the diagram at a value between 33 and 200, enter the percentage in the drop-down box.
-
To increase magnification, click the Zoom In icon.
-
To decrease magnification, click the Zoom Out icon.
-
-
Show or hide the partner link types.
-
Show or hide the messages.
-
Validate the WSDL file. The validation tool reviews the WSDL file for problems with syntax and semantics. The Output window displays any errors or warnings.
If you right-click a component and choose Go To > Source, then the Source view appears with the cursor positioned at the beginning of the component's block.
If you right-click a component and choose Go To -> WSDL, then the WSDL view appears with the appropriate node highlighted.
After performing an action in the Partner view, you can reverse the action by choosing Edit -> Undo (Ctrl-Z) from the IDE's main menu. You can reverse an undo command by choosing Edit -> Redo (Ctrl-Y) from the IDE's main menu.
You can print the contents of the Partner view by using the IDE's standard print feature.
Creating Partner Link Types Using the Partner View
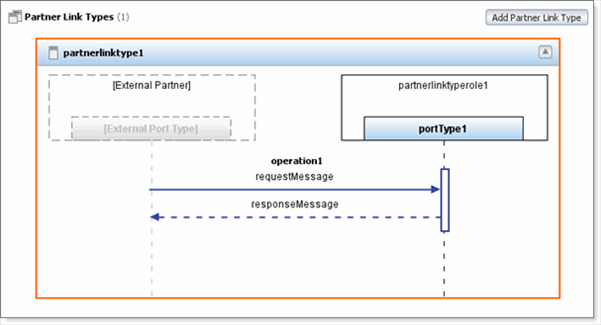
The Partner Link Types area in the Partner view contains one configuration box for each partner link type in the WSDL file.

A partner link type can have one role or two roles. The first role appears in the right side of the configuration box. If included, the second role appears in the left side of the configuration box.
The role's port type appears below the role. A port type has one or more operations, which are illustrated in the area below the port types. A solid horizontal arrow indicates an input message. A dashed horizontal arrow indicates an output message.
If the operation is a request-response operation, then you can optionally add a fault. A dashed horizontal arrow indicates a fault message.
The configuration box resembles a sequence diagram in Unified Modeling Language (UML).
Partner link types from imported WSDL files do not appear in the Partner view.
 To create a partner link type with one role
-
If the WSDL file contains a port type that is not associated with a partner link type, then the Auto Create button appears in the Partner Link Types area. To generate a partner link type that references the port type, click Auto Create.
-
Do one of the following:
-
Click Add Partner Link Type.
-
Drag the Partner Link Type icon from the Palette onto a blank portion of the Partner Link Types area.
-
Right-click a blank portion of the Partner Link Types area and choose Add PartnerLinkType.
The configuration box for the partner link type appears. The partner link type contains a default role.
-
-
In the right side of the configuration box, specify the port type that the service will use to receive messages. To create a new port type, double-click Enter or Select a Port Type and enter the name. To use an existing port type, click Enter or Select a Port Type and select the port type from the drop-down menu.
-
If you created a new port type, or if you want to add one or more operations to an existing port type, then do the following:
-
Drag one or more operations from the Palette onto the dashed vertical line that extends below the port type.
-
For each operation, select the messages. You can double-click <No Message Selected> and select a message from the drop-down list. Alternately, you can drag a message from the Navigator window onto <No Message Selected>.
-
 To add a second role to a partner link type
-
In the left side of the configuration box, double-click [External Partner] and enter the role name.
-
In the left side of the configuration box, specify the port type that the service will use to receive messages. To create a new port type, double-click Enter or Select a Port Type and enter the name. To use an existing port type, click Enter or Select a Port Type and select the port type from the drop-down menu.
-
If you created a new port type, or if you want to add one or more operations to an existing port type, then do the following:
-
Drag one or more operations from the Palette onto the dashed vertical line that extends below the port type.
-
For each operation, select the messages. You can double-click <No Message Selected> and select a message from the drop-down list. Alternately, you can drag a message from the Navigator window onto <No Message Selected>.
-
 To add a fault to a request-response operation
-
Right-click the operation name and choose Add Fault.
-
Double-click <No Message Selected>.
-
Select the fault message.
Editing Partner Link Types Using the Partner View
The Partner Link Types area in the Partner view enables you to modify or delete the partner link types, roles, port types, and operations in a WSDL file.
 To change the name of a partner link type, role, port
type, or operation
This procedure will rename all occurrences in the same WSDL file. If you want to rename all occurrences in the same WSDL file and all associated XSD, WSDL, and BPEL files, then right-click the component and choose Refactor > Rename.
-
Double-click the partner link type name, role name, port type name, or operation name.
-
Change the name.
-
Press Enter.
To delete an operation
To delete an operation do one of the following:
-
Select the operation and press Delete.
-
Right-click the operation and choose Delete from the pop-up menu.
To delete a port type
To delete a port type do one of the following:
-
Select the port type and press Delete.
-
Right-click the port type and choose Delete from the pop-up menu.
The port type area of the configuration box is changed to an unconfigured state.
To delete a role
To delete a role do one of the following:
-
Select the role and press Delete.
-
Right-click the role and choose Delete from the pop-up menu.
The role area of the configuration box is changed to an unconfigured state.
To delete a partner link type
To delete a partner link type do one of the following:
-
Select the configuration box for the partner link type and press Delete.
-
Right-click the configuration box for the partner link type and choose Delete from the pop-up menu.
Creating Messages Using the Partner View
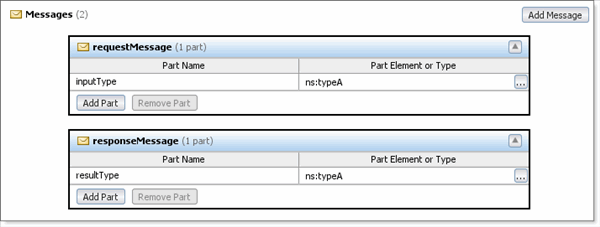
The Messages area in the Partner view contains one configuration box for each message in the WSDL file.

In a WSDL file, a port type contains one or more related operations that the web service can perform. An operation receives a message, sends a message, or does both.
Each message contains one or more logical parts. For each part, you must specify the name and the type of content.
 To create a message
-
Do one of the following:
-
Click Add Message.
-
Drag the Message icon from the Palette onto a blank portion of the Messages area.
-
Right-click a blank portion of the Messages area and choose Add Message.
The configuration box for the message appears. The message contains one part. The part's type of content is undefined.
-
-
Do one of the following:
-
In the Part Element or Type column, click the ellipsis (...) button. Select any of the built-in types in W3C XML Schema. If you added an inline schema or imported a schema, then you can select an element or type from the schema. Click OK.
-
Drag an element or type from the Navigator window onto the Part Element or Type column.
-
 To add a part to a message
-
Do one of the following:
-
Click Add Part.
A new row appears. The type of content is set to xs:string.
-
Right-click the configuration box for the message and choose Add Part from the pop-up menu.
A new row appears. The type of content is undefined.
-
Drag an element or type from the Navigator window onto the configuration box for the message, and above or below an existing row.
A new row appears. The type of content is set to the element or type that you selected.
-
Editing Messages Using the Partner View
The Messages area in the Partner view enables you to modify or delete the messages in a WSDL file.
 To change the name of a message
This procedure will rename all occurrences in the same WSDL file. If you want to rename all occurrences in the same WSDL file and all associated XSD, WSDL, and BPEL files, then right-click the component and choose Refactor -> Rename
 To change the name of a part
This procedure will rename all occurrences in the same WSDL file. If you want to rename all occurrences in the same WSDL file and all associated XSD, WSDL, and BPEL files, then right-click the component and choose Refactor > Rename.
To change the type of content for a part
To change the type of content for a part do one of the following:
-
In the Part Element or Type column, click the ellipsis (...) button. Select any of the built-in types in W3C XML Schema. If you added an inline schema or imported a schema, then you can select an element or type from the schema. Click OK.
-
Drag an element or type from the Navigator window onto the Part Element or Type column.
To delete a part
To delete a part do one of the following:
-
Select the part and press Delete.
-
Select the part and click Remove Part.
-
Right-click the part and choose Delete from the pop-up menu.
To delete a message
To delete a message do one of the following:
-
Select the configuration box for the message and press Delete.
-
Right-click the configuration box for the message and choose Delete from the pop-up menu.
- © 2010, Oracle Corporation and/or its affiliates
