Using Predefined Normalized Message Properties
Predefined normalized message properties are automatically available from the BPEL Designer's Mapper view. You can use additional properties by adding them directly to the source code. You can either define these properties using the BPEL Designer Mapper, or by entering the code directly into the source view.
You can perform additional tasks when working with normalized message properties, such as creating additional properties, deleting properties, creating property shortcuts, and so on. For more information, see Using Normalized Message Properties in BPEL Designer and Service Engine User’s Guide.
 To Use Predefined Normalized Message Properties
in Mapper View
You can access most of the normalized message properties from the BPEL Mapper. Certain properties, such as path and query parameters, need to be defined in the Source view.
-
Open the BPEL process you want to edit in the BPEL Designer.
-
In Design view, select the activity to add the normalized message property to.
-
In the BPEL Designer toolbar, click Mapper.
-
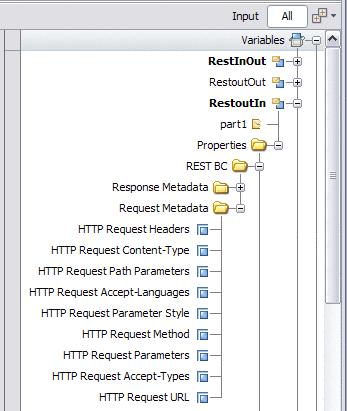
In the Output pane, expand the variable you want to edit, expand Properties, and then expand REST BC.
-
Expand Request Metadata or Response Metadata, depending on the message type.
A list of available normalized message properties appears.

-
Select the normalized message property you want to use, and use the mapper operands to build an expression or assign a value.
For a complete list of normalized message properties for the REST BC, see Normalized Message Properties for REST.
 To Use Predefined Normalized Message Properties
in Source View
You can define any of the normalized message properties using the Source view. You can only access path or query parameters from the Source view.
-
Open the BPEL process you want to edit in the BPEL Designer.
-
In the BPEL Designer toolbar, click Source.
The BPEL source code for the process is now visible.
-
Declare the sxnmp namespace near the beginning of the process element; for example:
xmlns:sxnmp="http://www.sun.com/wsbpel/2.0/process/executable/SUNExtension/NMProperty"
-
Access the property using the property names listed and described in Normalized Message Properties for REST.
For path and query parameters, separate normalized message properties are created for each. For example,
<assign name="AssignActivity">
   <copy>
      <from variable="GetCustomerNameIn"
            sxnmp:nmProperty="org.glassfish.openesb.rest.path-params.custName"/>
      <to>$CustomerQuery_OperationIn.part/ns0:param1</to>
   </copy>
</assign>
Example 1 Using REST BC Normalized Message Properties for Query Parameters
There are two methods to use normalized message properties to encode information as query parameters in an outbound REST call. Both methods are illustrated below in examples that show how to define query parameters for a simple address.
The following example illustrates defining all the parts and assigning their values as a single string.
<copy>
    <from>'{"street":"800 Royal Oaks Blvd.", "city":"Monrovia", "state":"CA", "zip":"91016"}'</from>
    <to variable="YahoomapIn" sxnmp:nmProperty="org.glassfish.openesb.rest.params"/>
</copy>
|
The following example illustrates defining each part as a query parameter and assigning the values individually.
<copy>
    <from>'800 Royal Oaks Blvd.'</from>
    <to variable="YahoomapIn"
        sxnmp:nmProperty="org.glassfish.openesb.rest.params.street"/>
</copy>
<copy>
    <from>'Monrovia'</from>
    <to variable="YahoomapIn"
        sxnmp:nmProperty="org.glassfish.openesb.rest.params.city"/>
</copy>
<copy>
    <from>'CA'</from>
    <to variable="YahoomapIn"
        sxnmp:nmProperty="org.glassfish.openesb.rest.params.state"/>
</copy>
<copy>
    <from>'91016'</from>
    <to variable="YahoomapIn"
        sxnmp:nmProperty="org.glassfish.openesb.rest.params.zip"/>
</copy>
|
- © 2010, Oracle Corporation and/or its affiliates
