Creating the Runtime Components
If you did not opt to have the Healthcare Pack Installer create the runtime components in your instance of GlassFish, you can create them manually. You can also rerun the installer and deselect all other options except the GlassFish Location and GlassFish Configuration options. This will reinstall all runtime components and also create the needed JDBC connection pools and resources, application variables and configurations, security profiles, and so on.
Perform the following procedures to manually create the runtime components. Each procedure is required.
Creating the JDBC Connection Pools and Resources
The PIX/PDQ Manager maintains connections to several databases to comply with IHE requirements for monitoring, audit logging, and master data management. If you did not have the installer create the connection pools and resources, you can create them manually or rerun the installer as mentioned earlier.
 To Create the JDBC Connection Pools
The following procedures outlines the steps to create a connection pool. The configuration information for each connection pool you need to create is listed after the procedure.
-
Log in to the GlassFish Admin Console.
You can access the console from the Services window in NetBeans.
-
In the left portion of the Admin Console, expand Resources, expand JDBC, and then select Connection Pools.
-
On the Create Connection Pool page, click New.
-
In the Name field, enter a name for the connection pool.
-
In the Resource Type field, select the Java class for the type of transactions being processed.
-
javax.sql.DataSource – For local transactions only.
-
javax.sql.XADataSource – For transactions that are distributed, either within the application or across applications.
-
javax.sql.ConnectionPoolDataSource – For local transactions only. This class provides possible performance improvements.
-
-
In the Database Vendor field, select MySQL.
-
Click Next.
-
In the DataSource Classname field, accept the default class or enter a new one to use.
-
Modify the Pool Settings, Connection Validation, and Transaction properties according to your business practices.
-
In the additional properties section, enter the values for the database. Be sure to enter the following information at a minimum (you might need to create some of these properties).
-
URL – The URL that points to the database. The syntax of the URL is jdbc:mysql://server:port/database_name.
-
portNumber – The port number of the database. For MySQL, the default port is 3306.
-
serverName – The name of the server where the database is located.
-
user – The login ID for database user.
-
password – The password for the above user.
-
databaseName – The name of the database schema.
Create the connection pools listed below. The database vendor for all pools is MySQL. The port number and server name depend on your MySQL environment, and the URL you enter depends on these values. The user and password properties are the ones you defined for each database schema in Creating the PIX/PDQ and ATNA Databases.
Note –You do not have to use the connection pool names given here. These are the default names given by the installer.
Connection Pool Name
Resource Type
Database Name
Purpose
cpPatientXA
The type corresponding to the type of transaction processed by the master index. The default is javax.sql.XADataSource.
midm
Connecting to the Master Index database.
cpPatientSequenceXA
The same as above.
midm
Connecting to the Master Index sequence table.
cpPIXDomainLU
javax.sql.DataSource
midm
Connecting to the Domain Lookup tables.
MyArrdbPool
javax.sql.DataSource
arrdb
Connecting to the ATNA database.
pixpdqMonitorPool
javax.sql.XADatabase
pixpdqCheckpoint
This is used by the PIX Console.
-
 To Create the JDBC Resources
The following procedures outlines the steps to create a JDBC resource. The configuration information for each resource you need to create is located after the procedure.
-
In the left portion of the Admin Console, expand Resources, expand JDBC, and then select JDBC Resources.
-
On the Create JDBC Resource page, click New.
-
In the JNDI Name field, enter a unique name for the JDBC resource.
-
In the Pool Name field, select the name of a JDBC connection pool.
-
In the Status field select the Enabled check box.
-
Click OK.
Create the JDBC Resources listed below, which correspond to the connection pools you created earlier. Note that several of the JNDI names are case-sensitive.
JNDI Name
Pool Name
jdbc/PatientDataSource
cpPatientXA
jdbc/PatientSequenceDataSource
cpPatientSequenceXA
jdbc/PIXDomainLUDataSource
cpPIXDomainLU
jdbc/arrdb
MyArrdbPool
jdbc/SHCPMonitorDB
pixpdqMonitorPool
Creating JMS Destination Resources and Connection Factory
The PIX/PDQ Manager uses JMS topics to make outbound patient notification updates available to the domains that subscribe to those updates. The Sun Master Index generates outbound messages for patient updates in XML format to the PatientTopic destination. The BPEL processes that handle update notifications make the information available to either HL7 v2 or HL7 v3 destinations according to the IHE framework.
You can create the JMS artifacts manually as described below or rerun the installer as mentioned earlier.
 To Create the JMS Destination Resources and
Connection Factory
-
In the left portion of the Admin Console, expand Resources, expand JMS Resources, and then select Connection Factories.
-
On the New JMS Connection Factory page, click New.
-
Enter the following information:
-
JNDI Name – jms/PatientOutBoundServer (this name is case-sensitive)
-
Resource Type – javax.jms.TopicConnectionFactory
-
-
Create the following additional properties and enter the property values:
-
UserName – A JMS user name. The default user name is admin.
-
Password – A password for the above user name. The default password is admin.
-
-
Click OK.
-
In the left portion of the Admin Console, select Destination Resources under JMS Resources.
-
On the New JMS Destination Resource page, click New.
-
Use this page to create the following topics:
JNDI Name
Resource Type
Physical Destination Name
Purpose
PatientTopic
javax.jms.Topic
PatientTopic
Updates to the Master Index patient records are written to this topic.
tHL7V3
javax.jms.Topic
tHL7V3
HL7 v3 updates to patient records are processed through a BPEL process and written to this topic.
tHL7V2
javax.jms.Topic
tHL7V2
HL7 v2 updates to patient records are processed through a BPEL process and written to this topic.
tSUNXDS
javax.jms.Topic
tSUNXDS
This is a placeholder and is not currently used.
tXDSMerge
javax.jms.Topic
tXDSMerge
This is a placeholder and is not currently used.
Creating Application Variables
Application variables are defined for different PIX/PDQ components to be referenced in WSDL files and BPEL processes. This is useful for information that is referenced from several files or that may be customized for different implementations, such as HTTP port numbers, URLs, and certain messaging information. The following procedure gives general instructions for creating an application variables. The specific variables you need to create are listed following this procedure.
 To Create Application Variables
-
On the NetBeans IDE Services window, expand Servers > GlassFish v2.1 > JBI.
-
Expand either Service Engines or Binding Components, depending on which type of component you are adding a variable to.
-
Right-click the component, and then select Properties.
The Properties window appears.
-
Click the ellipsis next to Application Variables.
The Application Variables Editor appears.
-
Click Add, select String for the variable type, and click OK.
-
In the new row that appears on the editor, enter a name and value for the variable.
The name and value pairs you need to add for each component are listed in the following table.
Component Name
Variable Name
Description
Type
Value
HTTP BC
GFDefaultHttpPort
ATNA Audit Service HTTP Port
String
The HTTP port of the GlassFish Server. This variable is referenced in the Audit Service WSDL files. The default value is 8080.
JMS BC
jmsURL
PIX Update Notification JMS URL
String
The URL for the JMS Server to which PIX update notification are written. The default value is mq://localhost:7676.
HL7 BC
sunpixmgr-v2–url
HL7 v2 Listening URL
String
The URL on which the HL7 BC listens for input from HL7 messaging systems. This is referenced in the hl7RecvWsdl.wsdl file. The default value is hl7://localhost:3600.
BPEL SE
sunpixmgr-application
PIX Update Sender HL7 v2 Application
String
The name of the system sending HL7 v2 PIX update notifications. This is referenced from the HL7 v2 PIX notification BPEL process. The default value is SUGA.
BPEL SE
sunpixmgr-facility
PIX Update Sender HL7 v2 Facility
String
The name of the facility sending HL7 v2 PIX update notifications. This is referenced from the HL7 v2 PIX notification BPEL process. The default value is SUNVAN.
BPEL SE
sunpixmgr-device
PIX Update Sender HL7 v3 Device
String
The device sending HL7 v3 PIX update notifications. This is referenced from the HL7 v3 PIX notification BPEL process. The default value is 2.1.12^654.
BPEL SE
sunpixmgr-organization
PIX Update Sender HL7 V3 Organization
String
The name of the organization sending HL7 v3 PIX update notifications. This is referenced from the HL7 v3 PIX notification BPEL process. By default, this variable is left empty.
Creating Application Configurations
Application configurations are defined for the SOAP URLs used in the HL7 v3 projects. The following procedure gives general instructions for creating an application configuration. The specific configurations you need to create are listed following the procedure. Optionally, you can rerun the installer as mentioned earlier to create the application configurations.
 To Create Application Configurations
-
On the NetBeans IDE Services window, expand Servers > GlassFish v2.1 > JBI > Binding Components.
-
Right-click sun-http-binding, and then select Properties.
The Properties window appears.
-
Click the ellipsis next to Application Configuration.
The Application Configuration Editor appears.
-
Click Add.
A new row appears in the configuration list.
-
In the new row, enter a name and HTTP URL Location.
The name and URL pairs you need to add are listed in the following table.
Configuration Name
Value
sunpdqsup-soap11
The SOAP 1.1 URL for the PDQ_HL7V3_Direct project. The default value is http://localhost:${HttpDefaultPort}/PDQSupplier/PDQPort11.
sunpdqsup-soap12
The SOAP 1.1 URL for the PDQ_HL7V3_Direct project. The default value is http://localhost:${HttpDefaultPort}/PDQSupplier/PDQPort12.
sunpixmgr-soap12
The SOAP 1.2 URL for the PIX_HL7V3_Direct project. The default value is http://localhost:${HttpDefaultPort}/PIXManager/PDQPort11.
sunpixmgr-soap11
The SOAP 1.1 URL for the PIX_HL7V3_Direct project. The default value is http://localhost:${HttpDefaultPort}/PIXManager/PDQPort11.
Defining PIX/PDQ Security
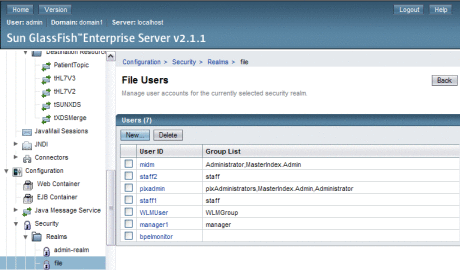
You create user accounts for MIDM and PIX Console access using the GlassFish Admin Console. For the PIX Console, there is one predefined user group to which users must be added. For the MIDM, there are two predefined user groups and you can define additional user groups each with different permissions. For more information about configuring user groups (roles) for MIDM, see Defining Master Index Data Manager Security in Maintaining Sun Master Indexes.
The following users are predefined for you when you install the PIX/PDQ Manager:
-
For the MIDM, a user named midm with a password of midm.
-
For the PIX Console, a user named pixadmin with a password of adminadmin.
 To Define PIX/PDQ Security
-
Log on to the GlassFish Admin Console.
-
In the left navigation panel, expand Configuration, expand Security, and then expand Realms.
-
Select File.
-
On the Edit Realm page, select Manage Users.
The File Users page appears.

-
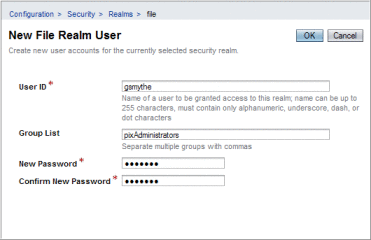
On the File Users page, select New.

-
In the User ID field, enter a name for the user.
-
In the Group List field, do one of the following:
-
For PIX Console users, enter pixAdministrators.
-
For MIDM users, enter MasterIndex.Admin and any of the predefined user groups or user groups that you defined. Separate multiple roles with a comma (no space).
-
-
Enter a password for the user in the New Password field.
-
In the Confirm New Password field, enter the password again.
-
Click OK.
- © 2010, Oracle Corporation and/or its affiliates
