Working With the PIX/PDQ Manager
This topic provides instructions to help you understand and use the PIX/PDQ Manager, which is installed as part of the Healthcare Pack. The Healthcare Pack is an add-on to GlassFish ESB, and it includes the following components:
-
Sun Master Index
-
HL7 Binding Component
-
PIX/PDQ Manager
To access all the GlassFish ESB documentation in PDF and HTML format, go to the GlassFish ESB page on docs.sun.com (http://docs.sun.com/app/docs/prod/gf.entsvc.bus#hic).
What You Need to Know
What You Need to Do
This document includes several tasks that are optional and some that a required for a production environment. The tasks are listed by category below.
For TestingIf you performed a complete installation of the Healthcare Pack, you are ready to work with the PIX/PDQ Manager and can start running test data and using the PIX Console and Master Index Data Manager (MIDM). See the following topics for instructions on running test data and monitoring the processed and data:
For ProductionFor a production environment, you need to configure certain variables unless you specified the correct values during installation, and each domain needs to be added to the PIX/PDQ Manager. Optionally, you can configure Master Index processing. See the following topic for more information:
For a Custom InstallationIf you did not perform a complete installation of the Healthcare Pack, you need to perform some of the following steps to begin using the PIX/PDQ Manager:
Additional Information
The following provide reference information along with information and instructions for using the HL7, HTTP, and JMS Binding Components; Sun Master Index; the BPEL Service Engine; and the PIX/PDQ Manager. These are the key components of the PIX/PDQ Manager.
PIX/PDQ Manager Overview
Sun's PIX/PDQ Manager provides a flexible solution to healthcare integration needs in the form of a lightweight enterprise service bus (ESB) that can be easily customized and extended to meet your integration needs. The processing logic in the PIX/PDQ Manager is based on the guidelines and standards put forth by Integrating the Healthcare Enterprise (IHE) to assure compatibility with other vendors and healthcare organizations.
About the PIX/PDQ Manager
The PIX/PDQ Manager forms a specialized implementation of HL7 messaging that facilitates patient health information exchange, and supports both HL7 v2 and HL7 v3 messaging. HL7 v2 is supported through the HL7 Binding Component using MLLP v1. HL7 v3 is supported through the HTTP Binding Component using SOAP 1.1 and 1.2.
The PIX/PDQ Manager leverages the advanced standardization and matching algorithms of Sun Master Index to cross-reference and uniquely identify the patients in your healthcare organization. Master Index provides a single complete view of the participants in your healthcare system and is able to quickly reconcile which information is associated with which patient, allowing you to quickly create a complete medical history.
The PIX/PDQ Manager processes messages based on the IHE frameworks, which define how to process HL7 messages using existing standards when available. In compliance with these frameworks, the PIX/PDQ Manager generates and maintains an audit repository of all events processed by the manager, and also maintains a trace record of how each message was processed through the system and by which components. Information about the state of the PIX/PDQ Manager components is provided by a common logging, alerting, error handling, and reporting mechanism. The PIX/PDQ Manager provides a monitoring and management tool where you can monitor the audit repository, log messages, and message traces.
GlassFish ESB Components in the PIX/PDQ Manager
Sun's PIX/PDQ Manager uses various components of GlassFish ESB such as HTTP, JMS, and HL7 Binding Components; the BPEL Service Engine; Composite Applications; Java EE EJBs; and Sun Master Index. The solution includes the following GlassFish ESB components:
-
Sun Master IndexThe Sun Master Index provides patient identifier cross-referencing and unique identification of patient records. It also maintains a centralized repository of each patient's most current information. You can customize many features of the Master Index, such as the queries, match and standardization logic, the data fields stored, and how the single best record for each patient is formed.
-
PIX ConsoleThe PIX Console is a system management and monitoring tool that allows you to view records in the ATNA audit repository, the PIX/PDQ processing log, message traces (how each message was processed through the PIX/PDQ Manager). The console includes a Domain Manager that allows you to update and add information about the systems, or domains, that share information in the PIX/PDQ system, including domain identification information, subscriptions to outbound notifications, and application configurations and variables.
-
BPEL Service EngineThe BPEL Service Engine orchestrates services to define the processing flow and business logic of messages through the PIX/PDQ system, including routing and transforming data, mapping data fields, and calling the appropriate functions from other PIX/PDQ components. The BPEL processes also write the required data to the ATNA audit repository, and are responsible for generating HL7 ACK/NACK responses. Each BPEL process is specific to either HL7 v2 or HL7 v3.
-
HL7 Binding ComponentThe HL7 Binding Component supports the HL7 messaging structure up to version 2.6 and defines the communication protocols for connecting to the HL7 messaging systems The HL7 Binding Component in the PIX/PDQ Manager is configured to use the Minimal Lower Layer Protocol (MLLP) version 1 to connect to external systems.
-
HTTP Binding ComponentThe HTTP Binding Component supports the HL7 v3 messaging structure and defines the communication protocols for connecting to the HL7 messaging systems. The HTTP Binding Component in the PIX/PDQ Manager uses the SOAP 1.1 and 1.2 protocols to connect with external systems.
-
JMS Binding Component: The JMS Binding Component is used for PIX outbound notifications published by Master Index. Notifications are published to JMS topics and then distributed to all subscribed domains.
Configuring the PIX/PDQ Components
The PIX/PDQ Manager was designed to be implemented with minimal required customizations. However, GlassFish ESB provides a flexible framework that allows you to extend the functionality beyond its original design. At a minimum, you would need to configure connectivity information for a product environment. You can also optionally customize the Master Index and how it processes and matches patient records.
Configuring Connectivity Information
You can customize and extend the functionality of the PIX/PDQ Manager, but only the following configuration changes are required for a production environment.
-
Add information about each domain that shares data with PIX/PDQ Manager to the database tables. For instructions, see Managing Domains. Make sure the following is correct to enable messaging and PIX update notifications.
-
The receiving URL for each domain.
-
The endpoint (either HL7V2 or HL7V3).
-
The name of the HL7 application or device.
-
The name of the facility or organization (organization is not required).
-
-
Define a list of which receiving domains will subscribe to updates from which sending domains. For instructions, see Maintaining Subscriptions to Patient Updates.
-
Verify the port numbers for the following variables. As long as there are no port conflicts, the default values should be fine.
-
jmsURL (for the JMS BC)
-
GFDefaultHttpPort (for the HTTP BC)
-
sunpixmgr-v2–url (for the HL7 BC)
-
-
Verify the URLs for SOAP communication for the following application configurations:
-
sunpdqsup-soap11
-
sunpdqsup-soap12
-
sunpixmgr-soap11
-
sunpixmgr-soap12
-
Configuring the Master Index
You can configure several features of the Master Index to customize how data is matched and processed through the PIX/PDQ Manager. The type and quality of data stored for a patient varies from system to system and from organization to organization. The Master Index takes this into account and allows you to tailor the processing for your specific data requirements. For example, you may know that some systems contain more accurate data than others. You can weight those systems higher when determining which values will populate the single best record (SBR). Also, some fields might contain more accurate data than others and would thus be given a higher match weight than other, less accurate fields.
You can configure the following components of the Master Index:
-
Patient demographic queries, matching queries, and queries performed from the MIDM.
-
Standardization and matching rules, including which fields to standardize, which fields to match, a range of match weights to assign to each field, and the type of algorithm to use to match each field.
-
Filters for match results (for example, you can configure the Master Index to ignore default values).
-
The single best record and how it is formed.
-
The appearance of the MIDM.
-
The structure of the data stored by the MIDM.
-
Field validations.
In addition, you can customize logic for the underlying process of the master index. For complete information on configuring the Master Index, see the Sun Master Index Configuration Guide.
If you modify the configuration of the Master Index, you need to do the following:
-
If you made any changes to the object structure, make the corresponding changes to the mappings in the BPEL processes.
-
Rebuild and redeploy all PIX/PDQ projects. Scripts are provided to automate this process since the projects must be built and deployed in a specific order. For more information, see Building and Deploying the PIX/PDQ Manager Projects
Creating the PIX/PDQ and ATNA Databases
If you did not choose to have the Healthcare Pack Installer automatically create the Master Index, PIX/PDQ and ATNA database tables, you need to create them manually before you can work with the PIX/PDQ Manager. Optionally, you can rerun the Healthcare Pack installer and deselect every option except Configure MySQL.
Before you begin, make sure you have MySQL installed as a service with remote host access enabled. Perform the following steps to create all databases:
 To Create the Master Index Database
Before You Begin
The PIX/PDQ solution currently supports MySQL 5.1. Before you begin this process, be sure you have MySQL installed as a service with remote host access enabled.
-
Copy the MySQL driver file (mysql-connector-java-5.1.7-bin.jar) to app-server-home/domains/domain-name/lib.
-
Create a password for the root user.
-
Run the following command against the root user:
grant all privileges on *.* to 'root'@'%' with grant option;
-
Create a schema in your MySQL environment named midm.
-
Create a user for the Master Index tables by running the following command:
grant create, alter, drop, delete, index, insert, select, trigger, update, create routine, alter routine, execute on midm.* to username identified by 'password';
Substitute an actual user name and password for username and password in the above command. The default user name and password are both midm.
-
Navigate to the directory to which you downloaded the PIX/PDQ projects during installation, and then navigate to PIXPDQCORE/MDMPIXPDQ/src/DatabaseScript.
-
Open systems.sql in a text editor, and add the HL7 systems with which you will be sharing data.
For more information about modifying this file, see Step 4: Define Master Index External Systems in Sun Master Index User’s Guide.
-
Open codelist.sql in a text editor, and add any common code information you need for the master index system.
For more information about code lists and modifying this file, see Step 5: Define Master Index Code Lists in Sun Master Index User’s Guide.
Note –This step is optional. The default configuration does not use common code tables. Adding this feature will cause additional validations to be performed against incoming data.
-
Log in to the midm schema as user you created above.
-
Run the following SQL files against the midm schema. The create.sql file must be run first.
-
create.sql
-
systems.sql
-
codelist.sql
-
-
Continue to To Create the PIX/PDQ Database Tables.
 To Create the PIX/PDQ Database Tables
Before You Begin
Complete To Create the Master Index Database.
-
Navigate to the directory to which you downloaded the PIX/PDQ projects during installation, and then navigate to the SQL folder.
-
Open pixpdq_configuration_data.sql in a text editor, and add any systems you added to the systems.sql file in To Create the Master Index Database.
You need to insert the corresponding namespace ID, universal ID, and encoding scheme for each new system; for example:
insert into PIX_PDQ_SYSTEMS (NAMESPACEID, UNIVERSALID, ENCODINGSCHEME) values ('HOSPITAL1', '1.4.5.2.6.2.23455', 'ISO')
-
Save and close the file.
-
Log in to the midm schema as the user you created in To Create the Master Index Database.
-
Run the following scripts against the midm schema in the order given.
-
create_pixpdq_configuration.sql
-
pixpdq_configuration_data.sql
-
-
Continue to To Create the ATNA Repository Database.
 To Create the ATNA Repository Database
Before You Begin
Complete To Create the PIX/PDQ Database Tables.
-
Create a schema in your MySQL environment named arrdb.
-
Create a user for the ATNA tables by running the following command:
grant create, alter, drop, delete, index, insert, select, trigger, update, create routine, alter routine, execute on arrdb.* to username identified by 'password';
Substitute an actual user name and password for username and password in the above command. The default user name and password are both arr.
-
Navigate to the directory to which you downloaded the PIX/PDQ projects during installation, and then navigate to the SQL folder.
-
Log in to the arrdb schema as the ATNA user you just created.
-
From a SQL editor, run the arrdb.sql file against the arrdb schema.
 To Create the PIX/PDQ Checkpoint Database
Before You Begin
Complete To Create the ATNA Repository Database.
-
Create a schema in your MySQL environment named monitor.
-
Create a user for the checkpoint tables by running the following command:
grant create, alter, drop, delete, index, insert, select, trigger, update, create routine, alter routine, execute on pixpdqcheckpoint.* to pixpdq identified by 'pixpdq';
-
Navigate to the directory to which you downloaded the PIX/PDQ projects during installation, and then navigate to the SQL folder.
-
Log in to the pixpdqcheckpoint schema as the user you created above.
-
Run the monitor.sql file against the pixpdqcheckpoint schema.
 To Remove Existing Data from the Master Index
Database
If you run test data through the PIX/PDQ Manager you can clear out the data to start over with a fresh database. This only clears out the master index tables, and does not affect the audit repository database, the PIX checkpoint database, or the PIX/PDQ tables in the master index database.
Note –
This procedure will only work on the default database; if you change the object structure and recreate the database, use the scripts provided in the master index project to drop the database tables. For more information, see Dropping Master Index Database Tables in Sun Master Index User’s Guide.
-
Navigate to the directory to which you downloaded the PIX/PDQ projects during installation, and then navigate to the SQL folder.
-
Log in to the midm schema as the midm user.
-
From a SQL editor, run the clean_mdm.sql file against the midm schema.
Creating the Runtime Components
If you did not opt to have the Healthcare Pack Installer create the runtime components in your instance of GlassFish, you can create them manually. You can also rerun the installer and deselect all other options except the GlassFish Location and GlassFish Configuration options. This will reinstall all runtime components and also create the needed JDBC connection pools and resources, application variables and configurations, security profiles, and so on.
Perform the following procedures to manually create the runtime components. Each procedure is required.
Creating the JDBC Connection Pools and Resources
The PIX/PDQ Manager maintains connections to several databases to comply with IHE requirements for monitoring, audit logging, and master data management. If you did not have the installer create the connection pools and resources, you can create them manually or rerun the installer as mentioned earlier.
 To Create the JDBC Connection Pools
The following procedures outlines the steps to create a connection pool. The configuration information for each connection pool you need to create is listed after the procedure.
-
Log in to the GlassFish Admin Console.
You can access the console from the Services window in NetBeans.
-
In the left portion of the Admin Console, expand Resources, expand JDBC, and then select Connection Pools.
-
On the Create Connection Pool page, click New.
-
In the Name field, enter a name for the connection pool.
-
In the Resource Type field, select the Java class for the type of transactions being processed.
-
javax.sql.DataSource – For local transactions only.
-
javax.sql.XADataSource – For transactions that are distributed, either within the application or across applications.
-
javax.sql.ConnectionPoolDataSource – For local transactions only. This class provides possible performance improvements.
-
-
In the Database Vendor field, select MySQL.
-
Click Next.
-
In the DataSource Classname field, accept the default class or enter a new one to use.
-
Modify the Pool Settings, Connection Validation, and Transaction properties according to your business practices.
-
In the additional properties section, enter the values for the database. Be sure to enter the following information at a minimum (you might need to create some of these properties).
-
URL – The URL that points to the database. The syntax of the URL is jdbc:mysql://server:port/database_name.
-
portNumber – The port number of the database. For MySQL, the default port is 3306.
-
serverName – The name of the server where the database is located.
-
user – The login ID for database user.
-
password – The password for the above user.
-
databaseName – The name of the database schema.
Create the connection pools listed below. The database vendor for all pools is MySQL. The port number and server name depend on your MySQL environment, and the URL you enter depends on these values. The user and password properties are the ones you defined for each database schema in Creating the PIX/PDQ and ATNA Databases.
Note –You do not have to use the connection pool names given here. These are the default names given by the installer.
Connection Pool Name
Resource Type
Database Name
Purpose
cpPatientXA
The type corresponding to the type of transaction processed by the master index. The default is javax.sql.XADataSource.
midm
Connecting to the Master Index database.
cpPatientSequenceXA
The same as above.
midm
Connecting to the Master Index sequence table.
cpPIXDomainLU
javax.sql.DataSource
midm
Connecting to the Domain Lookup tables.
MyArrdbPool
javax.sql.DataSource
arrdb
Connecting to the ATNA database.
pixpdqMonitorPool
javax.sql.XADatabase
pixpdqCheckpoint
This is used by the PIX Console.
-
 To Create the JDBC Resources
The following procedures outlines the steps to create a JDBC resource. The configuration information for each resource you need to create is located after the procedure.
-
In the left portion of the Admin Console, expand Resources, expand JDBC, and then select JDBC Resources.
-
On the Create JDBC Resource page, click New.
-
In the JNDI Name field, enter a unique name for the JDBC resource.
-
In the Pool Name field, select the name of a JDBC connection pool.
-
In the Status field select the Enabled check box.
-
Click OK.
Create the JDBC Resources listed below, which correspond to the connection pools you created earlier. Note that several of the JNDI names are case-sensitive.
JNDI Name
Pool Name
jdbc/PatientDataSource
cpPatientXA
jdbc/PatientSequenceDataSource
cpPatientSequenceXA
jdbc/PIXDomainLUDataSource
cpPIXDomainLU
jdbc/arrdb
MyArrdbPool
jdbc/SHCPMonitorDB
pixpdqMonitorPool
Creating JMS Destination Resources and Connection Factory
The PIX/PDQ Manager uses JMS topics to make outbound patient notification updates available to the domains that subscribe to those updates. The Sun Master Index generates outbound messages for patient updates in XML format to the PatientTopic destination. The BPEL processes that handle update notifications make the information available to either HL7 v2 or HL7 v3 destinations according to the IHE framework.
You can create the JMS artifacts manually as described below or rerun the installer as mentioned earlier.
 To Create the JMS Destination Resources and
Connection Factory
-
In the left portion of the Admin Console, expand Resources, expand JMS Resources, and then select Connection Factories.
-
On the New JMS Connection Factory page, click New.
-
Enter the following information:
-
JNDI Name – jms/PatientOutBoundServer (this name is case-sensitive)
-
Resource Type – javax.jms.TopicConnectionFactory
-
-
Create the following additional properties and enter the property values:
-
UserName – A JMS user name. The default user name is admin.
-
Password – A password for the above user name. The default password is admin.
-
-
Click OK.
-
In the left portion of the Admin Console, select Destination Resources under JMS Resources.
-
On the New JMS Destination Resource page, click New.
-
Use this page to create the following topics:
JNDI Name
Resource Type
Physical Destination Name
Purpose
PatientTopic
javax.jms.Topic
PatientTopic
Updates to the Master Index patient records are written to this topic.
tHL7V3
javax.jms.Topic
tHL7V3
HL7 v3 updates to patient records are processed through a BPEL process and written to this topic.
tHL7V2
javax.jms.Topic
tHL7V2
HL7 v2 updates to patient records are processed through a BPEL process and written to this topic.
tSUNXDS
javax.jms.Topic
tSUNXDS
This is a placeholder and is not currently used.
tXDSMerge
javax.jms.Topic
tXDSMerge
This is a placeholder and is not currently used.
Creating Application Variables
Application variables are defined for different PIX/PDQ components to be referenced in WSDL files and BPEL processes. This is useful for information that is referenced from several files or that may be customized for different implementations, such as HTTP port numbers, URLs, and certain messaging information. The following procedure gives general instructions for creating an application variables. The specific variables you need to create are listed following this procedure.
 To Create Application Variables
-
On the NetBeans IDE Services window, expand Servers > GlassFish v2.1 > JBI.
-
Expand either Service Engines or Binding Components, depending on which type of component you are adding a variable to.
-
Right-click the component, and then select Properties.
The Properties window appears.
-
Click the ellipsis next to Application Variables.
The Application Variables Editor appears.
-
Click Add, select String for the variable type, and click OK.
-
In the new row that appears on the editor, enter a name and value for the variable.
The name and value pairs you need to add for each component are listed in the following table.
Component Name
Variable Name
Description
Type
Value
HTTP BC
GFDefaultHttpPort
ATNA Audit Service HTTP Port
String
The HTTP port of the GlassFish Server. This variable is referenced in the Audit Service WSDL files. The default value is 8080.
JMS BC
jmsURL
PIX Update Notification JMS URL
String
The URL for the JMS Server to which PIX update notification are written. The default value is mq://localhost:7676.
HL7 BC
sunpixmgr-v2–url
HL7 v2 Listening URL
String
The URL on which the HL7 BC listens for input from HL7 messaging systems. This is referenced in the hl7RecvWsdl.wsdl file. The default value is hl7://localhost:3600.
BPEL SE
sunpixmgr-application
PIX Update Sender HL7 v2 Application
String
The name of the system sending HL7 v2 PIX update notifications. This is referenced from the HL7 v2 PIX notification BPEL process. The default value is SUGA.
BPEL SE
sunpixmgr-facility
PIX Update Sender HL7 v2 Facility
String
The name of the facility sending HL7 v2 PIX update notifications. This is referenced from the HL7 v2 PIX notification BPEL process. The default value is SUNVAN.
BPEL SE
sunpixmgr-device
PIX Update Sender HL7 v3 Device
String
The device sending HL7 v3 PIX update notifications. This is referenced from the HL7 v3 PIX notification BPEL process. The default value is 2.1.12^654.
BPEL SE
sunpixmgr-organization
PIX Update Sender HL7 V3 Organization
String
The name of the organization sending HL7 v3 PIX update notifications. This is referenced from the HL7 v3 PIX notification BPEL process. By default, this variable is left empty.
Creating Application Configurations
Application configurations are defined for the SOAP URLs used in the HL7 v3 projects. The following procedure gives general instructions for creating an application configuration. The specific configurations you need to create are listed following the procedure. Optionally, you can rerun the installer as mentioned earlier to create the application configurations.
 To Create Application Configurations
-
On the NetBeans IDE Services window, expand Servers > GlassFish v2.1 > JBI > Binding Components.
-
Right-click sun-http-binding, and then select Properties.
The Properties window appears.
-
Click the ellipsis next to Application Configuration.
The Application Configuration Editor appears.
-
Click Add.
A new row appears in the configuration list.
-
In the new row, enter a name and HTTP URL Location.
The name and URL pairs you need to add are listed in the following table.
Configuration Name
Value
sunpdqsup-soap11
The SOAP 1.1 URL for the PDQ_HL7V3_Direct project. The default value is http://localhost:${HttpDefaultPort}/PDQSupplier/PDQPort11.
sunpdqsup-soap12
The SOAP 1.1 URL for the PDQ_HL7V3_Direct project. The default value is http://localhost:${HttpDefaultPort}/PDQSupplier/PDQPort12.
sunpixmgr-soap12
The SOAP 1.2 URL for the PIX_HL7V3_Direct project. The default value is http://localhost:${HttpDefaultPort}/PIXManager/PDQPort11.
sunpixmgr-soap11
The SOAP 1.1 URL for the PIX_HL7V3_Direct project. The default value is http://localhost:${HttpDefaultPort}/PIXManager/PDQPort11.
Defining PIX/PDQ Security
You create user accounts for MIDM and PIX Console access using the GlassFish Admin Console. For the PIX Console, there is one predefined user group to which users must be added. For the MIDM, there are two predefined user groups and you can define additional user groups each with different permissions. For more information about configuring user groups (roles) for MIDM, see Defining Master Index Data Manager Security in Maintaining Sun Master Indexes.
The following users are predefined for you when you install the PIX/PDQ Manager:
-
For the MIDM, a user named midm with a password of midm.
-
For the PIX Console, a user named pixadmin with a password of adminadmin.
 To Define PIX/PDQ Security
-
Log on to the GlassFish Admin Console.
-
In the left navigation panel, expand Configuration, expand Security, and then expand Realms.
-
Select File.
-
On the Edit Realm page, select Manage Users.
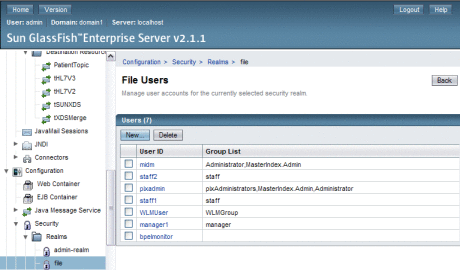
The File Users page appears.
-
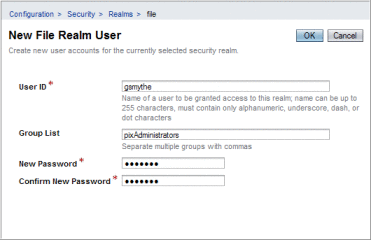
On the File Users page, select New.
-
In the User ID field, enter a name for the user.
-
In the Group List field, do one of the following:
-
For PIX Console users, enter pixAdministrators.
-
For MIDM users, enter MasterIndex.Admin and any of the predefined user groups or user groups that you defined. Separate multiple roles with a comma (no space).
-
-
Enter a password for the user in the New Password field.
-
In the Confirm New Password field, enter the password again.
-
Click OK.
Setting Logging Levels for the PIX/PDQ Manager
By default, all logging components of the PIX/PDQ Manager are set to log at INFO levels, which provides general information about the processes being performed and includes warning and severe error messages. The logging level for lifecycle events in the PIX/PDQ Manager is set in the extralog lifecycle module; you can also modify the log level for any of the PIX/PDQ Manager loggers.
 To Set the Logging Level for the Lifecycle
Logger
-
Launch the GlassFish Admin Console.
-
In the left navigation panel, expand Applications, and then expand Lifecycle Modules.
-
Select extralog.
The Edit Lifecycle Module page appears. The extralog lifecycle has these additional properties:
-
selector – The event selector for the module. Leave this at its default value, solutiongroup in ('SUNPIXPDQ').
-
level – The log level for the PIX/PDQ Manager. By default this is set to FINEST, but you can modify the value.
-
filename – The name of the PIX/PDQ Manager log file. By default, this is pixpdq.log, and the file is located in glassfish-home/domains/domain-name/logs.
-
-
Update the Value column for the level property with any of these values, and then click save.
-
FINEST: Logs highly detailed tracing.
-
FINER: Logs reasonably detailed tracing.
-
FINE: Logs basic tracing.
-
CONFIG Logs static configuration messages.
-
INFO: Logs informative messages.
-
WARNING: Logs messages that indicate a warning.
-
SEVERE: Logs messages that indicate a severe failure.
-
OFF: No logging is performed.
-
 To Set Logging Levels for PIX/PDQ Components
-
Launch the GlassFish Admin Console.
-
In the left navigation panel, click Application Server.
-
On the Application Server page, click the Logging tab, and then click the Log Levels subtab.
-
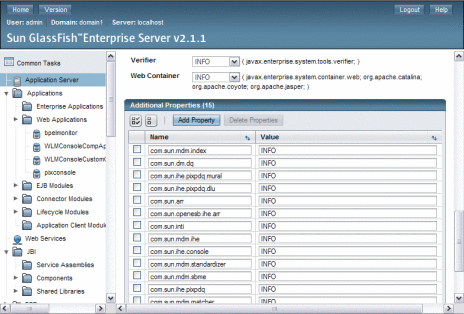
Scroll to the bottom of the page where the Additional Properties table is visible.
-
Update the Value column for any of the loggers listed in the table following this procedure. Enter any of the logging levels listed in the previous procedure.
-
If the logger you want to configure does not appear in the list, do the following:
-
When you are done setting logging levels, click Save.
Logger Name
Description
com.sun.mdm.index
Sun Master Index logger
com.sun.dm.dq
Master Data Management data quality logger
com.sun.inti
Master Index Standardization Engine logger
com.sun.mdm.matcher
Master Index Match Engine logger
com.sun.mdm.standardizer
Master Index Standardization Engine logger
com.sun.mdm.sbme
Master Index Match Engine logger
com.sun.ihe.pixpdq
PIX/PDQ EJB logger
com.sun.ihe.pixpdq.mural
Master Index Facade EJB logger
com.sun.ihe.pixpdq.dlu
Domain Lookup EJB logger
com.sun.mdm.ihe
PIX patient update notification logger
com.sun.arr
ATNA audit helper logger
com.sun.openesb.ihe.arr
ATNA audit repository and system log client logger
com.sun.mdm.ihe.audit
ATNA Audit Web Service EJB logger
com.sun.ihe.checkpoint
Checkpoint logger (for creating the message trace)
com.sun.ihe.console
PIX Console logger
Building and Deploying the PIX/PDQ Manager Projects
The PIX/PDQ projects need to be built and deployed in a specific order. Unless you specify otherwise, the installer takes care of this process when it installs the projects. If you opt to not build and deploy the projects from the installer, build scripts are provided so you can easily build and deploy the projects without being concerned about doing it in the correct order. You can also use these scripts if you update any of the PIX/PDQ projects.
Note –
The PIX/PDQ projects have several dependencies on one another. If you make changes to a project, you should rebuild and redeploy all projects using the scripts provided to ensure that it is done in the correct order and that no components are missed.
 Building and Deploying the PIX/PDQ Manager
Projects
-
Navigate to the location where you installed the PIX/PDQ projects, and then to /hcpbuild.
-
To build the projects, do the following:
-
For Windows, open runBuild.bat in a text editor. For UNIX or Mac OS, open runBuild.sh in a text editor.
-
Verify the values of the following properties, and update them if needed:
-
GLASSFISH_HOME – The GlassFish server home directory for the GlassFish ESB installation; for example, C:\GlassFishESBv22\glassfish..
-
NETBEANS_HOME – The NetBeans home directory for the GlassFish ESB installation; for example, C:\GlassFishESBv22\netbeans..
-
ADMIN_USER – The login ID of the GlassFish admin user. The default login ID is admin.
-
ADMIN_PORT – The GlassFish server admin port.
-
ADMIN_HOST – The name of the server on which the GlassFish server for GlassFish ESB is installed. Unless it is a remote server, you can specify localhost.
-
-
Save and close the file.
-
From a command prompt, type runBuild.bat (for Windows) or runBuild.sh for UNIX.
-
-
To deploy the projects after building them, do the following:
 Redeploying the PIX Console
The PIX Console WAR file is included in the PIX/PDQ Manager installation in case you should ever need to redeploy the console.
-
Launch the GlassFish Admin Console.
-
In the left navigation panel, expand Applications and then select Web Applications.
A list of web applications appears.
-
Do one of the following:
-
If the console is still deployed but needs to be redeployed, click Redeploy in the Action column next for pixconsole.
The Redeploy Enterprise Applications/Modules page appears.
-
If the console is no longer deployed, select the check box next to pixconsole and then click Deploy in the table header.
The Deploy Enterprise Applications/Modules page appears.
-
-
In the Location area, select Packaged File to be Uploaded to the Server.
-
Click Browse, and then navigate to glassfish-home/adsdons/ihe and select pixconsole.war.

-
Click OK.
Running Data Through the PIX/PDQ Manager
Sun provides both HL7 v2 and HL7 v3 sample data for you to run through the PIX/PDQ system to help you get started with the applications. To enter the HL7 v2 sample messages, you need an HL7 simulator. There are several available on the internet. The HL7 v3 data is provided in the form of test cases that are run from the HL7 v3 composite application project.
The sample data illustrates several scenarios for data processing. You add new records, update existing records, cause assumed matches in Master Index, perform PIX queries for associated local identifiers, perform demographic queries, and perform merges. The data was designed to be run in a specific order to get the expected results from PIX and PDQ queries.
Before you can run these test, you need to run a database script to add system information to the midm database, as described below. Without this data, the sample tests will fail.
Note –
You can modify the HL7 v2 sample files and the HL7 v3 test input files to insert additional records into the master index database. If you modify the HL7 v2 sample files, be sure to use an editor that does not automatically convert \r to \r\n, such as UltraEdit.
 To Add Required Systems to the Database
-
Navigate to the location where you installed the PIX/PDQ projects, and then to hcpbuild/smoketest/SQL.
-
Log into the midm database from a SQL prompt or editor as the midm user.
-
Run the pixpdq_configuration_data.sql file against the database.
 To Run HL7 V2 Data
Before You Begin
Make sure the GlassFish server is running and the HL7 simulator is configured correctly. Configuring the HL7 simulator is specific to the type of simulator you are using. Generally, you should only need to configure it to use the HL7 v2 listening URL, which is defined in the sunpixmgr-v2–url application variable for the HL7 Binding Component (by default, hl7://localhost:3600).
Note –
Each group of test files has a readme file that you should review to learn how each file should be processed and what the expected results should be.
-
Navigate to the location where you installed the PIX/PDQ projects, and then to hcpbuild/smoketest/data.
This folder contains a complete set of HL7 v2 files. It also contains subdirectories that each contain a subset of the test files that perform specific functions.
-
From your HL7 simulator, do any of the following:
-
To add records for the same person with different aliases and then perform both PIX and PDQ queries against the data, run the files under the /TestJamesnameStandardization subdirectory in alphanumeric order (this is the order in which they are displayed by default).
-
To perform the same processing as above on a new patient, run the files under the /TestPlainJane subdirectory in alphanumeric order.
-
To perform the same processing as above and include a merge transaction, run the files under the /TestSamuelMerge subdirectory.
These test also include a PIX query that should return no results.
-
-
To process additional records into the system, copy any of the test files and modify the message data as needed. Then process those files using the HL7 simulator.
-
After you process any of the files through the system, you can view audit records and message tracing, content, and extensions from the PIX Console.
For more information, see Viewing Messages and Auditing the PIX/PDQ Manager.
 To Run HL7 V3 Data
Before You Begin
Make sure the PIXPDQ_HL7V3_Direct_ca project is open in the NetBeans IDE and the GlassFish server is running. Run these tests in the
Note –
For best results, run the tests in the order they are displayed in the project. This will show you a full spectrum of PIX/PDQ processing. Because each response is uniquely identified in the id root element, each test will report a failure because it does not receive the expected output. In addition, if the tests are run out of order additional errors will occur because the response from the Master Index will be different.
-
On the NetBeans Projects window, expand the PIXPDQ_HL7V3 project, and then expand Test.
-
Right-click on the test you want to run, and select Run.
-
Check whether the test passed or failed. Do one or both of the following to verify a test:
-
To perform additional tests, you can modify the input file of any of the tests and rerun it. You can also create your own tests by doing the following:
-
Right-click Test, and then select New Test Case.
The New Test Case Wizard appears.
-
Enter a name for the test case, and then click Next.
The Select the WSDL Document window appears.
-
Expand the HL7 v3 project containing the operation you want to test.
-
Select the WSDL file containing the operation to test, and then click Next.
The Select the Operation to Test window appears.
-
Select the operation to test, and then click Finish.
Note –Currently the tester only support SOAP 1.1 and not SOAP 1.2, so you cannot select any of the SOAP 1.2 operations.
In the Projects tree, a new folder is created under the Test node, containing two files: Input.xml and Output.xml.
-
Monitoring the PIX/PDQ Manager
The PIX/PDQ Manager includes a web-based management and monitoring application, the PIX Console. The PIX Console gives you the tools you need to monitor and view messages processed by the PIX/PDQ Manager, to monitor the ATNA audit repository, to maintain system and configuration information, and to view server log messages pertaining to the PIX/PDQ Manager.
The following topics provide information and instructions for monitoring the PIX/PDQ Manager using the PIX Console.
Setting the Session Timeout Duration
By default, if you login to the PIX Console and then leave it idle for 30 minutes, your session will automatically timeout and you will need to log back in to access the console. You can configure the length of time it takes to time out.
 To Set the Session Timeout Duration
-
On the server on which your GlassFish environment is located, navigate to glassfish-home/domains/domain-name/applications/j2ee-modules/pixconsole/WEB-INF.
-
Open web.xml in a text or XML editor.
-
Change the value of the session-timeout element to the number of minutes you want the console to be idle before it times out the session.
For example:
<session-config> <session-timeout> 30 </session-timeout> </session-config> -
Save and close the file.
Launching the PIX Console
The PIX Console is a web-based application, and can be accessed from either the GlassFish Admin Console or by entering the URL directly into a web browser.
 To Start the PIX Console From the Admin Console
-
Start the GlassFish server, if it is not already running.
-
Start the GlassFish Admin Console.
Tip –You can start the console by right-clicking GlassFish v2.1 on the NetBeans Services window, and then selecting View Admin Console. You can also enter the following URL directly into a browser: http://hostnameadmin-listener-port. The default port number is 4848.
-
In the left navigation panel of the Admin Console, select Web Applications.
A list of available web applications appears.
-
In the pixconsole row, click Launch.
The Login window of the PIX Console appears.
-
Enter the user name and password, and then click Login.
The default user name is pixadmin and the default password is adminadmin.
 To Start the PIX Console From a Web Browser
-
Start the GlassFish server, if it is not already running.
-
Enter the following URL directly into a browser: http://hostnamehttp-listener-port/pixconsole. The default port number is 8080.
For example, http://localhost:8080/pixconsole.
The Login window of the PIX Console appears.
-
Enter the user name and password, and then click Login.
The default user name is pixadmin and the default password is adminadmin.
Viewing Messages
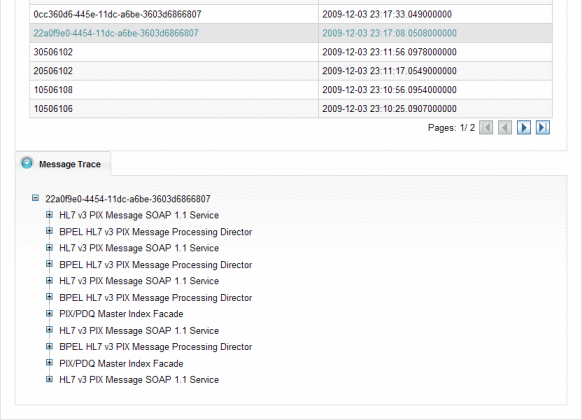
The Messages tab of the PIX Console allows you to view information about the messages that are processed through the PIX/PDQ Manager. You can view the processing flow of the message through PIX/PDQ components, and you can view the content of the input message and any other messages that are generated by the PIX/PDQ Manager components. The PIX Console also lets you view the additional component information, called extensions, to correlate specific component instance with messages. For example, you can view the BPEL process instance ID along with the corresponding message control ID.
 To View Messages
-
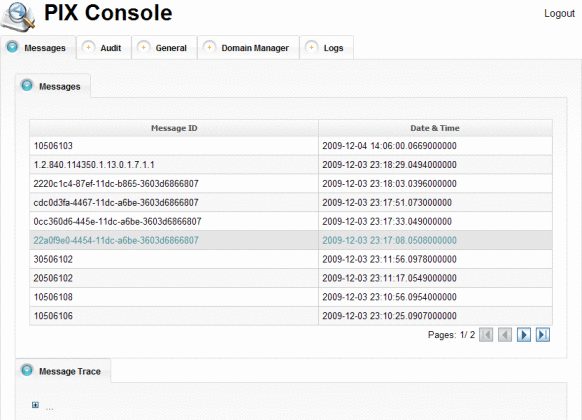
On the PIX Console, click the Messages tab.
A list of transactions appears.
-
To navigate through the transaction list, use the arrow buttons beneath the transaction table.
-
Select a transaction to view from the list.
-
Expand the tree nodes to view how the message was processed through the PIX/PDQ Manager.
-
To view the content of the messages involved in the transaction, do the following:
-
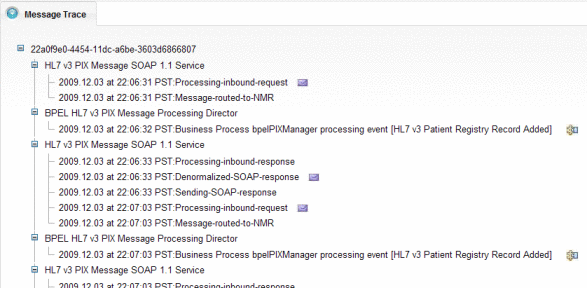
Expand the tree view for the selected transaction until you see the request or response message you want to view.
Note –Each transaction can contain multiple request and response messages since the PIX/PDQ Manager generates additional responses and requests based on the type of transaction being processed.
-
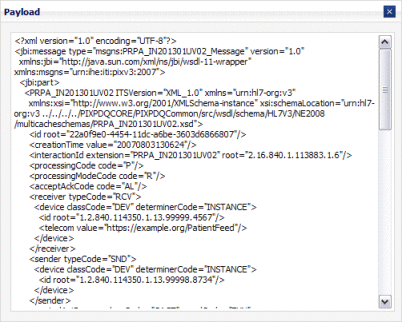
Click the envelope icon to the right of the message description.
The payload appears in XML format.
-
-
To view extensions for the components that processed the transaction, do the following:
Auditing the PIX/PDQ Manager
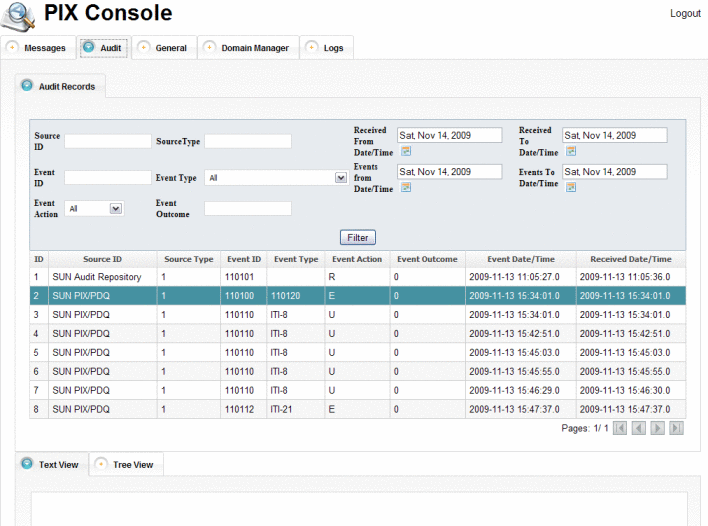
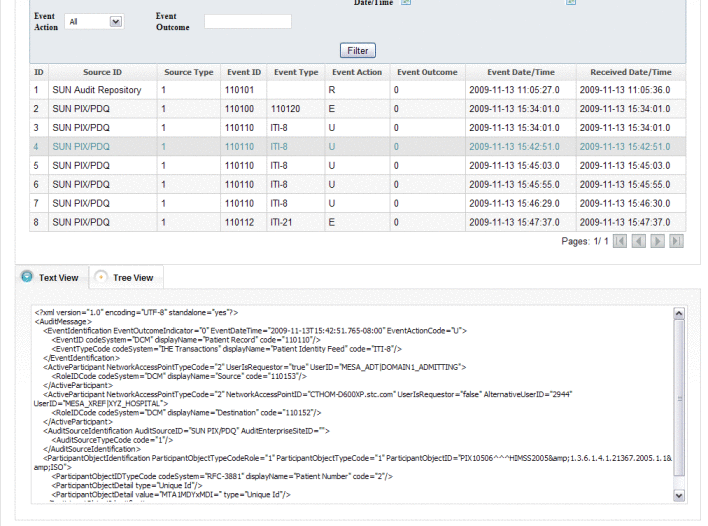
The PIX/PDQ solution provides complete auditing capabilities for the events that are processed through the system in accordance with the ATNA audit repository framework defined by IHE. You can view information about each event and you can filter the list of events by a variety of criteria, such as the source ID, event ID, date range, and so on.
 To Audit the PIX/PDQ Manager
-
On the PIX Console, click the Audit tab.
The Audit page appears with a list of audit events.
-
To scroll through the pages in the list, use the arrow buttons at the bottom left of the list.
-
To narrow down the list, enter filter criteria in the upper portion of the window, and then click Filter.
For a description of the filter fields, see Audit Filter Fields.
-
To view detailed information about an audit event, select the entry from the list.
The text appears in XML format in the Text View panel.
-
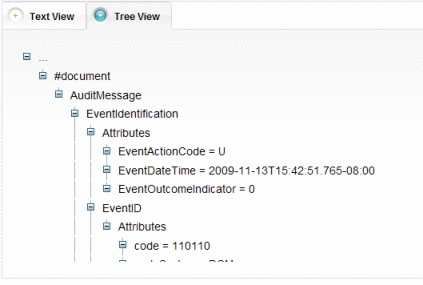
To view the event information in tree view for the selected event, click the Tree View tab near the bottom of the page.
Audit Filter Fields
The following table lists and describes the fields that you can use to narrow down the list of audit entries on the PIX Console.
Maintaining Application Configurations and Variables
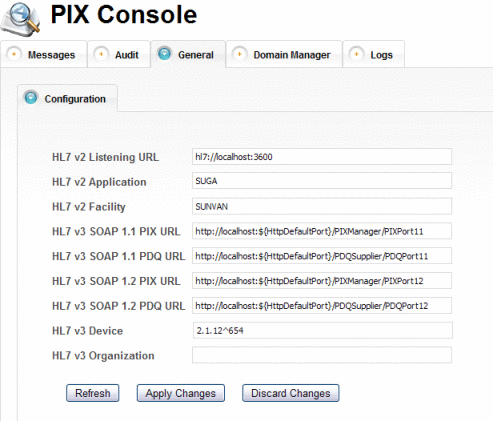
From the PIX Console General page, you can update the values of the predefined application variables and a subset of the application configurations for the PIX/PDQ Manager. The variables define required information for processing both HL7 v2 and HL7 v3 messages.
 To Maintain Application Configurations and
Variables
-
On the PIX Console, click the General tab.
The General page appears with a list of existing PIX/PDQ application variables and certain configurations.
-
To change the value of a variable or configuration, enter the new value and then click Apply Changes.
Tip –If you make a change you need to reverse, click Discard Changes instead of Apply Changes. Any changes that have not been applied are reverted back to their original value.
-
To refresh the list and retrieve any changes to PIX/PDQ application variables and configurations, click Refresh.
Managing Domains
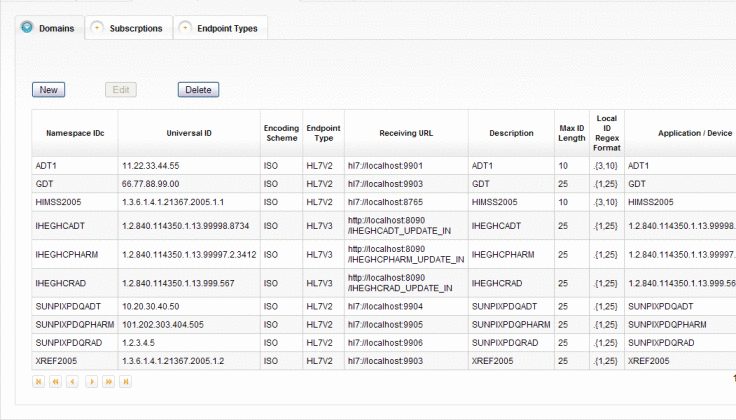
The PIX Console includes a Domain Manager that allows you to view and update information about the external domains that participate in the PIX/PDQ system. You can add new domains and edit or delete existing ones. Changes you make in the Domain Manager are also reflected in the sbyn_systems table of the master index database.
When you update or add domain information, you need to restart the GlassFish server in order for the changes to take effect in the system.
 To Modify Domain Information
-
On the PIX Console, click the Domain Manager tab.
The Domain Manager page appears with a list of the currently defined domains.
-
To add a new domain, do the following:
-
On the Domains tab, click New.
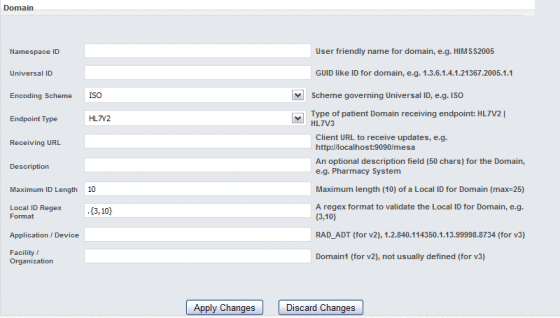
A new page appears with fields you can edit.
-
Enter information about the new domain.
For more information about the fields on this page, see Domain Fields.
-
When you have entered all information, click Apply Changes.
-
On the Confirmation dialog box that appears, click OK.
A new row appears in the domains list.
-
-
To modify domain information, do the following:
-
In the domains list on the Domains tab, select the domain to modify and then click Edit.
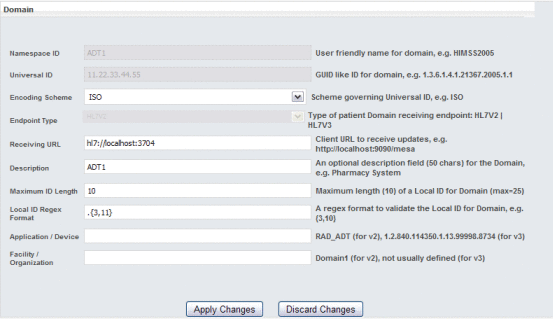
The domain information appears on a new page appears with fields you can edit.
-
Modify the value of any open field.
You cannot modify the namespace ID, Universal ID, or endpoint type. For more information about the fields on this page, see Domain Fields.
-
When you are done with your changes, click Apply Changes.
-
On the confirmation dialog box that appears, click OK.
The domain list reappears with your changes.
-
-
To delete an existing domain, select the domain in the domains list and then click Delete. On the confirmation dialog box that appears, click Delete again.
The row is removed from the domains list.
-
Restart the GlassFish server after making any changes.
Domain Fields
The following tables lists and describes the fields for adding a new domain in the Domain Manager. If you are modifying an existing domain, you cannot update the namespace ID, universal ID, or endpoint type.
Note –
The first three fields in the table correspond to the components of the HL7 assigning authority of the PID-3 field. These fields identify the domain.
|
Field |
Description |
|---|---|
|
Namespace ID |
A user-friendly name for the domain. |
|
Universal ID |
A unique identifier for the domain. The syntax of the ID is governed by the encoding scheme selected below. |
|
Encoding Scheme |
The type of encoding that governs the universal ID, such as ISO. |
|
Endpoint Type |
The type of domain receiving endpoint. The options are HL7v2 and HL7v3. |
|
Receiving URL |
The URL of the HL7 client receiving updates; for example, http://hl7.company.com:7800. |
|
Description |
An optional description of up to 50 characters for the domain. |
|
Maximum ID Length |
The maximum length of the local IDs assigned by the domain. |
|
Local ID Regex Format |
The format of the local IDs assigned by the domain. Use java.util.regex syntax to define the format. |
|
Application/Device |
The name of the HL7 application for HL7 v2. For HL7 v3, this is the name of the device. |
|
Facility/Organization |
The name of the facility for HL7 v2. For HL7 v3, this is the organization (and is generally left empty). |
Maintaining Subscriptions to Patient Updates
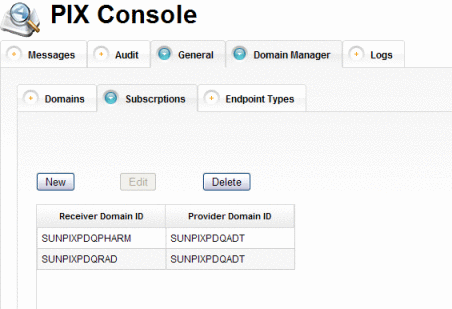
Each domain in the PIX/PDQ system can subscribe to updates made to patient records in the master index database. A subscription definition includes a receiving domain and a provider domain. Any updates to patient records made by the provider domain are published to a JMS topic where they are made available to the receiving domain.
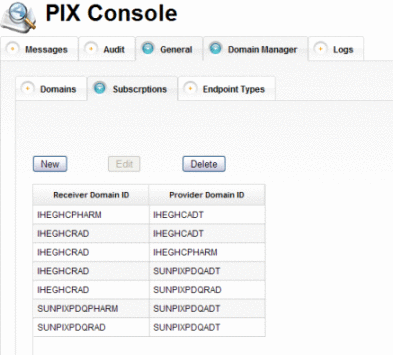
A receiving domain must specifically subscribe to each domain from which it needs to receive update information. In your subscriptions list, one receiving domain might have several subscriptions defined and one provider domain might be specified for several receiving domains.
 To Maintain Subscriptions to Patient Updates
-
On the PIX Console, click the Domain Manager tab, and then click the Subscriptions subtab.
A list appears showing the domains currently sending updates to and receiving updates from each other.
-
To add a new subscription, do the following:
-
On the Subscriptions page, click New.
A new page appears with fields you can edit.

-
In the Receiver Domain ID field, select the domain that will receive updates from the provider domain.
-
In the Provider Domain ID, select the domain whose updates will be received by the subscriber.
-
Click Apply Changes.
The subscriptions list reappears with the new subscription added.
-
-
To change the trigger domain for a subscription, do the following:
-
On the Subscriptions page, select the subscription to modify.
The subscription information appears on a new page appears with fields you can edit.
-
In the Provider Domain ID, select a new domain whose updates will be made available to the subscriber.
-
Click Apply Changes.
The subscriptions list reappears with your changes.
-
-
To delete an existing subscription, select the subscription in the list and then click Delete. On the confirmation dialog box that appears, click Delete again.
The row is removed from the subscriptions list.
Viewing Available Endpoint Types
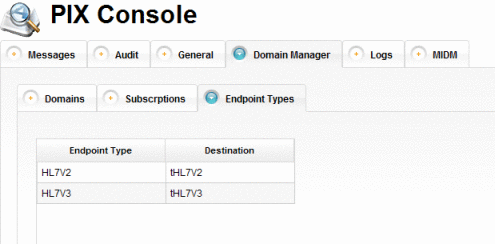
The endpoint types listed on this page are the JMS destinations to which patient record updates are written. A JMS destination is a message repository.
 To View Endpoint Types
-
On the PIX Console, click the Domain Manager tab.
-
Click the Endpoint Types subtab.
A list of available endpoints for the PIX/PDQ Manager appears.
Viewing Server Log Entries for the PIX/PDQ Manager
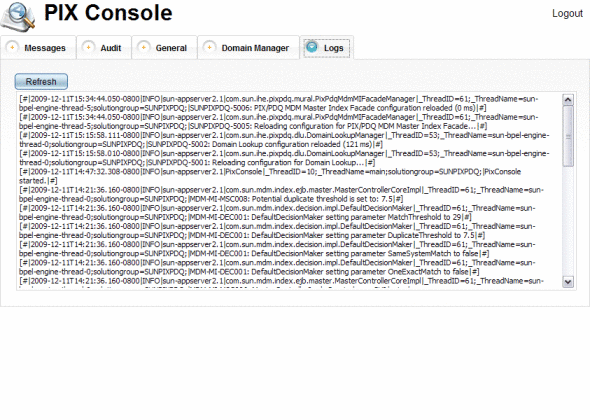
The PIX Console filters server log messages and only displays those entries that pertain to the PIX/PDQ Manager so you do not need to review the entire server log to find information about the PIX/PDQ Manager. You can specify the level of logging detail for each component of the PIX/PDQ Manager. For more information, see Setting Logging Levels for the PIX/PDQ Manager.
 To View the Server Log
-
On the PIX Console, click the Logs tab.
The server log messages pertaining to the PIX/PDQ Manager appear.
Monitoring and Maintaining Master Index Data
The Master Index Data Manager provides the following functions so you can maintain the patient records in the master index database:
-
View patient records
-
Compare patient records
-
Merge and unmerge patient records
-
Compare records that are flagged as possible duplicates
-
Resolve or merge potential duplicate records
-
Review and reverse automatic record matches made by the master index
-
Create reports on master index data and statistics, including records added or updated, potential duplicates, merged and unmerged records, and so on
Logging in to the Master Index Data Manager
The MIDM is accessed through a web browser, and requires you to log in before you can access any patient information. The URL for the MIDM is:
http://host:http_port/app_nameMIDM |
where
-
host is the name of the server machine.
-
http_port is the HTTP port number of the application server.
-
app_name is the name of the master index application.
The default URL for the PIX/PDQ Manager MIDM is:
http://localhost:8080/PatientMIDM |
 To Log in to the MIDM
Before You Begin
-
Make sure you have a login ID and password.
-
Make sure the GlassFish server is running.
-
Launch a web browser.
-
In the Address field, enter the appropriate URL.
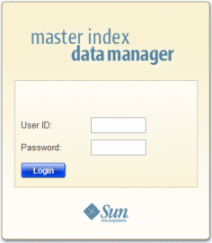
The login page appears.
-
In the upper right portion of the page, select the language for the MIDM display.
-
Enter your user ID and password in the appropriate fields.
-
Click Login.
The initial page appears. (By default, the initial page is the Record Details page, but this is configurable.)
- © 2010, Oracle Corporation and/or its affiliates

