Creating Composite Applications for POJO Service Engine Projects
The way you create a Composite Application varies depending on whether you created a POJO service provider or consumer, and whether you created it with or without binding. The following topics describe the different methods.
-
Creating a Composite Application for a POJO Service Provider (Without Binding)
-
Creating a Composite Application for a POJO Service Provider (With Binding)
-
Creating a Composite Application for a POJO Service Consumer (Without Binding)
-
Creating a Composite Application for a POJO Service Consumer (With Binding)
Creating a Composite Application for a POJO Service Provider (Without Binding)
When you create a POJO service provider without any binding, you can apply the binding to the service assembly in the Composite Application.
 To Create a Composite Application for a POJO
Service Provider (Without Binding)
-
Right-click in the NetBeans Projects window, and then select New Project.
The New Project Wizard appears.
-
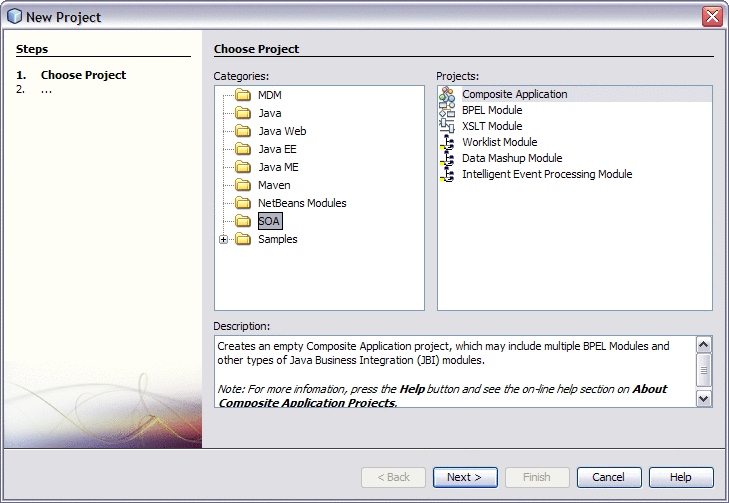
Under Categories, select SOA; under Projects, select Composite Application.
-
Click Next.
The Name and Location window appears.
-
Enter a unique name for the project. You can also modify the location of the project files.

-
Click Finish.
The new project appears in the projects list and the Composite Application appears in the CASA Editor.
-
Drag the POJO Service Engine project to the JBI Module section of the CASA Editor.
-
Click Build.
-
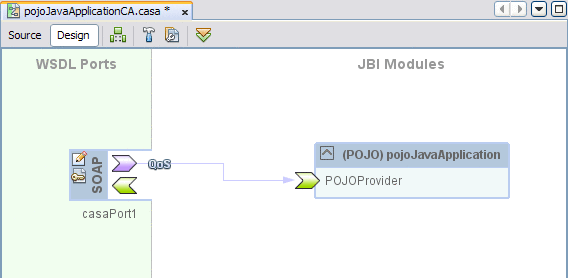
From the CASA Editor Palette, drag the appropriate WSDL Binding to the WSDL Ports section of the CASA Editor.
-
Drag a connection from the WSDL port endpoint to the POJO service endpoint.
-
Save the changes to the Composite Application.
-
To deploy the application, do the following:
Creating a Composite Application for a POJO Service Provider (With Binding)
When you create a Composite Application for a POJO service provider with binding, the CASA Editor automates most of the work for you.
 To Create a Composite Application for a POJO
Service Provider (With Binding)
-
Right-click in the NetBeans Projects window, and then select New Project.
The New Project Wizard appears.
-
Under Categories, select SOA; under Projects, select Composite Application.

-
Click Next.
The Name and Location window appears.
-
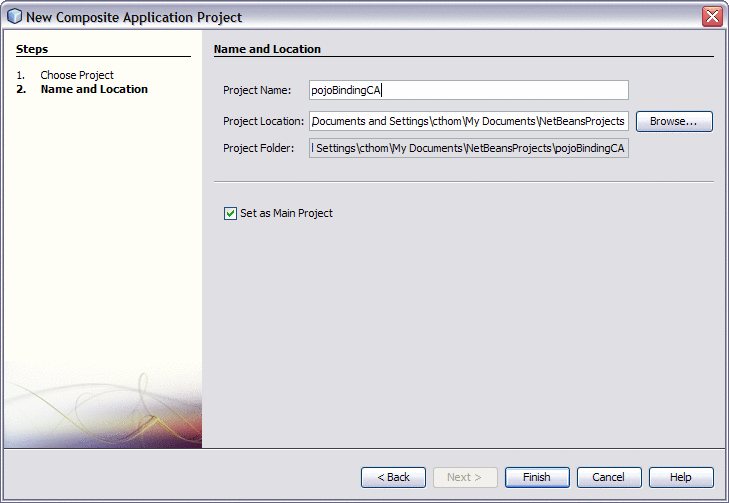
Enter a unique name for the project. You can also modify the location of the project files.
-
Click Finish.
The new project appears in the projects list and the Composite Application appears in the CASA Editor.
-
Drag the POJO Service Engine project to the JBI Module section of the CASA Editor.
-
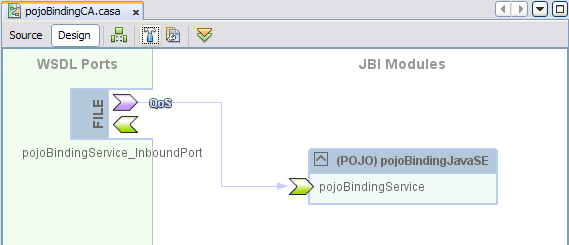
Click Build.
The WSDL port and JBI Module both appear in the CASA Editor with the endpoints connected.
-
Save the changes to the Composite Application.
-
To deploy the application, do the following:
Creating a Composite Application for a POJO Service Consumer (Without Binding)
When you create a POJO service consumer without any binding, you can apply the binding to the service assembly in the Composite Application.
 To Create a Composite Application for a POJO
Service Consumer (Without Binding)
-
Right-click in the NetBeans Projects window, and then select New Project.
The New Project Wizard appears.
-
Under Categories, select SOA; under Projects, select Composite Application.

-
Click Next.
The Name and Location window appears.
-
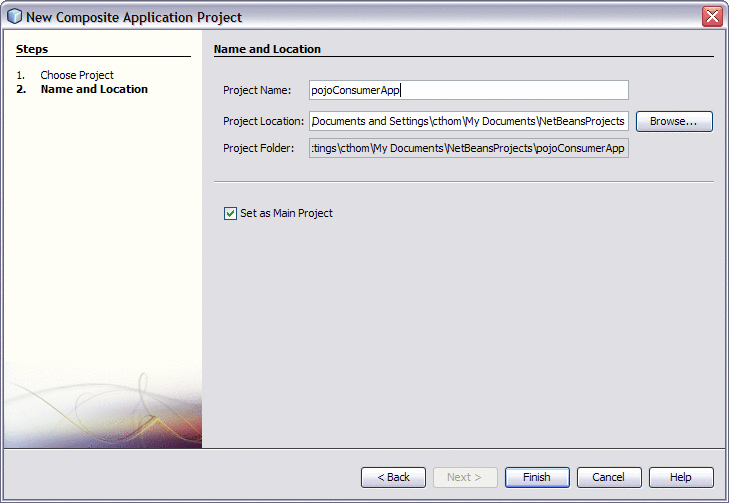
Enter a unique name for the project. You can also modify the location of the project files.
-
Click Finish.
The new project appears in the projects list and the Composite Application appears in the CASA Editor.
-
Drag the POJO Service Engine project to the JBI Module section of the CASA Editor.
-
Click Build.
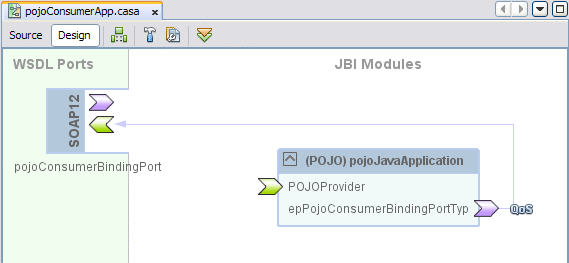
If you configured the POJO consumer from an existing WSDL document, the WSDL port for the consumer appears and is connected to the POJO application.
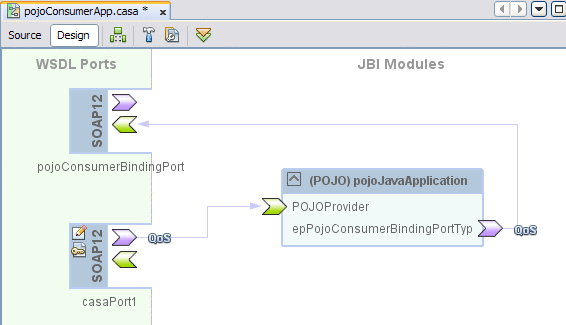
If you added the consumer to a provider that was created with binding, the WSDL port for the provider also appears and is connected to the POJO application.
-
If you did not configure the consumer from an existing WSDL document, drag the appropriate WSDL binding from the Palette to the WSDL Ports section of the CASA Editor and connect it to the consumer endpoint as shown above.
-
If the provider was not created with binding, drag the appropriate WSDL binding from the Palette to the WSDL Ports section of the CASA Editor and connect it to the provider endpoint as shown above.
-
Save the changes to the Composite Application.
-
To deploy the application, do the following:
Creating a Composite Application for a POJO Service Consumer (With Binding)
When you create a Composite Application for a POJO service consumer with binding, building the Composite Application automates most of the work for you.
 To Create a Composite Application for a POJO
Service Consumer (With Binding)
-
Right-click in the NetBeans Projects window, and then select New Project.
The New Project Wizard appears.
-
Under Categories, select SOA; under Projects, select Composite Application.

-
Click Next.
The Name and Location window appears.
-
Enter a unique name for the project. You can also modify the location of the project files.

-
Click Finish.
The new project appears in the projects list and the Composite Application appears in the CASA Editor.
-
Drag the POJO Service Engine project to the JBI Module section of the CASA Editor.
-
Click Build.
The WSDL port for the consumer appears and is connected to the POJO application.

If you added the consumer to a provider that was created with binding, the WSDL port for the provider also appears and is connected to the POJO application.

-
If the provider was not created with binding, drag the appropriate WSDL binding from the Palette to the WSDL Ports section of the CASA Editor and connect it to the provider endpoint as shown above.
-
Save the changes to the Composite Application.
-
To deploy the application, do the following:
- © 2010, Oracle Corporation and/or its affiliates
