| Sun ONE Identity Server 6.1 Administration Guide |
Chapter 2
Identity ManagementThis chapter describes the identity management features of Sun™ ONE Identity Server. The Identity Management module interface provides a way to view, manage and configure all Identity Server objects and identities. This chapter contains the following sections:
The Identity Management InterfaceThere are two basic views of the Identity Server graphical user interface. Depending on the roles of the user logging in, they might gain access to the Identity Management View or the User Profile View.
Identity Management View
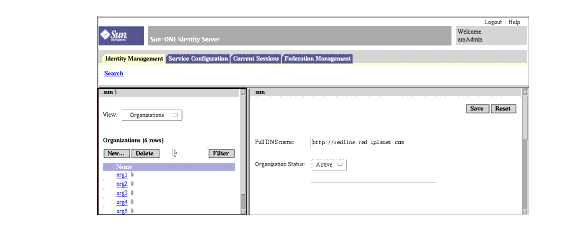
When a user with an administrative role authenticates to the Identity Server, the default view is the Identity Management view. In this view the administrator can perform administrative tasks. Depending on the role of the administrator, this can include creating, deleting and managing objects (users, organizations, policies, and so forth), and configuring services.
Figure 2-1 Identity Management View with Organization Properties Displayed
User Profile View
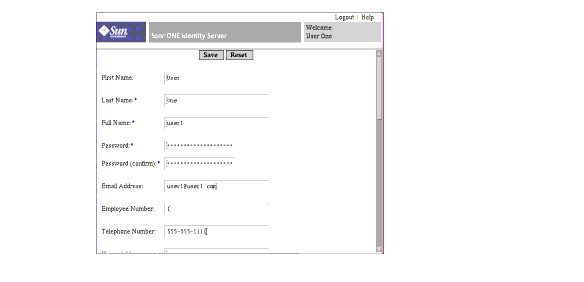
When a user who has not been assigned an administrative role authenticates to the Identity Server, the default view is the user’s own User Profile. In this view the user can modify the values of the attributes particular to the user’s personal profile. This can include, but is not limited to, name, home address and password. The attributes displayed in the User Profile View can be extended. For more information on adding customized attributes for objects and identities, see the Sun ONE Identity Server Customization and API Guide.
Figure 2-2 User Profile View
Managing Identity Server ObjectsThe User Management interface contains all the components needed to view and manage the Identity Server objects (organizations, groups, users, services, roles and policies). This section explains the object types and details on how to configure them.
Properties Function
To view or modify an entry’s properties, click the Properties arrow next to the object’s name. Its attributes and corresponding values are displayed in the Data frame. Different objects display different properties.
See the Sun ONE Identity Server Customization and API Guide for information on how to extend an entry’s properties.
Organizations
This object represents the top-level of a hierarchical structure used by an enterprise to manage its departments and resources. Upon installation, Identity Server dynamically creates a top-level organization (defined during installation) to manage the Identity Server enterprise configurations. Additional organizations can be created after installation to manage separate enterprises. All created organizations fall beneath the top-level organization.
Create an Organization
- Choose Organizations from the View menu in the Identity Management module.
- Click New in the Navigation frame.
The New Organization template displays in the Data frame.
- Enter a value for the name of the Organization in the New Organization template.
- Choose a status of active or inactive.
The default is active. This can be changed at any time during the life of the organization by selecting the Properties icon. Choosing inactive disables user access when logging in to the organization.
- Enter the values, if desired, for the optional fields. The optional fields are:
Organization Aliases. This field defines alias names for the organization, allowing you to use the aliases for authentication with a URL login. For example, if you have an organization named exampleorg, and define 123 and abc as aliases, you can log into the organization using any of the following URLs:
http://machine.example.com/UI/Login?org=exampleorg
http://machine.example.com/UI/Login?org=abc
http://machine.example.com/UI/Login?org=123
Domain Name. Enter the full Domain Name System (DNS) name for the organization, if it has one.
DNS Alias Names. Allows you to add alias names for the DNS name for the organization. This attribute only accepts “real” domain aliases (random strings are not allowed). For example, if you have a DNS named example.com, and define example1.com and example2.com as aliases for an organization named exampleorg, you can log into the organization using any of the following URLs:
http://machine.example.com/UI/Login?org=exampleorg
http://machine.example1.com/UI/Login?=org=exampleorg
http://machine.example2.com/UI/Login?org=exampleorg
Unique Attribute List. Allows you to add a list of unique attribute names for users in the organization. For example, if you add a unique attribute names specifying an email address, you would not be able to create two users with the same email address. This field also accepts a comma-separated list. Any one of the attribute names in the list defines uniqueness. For example, if the field contains the following list of attribute names:
PreferredDomain, AssociatedDomain
and PreferredDomain is defined as http://www.example.com for a particular user, then the entire comma-separated list is defined as unique for that URL.
Uniqueness is enforced for all suborganizations.
- Click Create.
The new organization displays in the Navigation frame.
Delete an Organization
Add an Organization to a Policy
Identity Server objects are added to a policy through the policy’s subject definition. When a policy is created or modified, organizations, roles, groups, and users can be defined as the subject in the policy’s Subject page. Once the subject is defined, the policy will be applied to the object. For more information, see "Modifying Policies".
Groups
A group represents a collection of users with a common function, feature or interest. Typically, this grouping has no privileges associated with it. Groups can exist at two levels, within an organization and within other managed groups as a sub group. Users can be added to Managed Groups either statically or dynamically (filtered).
Membership By Subscription
When you specify group membership by subscription, a static group is created based on the Managed Group Type you specify. If the Managed Group Type value is static, group members are added to a group entry using the groupOfNames or groupOfUniqueNames object class. If the Managed Group Type value is dynamic, a specific LDAP filter is used to search and return only user entries that contain the memberof attribute. For more information, see Managed Group Type.
Membership By Filter
A filtered group is a dynamic group that is created through the use of an LDAP filter. All entries are funneled through the filter and dynamically assigned to the group. The filter would look for any attribute in an entry and return those that contain the attribute. For example, if you were to create a group based on a building number, you can use the filter to return a list all users containing the building number attribute.
Note
By default, the managed group type is dynamic. You can change this default in the Administration service configuration.
Create a Managed Group
- Navigate to the organization (or group) where the group will be created.
- Choose Groups from the View menu.
- Click New.
- Select the group type from within the Data frame.
- Enter a name for the group in the Name field. Click Next.
- Select the Users Can Subscribe to this Group attribute to allow users to subscribe to the group themselves.
- Add users to the group by selecting Add from the Member List.
- Enter the search criteria and click Filter. When the user list is returned, select the users you wish to add and click Submit. Adding users to the group is optional. They can be added after the group is created.
- Click Create.
- Enter a name for the group in the Name field. Click Next.
- Construct the LDAP search filter.
- The fields used to construct the filter use either an OR or AND operator. All the fields listed in the UI are used. If a field is left blank it will match all possible entries for that particular attribute.
- Click Create.
Delete a Managed Group
- Navigate to the organization where the group exists.
- Choose Groups from the View menu.
- Select the checkbox next to the name of the group to be deleted.
- Click Delete.
Add a Group to a Policy
Identity Server objects are added to a policy through the policy’s subject definition. When a policy is created or modified, organizations, roles, groups, and users can be defined as the subject in the policy’s Subject page. Once the subject is defined, the policy will be applied to the object. For more information, see "Modifying Policies".
Users
Users represent the identity of a person. Through the Identity Server Identity Management module, users can be created and deleted in organizations, containers and groups; added or removed from roles and/or groups; and you can assign services to the user.
Create a User
- Navigate to the organization, container or people container where the user is to be created (or you can select the people container from the user creation page).
- Choose Users from the View menu.
- Click New.
This displays the New User page in the Data frame.
- Enter values for the required attributes and any optional fields.
Information on the user profile attributes can be found in "User Attributes".
- Click Create.
Add a User to Roles and Groups
- Navigate to the Organization for the user that is to be modified.
- Choose Users from the View menu.
- In the Navigation frame, select the user you wish to modify and click the Properties arrow.
- From the View menu in the Data frame, select Roles or Groups.
The User view allows you to modify any attributes defined the User service.
- Select the role, or group that to which you wish to add the user, and click Save. Filtered roles and groups can not be displayed.
Add a Service to a User
- Navigate to the Organization for the user that is to be modified.
- Choose Users from the View menu.
- In the Navigation frame, select the user you wish to modify and click the Properties arrow.
- From the View menu in the Data frame, select Services.
- Click Add to select the services you wish to assign to the user.
- Click Save.
Delete a User
Add a User to a Policy
Identity Server objects are added to a policy through the policy’s subject definition. When a policy is created or modified, organizations, roles, groups, and users can be defined as the subject in the policy’s Subject page. Once the subject is defined, the policy will be applied to the object. For more information, see "Modifying Policies".
Services
Activating a service for an organization or container (containers behave the same as organizations) is a two step process. In the first step you need to register the service with the organization. After a service is registered, a template configured specifically for that organization must be created. For additional information, see Chapter 3, "Service Configuration"
Register a Service
- Navigate to the Organization where you will add services.
Choose Organizations from the View menu in the Identity Management module and select the organization from the Navigation frame. The Location path displays the default top-level organization and chosen organization.
- Choose Services from the View menu.
- Click Register.
The Data frame will display a list of services available to register to this organization.
- Select the checkbox next to the services to be added.
- Click Register. The registered services are displayed in the Navigation frame.
Create a Template for a Service
- Navigate to the organization or role where the registered service exists.
Choose Organizations from the View menu in the Identity Management module and select the organization from the Navigation frame.
- Choose Services from the View menu.
- Click the properties icon next to the name of the service to be activated.
The Data frame displays the message No Template Available For This Service. Do you want to create it?
- Click Create.
A template is created for this service for the parent organization or role. The Data frame displays the default attributes and values for this service. Descriptions for the attributes for the default services are described in the "Attribute Reference Guide".
- Accept or modify the default values and click Save.
Unregister a Service
Roles
Roles are a Directory Server entry mechanism similar to the concept of a group. A group has members; a role has members. A role’s members are LDAP entries that possess the role. The criteria of the role itself is defined as an LDAP entry with attributes, identified by the Distinguished Name (DN) attribute of the entry. Directory Server has a number of different types of roles but Identity Server can manage only one of them: the managed role.
Note
The other Directory Server role types can still be used in a directory deployment; they just can not be managed by the Identity Server console. Other Directory Server types can be used in a policy’s subject definition. For more information on policy subjects, see "Policy Management".
Users can possess one or more roles. For example, a contractor role which has attributes from the Session Service and the URL Policy Agent Service might be created. When new contractors start, the administrator can assign them this role rather than setting separate attributes in the contractor entry. If the contractor were then to become a full-time employee, the administrator would just re-assign the user a different role.
Identity Server uses roles to apply access control instructions. When first installed, Identity Server configures access control instructions (ACIs) that define administrator permissions. These ACIs are then designated in roles (such as Organization Admin Role and Organization Help Desk Admin Role) which, when assigned to a user, define the user’s access permissions.
Users can view their assigned roles only if the Display User’s Roles attribute is enabled in the Administration Service. For more information, see "Display User's Roles".
Similar to groups, roles can be created by a filter, or be created statically.
Filtered Role. A filtered role is a dynamic role created through the use of an LDAP filter. All users are funneled through the filter and assigned to the role at the time of the role’s creation. The filter looks for any attribute value pair (for example, ca=user*) in an entry and automatically assign the users that contain the attribute to the role.
Static Role. In contrast to a filtered role, a static role can be created without adding users at the point of the role’s creation. This gives you more control when adding specific users to a given role.
Create a Filtered Role
- In the Navigation frame, go the organization where the role will be created.
- Choose Roles from the View menu.
A set of default roles are created when an organization is configured, and are displayed in the Navigation frame.
For descriptions of these roles, see "Dynamic Admin Roles ACIs" of the Attribute Reference section.
- Click New in the Navigation frame. The New Role template appears in the Data frame.
- Select Filtered Role and enter the name. Click Next.
- Enter a description for the role.
- Choose the role type from the Type menu.
The role can be either an Administrative role or a Service role. The role type is used by the console to figure out where to start the user in the DIT. An administrative role notifies the console that the possessor of the role has administrative privileges; the service role notifies the console that the possessor is an end user.
- Choose a default set of permissions to apply to the role from the Access Permission menu.
The permissions provide access to entries within the organization. They are discussed in the section "Default Role Permissions (ACIs)". (The default permissions shown are in no particular order.)
Generally, the No Permissions ACI is assigned to Service roles, while Administrative roles are assigned any of the default ACIs.
- Enter the information for the search criteria. The fields are:
Logical Operator. Allows you to include an operator for any the fields you wish to include for the filter. AND returns users for all specified fields. OR returns users for any one of the specified fields.
User ID. Search for a user by User ID.
First Name. Search for users by their first name.
Last Name. Search for users by their last name.
Full Name. Search for users by their full name.
User Status. Search for users by their status (active or inactive).
Alternatively, you can select the Advanced button to define the filter attributes yourself. For example,
(&(uid=user1)(|(inetuserstatus=active)(!(inetuserstatus=*))))
If the filter is left blank, by default, the following role is created:
(objectclass = inetorgperson)
Click Reset to clear the filter properties, or click Cancel to cancel the role creation process.
- Click Create to initiate the search based on the filter criteria. The users defined by the filter criteria are automatically assigned to the role.
Create a Static Role
For descriptions of these roles, see "Dynamic Admin Roles ACIs" of the Attribute Reference section.
- Click New in the Navigation frame. The New Role template appears in the Data frame.
- Select Static Role and enter a name. Click Next.
- Enter a description of the role.
- Choose the role type from the Type menu.
The role can be either an Administrative role or a Service role. The role type is used by the console to figure out where to start the user in the DIT. An administrative role notifies the console that the possessor of the role has administrative privileges; the service role notifies the console that the possessor is an end user.
- Choose a default set of permissions to apply to the role from the Access Permission menu.
The permissions provide access to entries within the organization. They are discussed in the section "Default Role Permissions (ACIs)". (The default permissions shown are in no particular order.)
Generally, the No Permissions ACI is assigned to Service roles, while Administrative roles are assigned any of the default ACIs.
- Click Create.
The created role is displayed in the Navigation frame and status information about the role is displayed in the Data frame.
The services available to the role are inherited from the parent organization for the role. You can create a service template for the role, if one does not already exist, by clicking the Edit link. If the service template already exists, the service properties are displayed and can be configured. For more information, see "Customize a Service to a Role".
Add Users to a Static Role
- Select the role to modify and click on the Properties arrow.
- Choose Users from the View menu in the Data frame.
- Click Add.
- Enter the information for the search criteria. You can choose to search for users based on one or more the displayed fields The fields are:
Logical Operator. Allows you to include an operator for any the fields you wish to include for the filter. AND returns users for all specified fields. OR returns users for any one of the specified fields.
User ID. Search for a user by User ID.
First Name. Search for users by their first name.
Last Name. Search for users by their last name.
Full Name. Search for users by their full name.
User Status. Search for users by their status (active or inactive).
Return Users By. Allows you to specify the value returned by the search.
- Click Filter to begin the search.
- Choose the users from the names returned by selecting the checkbox next to the user name.
- Click Save.
The Users are now assigned to the role.
Remove Users from a Role
- Navigate to the Organization that contains the role to modify.
Choose Organizations from the View menu in the Identity Management module and select the organization from the Navigation frame.
- Choose Roles from the View menu.
- Select the role to modify.
- Choose Users from the View menu.
- Select the checkbox of the users for removal.
- Click Remove.
The users are now removed from the role.
Add a Role to a Policy
Identity Server objects are added to a policy through the policy’s subject definition. When a policy is created or modified, organizations, roles, groups, and users can be defined as the subject in the policy’s Subject page. Once the subject is defined, the policy will be applied to the object. For more information, see "Modifying Policies".
Customize a Service to a Role
You can customize the services available to a role, and the access level for the service attributes, on a per-role basis. Using the General view, an administrator can customize the Service and User pages, and create service administrators who only have access to specific services. For example, an administrator can deny write-access to one or more attributes in the user services for a given role, and a user possessing this role will not be able to modify these attributes. A policy administrator role can be created by granting access to all policy services, but denying access to other services. An administrator possessing the policy administrator role will then be able to create and assign policies, but will be denied from performing user management tasks.
You must register the services at the organization level in order to display the services. Users that are added to the role will inherit the role’s service attributes.
Customize Service Access
- Click the Properties arrow for the role you wish to modify.
- Select General from the View menu.
- In the Role Properties page, click Edit in the Services listing.
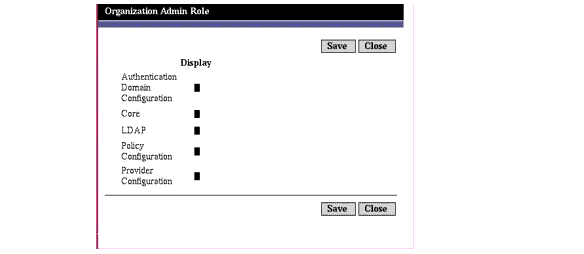
The Service Access page is displayed, as shown in Figure 2-3.
- Choose a service that is to be granted to the role by clicking on the service name in the Display column. By default, a role has access to all services.
- Click Save.
Figure 2-3 Service Access Page
Customize Attribute Access
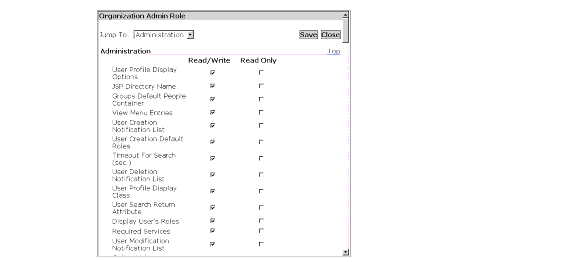
- In the Role Properties page, click Edit in the Service Attribute listing. The Attribute Access page is displayed, as shown in Figure 2-4.
- Use the Jump menu to display the attributes for a particular service.
- Assign an access level to an attribute by selecting the Read/Write or Read Only check boxes.
- Click Save.
Note
If neither the Read/Write or Read Only options are selected for a given attribute, read and write access to that attribute is denied.
Figure 2-4 Attribute Access Page
For more information on specific Service attributes, see Part 3 of this manual, the Attribute Reference Guide.
Delete a Role
- Navigate to the organization that contains the role for deletion.
Choose Organizations from the View menu in Identity Management and select the organization from the Navigation frame. The Location path displays the default top-level organization and chosen organization.
- Choose Roles from the View menu.
- Select the checkbox next to the name of the role.
- Click Delete.
Policies
Policies define rules to help protect an organization’s web resources. Although policy creation, modification and deletion is performed through the Identity Management module, the procedures are described in "Policy Management".
Containers
The container entry is used when, due to object class and attribute differences, it is not possible to use an organization entry. It is important to remember that the Identity Server container entry and the Identity Server organization entry are not necessarily equivalent to the LDAP object classes organizationalUnit and organization. They are abstract Identity entries. Ideally, the organization entry will be used instead of the container entry.
Note
The display of containers is optional. To view containers you must select Display Containers in Menu in the Identity Server Administration service. For more information, see "Display Containers In Menu".
Create a Container
Delete a Container
People Containers
A People Container is the default LDAP organizational unit to which all users are assigned when they are created within an organization. People containers can be found at the organization level and at the people container level as a sub People Container. They can contain only other people containers and users. Additional people containers can be added into the organization, if desired.
Note
The display of people containers is optional. To view People Containers you must select Show People Containers in the Identity Server Administration service. For more information, see "Show People Containers".
Create a People Container
Delete a People Container
Group Containers
A Group Container is used to manage groups. It can contain only groups and other group containers. The group container Groups is dynamically assigned as the parent entry for all managed groups. Additional group containers can be added, if desired.
Note
The display of group containers is optional. To view group containers you must select Show Group Containers in the Identity Server Administration service. For more information, see "Show Group Containers".
Create a Group Container
Delete a Group Container