Specifying Additional Approvers (Approvals Tab, Additional Approvers Section)
Use the Determine additional approvers from menu to specify how Identity Manager will determine additional approvers for the create user, delete user, or update user tasks.
The options on this menu are listed in Table 9–1.
Table 9–1 Determine Additional Approvers From Menu Options|
Option |
Description |
|---|---|
|
None (default) |
No additional approvers are required for task execution. |
|
Attribute |
Approvers’ account IDs are derived from within an attribute specified in the user’s view. |
|
Rule |
Approvers’ account IDs are derived by evaluating a specified rule. |
|
Query |
Approvers’ account IDs are derived by querying a particular resource. |
|
Administrator List |
Approvers are chosen explicitly from a list. |
When you select any of these options (except None), additional options display in the Administrator user interface.
Use the instructions provided in the following sections to specify a method for determining additional approvers.
 To Determine Additional Approvers From an Attribute
Use the following steps to determine additional approvers from an attribute.
-
Select Attribute from the Determine Additional Approvers from menu.
Note –The attribute must resolve to a string that represents a single account ID or to a list in which the elements are account IDs.
New options display, as shown in the following figure.
Figure 9–12 Additional Approvers: Attribute

-
Approver Attribute. Provides a list of attributes (currently defined for the view associated with the task configured by this template) used to determine approvers’ account IDs.
-
Approval times out after. Provides a method for specifying when the approval will time out.
The Approval times out after setting affects both initial approvals and escalated approvals.
-
-
Use the Approver Attribute menu to select an attribute.
The selected attribute displays in the adjacent text field.
-
Decide whether you want the approval request to timeout after a specified period of time.
-
If you want to specify a timeout period, continue to To Configure Approval Timeouts for instructions.
-
If you do not want to specify a timeout period, you can continue to Configuring the Approval Form (Approvals Tab, Approval Form Configuration Section) or save your changes and go on to configure a different tab.
-
 To Determine Additional Approvers from a Rule
Use the following steps to derive the approver's accountIDs from a specified rule.
-
Select Rule from the Determine additional approvers from menu.
Note –When evaluated, the rule must return a string that represents a single account ID or to a list in which the elements are account IDs.
New options display, as shown in the following figure.
Figure 9–13 Additional Approvers: Rule

-
Approver Rule. Provides a list of rules (currently defined for your system) that, when evaluated, returns the recipients’ account IDs.
-
Approval times out after. Provides a method for specifying when the approval will time out.
The Approval times out after setting affects both initial approvals and escalated approvals.
-
-
Select a rule from the Approver Rule menu.
-
Decide whether you want the approval request to timeout after a specified period of time.
-
If you want to specify a timeout period, continue to To Configure Approval Timeouts for instructions.
-
If you do not want to specify a timeout period, you can continue to Configuring the Approval Form (Approvals Tab, Approval Form Configuration Section) or save your changes and go on to configure a different tab.
-
 To Determine Additional Approvers From a Query
Use the following steps to derive approvers accountIDs by querying a specified resource.
Note –
Only LDAP and Active Directory resource queries are supported at this time.
-
Select Query from the Determine Additional Approvers from menu and new options display, as shown in the following figure.
Figure 9–14 Additional Approvers: Query

-
Approval Administrator Query. Provides a table consisting of the following menus, which you can use to construct a query:
-
Resource to Query. Provides a list of resources currently defined for your system.
-
Resource Attribute to Query. Provides a list of resource attributes currently defined for your system.
-
Attribute to Compare. Provides a list of attributes currently defined for your system.
-
-
Approval times out after. Provides a method for specifying when the approval will time out.
Note –The Approval times out after setting affects both initial approvals and escalated approvals.
-
-
Construct a query as follows:
-
Decide whether you want the approval request to timeout after a specified period of time.
-
If you want to specify a timeout period, continue to To Configure Approval Timeouts for instructions.
-
If you do not want to specify a timeout period, you can continue to Configuring the Approval Form (Approvals Tab, Approval Form Configuration Section) or save your changes and go on to configure a different tab.
-
 To Determine Additional Approvers From the Administrator
List
Use the following steps to explicitly choose additional approvers from the administrators list.
-
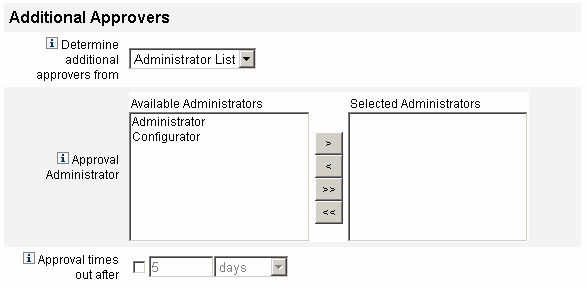
Select Administrator List from the Determine Additional Approvers from menu and new options display, as shown in the following figure.
Figure 9–15 Additional Approvers: Administrators List

-
Administrators to Notify. Provides a selection tool with a list of available administrators.
-
Approval Form. Provides a list of user forms additional approvers can use to approve or reject an approval request.
-
Approval times out after. Provides a method for specifying when the approval will time out.
The Approval times out after. Affects both initial approvals and escalated approvals.
-
-
Select one or more administrators in the Available Administrators list and move the selected names to the Selected Administrators list.
-
Decide whether you want the approval request to timeout after a specified period of time.
-
If you want to specify a timeout period, continue to To Configure Approval Timeouts for instructions.
-
If you do not want to specify a timeout period, you can continue to Configuring the Approval Form (Approvals Tab, Approval Form Configuration Section).
-
 To Configure Approval Timeouts
Use the following steps to configure approval timeouts in the Approval times out after section.
-
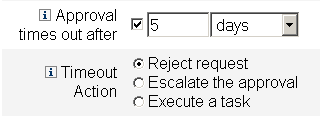
Select the Approval times out after checkbox.
The adjacent text field and menu become active, and the Timeout Action options display, as shown in the following figure.
Figure 9–16 Approval Timeout Options

-
Use the Approval times out after text field and menu to specify a timeout period as follows:
-
Use the Timeout Action buttons to specify what happens when the approval request times out.
Click one of the following:
-
Reject Request. Identity Manager automatically rejects the request if it is not approved before the specified timeout period.
-
Escalate the approval. Identity Manager automatically escalates the request to another approver if the request is not approved before the specified timeout period.
When you enable this button, new options display because you must specify how Identity Manager will determine approvers for an escalated approval. Continue to To Configure the Determine Escalation Approvers From Section for instructions.
-
Execute a task. Identity Manager automatically executes an alternate task if the approval request is not approved before the specified timeout period.
Enable this button and the Approval Timeout Task menu displays so you can specify a task to execute if the approval request times out. Continue to To Configure the Approval Timeout Task Section for instructions.
-
 To Configure the Determine Escalation Approvers From
Section
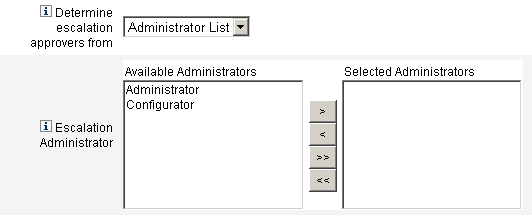
When you select Escalate the approval in the Timeout Action section (To Configure Approval Timeouts), the Determine escalation approvers from menu displays, as shown in the following figure.

-
Choose an option from this menu to specify how approvers are determined for an escalated approval.
The options include:
-
Attribute. Determine approver account IDs from within an attribute specified in the new user’s view.
Note –The attribute must resolve to a string that represents a single account ID or to a list in which the elements are account IDs.
When you select this option, the Escalation Administrator Attribute menu displays. Select an attribute from the list and the selected attribute displays in the adjacent text field, as shown in the following figure.

-
Rule. Determine approver account IDs by evaluating a specified rule.
Note –When evaluated, the rule must return a string that represents a single account ID or to a list in which the elements are account IDs.
When you select this option, the Escalation Administrator Rule menu displays, as shown. Select a rule from the list.

-
Query. Determine approvers account IDs by querying a particular resource.
The Escalation Administrator Query menus display as shown in the following figure.
-
Select a resource from the Resource to Query menu.
-
Select an attribute from the Resource Attribute to Query menu.
-
Select an attribute from the Attribute to Compare menu.

Build your query as follows:
-
-
Administrator List (default). Choose approvers explicitly from a list.
The Escalation Administrator selection tool displays as shown in the following figure.

-
Select one or more administrator names from the Available Administrators list.
-
Move the selected names to the Selected Administrators list.
Select approvers as follows:
-
-
 To Configure the Approval Timeout Task Section
When you select the Execute a task option in the Timeout Action section (To Configure Approval Timeouts), the Approval Timeout Task menu displays as shown in the following figure.

- © 2010, Oracle Corporation and/or its affiliates
