Configuring PasswordSync with a Sun JMS Server
Identity Manager can use Java Message Service (JMS) to receive password change notifications from the PasswordSync servlet. In addition to guaranteed delivery, JMS can deliver messages to multiple systems.
Note –
See the Sun Identity Manager 8.1 Resources Reference for more information about this adapter.
Using a sample scenario, this section provides instructions for configuring PasswordSync with a Sun JMS server.
The information is organized as follows:
Sample Scenario
A typical (simple) use case for configuring PasswordSync with a JMS server is to enable users to change their passwords on Windows, have Identity Manager pick up the new password, and then update the user accounts with the new passwords on a Sun Directory Server.
The following environment was configured for this scenario:
-
Windows Server 2003 Enterprise Edition– Active Directory
-
Sun JavaTM System Identity Manager 6.0 2005Q4M3
-
MySQL running on SUSE Linux 10.0
-
Tomcat 5.0.28 running on SUSE Linux 10.0
-
Sun Java System Message Queue 3.6 SP3 2005Q4 running on SUSE Linux 10.0
-
Sun Java System Directory Server 5.2 SP4 running on SUSE Linux 10.0
-
Java 1.5 (Java 5.0)
The following files were copied to the Tomcat common/lib directory to enable JMS and JNDI:
-
jms.jar (from Sun Message Queue)
-
fscontext.jar (from Sun Message Queue)
-
imq.jar (from Sun Message Queue)
-
jndi.jar (from Java JDK)
Creating and Storing Administered Objects
This section provides instructions for creating and storing the following administered objects, which are required for the sample scenario to work successfully:
-
Connection factory objects
-
Destination objects
You can store administered objects in an LDAP directory or in a file. If you are using a file, all instances of the file must be the same.
For instructions, see
Note –
-
The instructions in this section assume you have installed Sun Java System Message Queue. (The necessary tools are located in the bin/ directory of your Message Queue installation.)
-
You can use the Message Queue administrative GUI (imqadmin) or the command-line tool (imqobjmgr) to create these administered objects. The following instructions use the command-line tool.
Storing Administered Objects in an LDAP Directory
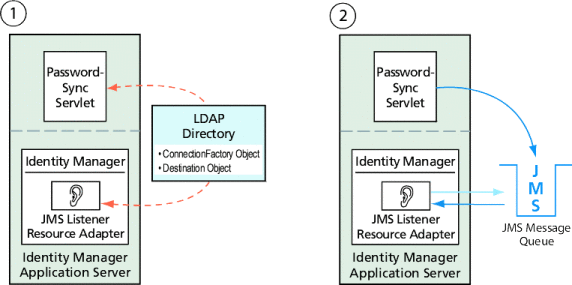
PasswordSync and the JMS Listener can be configured to use administered objects stored in an LDAP directory. Figure 11–14 illustrates the process. Both the PasswordSync Servlet and the JMS Listener adapter must retrieve connection factory and destination settings from the LDAP Directory in order to send and receive messages.
Figure 11–14 Retrieving Connection Factory and Destination Objects from the LDAP Directory

Using the Message Queue Command-Line Tool
This section explains how to use the Message Queue command-line tool (imqobjmgr) to store administered objects in an LDAP directory.
Storing Connection Factory Objects
Open the Message Queue command-line tool (imqobjmgr) and type the commands in Storing Connection Factory Objects to store the connection factory objects.
Example 11–1 Storing Connection Factory Objects
#> ./imqobjmgr add -l "cn=mytestFactory" -j "java.naming.factory.initial=com.sun.jndi.ldap.LdapCtxFactory" -j "java.naming.provider.url=ldap://gwenig.coopsrc.com:389/ou=sunmq,dc=coopsrc,dc=com" -j "java.naming.security.principal=cn=directory manager" -j "java.naming.security.credentials=password" -j "java.naming.security.authentication=simple" -t qf -o "imqAddressList=mq://gwenig.coopsrc.com:7676/jms" Adding a Queue Connection Factory object with the following attributes: imqAckOnAcknowledge [Message Service Acknowledgement of Client Acknowledgements] ... imqSetJMSXUserID [Enable JMSXUserID Message Property] false Using the following lookup name: cn=mytestFactory The object’s read-only state: false To the object store specified by: java.naming.factory.initial com.sun.jndi.ldap.LdapCtxFactory java.naming.provider.url ldap://gwenig.coopsrc.com:389/ou=sunmq,dc=coopsrc,dc=com java.naming.security.authentication simple java.naming.security.credentials netscape java.naming.security.principal cn=directory manager Object successfully added. |
In Storing Connection Factory Objects imqAddressList defines the JMS server/broker hostname (gwenig.coopsrc.com), port (7676), and the access method (jms).
Storing Destination Objects
In the Message Queue command-line tool (imqobjmgr), type the commands in Storing Destination Objects to store the destination objects.
Example 11–2 Storing Destination Objects
#> ./imqobjmgr add -l "cn=mytestDestination" -j "java.naming.factory.initial=com.sun.jndi.ldap.LdapCtxFactory" -j "java.naming.provider.url=ldap://gwenig.coopsrc.com:389/ou=sunmq,dc=coopsrc,dc=com" -j "java.naming.security.principal=cn=directory manager" -j "java.naming.security.credentials=password" -j "java.naming.security.authentication=simple" -t q -o "imqDestinationName=mytestDestination" Adding a Queue object with the following attributes: imqDestinationDescription [Destination Description] A Description for the Destination Object imqDestinationName [Destination Name] mytestDestination Using the following lookup name: cn=mytestDestination The object’s read-only state: false To the object store specified by: java.naming.factory.initial com.sun.jndi.ldap.LdapCtxFactory java.naming.provider.url ldap://gwenig.coopsrc.com:389/ ou=sunmq,dc=coopsrc,dc=com java.naming.security.authentication simple java.naming.security.credentials netscape java.naming.security.principal cn=directory manager Object successfully added. |
You can check the newly created object with an ldapsearch or an LDAP browser.
This concludes the section on Storing Administered Objects on an LDAP Server. Skip the next section, which describes how to store Administered Objects in a file, and go to the section on Configuring the JMS Listener Adapter for this Scenario.
Storing Administered Objects in a File
PasswordSync and the JMS Listener can be configured to use administered objects stored in a file. If you are not storing administered objects on an LDAP server (Storing Administered Objects in an LDAP Directory), follow the instructions in this section.
Storing Connection Factory Objects
Open the Message Queue command-line tool (imqobjmgr) and type the commands in Storing Connection Factory Objects to store connection factory objects and specify a lookup name.
Example 11–3 Storing Connection Factory Objects and Specifying Lookup Names
#> ./imqobjmgr add -l "mytestFactory" -j "java.naming.factory.initial= com.sun.jndi.fscontext.RefFSContextFactory" -j "java.naming.provider.url=file:///home/gael/tmp" -t qf -o "imqAddressList=mq://gwenig.coopsrc.com:7676/jms" Adding a Queue Connection Factory object with the following attributes: imqAckOnAcknowledge [Message Service Acknowledgement of Client Acknowledgements] ... imqSetJMSXUserID [Enable JMSXUserID Message Property] false Using the following lookup name: mytestFactory The object’s read-only state: false To the object store specified by: java.naming.factory.initial com.sun.jndi.fscontext.RefFSContextFactory java.naming.provider.url file:///home/gael/tmp Object successfully added. To specify a destination: #> ./imqobjmgr add -l "mytestQueue" -j "java.naming.factory.initial=com.sun.jndi.fscontext.RefFSContextFactory" -j "java.naming.provider.url=file:///home/gael/tmp" -t q -o "imqDestinationName=myTestQueue" Adding a Queue object with the following attributes: imqDestinationDescription [Destination Description] A Description for the Destination Object imqDestinationName [Destination Name] myTestQueue Using the following lookup name: mytestQueue The object’s read-only state: false To the object store specified by: java.naming.factory.initial com.sun.jndi.fscontext.RefFSContextFactory java.naming.provider.url file:///home/gael/tmp Object successfully added. |
Creating the Destination on the Broker
By default, the Sun Message Queue broker allows auto-creation of the queue destination (see config.properties, where the default value for imq.autocreate.queue is true).
If the queue destination is not created automatically, you must create the destination object on the broker using the command shown in Creating the Destination on the Broker (where myTestQueue is the destination).
Example 11–4 Creating a Destination Object on the Broker
name (Queue name): #> cd /opt/sun/mq/bin #>./imqcmd create dst -t q -n mytestQueue Username: <admin> Password: <admin> Creating a destination with the following attributes: Destination Name mytestQueue Destination Type Queue On the broker specified by: ------------------------- Host Primary Port ------------------------- localhost 7676 Successfully created the destination. |
You can store administered objects in a directory or in a file:
-
In a directory: Using a directory is a centralized way of storing the Connection Factory and the Destination objects.
When you use a directory, these administered objects are stored as directory entries.
Note –If the Identity Manager PasswordSync servlet and the Identity Manager server are not on the same machine, then each of them must be able to access the .bindings file. You can repeat the administered object creation twice (on each machine) or you can copy the .bindings file to the proper location on each machine.
-
In a file: If the Identity Manager PasswordSync servlet and Identity Manager server are both running on the same server (or if you do not have a directory available), you can store the administrative objects in a file.
When you use a file, both administered objects are stored in a single file (called .bindings on both Windows and UNIX), under the directory you specified for the java.naming.provider.url (for example, file:///c:/temp on Windows or file:///tmp on UNIX).
Configuring the JMS Listener Adapter for this Scenario
Configure the JMS listener adapter on the application server. Follow the instructions in the section Adding and Configuring a JMS Listener Adapter.
Configuring Active Sync
Next, configure the JMS Listener for synchronization. Active Sync is required if you are using JMS, but it is not used for direct connections.
 To Configure the JMS Listener for Synchronization
-
In the Administrator interface, click Resources in the menu.
-
In the Resource List, select the JMS Listener checkbox.
-
In the Resource Actions list, select Edit Synchronization Policy.
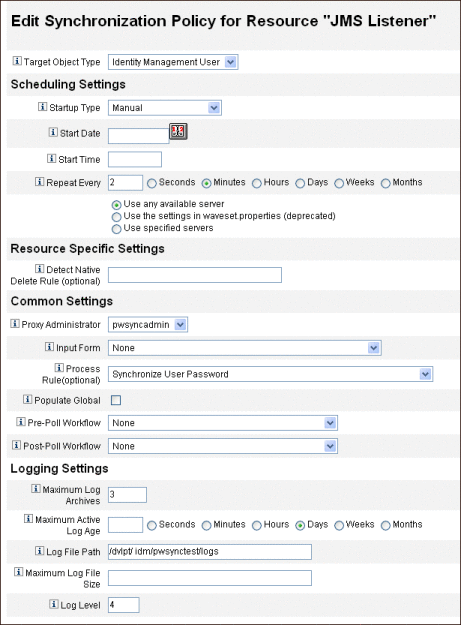
The Edit Synchronization page for the JMS Listener resource opens (Figure 11–15).
Figure 11–15 Configuring Active Sync for the JMS Listener

-
Under Common Settings, locate Proxy Administrator and select pwsyncadmin. (This administrator is associated with an empty form.)
-
Under Common Settings, locate Process Rule and select Synchronize User Password from the list. The default Synchronize User Password workflow takes each request that comes in from the JMS Listener adapter, checks out the ChangeUserPassword viewer, and then checks the ChangeUserPassword viewer back in.
-
In the Log File Path box, specify a path to a directory where the active and archived log files should be created.
-
For debugging purposes, set the Log Level to 4 to generate a verbose log.
-
Click Save.
- © 2010, Oracle Corporation and/or its affiliates
