Window List
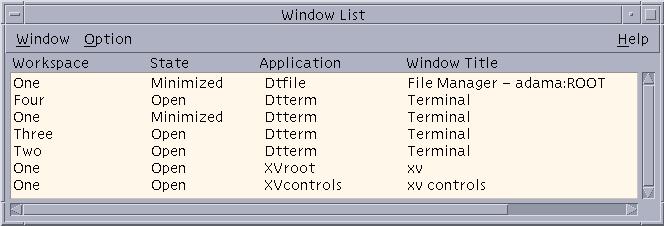
The Window List displays information about all windows across the CDE workspaces. Once launched, the window list will be updated in a dynamic fashion.
Figure 7–5 Window List Main Screen

The windows can be sorted in one of the following orders:
-
Workspace Name
-
Window State
-
Application Name
-
Window Title
Starting the Window List
The Window List can be started either from the Desktop or from the command line.
To Start the Window List from the Desktop
-
Right-click on the Desktop to open the Workspace Menu.
-
Select Applications.
-
Select Application Manager from the Applications submenu.
-
Double-click Desktop_Apps.
-
Double-click Window List.
To Start the Window List From the Command Line
Type sdtwinlst at the command line.
Performing Window List Tasks From the Window Menu
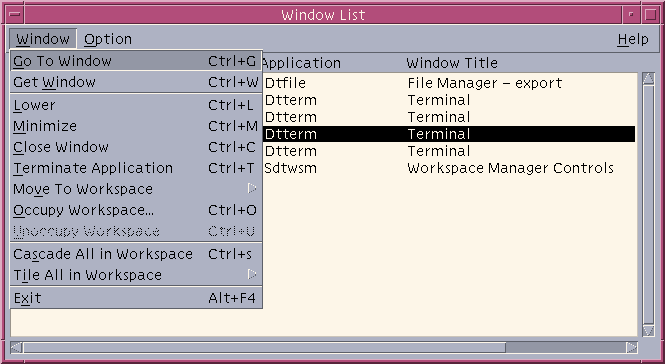
There are a number of tasks that you can perform using the Window List. They are:
-
To Go To a Window – Goes to the selected window and gives it focus. If it is in another workspace, you are moved to that workspace.
-
To Get a Window – Moves the selected window from whatever workspace it is in to the one you are currently in and gives it focus.
-
To Lower a Window in the Stack – Lowers the selected window to the bottom of the window stack.
-
To Minimize the Selected Window(s) – Minimizes the selected window(s).
-
To Close a Window – Closes the selected window(s). If the window to be closed is the only window associated with an application, a confirmation dialog box appears.
-
To Terminate an Application – A confirmation dialog box appears and all windows associated with that application are closed.
-
To Move the Selected Window(s) Into Another Workspace – Moves the selected window(s) to the specified workspace.
-
To Occupy the Selected Workspace – Opens the Workspace Chooser dialog box and places the selected window in the workspace chosen from the list.
-
To Unoccupy the Selected Workspace – Removes the selected window from the current workspace. If this is the only workspace the selected window resides in, this option is greyed out.
-
To Cascade all Non-minimized Windows in a Workspace – Cascades all windows in the current workspace.
-
To Tile all Non-minimized Windows in a Workspace – Tiles all windows in the current workspace. Tiling can be horizontal or vertical.
Figure 7–6 Window List Window Menu

To Go To a Window
Note –
Depending on the setting of the Window List Options, you may be able to double-click on the Window List entry and move to the workspace that contains the selected window or have the window move to the current workspace. Refer to To Set the Action of a Double-click on a Window Entry.
To Get a Window
-
Select a window from the Window List.
-
Choose Get Window from the Window menu.
Window appears in the current workspace.
To Lower a Window in the Stack
To Minimize the Selected Window(s)
To Close a Window
-
Select a window(s) from the Window List.
-
Choose Close Window from the Window menu.
-
(Optional) If the window being closed is the only window that contains a given application, a confirmation dialog box will appear. Click OK, if you want to close the window and terminate the application.
To Terminate an Application
-
Select a window from the Window List.
-
Choose Terminate Application from the Window menu.
-
(Optional) If the window being closed is the only window that contains a given application, a confirmation dialog box will appear. Click OK, if you want to close the window and terminate the application.
To Move the Selected Window(s) Into Another Workspace
-
Select a window(s) from the Window List.
-
Choose Move to Workspace from the Window menu.
-
Choose a workspace or All Workspaces.
To Occupy the Selected Workspace
-
Select a window(s) from the Window List.
-
Choose Occupy a Workspace from the Window menu.
-
Choose the workspace you want the window to occupy from the Occupy Workspace dialog box.
To Unoccupy the Selected Workspace
To Cascade all Non-minimized Windows in a Workspace
This occurs only in the current workspace.
Choose Cascade All in Workspace from the Window menu.
To Tile all Non-minimized Windows in a Workspace
This occurs only in the current workspace.
Performing Window List Tasks from the Option Menu
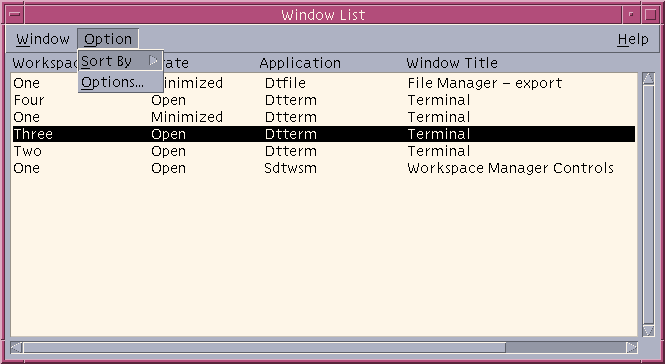
There are two tasks that can be performed from the Option Menu. They are:
Figure 7–7 Window List Option Menu

Sorting Options
Opening the Options Dialog
Select Options from the Option menu.
Window List Options
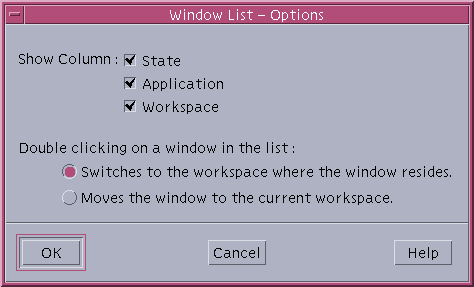
There are two options that you can change using the Window List – Options dialog box:
-
Show Column
-
Double–clicking on a window in the list
These two options allow the setting of which columns will appear in the Window List and what action will be taken when you double-click on a window item in the Window List.
Figure 7–8 Window List – Options Dialog

To Show Columns
-
Click the State, Application, or Workspace check boxes for that column to be displayed.
The lack of a checkmark means the column will not be displayed.
Note –The Window Title column will always be visible.
To Set the Action of a Double-click on a Window Entry
Window List provides the ability to select the effect of double-clicking a window entry in the Window List.
- © 2010, Oracle Corporation and/or its affiliates
