Chapter 6 Miscellaneous Configurations
This chapter addresses setup and system administration topics.
Solaris CDE Directory Structure
This section describes the main directories included in your desktop environment.
/usr/dt
This directory is the Solaris CDE installation location. It can also be the mount point from a remote file server. Table 6–1 describes the /usr/dt subdirectories.
Table 6–1 /usr/dt Subdirectories|
Subdirectory |
Description |
|---|---|
|
SCDE applications and utilities |
|
|
SCDE run-time shared libraries |
|
|
Default system configuration files |
|
|
[Optional] Man pages |
|
|
Default application resources |
|
|
Default application icons, types, and actions |
|
|
[Optional] CDE code/program examples |
|
|
[Optional] Developer include files |
|
|
Color palettes |
|
|
CDE AnswerBook documentation and default backdrops |
/etc/dt
This directory contains customized workstation-specific configuration files. These files enable you to customize your environment in the following ways:
-
Set X-server configuration options
-
Use multiple screens
-
Customize workstation action files, data types, icons, and fonts
/var/dt
This directory is used to store temporary files for Solaris CDE applications such as Login Manager and Application Manager.
$HomeDirectory
This directory contains user specific files that relate to the user's desktop setup. They include applications, color scheme, Workspace menu and Front Panel modifications, and error logs.
Key Configuration Files
Most customization of your desktop environment can involve many files. The following files are two examples:
-
/usr/dt/config/Xconfig
-
/usr/dt/config/Xservers
Xconfig
Xconfig is the master configuration file used by dtlogin. It sets login resources and specifies locations of additional files required by dtlogin. The following example shows a few of the lines found in the default Xconfig file:
Dtlogin.errorLogFile: /var/dt/Xerrors
Dtlogin.servers: /usr/dt/config/Xservers
Dtlogin*session: /usr/dt/bin/Xsession
For more information about this file, refer to Appendix A, dtconfig(1) Man Page. You can also review the explanatory comments in the file itself.
Xservers
dtlogin, like XDM (X Display Manager) on which it is based, uses the Xservers file to specify how the local Xserver is started. By default, the last line in this file is:
:0 Local local@console /usr/openwin/bin/Xsun :0
-
:0 means that the Xserver display is <localhost:0>.
Note –
Replace local with foreign if you want to attach to a running X11 server.
-
/usr/openwin/bin/Xsun is the path to the X11 server.
Note –
The Solaris CDE and OpenWindowsTM environments run the same X11 server.
Refer to the dtlogin(1) man page for more information about this file. You can also review the explanatory comments in the file itself.
Starting the Login Server
The login server is usually started automatically when the system is booted. You can also start the login server from a command line, but you must log in as the root user first.
To set the login server to start when the system Is booted:
Type the following command and press Return:
# /usr/dt/bin/dtconfig -e
This will add a S99dtlogin file to your /etc/rc2.d directory. The login server starts automatically when you reboot.
To disable the login server from starting automatically when the system is booted:
Type the following command and press Return:
# /usr/dt/bin/dtconfig -d
To start the login server from a command line:
Type the following command and press Return:
# /usr/dt/bin/dtlogin -daemon; exit
Note –
Although starting the login server from the command line is available for temporary configuration testing, the login server should normally be started when the system is booted.
To kill the login server, Xserver, and the entire Solaris CDE desktop:
Type the following command and press Return:
# /usr/dt/bin/dtconfig -kill
For more information about the desktop configuration utility, dtconfig, see Appendix A, dtconfig(1) Man Page. It provides a copy of the dtconfig.1 man page.
To exit the Solaris CDE login screen using the Command Line Login Option:
Choose Command Line Login from the Options menu on the Solaris CDE login screen. After the screen clears, press Return to display a login prompt.
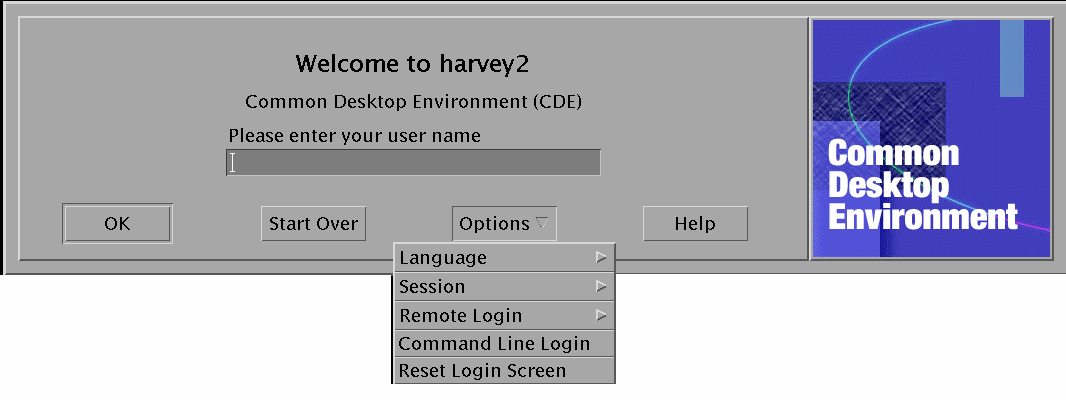
Note –
The desktop login daemon will start the desktop login screen automatically after you are finished with the Command Line Login.
To start a single terminal emulation window:
Choose Failsafe Session from the Session submenu of the Options menu on the Solaris CDE login screen.
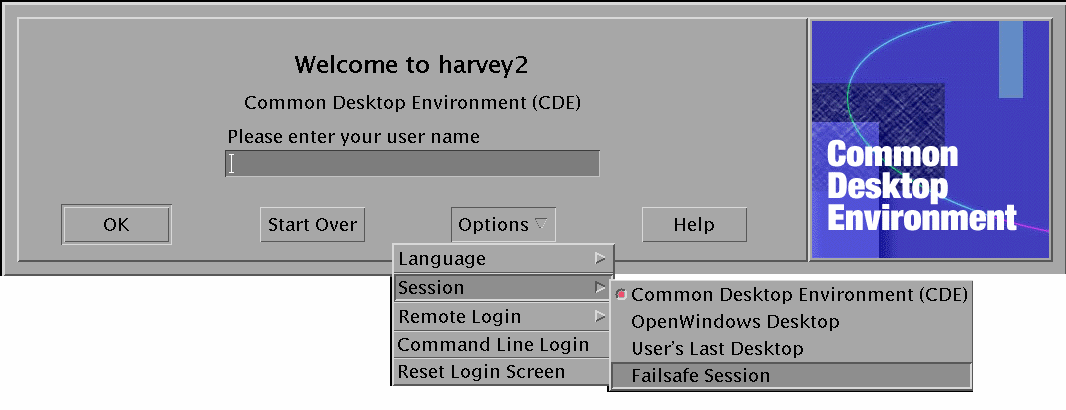
If you want to leave the Xserver running, choose Failsafe Session from the Session submenu. This will start a single xterm window. The Failsafe Session option is always available, even when the Command Line Login option is not available.
Mounting an Installed CDE from Another Workstation or Network Server Installation Location
You can mount an installed CDE from another workstation or network server installation location if you do not have the required disk space on your workstation, since this procedure does not use your local disk space.
Note –
Since the /usr/dt directory structure differs between Solaris releases and client workstations (SPARC directory structure differs for the Intel directory structure), the client workstation must mount the appropriate NFS server /usr/dt image. For example, a SPARC system with Solaris 2.5 would mount /usr/dt from another Solaris 2.5 system with /usr/dt installed CDE.
To Mount an Installed CDE
-
Mount a /usr/dt directory from a previously installed workstation or network server to the /usr/dt directory on your workstation.
-
Type /usr/dt/bin/dtconfig -inetd
-
Enable the Solaris Desktop Login by typing:
/usr/dt/bin/dtconfig -e
-
Reboot your workstation.
For more information about the desktop configuration utility, dtconfig, see Appendix A, dtconfig(1) Man Page. It provides a copy of the dtconfig(1) man page.
To Unmount a Mounted CDE Directory
-
Disable the Solaris Desktop Login by typing:
/usr/dt/bin/dtconfig -d
-
Type /usr/dt/bin/dtconfig -inetd.ow
-
Unmount /usr/dt.
-
Reboot your workstation.
For more information about the desktop configuration utility, dtconfig, see Appendix A, dtconfig(1) Man Page. It provides a copy of the dtconfig(1) man page.
Configuring Your Desktop To Use Multiple Screens
The standard login starts the desktop on a single screen. You can edit the Xconfig file to have the desktop start on multiple screens. You must be logged in as the root user to change this file.
Note –
For faster editing of login configuration information, use the Failsafe Session option to run a single xterm window rather than the whole desktop.
To Make the Desktop Start on Multiple Screens
-
Create a copy of the Xserver file by typing the following command and pressing Return:
# cp /usr/dt/config/Xservers /etc/dt/config/Xservers
Note –/etc/dt/config/Xservers overrides /usr/dt/config/Xservers.
-
Edit the /etc/dt/config/Xservers file to set up two frame buffers (screens):
-
Choose Reset Login Screen from the Options menu.
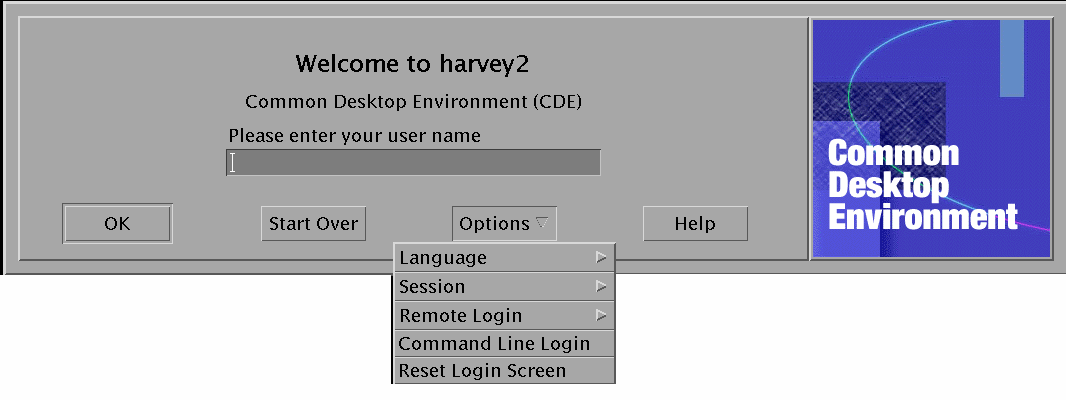
Note –When running Solaris CDE on multiple screens, a Front Panel is displayed on each screen. These Front Panels are independent of each other and have separate configuration files.
Networked Desktops
The Solaris CDE Login Manager is network aware. By default, login screens will respond to queries by the Solaris CDE Chooser.
To show the list of remote hosts:
Select Choose Host From List from the Remote Login menu on the Solaris CDE login screen.
Alternatively, to run the Chooser independently of the login screen, refer to the section Using Workstations as XTerminals. The following screen shows a typical Chooser list of available servers.
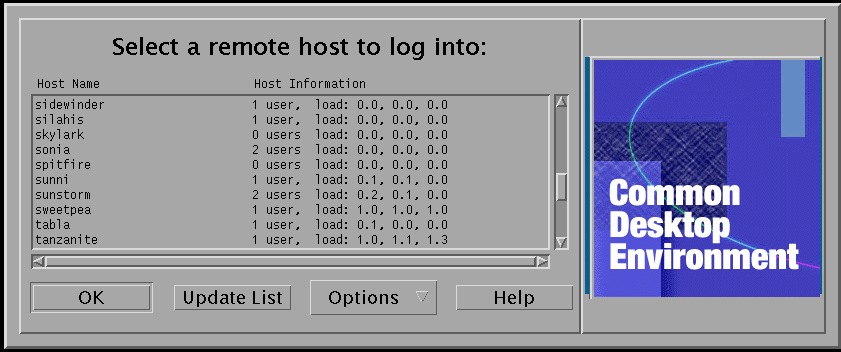
You can select an idle server from the list to use its resources via Chooser to log in to Solaris CDE.
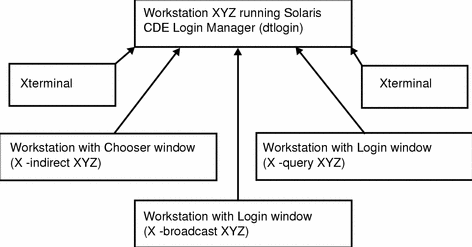
Any networked workstation running the Solaris CDE Login Manager can support both a local desktop user and multiple remote users including Xterminal users using the workstation as a Solaris CDE desktop server. (See Figure 6–1.)
Figure 6–1 Networked Desktops
Note –
Figure 6-1 can include a mixed hardware environment.
Using XTerminals
Any Xterminal that supports the XDM protocol can use Chooser to log in to Solaris CDE. To run the Chooser, refer to the section Using Workstations as XTerminals. The SPARC XterminalTM software version 2.0 (or later) works well with Solaris CDE. Click Properties on the X-Terminal Controls window and choose Session as the Category to display the setup screen shown in Figure 6–2.
Figure 6–2 Session setup screen
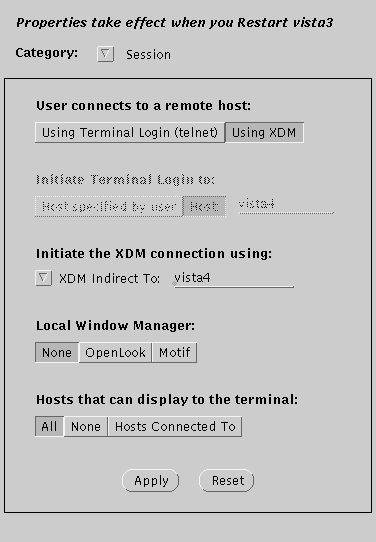
Select None for the Local Window Manager, and XDM Indirect for the XDM connection to the remote system running Solaris CDE.
Login Locale and Font Path
You select the preferred language when you log in to Solaris CDE. The following Solaris CDE login screen shows the Language choice on the Options menu.
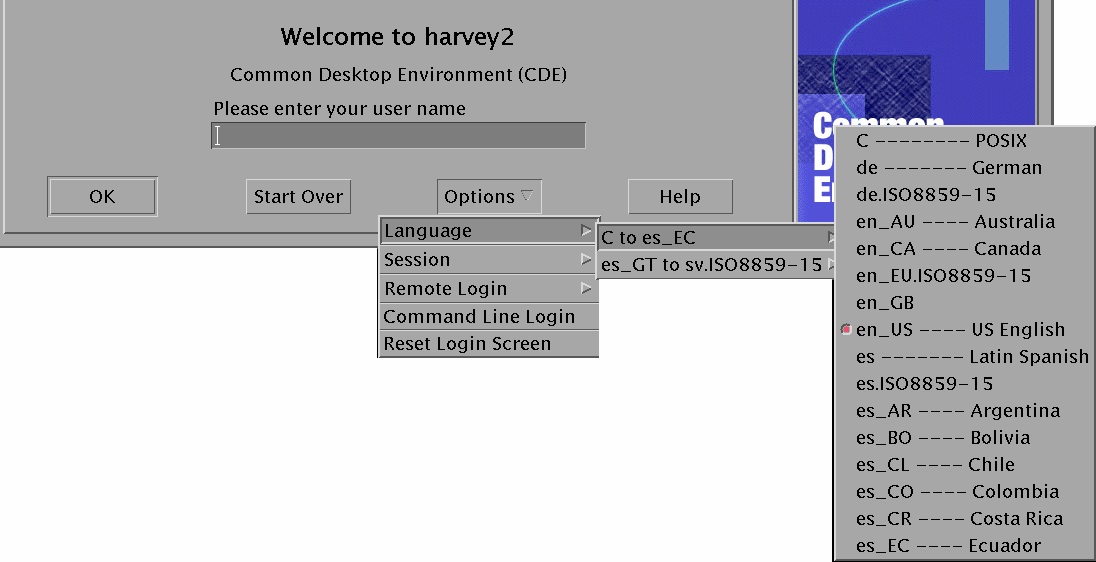
On workstations, font paths are automatically set to include fonts (and aliases) associated with both the preferred language and the system's base “C” locale. For Xterminals, these fonts are automatically supplied by an X11 font server.
Using Workstations as XTerminals
If you have older workstations or workstations with 16 megabytes or less of memory, you can use them as Xterminals when they are loaded with Solaris 2.4 software or later (or Solaris 2.3 software with the Xserver jumbo patch).
Note –
If the fonts on your workstation's screen do not display normally when following the procedures below, Solaris CDE may not be installed on the host workstation. Use the pkgadd utility to add the SUNWdtft() Solaris CDE font package separately from a Solaris CDE 1.0.x unbundled release.
To Use Chooser To Select a Host CDE Login
-
Exit any running window system.
-
Start Chooser. From the console command line, type the following commands (using csh):
setenv OPENWINHOME /usr/openwin
/usr/openwin/bin/X -indirect CDE_login_host
The Xserver starts and displays the Chooser window from the host.
-
Select the desired login host from the Chooser window.
To Use a Specific Host CDE Login
Type the following command and press Return:
/usr/openwin/bin/X -once -query CDE_login_host
The Xserver starts and displays the Login screen from the host. The -once option will exit the server after one login/logout session. If the -once option is not added, the Login screen appears again after the Solaris CDE logout.
To Use the First Available Host Login
Type the following command and press Return:
/usr/openwin/bin/X -broadcast
This starts the Xserver. On the local sub-net, it broadcasts a request for an XDM (X Display Manager) login service. If any systems on the sub-net are running the Solaris CDE Login Manager (or any other XDM-based login window), the first host to respond places its login window on your desktop.
Special CDE Configurations
This section addresses special configurations.
Customizing Mail Printing
The CDE Mailer prints mail messages using the Print action that is defined for the DTMAIL_FILE data type. It does not use the print script specified by the OpenWindows Mail Tool. To change the print behavior you must modify this Print action.
To Modify the Print Action
-
Using your favorite editor, create the following file:
HomeDirectory/.dt/types/dtmail.dt
-
Enter the following lines into this file:
#
# Override default Print action for mailboxes
#
ACTION Print
{LABEL Print
ARG_TYPE DTMAIL_FILE
TYPE COMMAND
WINDOW_TYPE NO_STDIO
EXEC_STRING sh -c ' \
dtmailpr -p -f %(File)Arg_1% | mp -m -l | \
dtlp -u %(File)Arg_1%;'
}
Note –dtmailpr is a print filter that strips out attachments, resulting in a stream of plain text. dtlp is the standard CDE interface to lp. %(File)Arg_1% is the file being printed.
-
Modify the EXEC_STRING to include the print commands you want.
-
Restart Mailer.
Converting Calendars to New Data Format
The version 4 extensible data format is a new format supported by the CDE Calendar. The OpenWindows Calendar Manager will not be able to read this format. If you need to switch back and forth between the OpenWindows and CDE platforms, you should not convert your calendar to the version 4 data format. However, you can use the sdtcm_convert script to prune your calendar.
Note –
You can find out the data version of your calendar by choosing About Calendar from the Calendar Help menu.
Otherwise, use the sdtcm_convert script to convert your calendar to the version 4 data format.
For more information about this file, refer to the sdtcm_convert(1) man pages.
Note –
If you installed only the End User CDE Packages, the man pages were not installed. To see the man pages, you will need to install them with the pkgadd utility.
Adding the AnswerBook Package from the Network
When installing Solaris CDE, the installation menu gives you the option to install the AnswerBook CDE package. If you choose YES, the AnswerBook package is installed in the /usr/dt/share/answerbooks/language directory (language is the local name of the particular AnswerBook translation).
Since the AnswerBook package requires 109 megabytes of disk space, you may not want to install it. However, the following two options are available:
-
You can mount (or link from /net/. . .) the AnswerBook package to /usr/dt/share/answerbooks/language.
-
You can add the
AB_CARDCATALOGenvironment variable to HomeDirectory/.dtprofile. For example, if you have an exported version on your network, then add the following line to HomeDirectory/.dtprofile:
	export AB_CARDCATALOG=/net/hostname/usr/dt/share/answerbooks \
    /language/ab_cardcatalog
Setting Up the CDE Environment Outside the CDE Desktop
Environment variables used by your Solaris CDE applications can be set up outside the CDE desktop. For example, you may want to log in to a remote workstation and display a CDE application back to your workstation. Use the CDE utility dtsearchpath to set up various CDE shell environment variables.
For Bourne and Korn shells, type the following command:
eval `/usr/dt/bin/dtsearchpath`
For C shell, type the following command:
eval `/usr/dt/bin/dtsearchpath -c`
You could follow this command by setting DISPLAY back to the local workstation and then running the CDE application remotely. The results will be displayed on the local workstation.
Note –
In this example, the Bourne and Korn shell dtsearchpath syntax is part of the CDE sample implementation available on all platforms running CDE. However, the C shell (-c) option is only available on a Sun platform.
Desktop Environment File
The CDE desktop provides a run-time environment for the OpenWindows DeskSetTM applications. Nothing special needs to be done to the CDE setup for this capability. Some of this environment setup is provided by the following file:
/usr/dt/config/Xsession.d/0015.sun.env
If you need to add to or subtract from this environment setup for a particular workstation, this file can be either edited in place or copied first to the following file location:
/etc/dt/config/Xsession.d/0015.sun.env
One example of an addition would be the start-up of the old OpenWindows virtual keyboard for use by the OpenWindows DeskSet applications. Since most applications on a CDE desktop (and the majority of Sun users) do not use this virtual keyboard utility program, it was left out of the default start sequence to improve overall desktop start-up performance.
See comments in the 0015.sun.env file for additional information on the optional OpenWindows virtual keyboard (vkdb) start-up.
Using Floppy and CD Media with the Apple Macintosh Application Environment
If you have installed the Apple Macintosh Application Environment (MAE) version 1.0 and intend to use removable media (diskettes or CD-ROMs) through the OpenWindows File Manager application, you must edit the /etc/rmmount.conf file. This ensures that the MAE will work properly with File Manager removable media.
To Change the /etc/rmmount.conf File
-
Become the root user by typing su, then type your password.
-
Change to the /etc directory. Type the following command and press Return:
# cd /etc
-
Open the /etc/rmmount.conf file in your favorite editor.
-
Move the following line under #Actions to the end of the list:
action floppy action_macfs.so
For example:
# more rmmount.conf
# @(#)rmmount.conf 1.2 92/09/23 SMI
#
# Removable Media Mounter configuration file.
#
# File system identification
ident hsfs ident_hsfs.so cdrom
ident ufs ident_ufs.so cdrom floppy
ident pcfs ident_pcfs.so floppy
ident macfs ident_macfs.so floppy
# Actions
action cdrom action_filemgr.so
action floppy action_filemgr.so
action floppy action_macfs.so
-
Save and exit.
When the MAE is installed, it puts the macfs action line in the rmmount.conf file for you. If MAE is de-installed, the line is removed.
This change enables you to use removable media in the OpenWindows or CDE File Manager application and still use Macintosh floppies in MAE. However, it does stop MAE from grabbing unformatted, unreadable, or DOS floppies. All those disks will go to the OpenWindows File Manager application using this setup procedure.
If you want to allow MAE access to unreadable, unformatted, or DOS floppies, then the action floppy action action_macfs.so line must be placed before the action floppy action_filemgr.so line.
- © 2010, Oracle Corporation and/or its affiliates
