| Exit Print View | |
Sun Dual 10GbE SPF+ PCIe 2.0 ExpressModule User’s Guide |

|
Documentation, Support, and Training
Understanding the ExpressModule
Front Panel Connectors and LEDs
Power and Environmental Requirements
Hardware and Software Requirements
Solaris Platform Installation Overview
Linux Platform Installation Overview
Microsoft Windows Platform Installation Overview
Verify the Driver Version on a Solaris Platform
Remove the Driver From a Solaris Platform
Download and Install the Driver on a Linux Platform
Remove the Driver From a Linux Platform
Download and Install the Driver on a Microsoft Windows Platform
Remove the Driver From a Microsoft Windows Platform
Verify the Installation in a Solaris SPARC System
Verify the Installation in a Solaris x86 System
Verify the Installation in a Linux System
Verify the Installation in a Microsoft Windows System
Create /etc/hostname.ixgbe# Files
Configure the Network Host Files With the ifconfig Command
Boot Over the Network Using PXE
Boot Solaris x86 and Linux Systems Over a 10GbE Network
Install the Solaris OS Over a 10GbE Network on SPARC Systems
Configuring the Driver Parameters
Driver Parameters for the Solaris OS
Set ixgbe Driver Parameters in the Solaris OS
Solaris OS Performance Variables
Improve Performance in the Solaris OS
Set Driver Parameters in Linux
Configure Jumbo Frames in Solaris OS
Configure Jumbo Frames in Linux
Configuring Link Aggregation in a Solaris Environment
Display Information About Link Aggregations
Configure Static VLANs in a Solaris Environment
Configure VLANs in a Linux Environment
Configure VLANs in a Microsoft Windows Environment
The following instructions describe the basic steps required to install the ExpressModule. You can install the ExpressModule on a powered-on system using a hot-swap procedure, as well as from powered-off system. Refer to your system installation or service manual for detailed ExpressModule installation instructions.
Note - To maintain proper cooling for the ExpressModule in your chassis, all ExpressModule slots must be filled with either operating ExpressModules or filler panels.
Halt and power off your system if needed.
Attach the adhesive copper strip of the antistatic wrist strap to the metal casing of the power supply. Wrap the other end twice around your wrist, with the adhesive side against your skin.
Remove the filler panel from the ExpressModule opening.
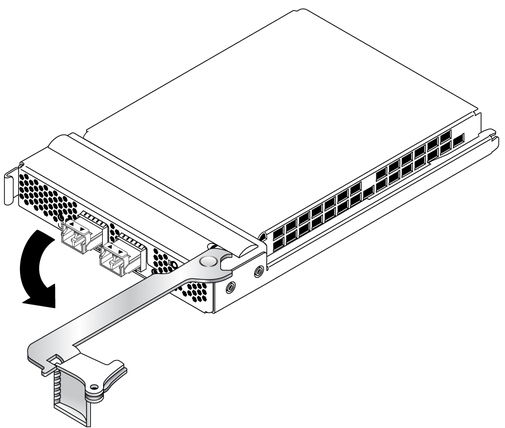
Open the latch on the ExpressModule.

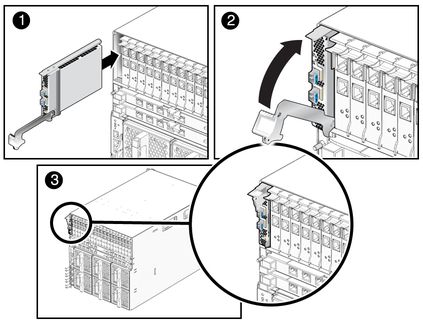
Align the ExpressModule with the vacant ExpressModule slot (detail 1 in the following figure).
Ensure that the ExpressModule’s indicator lights on the front panel are facing toward you and that the ExpressModule ejector lever on the bottom is fully opened.

Slide the ExpressModule into the vacant ExpressModule chassis slot until the ejector lever engages and starts to close (detail 2 in the preceding figure).
Failure to align the ExpressModule correctly can result in damage to the ExpressModule’s internal connection to the chassis midplane.
Complete the installation by closing the ejector lever until the latch snaps into place (detail 3 in the preceding figure).
 | Caution - Do not use excessive force when installing the ExpressModule into the slot. You might damage the ExpressModule’s connector. If the ExpressModule does not seat properly when you apply even pressure, remove and carefully reinstall the ExpressModule. |
Detach the wrist strap.
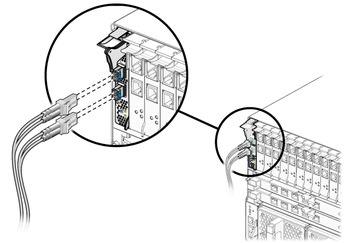
Connect the Ethernet cables.
