|
| |
| Sun Java Enterprise System 2004Q2 Installation Guide | |
Chapter 10
Uninstalling SoftwareThis chapter provides instructions for uninstalling Java Enterprise System component products from your system. Before starting the tasks in this chapter, you should read the entire chapter and also be familiar with the Java Enterprise System installation processes.
This chapter contains the following sections:
Caution
Do not use the Java Enterprise System uninstaller to uninstall Sun Cluster software. For more information, see Sun Cluster Software and Sun Cluster Agents for Sun Java System.
Planning for UninstallationThe Java Enterprise System uninstallation modes are the same as the modes available for installation: interactive graphical and text-based interface as well as silent uninstallation using a parameter file you provide. During installation, the Java Enterprise System installation program places the Java Enterprise System uninstaller at the following location:
/var/sadm/prod/entsys/uninstall
This section provides an overview of Java Enterprise System uninstallation. The following topics are addressed:
Overview
The Java Enterprise System uninstaller might behave differently depending on which component products you installed and how they are interrelated. Keep the following in mind when running the uninstaller:
- The uninstaller must be run separately on each host that contains Java Enterprise System components. For each host on which you run the uninstaller, you can select one or more component products for removal.
- The uninstaller only removes component products that were installed by the Java Enterprise System installer. To remove component products that were not installed by the Java Enterprise System installer, follow instructions in the component product documentation.
- The uninstaller checks product dependencies only for the system on which it is running, issuing warnings when it discovers a dependency. For more information on dependencies that affect removal of software, refer to How Product Interdependencies Affect Uninstallation.
- The uninstaller does not remove Java Enterprise System shared components.
- The uninstaller might remove configuration and user data files.
The configuration and user data files that are removed by the uninstaller varies for each component product. After uninstallation completes, you might have to remove some additional files and directories. For product-by-product information, refer to Component Product Uninstallation Details.
How Product Interdependencies Affect Uninstallation
Before uninstalling, you need to plan how to handle the impact of uninstallation on the component products that are installed. The following interdependencies must be planned for:
Recognized Dependencies
The Java Enterprise System uninstaller recognizes dependencies only among products that are installed on the same host. If you attempt to uninstall a component that has dependent products on the same host, the uninstaller issues a warning before proceeding with the uninstallation.
For example, if you attempt to uninstall Identity Server from the host where Portal Server is also installed, the uninstaller warns you that Portal Server depends on Identity Server.
Also, prior to uninstalling a Messaging Server that has been installed on its own system, you should unconfigure the Administration Server by running:
/usr/bin/mpsadmserver unconfigure
Then run the uninstaller.
Unrecognized Interdependencies
The Java Enterprise System uninstaller does not recognize the following interdependencies:
Product Dependencies from Remote Hosts
Some component product dependencies can be satisfied with component products deployed on remote hosts. However, the uninstaller does not recognize these dependency relationships.
For example, the following dependencies can be satisfied by component products deployed on remote hosts:
For example: if you uninstall Directory Server, the uninstaller does not warn you that Identity Server depends on Directory Server, even if both products are deployed on the same host. This is because another Directory Server instance on another host could support Identity Server. This example could apply to any of the dependencies in the bulleted list above.
Products That Support Other Component Products
The uninstaller does not recognize when one component product supports another component product.
For example, Identity Server supports Portal Server. If you attempt to uninstall Portal Server, the uninstaller does not warn you of this dependency because Identity Server can function without Portal Server.
Product Dependencies Resulting from Configuration
The uninstaller does not recognize a product dependency that is the result of post-installation configuration.
For example, suppose you install both Portal Server and Calendar Server on the same host, and then configure Portal Server to use Calendar Server for the Portal Server’s calendar channel. Portal Server now depends on Calendar Server. If you uninstall Calendar Server, the uninstaller does not warn you that Portal Server depends on Calendar Server.
Pre-uninstallation Checklist
The following table lists the tasks that you should perform before beginning uninstallation. The left column lists the order in which you should perform the tasks, the middle column describes the action to take, and the right column contains other useful information and the location of instructions.
Table 10-1 Pre-uninstallation Tasks
Order
Task
Instructions and Helpful Information
1
Review the software that has been installed on your system by the Java Enterprise System installer.
2
Review the needs and behaviors of each component product you are going to uninstall.
How Product Interdependencies Affect Uninstallation
3
Make a copy of the product registry file, /var/sadm/install/productregistry.
The backup copy of the product registry is helpful in recovering if uninstallation fails.
4
Back up or archive configuration or user data for component products you are uninstalling if you plan to reuse this data in subsequent installations.
Component Product Uninstallation Details
Component product documentation:
http://docs.sun.com/prod/entsys.04q25
Make sure the Directory Server instance that hosts the configuration directory is running.
This Directory Server instance must be running so the uninstaller can unconfigure the component products you are uninstalling.
6
If needed, gather administrator access information for Administration Server, Directory Server, and Identity Server.
Reviewing the Installed Java Enterprise System Components
Perform one of the following procedures to review the Java Enterprise System component product software that is already installed on each host:
To Use the Uninstaller for Viewing Installed Software
- As root, run the Java Enterprise System uninstaller from the /var/sadm/prod/entsys directory as follows:
./uninstall -no
The optional -no parameter runs the uninstaller but does not uninstall any software. This option is also useful for familiarizing yourself with the uninstaller and for creating a state file for a subsequent silent uninstallation.
- Proceed through the uninstaller pages until you reach the list of installed products.
- After viewing the list of installed component products, exit the uninstaller.
No software has been uninstalled.
To Use the prodreg Utility to View Installed Software
You can use the prodreg utility to view information about all packages installed on your system, including Java Enterprise System components. The prodreg utility opens a window that provides information about installed packages. This information is useful when checking for product dependencies. The prodreg utility also indicates packages that are incomplete and might need special handling. The prodreg utility is available with Solaris 9 operating system and some versions of Solaris 8 operating system.
Administrator Access for the Uninstaller
Depending on the components you elect to uninstall, you might need to grant the uninstaller administrator access to Administration Server, Directory Server, and Identity Server.
- Administration Server and Directory Server administrator access is required to manage the configuration directory during uninstallation
- Identity Server administrator access is required to undeploy the Identity Server web applications from the Application Server and to remove the Identity Server schema.
The table in this section describes the information the uninstaller needs in order to be granted administrator access for Administration, Directory, and Identity Servers. The left column of each table lists the graphical mode labels and state file parameters for the information you must provide. The right column describes the information.
Running the Uninstaller in Graphical ModeAfter you have completed the Pre-uninstallation Checklist, you are ready to run the uninstaller. This section contains the following procedures for uninstalling in graphical mode:
For instructions on using text-based mode or silent mode to uninstall Java Enterprise System component products, refer to Running the Uninstaller in Text-Based Mode or Running the Uninstaller in Silent Mode.
If you have problems during uninstallation, refer to Chapter 11, "Troubleshooting".
To Start the Graphical Uninstaller
- Provide access to your local display.
- The Java Enterprise System installer may need access to your local display. If you are logging in to a remote machine, or using the su command to become superuser on a local machine, use the xhost command on the local machine to allow access to your local display. For example, use the following command to grant access to all users:
xhost +
- If you are logging in to a remote machine, make sure your DISPLAY environment variable is properly set to the local display. If the DISPLAY variable is not set properly, the installer runs in text-based mode.
- If you are not logged in as root, become superuser.
- Navigate to the following directory:
cd /var/sadm/prod/entsys/
- Start the graphical uninstaller:
./uninstall
The Welcome page is displayed.
- Click Next to proceed.
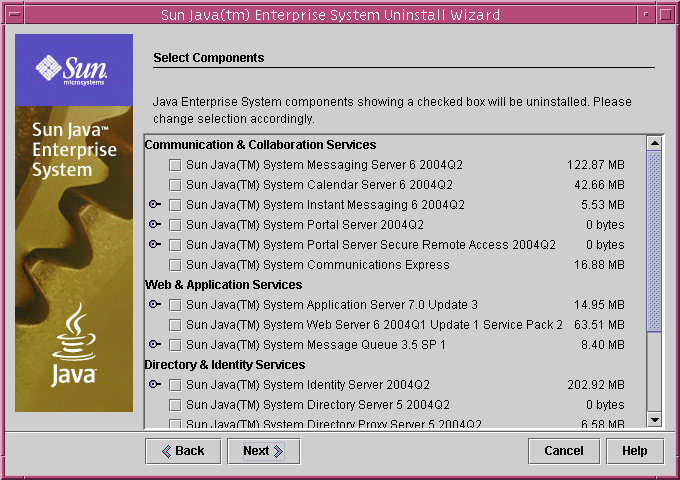
To Select Components to Uninstall
The Select Components page lists all possible Java Enterprise System components on your system.
- Examine the default selections and deselect any component product you do not want to uninstall.
- Component products that are installed on your system are automatically selected for removal. Component products that are not installed on your system are disabled and cannot be selected.
- Some component products contain subcomponents. You can expand these components to view the subcomponents.
- If all the subcomponents for a component are selected, you can deselect them all by deselecting the parent component.
- To select a component and all its subcomponents, expand the component and select each subcomponent. You cannot simply select the parent component.
- If you deselect a component that contains subcomponents, expand the component to verify the subcomponent list.
- After you are satisfied with your selections, click Next.
- If the uninstaller detects any recognizable product dependencies among the products selected for removal, a warning about a potential loss of configuration data is displayed. Your choices are:
To Grant Administrator Access
Depending on the component products you selected for removal, the uninstaller prompts you for administrator IDs and passwords. For details on the information you must provide the uninstaller, refer to Administrator Access for the Uninstaller.
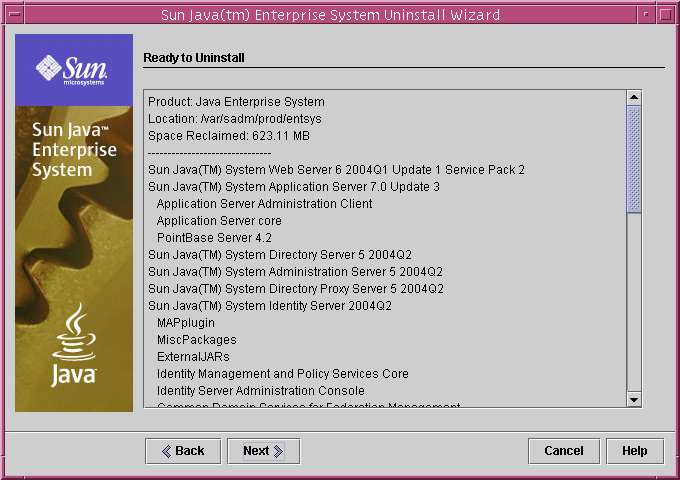
To Confirm Uninstallation Readiness
Before removing software from your system, the uninstaller displays the Ready to Uninstall page which shows the components you have selected for removal and the total disk space that will be reclaimed.
- Review the uninstallation selections you have made.
- If changes are needed, click Back through successive pages until the Component Selection page appears.
- Make changes as needed on the Component Selection page.
- Click Next to proceed again through the uninstaller pages.
The uninstaller remembers previously-specified values. You can modify any value you previously specified.
- At the Ready to Uninstall page, click Next when you are satisfied with your selections.
The uninstaller begins removing software from your system and displays the following:
To Complete the Uninstallation Session
After all component product software has been removed, the uninstaller displays the Uninstallation Complete page.
- Click View Summary or View Log for information about the uninstallation.
- Click Close to exit the uninstaller.
- If you uninstalled Messaging Server, Portal Server, or Sun Cluster 3.1 4/04 software, proceed to Post-uninstallation Tasks to complete the post-uninstallation tasks.
Running the Uninstaller in Text-Based ModeThe text-based interface allows you to run the uninstaller directly from a terminal window by responding to prompts displayed in the window. Navigation techniques in text-based mode for the uninstaller differ slightly from the navigation techniques for the installer.
Text-based uninstaller prompts are explained in the following table.
After you have completed the tasks in Pre-uninstallation Checklist, you are ready to run the uninstaller. This section contains the following procedures for uninstalling in text-based mode:
If you have problems during uninstallation, refer to Chapter 11, "Troubleshooting".
To Start the Uninstaller in Text-Based Mode
To Select Component Products for Uninstallation
Refer to Text-Based Uninstaller Prompts to select and deselect component products for uninstallation.
Note
The uninstaller automatically selects for removal any Java Enterprise System components it finds on your system.
- To select additional components for removal. Type the corresponding number for a component you want to uninstall and press Return. For example, type 1 to select Web Server for uninstallation.
The uninstaller does not allow you to select multiple components for uninstallation. You must loop through for each additional component you want to uninstall.
- To deselect additional components for removal, type the corresponding number and press Return. For example, 1 is corresponding number for Web Server. Type 1 to deselect it for uninstallation and press Return.
The uninstaller does not allow you to deselect multiple components. You must loop through for each additional component you want to deselect for uninstallation.
- After you are satisfied with your selections, type the number 0 (zero) and press Return.
If the uninstaller detects product dependencies among the products selected for removal, a warning about a potential loss of configuration data is displayed. Your choices are:
To Grant Administrator Access
If you selected a product for which the uninstaller needs an administrative ID or password, the uninstaller prompts you for administrator IDs and passwords. For details on the information you must provide the uninstaller, refer to Administrator Access for the Uninstaller.
To Confirm Uninstallation Readiness
Before removing software from your system, the uninstaller displays a summary page, showing the components selected for removal.
To Complete the Uninstallation Session
After all component product software has been removed, you can view the uninstallation summary and log.
- Type 1 or 2 and press Return to information about the uninstallation.
- Uninstallation summary. Type 1 to list the component products that were uninstalled and then lists configuration information for the components.
- Uninstallation log. Type 2 to list all messages generated by the uninstaller during uninstallation.
You can also view the uninstallation summary and log files at the following location:
/var/sadm/install/logs
- Type the ! character to exit the uninstaller.
- If you uninstalled Messaging Server, Portal Server, or Sun Cluster 3.1 4/04 software, proceed to Post-uninstallation Tasks to complete the post-uninstallation tasks.
Running the Uninstaller in Silent ModeSilent uninstallation is useful for uninstalling Java Enterprise System components on multiple hosts that share similar configurations.
The procedure for uninstalling in silent mode is similar to the procedure for installing in silent mode as described in Chapter 6, "Installing Software in Silent Mode".
This section contains the following procedures:
To Generate a State File
To create a state file for the silent installation, you must generate a state file by first running the uninstaller in either graphical or text-based mode as follows:
- If you are not logged in as root, become superuser.
- Navigate to the following directory:
cd /var/sadm/prod/entsys/
- If you are using the graphical interface of the uninstaller, provide access to your local display.
- The Java Enterprise System installer may need access to your local display. If you are logging in to a remote machine, or using the su command to become superuser on a local machine, use the xhost command on the local machine to allow access to your local display. For example, use the following command to grant access to all users:
xhost +
- If you are logging in to a remote machine, make sure your DISPLAY environment variable is properly set to the local display. If the DISPLAY variable is not set properly, the installer runs in text-based mode.
- Run the uninstaller with the following command:
./uninstall [-no] [-nodisplay] -saveState statefile
where:
- Proceed through the uninstaller to completion.
As you respond to the uninstaller, the uninstaller records your answers in the specified state file. When you complete the uninstallation, the state file is available in the location that you specified.
To Edit the State File for the Hosts
Edit a copy of the state file for each host on which you are going to perform a silent uninstallation, providing information specific to each host. For information on editing state files, refer to Editing the State File. Editing the state file might also include generating a state file ID, as explained in Creating a Platform-Appropriate State File ID.
To Run the Uninstaller in Silent Mode
- Verify that you have properly prepared and edited the state file for the host where you want to uninstall Java Enterprise System components.
- Open a terminal window.
- If you are not logged in as root, become superuser.
- Navigate to the following directory:
cd /var/sadm/prod/entsys/
- Start the uninstaller, using the following format:
./uninstall -noconsole -state statefile
where:
To Monitor the Progress of a Silent Uninstallation
- In a terminal window, navigate to the log file directory.
cd /var/sadm/install/logs
- Locate the log files for the current uninstallation. The log file of interest for monitoring purposes is:
Java_Enterprise_System_uninstall.Btimestamp
The timestamp variable represents the time the log was created. It has the format MMddhhmm, where:
- Use the tail command to watch messages as they are written to the logs.
For example:
tail -f log-file-name
Post-uninstallation TasksThis section provides instructions for tasks that you might need to perform after uninstalling Java Enterprise System component products from your system. The actual tasks required depend on which components you chose to uninstall.
Messaging Server Tasks
In some cases, the uninstaller might not be able to remove some or all of your installation files. To do a final cleanup, remove the Messaging Server base directory and its contents. The default base directory is at the following location:
/opt/SUNWmsgsr
You can also remove the configuration directory for Messaging Server. The default configuration directory for Messaging Server is at the following location:
/var/opt/SUNWmsgsr
sendmail Configuration
After uninstalling Messaging Server, undo any sendmail configuration for Messaging Server.
Identity Server Tasks
If you uninstall Identity Server but not its web container (Administration Server or Web Server), you need to apply configuration changes to the instance where was Identity Server deployed:
- For Administration Server:
- If necessary, start the Administration Server admin instance:
cd /var/opt/SUNWAppserver7/domains/domain1/admin-server/bin
./start- In a browser, go to the Application Server administration console. The default URL is http://hostname:4848.
- In the left navigation frame, click the key to left of App Server Instances.
- Select server1 or the name of the application server instance on which Identity Server was deployed.
- Click Apply Changes.
- For Web Server:
Also, in some cases the uninstaller might not be able to remove some or all of the Identity Server files. To do a final cleanup, remove these two directories and their contents:
Sun Cluster Software and Sun Cluster Agents for Sun Java System
Do not use the Java Enterprise System uninstaller to remove Sun Cluster software unless Sun Cluster software was installed but never used to configure a cluster node. Sun Cluster software should be uninstalled using the utilities provided with the Sun Cluster software. Sun Cluster Core and Sun Cluster Agents for Sun Java System must be removed together.
For more information on unconfiguring and uninstalling Sun Cluster software, refer to your Sun Cluster software documentation at http://docs.sun.com/coll/1124.1 for SPARC or http://docs.sun.com/coll/1125.1 for x86.
After uninstalling Sun Cluster software, edit the /var/sadm/install/productregistry file to remove references to Sun Cluster software.
Tip
Before editing the productregistry file, back up the file. This file contains information essential to the proper operation of Java Enterprise System.