| Sun ONE Portal Server, Secure Remote Access 6.1 Administrator's Guide |
Chapter 2
Administering the GatewayThis chapter describes gateway related concepts, and all the basic configurations required for the smooth running of the gateway. This chapter covers all the attributes in the gateway service.
This chapter covers the following topics:
Overview of the GatewayThe gateway provides the interface and security barrier between remote user sessions originating from the Internet, and your corporate intranet. The gateway presents content securely from internal web servers and application servers through a single interface to a remote user.
Creating a Gateway ProfileA gateway profile contains all the information related to gateway configuration, such as the port on which the gateway listens, SSL options, and proxy options.
When you install a gateway, if you choose the default values, a profile called "default" is created. A configuration file corresponding to the default profile exists at:
/etc/opt/SUNWps/platform.conf.default
where /etc/opt/SUNWps is the default location for all the platform.conf.* files.
See "Understanding the platform.conf File" for more information on the contents of the platform.conf file.
You can create multiple profiles, define attributes for each profile, and assign these profiles to different gateways as required. You can:
- Assign a single profile to gateway installations on different machines.
- Assign different profiles to instances of a single gateway running on the same machine.
To Create a Gateway Profile
- Log in to the Sun™ ONE Identity Server admin console as administrator.
- Select the Service Configuration tab.
- Click the arrow next to Gateway under SRAP Configuration.
The Gateway page displays in the right pane.
- Click New.
The Create New Gateway Profile page displays.
- Specify a name for the new profile in the "Enter the name of new Gateway Profile" field.
- Select the profile to use for creating the new profile, from the "Copy the existing configuration of" drop-down list.
By default, any new profile that you create is based on the pre-packaged "default" profile. If you have created any custom profile, you can select that profile from the drop-down list. The new profile inherits all the attributes of the selected profile.
- Click Create.
The new profile is created and you are returned to the Gateway page, in which the new profile is listed.
See "Configuring the Gateway Attributes" to configure individual gateway attributes.
- Restart the gateway with this profile name if you want the changes to take effect. See "Restarting the Gateway" for more information.
Starting and Stopping the GatewayBy default, the gateway starts as user noaccess.
To Start the Gateway
After installing the gateway and creating the required profile, run the following command to start the gateway:
InstallDir/SUNWps/bin/gateway -n default start
default is the default gateway profile that is created during installation. You can create your own profiles later, and restart the gateway with the new profile. See "Creating a Gateway Profile".
If you have multiple gateway instances, use:
InstallDir/SUNWps/bin/gateway start
This command starts all the gateway instances configured on that particular machine.
Run the following command to check if the gateway is running on the specified port:
netstat -a | grep port_number
The default gateway port is 443.
To Stop the Gateway
InstallDir/SUNWps/bin/gateway -n new_ profile_name stop
If you have multiple gateway instances, use:
InstallDir/SUNWps/bin/gateway stop
This command stops all the gateway instances that are running on that particular machine.
Creating Multiple Instances of a GatewayUse the script gwmultiinstance to create a new instance of the gateway. You can create a new instance in the following scenarios:
Creating a New Instance on a Portal Server Node
Table 2-1 lists the questions that the script asks. S
Table 2-1 Checklist for Creating a New Gateway Instance on a Portal Server Node
Parameter
Default Value
Description
New gateway uses portal server instance running on this node
y
The script detects an existing instance of the portal server and asks this question.
Specify y if you want the gateway to run with the portal server instance on the same node.
Choose n if you want to use a different instance of the portal server.
In this case, the "Creating a New Instance on a Separate Node" checklist applies.
Portal server instance is the default one created during installation
y
Specify which instance of the portal server you want the new gateway instance to work with.
If you choose y, the default portal server instance that is created during installation is used with the new gateway.
If you choose n, you will be asked to specify the name of the required portal server instance.
New portal server instance created
y
This question is asked only if you have chosen not to use the default portal server instance.
Specify whether the portal server instance that you want to use with your new gateway instance has already been created.
If you choose n, you are asked to create the instance first, and the script aborts.
Name of the new portal server instance
portal server instance name
This question is asked only if you have chosen not to use the default portal server instance.
Specify the name of the portal server instance that you want the new gateway instance to use.
Port on which the new portal server instance listens
This question is asked only if you have chosen not to use the default portal server instance.
Specify the port on which the new portal server instance listens.
Deployment URI
/portal
This question is asked only if you have chosen not to use the default portal server instance.
Specify the deployment URI of the new portal server instance.
Name of the new gateway instance
Specify the name of the new gateway instance that you want to create.
Protocol to be used by the gateway
https
Specify whether you want the gateway to operate in HTTP or HTTPS mode.
Port on which the new gateway instance listens
Specify the port on which the new gateway instance needs to listen. Ensure that this port has not been specified for any other gateway instance.
Create certificate database for new gateway instance
y
When the gateway is installed, a default certificate database is created as follows:
/etc/opt/SUNWps/cert/default
The default directory has the following database files:
cert7.db, key3.db, secmod.db
You can choose to use the same certificate database for various instances of the gateway or you can create and assign different certificate databases to different instances.
You can assign only one certificate to one instance of the gateway. If you want to assign different certificates to different organizations, you need to create multiple instances of the gateway.
Choose y to create a new certificate database for the new gateway instance.
Create self-signed certificate
y
This question is asked only if you have chosen to create a new certificate database.
Choose y to create a self-signed certificate. You are asked a series of questions in order to create this certificate.
If you choose n, you can create a self-signed certificate later. See Generating Self-signed Certificates in Chapter 4, “Installing SSL Certificates” in the Sun ONE Portal Server, Secure Remote Access Installation Guide for details.
Name of the organization
Name of the division
Name of the city or locality
Name of the state or province
Two-letter country code
Password for certificate database
These details are asked only if you have chosen y to create a self-signed certificate in the previous question.
Created a profile for the new gateway instance
y
You are asked if you have already created a profile for the new gateway instance.
See "To Create a Gateway Profile" for details on creating a new gateway profile.
Start the new gateway instance after installation
y
This question is asked only if you choose y for the previous question, that is, you have already created a profile for the new gateway instance.
If you have not created a profile, the script reminds you to create one before starting the gateway.
Start the new instance of the gateway with the new profile name.
InstallDir/SUNWps/bin/gateway -n test start
where test is the profile name of the new gateway instance
Creating a New Instance on a Separate Node
Table 2-2 lists the questions that the script asks.
Table 2-2 Checklist for Creating a New Gateway Instance on a Separate Node
Parameter
Default Value
Description
Host name of the Sun™ ONE Directory Server
hostname
This is the machine on which the directory server is installed.
Specify the machine on which directory server was installed for the portal server.
Sub-domain name for hostname
This is the sub-domain to which the directory server belongs.
Specify the sub-domain of the machine on which the directory server was installed for the portal server.
Domain name for hostname
This is the domain to which the directory server machine belongs.
Specify the domain of the machine on which the directory server was installed for the portal server.
Port used to access the directory server
389
This is the port which the portal server uses to access the directory server.
Specify the directory server port specified during the portal server installation.
Root suffix of the directory tree
o=isp
This is the default top level organization. Any new organization that you create is created under this organization.
Organization name
This is the name of the default organization that is created.
Hostname of portal server
portal server hostname
This is the hostname of the portal server.
Sub-domain for portal server hostname
This is the sub-domain to which the portal server machine belongs.
Domain name for portal server hostname
This is the domain to which the portal server machine belongs.
Port used to access portal server
80
This is the port used to access the portal server.
Protocol used to access portal server
http
Specify the protocol that is used to access the portal server.
Identity server deployment URI
/amserver
This is the identity server deployment URI. Do not change this value.
Portal server deployment URI
/portal
Specify the deployment URI of the new portal server instance.
Name of the new gateway instance
Specify the name of the new gateway instance that you want to create.
Protocol to be used by the gateway
http
Specify whether you want the gateway to operate in HTTP or HTTPS mode.
Port on which the new gateway instance listens
Specify the port on which the new gateway instance needs to listen. Ensure that this port has not been specified for any other gateway instance.
Create certificate database for new gateway instance
y
When the gateway is installed, a default certificate database is created as follows:
/etc/opt/SUNWps/cert/default
The default directory has the following database files:
cert7.db, key3.db, secmod.db
You can choose to use the same certificate database for various instances of the gateway or you can create and assign different certificate databases to different instances.
You can assign only one certificate to one instance of the gateway. If you want to assign different certificates to different organizations, you need to create multiple instances of the gateway.
Choose y to create a new certificate database for the new gateway instance.
If you choose n, the default certificate database is used.
Create self-signed certificate
y
This question is asked only if you have chosen to create a new certificate database.
Choose y to create a self-signed certificate. You are asked a series of questions in order to create this certificate.
If you choose n, you can create a self-signed certificate later. See “Generating Self Signed Certificates” in Chapter 4, “Installing SSL Certificates” in the Sun ONE Portal Server, Secure Remote Access Installation Guide for details.
Name of the organization
Name of the division
Name of the city or locality
Name of the state or province
Two-letter country code
Password for certificate database
These details are asked only if you have chosen y to create a self-signed certificate in the previous question.
Created a profile for the new gateway instance
y
You are asked if you have already created a profile for the new gateway instance.
See "To Create a Gateway Profile" for details on creating a new gateway profile.
Start the new gateway instance after installation
y
This question is asked only if you choose y for the previous question, that is, you have already created a profile for the new gateway instance.
If you have not created a profile, the script reminds you to create one before starting the gateway.
Start the new instance of the gateway with the new profile name.
InstallDir/SUNWps/bin/gateway -n test start
where test is the profile name of the new gateway instance
Configuring a Proxy to Contact the Portal ServerYou can configure the gateway to obtain profile information through a proxy if a direct connection is not available between the gateway and the portal server.
- From the command-line, edit the following file:
/etc/opt/bin/platform.conf.profilename
- Add the following entries:
http.proxyHost=proxy hostname
http.proxyPort=proxy port
http.proxySet=true
- Restart the gateway to use the specified proxy for Profile Service requests made to the server.
InstallDir/SUNWps/bin/gateway -n profilename start
Restarting the GatewayNormally, you do not need to restart the gateway. You need to restart only if any of the following events have occured:
To Restart the Gateway with a Different Profile
Restart the gateway using:
InstallDir/SUNWps/bin/gateway -n new profilename start
To Configure the watchdog process to Restart the Gateway if it Goes Down
To Configure the Gateway Watchdog
You can configure the time interval at which the watchdog monitors the status of the gateway. This time interval is set to 60 seconds by default. To change this, edit the following line in the crontab:
0-59 * * * * InstallDir/bin/checkgw /var/opt/SUNWps/.gw. 5 > /dev/null 2>&1
See the man pages for crontab to configure the crontab entries.
Configuring the Gateway AttributesThis section lists the attributes that you need to configure for the gateway to function as required.
Note
Click Documentation at the top right corner of the identity server admin console, and click SRAP Help for a quick reference on all the Secure Remote Access attributes.
Running in HTTP and HTTPS Modes
The gateway runs in HTTPS mode after installation if you have chosen to run the gateway in the HTTPS mode during installation. In the HTTPS mode, the gateway accepts SSL connections from browsers and rejects non-SSL connections.
However, you can also configure the gateway to run in HTTP mode. The benefits of doing this are performance related, since there is an overhead involved in managing SSL sessions and encrypting and decrypting the SSL traffic. Eliminating these steps speeds gateway performance.
To Configure the Gateway to Run in HTTP or HTTPS Mode
- Log in to the identity server admin console as administrator.
- Select the Service Configuration tab from the admin console.
- Click the arrow next to Gateway under SRAP Configuration.
The Gateway page displays.
- Click Edit... next to the gateway profile for which you want to set the attribute.
The Edit Gateway Profile page displays.
- Do the following:
- Click Save at the top or bottom of the Edit Gateway Profile page to record the change.
- From a terminal window, restart the gateway using:
InstallDir/SUNWps/bin/gateway -n gateway profile name start
Enabling the Rewriter Proxy
The Rewriter Proxy needs to be installed only on a portal server node.
Using the Rewriter Proxy enables secure HTTP traffic between the gateway and intranet computers. There are two advantages to using the Rewriter Proxy:
- If there is a firewall between the gateway and server, the firewall needs to open only two ports - one between the gateway and the Rewriter Proxy, and another between the gateway and the portal server.
- HTTP traffic is now secure between the gateway and the intranet even if the destination server only supports HTTP protocol (no HTTPS).
If you do not specify a Rewriter Proxy, the gateway component makes a direct connection to intranet computers when a user tries to access one of those intranet computers.
Note
The Rewriter Proxy needs to be installed on the portal server node.
Ensure that the Rewriter Proxy and the gateway use the same gateway profile.
Rewriter Proxy does not run automatically after installation. You need to enable Rewriter Proxy as described below.
To Enable Rewriter Proxy
- Log in to the identity server admin console as administrator.
- Select the Service Configuration tab.
- Click the arrow next to Gateway under SRAP Configuration.
The Gateway page displays.
- Click Edit... next to the gateway profile for which you want to set the attribute.
The Edit Gateway Profile page displays.
- Select the Enable Rewriter Proxy checkbox to enable the Rewriter Proxy.
- Specify the desired port for the Rewriter Proxy in the Rewriter Proxy Port edit box.
- Click Save at the top or bottom of the Edit Gateway Profile page to record the change.
- Run InstallDir/SUNWps/bin/certadmin on the server to create a certificate for the Rewriter Proxy.
You need to run this step only if you have not chosen to create a certificate while installing the Rewriter Proxy.
- Log in as root on the portal server machine and start the Rewriter Proxy by typing:
InstallDir/SUNWps/bin/rwproxyd -n gateway profile name start
- For the changes to take effect, restart the gateway by typing:
InstallDir/SUNWps/bin/gateway -n gateway profile name start
Disabling Netlet
Netlet enables users to securely run common TCP/IP services over insecure networks such as the Internet. You can run TCP/IP applications (such as Telnet and SMTP), HTTP applications, and any fixed port applications.
If Netlet is enabled, the gateway needs to determine whether the incoming traffic is Netlet traffic or portal server traffic. Disabling Netlet reduces this overhead since the gateway assumes that all incoming traffic is either HTTP or HTTPS traffic. Disable Netlet only if you are sure you do not want to use any application with the portal server.
To Disable Netlet
- Log in to the identity server admin console as administrator.
- Select the Service Configuration tab.
- Click the arrow next to Gateway under SRAP Configuration.
The Gateway page displays.
- Click Edit... next to the gateway profile for which you want to set the attribute.
The Edit Gateway Profile page displays.
- Select the Enable Netlet checkbox. This checkbox is selected by default. Removing the selection disables Netlet.
- Click Save at the top or bottom of the Edit Gateway Profile page to record the change.
- For the changes to take effect, restart the gateway by typing:
InstallDir/SUNWps/bin/gateway -n gateway profile name start
Enabling Netlet Proxy
Netlet Proxy enhances the security of Netlet traffic between the gateway and the intranet by extending the secure tunnel from the client, through the gateway to the Netlet Proxy that resides in the intranet. If the Netlet Proxy is enabled, the Netlet packets are decrypted by the Netlet Proxy and then sent to the destination server. This reduces the number of ports required to be opened in the firewall.
See "Configuring the Netlet Proxy" in Chapter 3, "Configuring Netlet" for details on the Netlet Proxy.
Managing Proxies
You can configure the gateway to contact HTTP resources using web proxies. Different proxies may be used for different domains and subdomains. These entries tell the gateway which web proxy to use to contact specific subdomains in specific domains. The proxy configuration specified in the gateway works as follows:
- Creates a list of domains and subdomains along with the required proxies in the Proxies for Domains and Subdomains field in the gateway service.
- With the Use Proxy field enabled:
- With the Use Proxy field disabled:
- To ensure that proxies are used for certain URLs within the domains and subdomains specified in the Proxies for Domains and Subdomains field, specify these URLs in the Use Webproxy URLs list. Although the Use Proxy option is disabled, a proxy is used to connect to the URLs listed under Use Webproxy URLs. The proxies for these URLs are obtained from the Proxies for Domains and Subdomains list.
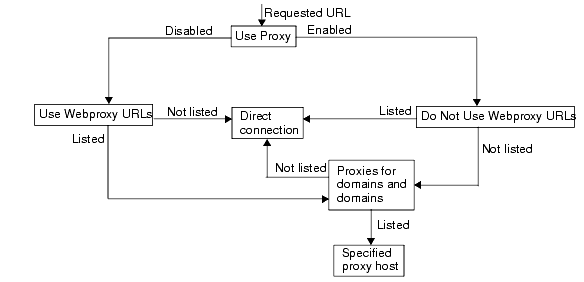
Figure 2-1 shows how the proxy information is resolved based on the proxy configuration in the gateway service.
Figure 2-1 Proxy Management
In Figure 2-1, if Use Proxy is enabled, and the requested URL is listed in the Do Not Use Webproxy URLs list, the gateway connects to the destination host directly.
If Use Proxy is enabled, and the requested URL is not listed in the Do Not Use Webproxy URLs list, the gateway connects to the destination host through the specified proxy. The proxy, if specified, is looked up from the Proxies for Domains and Subdomains list.
If Use Proxy is disabled, and the requested URL is listed in the Use Webproxy URLs list, the gateway connects to the destination host using the proxy information in the Proxies for Domains and Subdomains list.
If Use Proxy is disabled, and the requested URL is not listed in the Use Webproxy URLs list, the gateway connects to the destination host directly.
If none of the above conditions are met, and a direct connection is not possible, the gateway displays an error saying that connection is not possible.
Syntax
domainname [web_proxy1:port1]|subdomain1 [web_proxy2:port2]|......
Example
sesta.com wp1:8080|red wp2:8080|yellow|* wp3:8080
* is a wild card that matches everything
where,
sesta.com is the domain name and wp1 is the proxy to contact on port 8080.
red is a subdomain and wp2 is the proxy to contact on port 8080.
yellow is a subdomain. Since no proxy is specified, the proxy specified for the domain is used, that is, wp1 on port 8080.
* indicates that for all other subdomains wp3 needs to be used on port 8080.
Processing of the Proxy Information
When a client tries to access a particular URL, the host name in the URL is matched with the entries in the Proxies for Domains and Subdomains list. The entry that matches the longest suffix of the requested host name is considered. For example, consider that the requested host name is host1.sesta.com
- The Proxies for Domains and Subdomains is scanned for host1.sesta.com. If a matching entry is found, the proxy specified against this entry is used to connect to this host.
- Else, the list is scanned for *.sesta.com. If an entry is found, the corresponding proxy is used.
- Else, the list is searched for sesta.com. If an entry is found, the corresponding proxy is used.
- Else, the list is searched for *.com. If an entry is found, the corresponding proxy is used.
- Else the list is searched for com. If an entry is found, the corresponding proxy is used.
- Else the list is searched for *. If an entry is found, the corresponding proxy is used.
- Else, a direct connection is attempted.
Consider the following entries in the Proxies for Domains and Subdomains list:
com p1| host1 p2 | host2 | * p3
sesta.com p4 | host5 p5 | * p6
florizon.com | host6
abc.sesta.com p8 | host7 p7 | host8 p8 | * p9
host6.florizon.com p10
host9.sesta.com p11
siroe.com | host12 p12 | host13 p13 | host14 | * p14
siroe.com | host15 p15 | host16 | * p16
* p17
The gateway internally maps these entries into a table as shown in Table 2-3.
Rewriting Based on the Proxies for Domains and Subdomains List
The entries in the Proxies for Domains and Subdomains list are also used by Rewriter. Rewriter rewrites all URLs whose domains match the domains listed in the Proxies for Domains and Subdomains list.
Caution
The * entry in the Proxies for Domains and Subdomains list is not considered for rewriting. For example, in the sample provided in Table 2-3, entry 24 is not considered.
See Chapter 5, "Configuring Rewriter" for more details on Rewriter and its functionality.
Default Domain and Subdomain
When the destination host in the URL is not a fully qualified host name, the default domain and subdomain are used to arrive at the fully qualified name.
Assume that the entry in the Default Domain Subdomain field of the admin console is:
red.sesta.com
In the example above, sesta.com is the default domain and the default subdomain is red.
If the requested URL is host1, this is resolved to host1.red.sesta.com using the default domain and subdomain. The Proxies for Domains and Subdomains list is then looked up for host1.red.sesta.com.
To Enable the Usage of Web Proxies
- Log in to the identity server admin console as administrator.
- Select the Service Configuration tab.
- Click the arrow next to Gateway under SRAP Configuration.
The Gateway page displays.
- Click Edit... next to the gateway profile for which you want to set the attribute.
The Edit Gateway Profile page displays.
- Select the Use Proxy checkbox to enable the usage of web proxies.
- Click Save at the top or bottom of the Edit Gateway Profile page to record the change.
- For the changes to take effect, restart the gateway by typing:
InstallDir/SUNWps/bin/gateway -n gateway profile name start
Specifying URLS for Webproxies
You can specify that the gateway needs to contact certain URLs only through the webproxies listed in the Proxies for Domains and Subdomains list, even if the Use Proxy option is disabled. You need to specify these URLs in the Use Webproxy URLs field. See "Managing Proxies" for details on how this value affects the usage of proxies.
To Specify the URLs for Webproxies
- Log in to the identity server admin console as administrator.
- Select the Service Configuration tab.
- Click the arrow next to Gateway under SRAP Configuration.
The Gateway page displays.
- Click Edit... next to the gateway profile for which you want to set the attribute.
The Edit Gateway Profile page displays.
- Type the required URL in the Use Webproxy URLs edit box in the format http://host name.subdomain.com. Click Add.
The URL is added to the Use Webproxy URLs list.
- Click Save at the top or bottom of the Edit Gateway Profile page to record the change.
- For the changes to take effect, restart the gateway by typing:
InstallDir/SUNWps/bin/gateway -n gateway profile name start
Specifying URLs for which Proxies Should not be Used
The gateway tries to connect directly to the URLs listed in the Do Not Use Webproxy URLs list. A webproxy is not used to connect to these URLs.
To Specify the URLs for which Proxies Should not be Used
- Log in to the identity server admin console as administrator.
- Select the Service Configuration tab.
- Click the arrow next to Gateway under SRAP Configuration.
The Gateway page displays.
- Click Edit... next to the gateway profile for which you want to set the attribute.
The Edit Gateway Profile page displays.
- Type the required URL in the Do Not Use Webproxy URLs edit box and click Add.
The URL is added to the Do Not Use Webproxy URLs list.
- Click Save at the top or bottom of the Edit Gateway Profile page to record the change.
- For the changes to take effect, restart the gateway by typing:
InstallDir/SUNWps/bin/gateway -n gateway profile name start
Specifying the Default Domain and Subdomain
The default domain and subdomain are useful when URLs contain only the host names without the domain and subdomain. In this case, the gateway assumes that the host names are in the default domain and subdomain, and proceeds accordingly.
For example, if the host name in the URL is host1, and the default domain and subdomain are specified as red.sesta.com, the host name is resolved as host1.red.sesta.com.
To Specify the Default Domain and Subdomain
- Log in to the identity server admin console as administrator.
- Click the Service Configuration tab.
- Click the right arrow next to Gateway under SRAP Configuration.
The Gateway Profile page displays.
- Click Edit... for the gateway profile for which you want to set the attribute.
The Edit Gateway Profile page displays.
- Scroll down to the Default Domain Subdomain field and type the required default value in the format subdomain.domain name.
- Click Save at the top or bottom of the Edit Gateway Profile page to record the change.
- For the changes to take effect, restart the gateway by typing:
InstallDir/SUNWps/bin/gateway -n gateway profile name start
To Specify Proxies for Domains and Subdomains
See "Processing of the Proxy Information" for details on how the proxy information is applied to various hosts.
- Log in to the identity server admin console as administrator.
- Select the Service Configuration tab.
- Click the right arrow next to Gateway under SRAP Configuration.
The Gateway Profile page displays.
- Click Edit. for the gateway profile for which you want to set the attribute.
The Edit Gateway Profile page displays.
- Type the required information in the Proxies for Domains and Subdomains edit box and click Add. The entry is added to the Proxies for Domains and Subdomains list box.
The format for entering the proxy information is as follows:
domainname proxy1:port1|subdomain1 proxy2:port2|subdomain2 proxy3:port3|* proxy4:port4
* indicates that the proxy defined after the * needs to be used for all domains and subdomains other than those specifically mentioned.
If you do not specify the port for the proxy, port 8080 is used by default.
- Click Save at the top or bottom of the Edit Gateway Profile page to record the change.
- For the changes to take effect, restart the gateway by typing:
InstallDir/SUNWps/bin/gateway -n gateway profile name start
Specifying Proxy Authentication Information
You need to specify the user name and password required for the gateway to authenticate to the specified proxy server, if the proxy server requires authentication to access some or all the sites.
To Specify the Proxy Authentication Information
- Log in to the identity server admin console as administrator.
- Select the Service Configuration tab.
- Click the arrow next to Gateway under SRAP Configuration.
The Gateway page displays.
- Click Edit... next to the gateway profile for which you want to set the attribute.
The Edit Gateway Profile page displays.
- Scroll down to the Proxy Password List field.
- Type the information for each proxy server in the format proxyserver|username|password and click Add.
The proxyserver corresponds to the proxy server defined in the Proxies for Domains and Subdomains list.
- Repeat step 6 for all the proxies that require authentication.
- Click Save at the top or bottom of the page to record the changes.
- For the changes to take effect, restart the gateway by typing:
InstallDir/SUNWps/bin/gateway -n gateway profile name start
Configuring Cookies
Many web sites use cookies to track and manage user sessions. When the gateway routes requests to web sites that set cookies in the HTTP header, the gateway either discards or passes-through those cookies in the following manner:
- Cookies are not rewritten if Enable Cookie Management attribute is not selected in the gateway service. So, the cookies from the browser might not reach the intranet hosts and vice-versa.
- Gateway rewrites cookies if the Enable Cookie Management attribute is selected. Gateway ensures that the cookies from the browser reach the intended intranet hosts and vice-versa.
This setting does not apply to the cookies used by the portal server to track portal server user sessions. It is controlled by the Forwarding Cookie Configuration.
This setting applies to all web sites that the user is permitted to access (that is, you cannot choose to discard cookies from some sites and retain cookies from others).
To Enable Cookie Management
- Log in to the identity server admin console as administrator.
- Select the Service Configuration tab.
- Click the arrow next to Gateway under SRAP Configuration.
The Gateway page displays.
- Click Edit... next to the gateway profile for which you want to set the attribute.
The Edit Gateway Profile page displays.
- Select the Enable Cookie Management checkbox to enable cookie management.
- Click Save at the top or bottom of the Edit Gateway Profile page to record the change.
- For the changes to take effect, restart the gateway by typing:
InstallDir/SUNWps/bin/gateway -n gateway profile name start
Enabling HTTP Basic Authentication
HTTP basic authentication can be set in the gateway service.
Web sites may be protected with HTTP Basic Authentication, requiring visitors to enter a username and password before viewing the site (the HTTP response code is 401 and WWW-authenticate: BASIC). The portal server can save the username and password so that users need not re-enter their credentials when they revisit BASIC-protected web sites. These credentials are stored in the user profile on the directory server.
This setting does not determine whether or not a user may visit BASIC-protected sites, but only whether the credentials the user enters will be saved in the user's profile.
This setting applies to all web sites that the user is permitted to access (that is, HTTP basic authentication caching cannot be enabled for some sites and disabled for others).
You can also enable single sign-on using the Access List service in the admin console. See "Managing Single Sign-On" in Chapter 1, "Introduction to Sun ONE Portal Server, Secure Remote Access" for more information on enabling single sign-on.
To Enable HTTP Basic Authentication
- Log in to the identity server admin console as administrator.
- Select the Service Configuration tab.
- Click the arrow next to Gateway under SRAP Configuration.
The Gateway page displays.
- Click Edit... next to the gateway profile for which you want to set the attribute.
The Edit Gateway Profile page displays.
- Select the Enable HTTP Basic Authentication checkbox to enable HTTP basic authentication.
- Click Save at the top or bottom of the Edit Gateway Profile page to record the change.
- For the changes to take effect, restart the gateway by typing:
InstallDir/SUNWps/bin/gateway -n gateway profile name start
Configuring Persistent HTTP Connections
You can enable HTTP persistent connections at the gateway to prevent sockets being opened for every object (such as images and style sheets) in the web pages.
To Enable Persistent HTTP Connections
- Log in to the identity server admin console as administrator.
- Select the Service Configuration tab.
- Click the arrow next to Gateway under SRAP Configuration.
The Gateway page displays.
- Click Edit... next to the gateway profile for which you want to set the attribute.
The Edit Gateway Profile page displays.
- Select the Enable Persistent HTTP Connections checkbox.
- Click Save at the top or bottom of the Edit Gateway Profile page to record the change.
- For the changes to take effect, restart the gateway by typing:
InstallDir/SUNWps/bin/gateway -n gateway profile name start
To Specify the Maximum Number of Requests per Persistent Connection
- Log in to the identity server admin console as administrator.
- Select the Service Configuration tab.
- Click the arrow next to Gateway under SRAP Configuration.
The Gateway page displays.
- Click Edit... next to the gateway profile for which you want to set the attribute.
The Edit Gateway Profile page displays.
- Type the required number of requests in the Maximum Number of Requests per Persistent Connection field.
- Click Save at the top or bottom of the Edit Gateway Profile page to record the change.
- For the changes to take effect, restart the gateway by typing:
InstallDir/SUNWps/bin/gateway -n gateway profile name start
To Specify the Timeout for the Persistent Socket
- Log in to the identity server admin console as administrator.
- Select the Service Configuration tab.
- Click the arrow next to Gateway under SRAP Configuration.
The Gateway page displays.
- Click Edit... next to the gateway profile for which you want to set the attribute.
The Edit Gateway Profile page displays.
- Type the required timeout in seconds in the Timeout after which Persistent Socket gets Closed field.
- Click Save at the top or bottom of the Edit Gateway Profile page to record the change.
- For the changes to take effect, restart the gateway by typing:
InstallDir/SUNWps/bin/gateway -n gateway profile name start
To Specify Timeout to Account for Turnaround Time
This is the round trip time for the network traffic between the client (browser) and the gateway.
- Log in to the identity server admin console as administrator.
- Select the Service Configuration tab.
- Click the arrow next to Gateway under SRAP Configuration.
The Gateway page displays.
- Click Edit... next to the gateway profile for which you want to set the attribute.
The Edit Gateway Profile page displays.
- Type the required grace timeout in seconds in the Grace Timeout to Account for Turnaround Time field.
- Click Save at the top or bottom of the Edit Gateway Profile page to record the change.
- For the changes to take effect, restart the gateway by typing:
InstallDir/SUNWps/bin/gateway -n gateway profile name start
Forwarding Cookie Configuration
Portal server utilizes a cookie to track user sessions. This cookie is forwarded to the server when the gateway makes HTTP requests to the server (for example, when the desktop servlet is called to generate the user's desktop page). Applications on the server use the cookie to validate and identify the user.
The portal server's cookie is not forwarded to HTTP requests made to machines other than the server, unless URLs on those machines are specified in the Forward Cookie URL Lists. Adding URLs to this list therefore enables servlets and CGIs to receive the portal server's cookie and use the APIs to identify the user.
URLs are matched using an implicit trailing wildcard. For example, the default entry in the list:
http://server:8080
causes the cookie to be forwarded to all URLs starting with http://server:8080.
Adding:
http://newmachine.eng.siroe.com/subdir
causes the cookie to be forwarded to all URLs starting with that exact string.
For this example, the cookie is not forwarded to any URLs starting with "http://newmachine.eng/subdir", since this string does not start with the exact string in the forward list. To have cookies forwarded to URLs starting with this variation of the machine's name, an additional entry has to be added to the forward list.
Similarly, the cookie is not forwarded to URLs starting with "https://newmachine.eng.siroe.com/subdir" unless an appropriate entry is added to the list.
To Add a Forward Cookie URL
- Log in to the identity server admin console as administrator.
- Select the Service Configuration tab.
- Click the arrow next to Gateway under SRAP Configuration.
The Gateway page displays.
- Click Edit... next to the gateway profile for which you want to set the attribute.
The Edit Gateway Profile page displays.
- Type the required URL in the Forward Cookie URLs edit box.
- Click Add to add this entry to the Forward Cookie URLs list.
- Click Save at the top or bottom of the Edit Gateway Profile page to record the change.
- For the changes to take effect, restart the gateway by typing:
InstallDir/SUNWps/bin/gateway -n gateway profile name start
Specifying URLs that Bypass Authentication
You can specify that some URLs do not need any authentication. These are normally directories and folders that contain images.
To Specify Non-authenticated URL Paths
- Log in to the identity server admin console as administrator.
- Select the Service Configuration tab.
- Click the arrow next to Gateway under SRAP Configuration.
The Gateway page displays.
- Click Edit... next to the gateway profile for which you want to set the attribute.
The Edit Gateway Profile page displays.
- Scroll down to the Non-authenticated URLs field and type the required folder path in the format folder/subfolder.
- Click Add to add this entry to the Non-authenticated URLs list.
- Click Save at the top or bottom of the Edit Gateway Profile page to record the change.
- For the changes to take effect, restart the gateway by typing:
InstallDir/SUNWps/bin/gateway -n gateway profile name start
Specifying the Maximum Connection Queue Length
You can specify the maximum concurrent connections that the gateway needs to accept. Any connection attempts beyond this number are not accepted by the gateway.
To Specify the Maximum Connection Queue Length
- Log in to the identity server admin console as administrator.
- Select the Service Configuration tab.
- Click the arrow next to Gateway under SRAP Configuration.
The Gateway page displays.
- Click Edit... next to the gateway profile for which you want to set the attribute.
The Edit Gateway Profile page displays.
- Scroll down to the Maximum Connection Queue Length field and specify the required number of connections.
- Click Save at the top or bottom of the Edit Gateway Profile page to record the change.
- For the changes to take effect, restart the gateway by typing:
InstallDir/SUNWps/bin/gateway -n gateway profile name start
Specifying the Gateway Timeout
You can specify the time interval in milliseconds after which the gateway times out its connection with the browser.
To Specify the Gateway Timeout
- Log in to the identity server admin console as administrator.
- Select the Service Configuration tab.
- Click the arrow next to Gateway under SRAP Configuration.
The Gateway page displays.
- Click Edit... next to the gateway profile for which you want to set the attribute.
The Edit Gateway Profile page displays.
- Scroll down to the Gateway Timeout (milliseconds) field and specify the interval required in milliseconds.
- Click Save at the top or bottom of the Edit Gateway Profile page to record the change.
- For the changes to take effect, restart the gateway by typing:
InstallDir/SUNWps/bin/gateway -n gateway profile name start
Specifying the Maximum Number of Threads
You can specify the maximum number of threads that can be pre-created in the gateway thread pool.
To Specify the Maximum Number of Threads
- Log in to the identity server admin console as administrator.
- Select the Service Configuration tab.
- Click the arrow next to Gateway under SRAP Configuration.
The Gateway page displays.
- Click Edit... next to the gateway profile for which you want to set the attribute.
The Edit Gateway Profile page displays.
- Scroll down to the Maximum Thread Pool Size field and specify the required number of threads.
- Click Save at the top or bottom of the Edit Gateway Profile page to record the change.
- For the changes to take effect, restart the gateway by typing:
InstallDir/SUNWps/bin/gateway -n gateway profile name start
Specifying the Cached Socket Timeout
You can specify the time interval in milliseconds after which the gateway times out its connection with the portal server.
To Specify the Cached Socket Timeout
- Log in to the identity server admin console as administrator.
- Select the Service Configuration tab.
- Click the arrow next to Gateway under SRAP Configuration.
The Gateway page displays.
- Click Edit... next to the gateway profile for which you want to set the attribute.
The Edit Gateway Profile page displays.
- Scroll down to the Cached Socket Timeout field and specify the interval required in milliseconds.
- Click Save at the top or bottom of the Edit Gateway Profile page to record the change.
- For the changes to take effect, restart the gateway by typing:
InstallDir/SUNWps/bin/gateway -n gateway profile name start
Configuring Personal Digital Certificate (PDC) Authentication
PDCs are issued by a Certification Authority (CA) and signed with the CA's private key. The CA validates the identity of a requesting body before issuing a certificate. Thus the presence of a PDC is a very powerful authentication mechanism.
PDCs contain the owner's public key, the owner's name, an expiration date, the name of the Certification Authority that issued the Digital Certificate, a serial number, and maybe some other information.
Users can use PDCs and encoded devices such as Smart Cards and Java Cards for authentication in the portal server. The encoded devices carry an electronic equivalent of a PDC stored on the card. If a user logs in using one of these mechanisms, no login screen displays and no authentication screen displays.
The PDC authentication process involves several steps:
- From a browser, the user types a connection request, say https://my.sesta.com.
The response to this request depends on whether the gateway to my.sesta.com has been configured to accept certificates.
Note
When a gateway is configured to accept certificates, it will accept only logins with certificates, not any other kind of login.
The gateway checks that the certificate has been issued by a known Certificate Authority, has not expired, and has not been tampered with. If the certificate is valid, the gateway lets the user proceed to the next step in the authentication process.
- The gateway passes the certificate to the PDC authentication module in the server.
To Configure PDCs and Encoded Devices
The following steps are involved in configuring PDCs and encoded devices:
To Add the Gateway to the Certificate-Enabled Gateway Hosts list
- Log in to the identity server admin console as administrator.
- Select the required organization.
- Select the Service Configuration tab.
All the services are displayed in the left pane.
- Click the arrow next to Gateway under SRAP Configuration.
The Gateway Profiles page is displayed in the right pane.
- Click Edit... for the profile where you want to enable certificate based authentication.
- Add the gateway name to the Certificate-enabled Gateway Hosts.
Add the gateway in the format host1.sesta.com.
- Click Add.
To Register Required Services
- Log in to the identity server admin console as administrator.
- Select the Identity Management tab.
- Click Services from the View drop-down menu.
The Core service, if already registered, displays in the navigation pane. If it is not already registered, it can be done concurrently with the Certificate service.
- Click Register in the navigation pane.
A list of available services displays in the data pane.
- Select the checkbox for Certificate.
The Certificate service displays in the navigation pane confirming that the service has been registered.
- Click Register.
To Modify the Required Attributes
- Select the Identity Management tab.
- Choose Services from the View drop-down menu.
- Click the arrow next to Core under Authentication in the left pane.
The Core page displays.
- Click on the arrow next to Certificate.
The message “A template does not currently exist for this service. Do you want to create one now?”
- Click Create.
The Certificate page is displayed in the data pane.
- Modify the attributes as necessary.
Click Save at the top of the page to record the changes.
- Click the arrow next to Core.
- Choose Dynamically Created from the User Profile drop-down menu.
- Click Save.
- Restart the identity server:
InstallDir/SUNWps/bin/gateway -n gateway profile name start
To Add Trusted Remote Hosts
- Log in to the identity server admin console as administrator.
- Select the required organization.
- Click the arrow next to Certificate.
- Click Create... to create a template.
- Click Save.
- Scroll to the list box named Trusted Remote Host.
- Highlight none and click Remove.
- Type any in the text box and click Add.
To Enable Users to Login Without a Profile (Dynamic Creation of Profile at Login)
- Log in to the identity server admin console as administrator.
- Choose the required organization.
- Select Services from the View drop-down menu.
The services are displayed in the left pane.
- Click the arrow next to Core.
- Choose Dynamically Created from the User Profile drop-down menu.
- Click Save.
InstallDir/SUNWps/bin/gateway -n gateway profile name start
To Create a Gateway Instance with a Certification Module
- Log in to the identity server admin console as administrator.
- Choose the required organization.
- Select Services from the View drop-down menu.
The services are displayed in the left pane.
- Click the arrow next to Authentication Configuration.
The Service Instance List displays.
- Click New...
The New Service Instance page displays.
- Enter the service instance name gatewaypdc.
Note: You must use this name.
- Click Create.
The Service Instance List displays.
- Click on gatewaypdc to edit the service.
The gatewaypdc show properties page displays.
- Click Edit...
The Module List for your organization displays.
- Click Add...
The Add Module page displays.
- Choose Cert from the Module Name field and a Flag option.
- Click OK.
- Add the root CA from the CA authority on the gateway machine.
See “Installing Certificates From a Certificate Authority” in Chapter 4, “Installing SSL Certificates” in the Sun ONE Portal Server, Secure Remote Access Installation Guide for details.
- Restart the gateway machine.
Allowing 40-bit Browser Connections
Select this option if you want to allow 40-bit (weak) Secure Sockets Layer (SSL) connections. If you do not select this option, only 128-bit connections are supported.
If you disable this option, the user needs to ensure that the browser is configured to support the required connection type.
To Allow 40-bit Browser Connections
- Log in to the identity server admin console as administrator.
- Select the Service Configuration tab.
- Click the arrow next to Gateway under SRAP Configuration.
The Gateway page displays.
- Click Edit... next to the gateway profile for which you want to set the attribute.
The Edit Gateway Profile page displays.
- Select the Allow 40-bit Browser checkbox to enable 40-bit browser connections.
- Click Save at the top or bottom of the Edit Gateway Profile page to record the change.
- For the changes to take effect, restart the gateway by typing:
InstallDir/SUNWps/bin/gateway -n gateway profile name start
Disabling SSL Version 2.0
You can enable or disable SSL version 2.0. Disabling SSL 2.0 means that browsers that support only the older SSL 2.0 will not be able to authenticate to Secure Remote Access. This ensures a greater level of security.
To Disable SSL Version 2.0
- Log in to the identity server admin console as administrator.
- Select the Service Configuration tab.
- Click the arrow next to Gateway under SRAP Configuration.
The Gateway page displays.
- Click Edit... next to the gateway profile for which you want to set the attribute.
The Edit Gateway Profile page displays.
- Scroll down to the Enable SSL Version 2.0 field and deselect the option.
This option is enabled by default.
- Click Save at the top or bottom of the Edit Gateway Profile page to record the change.
- For the changes to take effect, restart the gateway by typing:
InstallDir/SUNWps/bin/gateway -n gateway profile name start
Enabling Cipher Selection
Secure Remote Access supports a number of standard ciphers. You have the option of supporting all the pre-packaged ciphers, or selecting the required ciphers individually. You can select specific SSL ciphers for each gateway instance. If any of the selected ciphers is present at the client site, the SSL handshake occurs successfully.
To Enable Individual Cipher Selection
- Log in to the identity server admin console as administrator.
- Select the Service Configuration tab.
- Click the arrow next to Gateway under SRAP Configuration.
The Gateway page displays.
- Click Edit... next to the gateway profile for which you want to set the attribute.
The Edit Gateway Profile page displays.
- Scroll down to the Enable SSL Cipher Selection field and select the option.
This option allows you to select the required ciphers from the list of SSL2, SSL3 and TLS ciphers.
- Click Save at the top or bottom of the Edit Gateway Profile page to record the change.
You can select the ciphers that you want to be supported at your client sites. Deselecting the Enable the SSL Ciphers Individually option automatically selects all the listed ciphers.
- For the changes to take effect, restart the gateway by typing:
InstallDir/SUNWps/bin/gateway -n gateway profile name start
Rewriting all URLs
See Chapter 5, "Configuring Rewriter" for details.
To Specify Domain-based Rulesets
See Chapter 5, "Configuring Rewriter" for details.
To Specify the MIME Mappings
See Chapter 5, "Configuring Rewriter" for details.
Specifying the List of Configured Portal Servers
You can configure multiple portal servers for the gateway to service requests. While installing the gateway, you would have specified the portal server that the gateway needs to work with. This portal server is listed in the Portal Server List by default. You can add more portal servers to the list in the format http://portal server name:port number. The gateway tries to contact each of the portal servers listed in a round robin manner to service the requests.
To Specify the List of Configured Portal Servers
- Log in to the identity server admin console as administrator.
- Select the Service Configuration tab.
- Click the arrow next to Gateway under SRAP Configuration.
The Gateway page displays.
- Click Edit... next to the gateway profile for which you want to set the attribute.
The Edit Gateway Profile page displays.
- Scroll down to the Portal Server List field. Specify the portal server in the format http://portal server name:port number in the edit field and click Add.
The specified portal server is added to the Portal Server List field.
- Click Save at the top or bottom of the page to record the changes.
- For the changes to take effect, restart the gateway by typing:
InstallDir/SUNWps/bin/gateway -n gateway profile name start
Specifying the Retry Interval for the Portal Server
You can set the frequency (in minutes) at which the gateway needs to check if the portal server is available.
To Specify the Retry Interval for the Portal Server
- Log in to the identity server admin console as administrator.
- Select the Service Configuration tab.
- Click the arrow next to Gateway under SRAP Configuration.
The Gateway page displays.
- Click Edit... next to the gateway profile for which you want to set the attribute.
The Edit Gateway Profile page displays.
- Scroll down to the Server Retry Interval field. Specify the time interval in minutes at which the gateway needs to check whether the portal server is available.
- Click Save at the top or bottom of the page to record the changes.
- For the changes to take effect, restart the gateway by typing:
InstallDir/SUNWps/bin/gateway -n gateway profile name start
Enabling Logging
You can specify the gateway log file to capture either minimum information or detailed information about each session. The log information is saved in the directory specified in the Log Location attribute as part of the Logging section of the Identity Server Configuration attributes. This log is located on the portal server machine.
The log name uses the following convention:
srapGateway_gatewayhostname_gateway profile name
The log information can be saved as a file or as a database as specified in the Identity Server Configuration. The fields in the log are comma-separated ASCII values, and can be exported to other data analysis tools.
To Enable Gateway Logging
- Log in to the identity server admin console as administrator.
- Select the Service Configuration tab.
- Click the arrow next to Gateway under SRAP Configuration.
The Gateway page displays.
- Click Edit... next to the gateway profile for which you want to set the attribute.
The Edit Gateway Profile page displays.
- Select the Enable Logging checkbox to enable gateway logging.
- Select the Enable per Session Logging checkbox to capture minimum log information such as Client Address, Request Type, and Destination Host.
- Select the Enable Detailed per Session Logging for the gateway to capture detailed log information such as Client, Request Type, Destination Host, Type of Request, Client Requested URL, Client Post Data size, SessionID, Response Result code, and Complete Response size.
Note
Detailed log information is captured only if the Enable per Session Logging checkbox has already been enabled.
- Click Save at the top or bottom of the page to record the changes.
- For the changes to take effect, restart the gateway by typing:
InstallDir/SUNWps/bin/gateway -n gateway profile name start
Enabling Netlet Logging
You can enable logging for Netlet related activities by selecting this option. The Netlet log will contain the following details about the Netlet sessions:
To Enable Netlet Logging
- Log in to the identity server admin console as administrator.
- Select the Service Configuration tab.
- Click the arrow next to Gateway under SRAP Configuration.
The Gateway page displays.
- Click Edit... next to the gateway profile for which you want to set the attribute.
The Edit Gateway Profile page displays.
- Select the Enable Netlet Logging checkbox to enable Netlet logging.
- Click Save at the bottom of the page to record the changes.
- For the changes to take effect, restart the gateway by typing:
InstallDir/SUNWps/bin/gateway -n gateway profile name start
Authentication ChainingAuthentication chaining provides a higher level of security over the regular mechanism of authentication. You can enable users to be authenticated against more than one authentication mechanism.
The procedure described here is only for enabling authentication chaining along with PDC authentication at the gateway. For authentication chaining without PDC authentication at the gateway please refer to Sun ONE Identity Server Administration Guide.
For example, if you chain the PDC, Unix and Radius authentication modules, the user will have to authenticate against all the three modules to access the portal server desktop.
To Add Authentication Modules to an Existing PDC Instance
- Log in to the identity server admin console as administrator.
- Choose the required organization.
- Select Services from the View drop-down menu.
The services are displayed in the left pane.
- Click the arrow next to Authentication Configuration.
The Service Instance List displays.
- Click gatewaypdc.
The gatewaypdc properties page displays.
- Click Edit in front of Authentication Configuration
Add Module displays.
- Select Module Name and set Flag to Required. Option can be blank.
- Click OK.
- Click Save after adding one or more modules.
- Click Save in the gatewaypdc properties page.
- For the changes to take effect, restart the gateway by typing:
InstallDir/SUNWps/bin/gateway -n gateway_profile_name start
Wild Card Certificates
A wild card certificate accepts a single certificate with a wild card character in the fully-qualified DNS name of the host.
This allows the certificate to secure multiple hosts within the same domain. For example, a certificate for *.domain.com can be used for abc.domain.com, and abc1.domain.com. In fact, this certificate is valid for any host in the domain.com domain.
To Create a Wild Card Certificate
See “Generating Self-Signed Certificates” in Chapter 4, “Installing SSL Certificates” in the Sun ONE Portal Server, Secure Remote Access Installation Guide for details.
You need to specify a * in the fully-qualified host name. For example, if the fully-qualified host name is abc.florizon.com, specify it as *.florizon.com. The certificate that is generated is now valid for all host names in the florizon.com domain.
Disabling Browser CachingAs the gateway component provides secure access to backend corporate data from any location using just a web browser, it may be necessary that the information not be cached locally by the client.
You can disable caching of pages redirected through the gateway by modifying the attribute in the platform.conf file of the specific gateway.
Disabling this option can have an impact on the gateway performance. Every time the desktop is refreshed, the gateway has to retrieve everything referenced by the page, such as images which may have been previously cached by the browser. However, by enabling this feature, remotely accessing secure content will not leave a cached footprint on the client site. This could outweigh performance implications if the corporate network is being accessed from an Internet cafe or similar remote location that is not under corporate IT control.
To Disable Browser Caching
- Log in as root and edit the platform.conf file of the required gateway instance:
/etc/opt/SUNWps/platform.conf.profilename
- Edit the following line:
gateway.allow.client.caching=true
This value is set to true by default. Change the value to false to disable browser caching at the client side.
- Restart the gateway using:
InstallDir/SUNWps/bin/gateway -n new profile name start
Running the Gateway in the chroot EnvironmentTo provide high security in a chroot environment, the chroot’d directory content must be as minimal as possible. For example, if any programs exist which allow a user to modify a file under the chrooted directory, then chroot will not protect the server against an attacker modifying files under the chroot tree. CGI programs should not be written in an interpreted language, such as bourne shell, c-shell, korn shell or perl, but should be compiled binaries so interpreters do not need to be present under the chroot directory tree.
To Install chroot
- As root, in a terminal window, copy the following files to an external source such as a computer on the network, a backup tape or a floppy disk.
cp /etc/vfstab external-device
cp /etc/nsswitch.conf external-device
cp /etc/hosts external-device
- Run the mkchroot script from:
InstallDir/SUNWps/bin/chroot
Note
The mkchroot script cannot be terminated by pressing Ctrl-C, once execution has begun.
In the event of an error during the execution of the mkchroot script, see "Execution Failure of the mkchroot Script".
You are prompted for a different root directory (new_root_directory). The script creates the new directory.
In the following examples, /safedir/chroot is the new_root_directory.
- Manually mount the Java directory mentioned in the platform.conf file to the chroot directory using the following command:
mkdir -p /safedir/chroot/javadir
mount -F lofs javadir /safedir/chroot/javadir
For Solaris 9, do the following:
mkdir -p /safedir/chroot/usr/lib/32
mount -F lofs /usr/lib/32 /safedir/chroot/usr/lib/32
mkdir -p /safedir/chroot/usr/lib/64
mount -F lofs /usr/lib/64 /safedir/chroot/usr/lib/64
To mount this directory at system startup, add a corresponding entry in the /etc/vfstab file:
javadir - /safedir/chroot/javadir lofs - no -
For Solaris 9:
/usr/lib/32 - /safedir/chroot/usr/lib/32 lofs - no -
/usr/lib/64 - /safedir/chroot/usr/lib/64 lofs - no -
- Type the command below to restart the gateway:
Execution Failure of the mkchroot Script
In the event of an error during the execution of the mkchroot script, the script will restore the files to their initial state.
In the following examples, /safedir/chroot is the chroot directory.
If the following error message is encountered:
Not a Clean Exit
- Copy the backed up files in step 1 of the procedure To Install chroot, to their original locations, and execute the following commands:
umount /safedir/chroot/usr/java1.2
umount /safedir/chroot/proc
umount /safedir/chroot/dev/random
- Remove the /safedir/chroot directory.
Restarting the Gateway in the chroot Environment
Follow these steps to run the Secure Remote Access gateway in a chroot environment whenever the gateway machine is rebooted.
To Restart the Gateway in the chroot Environment
- Stop the gateway running from the ’/’ directory.
InstallDir/SUNWps/bin/gateway -n profilename stop
- Start the gateway to run from the chroot directory.
chroot /safedir/chroot ./InstallDir/SUNWps/bin/gateway -n profilename start
Note
The /safedir/chroot/etc files (such as passwd and hosts) need to be administered, just like the /etc files, but only include host and account information required by the programs running in the chroot tree.
For example, if you change the IP address of the system, also change the file /safedir/chroot/etc/hosts.
Customizing the Gateway User InterfaceThis section discuss the various property files that can be edited. You can edit labels on the gateway admin console, error messages, or the order of log information. This is useful if you are trying to customize the product for different locales.
You can customize the following files:
InstallDir/SUNWam/locale/srapGatewayAdminConsole.properties
InstallDir/SUNWps/locale/srapGateway.properties
InstallDir/SUNWps/web-src/WEB-INF/classes/srapgwadminmsg.properties
Note
You need to store a copy of each of these files in the respective locale directories if you have different locale settings.
srapGatewayAdminConsole.properties File
Edit this file to change the field names that appear on the gateway admin console.
srapGateway.properties File
Edit this file to:
- Customize the error messages that may appear when the gateway is running.
- HTML-CharSets=ISO-8859-1 specifies the character set that was used to create this file.
- The number in braces (for example, {0}) indicates that the value will be displayed at run time. You can change the label associated with this number, or rearrange the labels as required. Ensure that the label corresponds to the message that will be displayed since the number and the message are associated.
- Customize the log information
By default the srapGateway.properties file is located under InstallDir/SUNWps/locale directory. All messages that appear on the gateway machine (gateway related messages) are located in this file, irrespective of the language of the messages.
If you need to change the language of the messages that appear on the client desktop, copy this file into the respective locale directory, for example InstallDir/SUNWps/locale_en_US.
srapgwadminmsg.properties File
Edit this file to:
Understanding the platform.conf FileThe platform.conf file is located at:
/etc/opt/SUNWps
The platform.conf file contains the details that the gateway needs to start running. This section provides a sample platform.conf file and describes all the entries.
The advantage of including all the machine-specific details in the configuration file is that a common profile can be shared by gateways running on multiple machines.
Here is a sample:
#
# Copyright 11/28/00 Sun Microsystems, Inc. All Rights Reserved.
# "@(#)platform.conf 1.38 00/11/28 Sun Microsystems"
#
gateway.user=noaccess
gateway.jdk.dir=/usr/java_1.3.1_06
gateway.dsame.agent=http://pserv2.iportal.com:8080/sunportal/Remote ConfigServlet
portal.server.protocol=http
portal.server.host=pserv2.iportal.com
portal.server.port=8080
gateway.protocol=https
gateway.host=sunone071.india.sun.com
gateway.port=333
gateway.trust_all_server_certs=true
gateway.trust_all_server_cert_domains=false
gateway.virtualhost=sunone071.india.sun.com 10.12.147.71
gateway.notification.url=/notification
gateway.retries=6
gateway.locale=en_US
gateway.debug=error
gateway.debug.dir=/var/opt/SUNWps/debug
gateway.logdelimiter=&&
gateway.external.ip=10.12.147.71
gateway.certdir=/etc/opt/SUNWps/cert/portal
gateway.allow.client.caching=true
gateway.userProfile.cacheSize=1024
gateway.userProfile.cacheSleepTime=60000
gateway.userProfile.cacheCleanupTime=300000
gateway.bindipaddress=10.12.147.71
gateway.sockretries=3
Table 2-4 lists and describes all the fields in the platform.conf file. The table has three columns. The first column lists the entries in the file, the second column gives the default value, if any, and the third column gives a brief description of the field.
Table 2-4 platform.conf file
Entry
Default Value
Description
gateway.user
noaccess
This is the user as whom the gateway runs.
The gateway has to be started as root and after initialization, it loses its root privileges to become this user.
gateway.jdk.dir
This is the location of the JDK directory that the gateway uses.
gateway.dsame.agent
This is the URL of the identity server that gateway contacts while starting up to get its profile.
portal.server.
protocolportal.server.host
portal.server.port
This is the protocol, host and port that the default portal server installation is using.
gateway.protocol
gateway.host
gateway.port
This is the gateway protocol, host and port. These values are the same as the mode and port that you specified during installation. These values are used to construct the notification URL.
gateway.trust_all_
server_certstrue
This indicates whether the gateway has to trust all server certificates, or only those that are in the gateway certificate database.
gateway.trust_all_
server_cert_domainsfalse
Whenever there is an SSL communication between the gateway and a server, a server certificate is presented to the gateway. By default, the gateway checks if the server host name is the same as the server certificate CN.
If this attribute value is set to true, the gateway disables the domain check for the server certificate that it receives.
gateway.virtualhost
If the gateway machines has multiple hostnames configured, you can specify a different name and IP address in this field.
gateway.
notification.url
A combination of the gateway host, protocol and port is used to construct the notification URL. This is used to receive session notification from iDS/AME.
Ensure that the notification URL is not the same as any organization name. If the notification URL matches an organization name, a user trying to connect to that organization will get a blank page instead of the login page.
gateway.retries
This is the number of times that the gateway tries to contact the portal server while starting up.
gateway.locale
This is the gateway locale
gateway.debug
error
This sets the debug level of the gateway. The debug log file is located at debug_directory/files. The debug file location is specified in the gateway.debug.dir entry.
The debug levels are:
error - Only serious errors are logged in the debug file. The gateway usually stops functioning when such errors occur.
warning - Warning messages are logged.
message - All debug messages are logged.
on - All debug messages are displayed on the console.
The debug files are:
srapGateway.profilename - Contains the gateway debug messages.
Gateway_to_from_server.profilename - In message mode, this file contains all the requests and response headers between the gateway and internal servers.
Gateway_to_from_browser.profilename - In message mode, this file contains all the requests and response headers between the gateway and the client browser.
gateway.debug.dir
This is the directory where all the debug files are generated.
This directory should have sufficient permissions for the user mentioned in gateway.user to write to files.
gateway.
logdelimiter
Not used currently.
gateway.external.ip
In case of a multihomed gateway machine, you need to specify the external IP address here. This IP is used for the Netlet to run FTP.
gateway.certdir
This specifies the location of the certificate database.
gateway.allow.
client.cachingtrue
Allow or disallow client caching.
If allowed, client browsers can cache static pages and images for better performance (by reduced network traffic).
If disallowed, there is higher security as nothing is cached at client side but there will be a performance drop and higher network load.
gateway.userProfile.cacheSize
This is the number of user profile entries that get cached at the gateway. If the number of entries exceeds this value, frequent retries occur to cleanup the cache.
gateway.userProfile.cacheSleepTime
Sets the sleep time of the cache cleanup thread in seconds.
gateway.userProfile.cacheCleanupTime
The maximum time in seconds after which a profile entry can get removed.
gateway.
bindipaddress
On a multihomed machine, this is the IP address to which the gateway binds its serversocket.
gateway.sockretries
3
Not used currently.