| Sun ONE Portal Server, Secure Remote Access 6.1 Administrator's Guide |
Chapter 3
Configuring NetletThis chapter describes how you can use the Netlet to run applications securely between users’ remote desktops and the servers running applications on your intranet.
This chapter covers the following topics:
Overview of NetletSun™ ONE Portal Server software users may want to run popular or company-specific applications on their remote desktops in a secure manner. You can provide secure access to these applications by setting up Netlet on your platform.
Netlet enables users to securely run common TCP/IP services over insecure networks such as the Internet. You can run TCP/IP applications (such as Telnet and SMTP), HTTP applications, and any fixed port applications.
You can run an application over Netlet if:
- It is TCP/IP-based.
- It uses fixed ports.
Note
Dynamic ports are supported only when FTP is used. To use Microsoft Exchange, use OWA ( Outlook Web Access). Refer to "Integrating Outlook Web Access".
Netlet Components
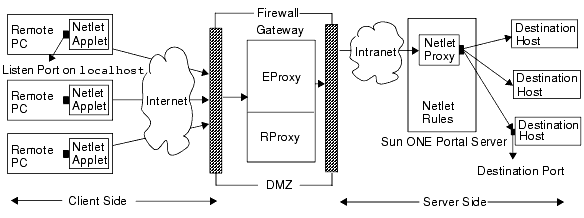
The various components used by Netlet are shown in Figure 3-1.
Figure 3-1 Netlet Components
Listen Port on localhost
This is the port on the client machine on which the Netlet applet listens. The client machine is the localhost.
Netlet Applet
The Netlet applet is responsible for setting up an encrypted TCP/IP tunnel between the remote client machine and intranet applications such as Telnet, Graphon or Citrix. The applet encrypts the packets and sends them to the gateway, and decrypts the response packets from the gateway and sends them to the local application.
Even if there is a single static Netlet rule, the Netlet applet is downloaded automatically when the user logs into the portal. If there are only dynamic rules, the applet is downloaded when the user clicks on the link corresponding to a dynamic rule. See "Types of Rules" for details on static and dynamic rules.
Netlet Rules
A Netlet rule maps an application that needs to run on a client machine to the corresponding destination server. This means that Netlet operates only on packets sent to ports defined in the Netlet rule. This ensures greater security.
As an administrator, you need to configure certain rules for the functioning of Netlet. These rules specify various details such as the algorithm to be used, URL to invoke, the applets to be downloaded, the destination port and the destination host. When a user on a client machine makes a request through Netlet, these rules help determine how the connection has to be established. See "Defining Netlet Rules" for details.
Netlet Provider
This is the UI component of the Netlet. The provider allows users to configure the required applications from the portal server desktop. A link is created in the provider, and the user clicks on this to run the required application. Users can also specify the destination host for a dynamic rule in the desktop Netlet provider. See "Defining Netlet Rules".
EProxy
All client requests are routed through the EProxy. EProxy handles only Netlet requests and passes any other requests to the RProxy. EProxy parses the Netlet requests and passes them to the Netlet Proxy (if it is enabled) or directly to the destination host.
Netlet Proxy (Optional)
The gateway ensures a secure tunnel between the remote client machine and the gateway. Netlet packets are decrypted at the gateway and sent to the destination servers. However, the gateway needs to access all the Netlet target hosts through the firewall between the demilitarized zone (DMZ) and the intranet. This requires opening a large number of ports in the firewall.
Netlet Proxy enhances the security between the gateway and the intranet by extending the secure tunnel from the client, through the gateway to the Netlet Proxy that resides in the intranet. With the proxy, the Netlet packets are decrypted by the proxy and then sent to the destination server. This reduces the number of ports required to be opened in the firewall.
Netlet Proxy is optional and you may choose not to install this proxy during the installation.
Destination Port
This is the port on the destination on which the destination application’s server listens.
Netlet Usage Scenario
The following sequence of events are involved in using the Netlet:
- The remote user logs in to the portal server desktop.
- If a static Netlet rule has been defined for a user, role or organization, the Netlet applet is automatically downloaded to the remote client.
If a dynamic rule has been defined for a user, role, or organization, the user needs to configure the required application in the Netlet Provider. The Netlet applet is downloaded when the user clicks on the application link in the Netlet Provider. See "Defining Netlet Rules" for details on static and dynamic rules.
- Netlet listens on the client ports defined in the Netlet rules. See "Netlet Rule Syntax".
- Netlet sets up a channel between the remote client and server over the ports specified in the Netlet rule.
Working With Netlet
For the Netlet to work as required for various users across different organizations, you need to do the following:
- Determine whether you need to create static or dynamic rules based on the user requirements. See "Types of Rules".
- Define the global options in the Netlet template from the Service Configuration tab on the identity server admin console.
- Assign the permission to execute Netlet in the Policy Management view on the admin console.
- Determine whether the rules should be organization, role, or user-based and make modifications as required at each level. See the Sun ONE Portal Server, Secure Remote Access 6.1 Administrator’s Guide for details on organization, role and user.
Defining Netlet RulesNetlet configuration is defined through Netlet rules that are configured in the identity server admin console. Netlet rules can be configured for organizations, roles, or users. If the Netlet rule is for a role or user, select the desired role or user after selecting the organization.
Netlet Rule Syntax
Netlet rules consist of the following fields:
Table 3-1 lists the fields in the Netlet rule. Table 3-1 has three columns. The first column lists the field name. The second column describes the field, and its function in the Netlet rule. The third column lists possible values for that particular field.
Table 3-1 Fields in a Netlet Rule
Parameter
Description
Value
Rule Name
Designates a name for this Netlet rule. You need to specify a unique name for each rule. This is useful while defining user access to specific rules. See "Defining Access to Netlet Rules" for details.
Encryption Algorithms
Defines the encryption algorithm, or specifies the list of algorithms that the user can choose from.
The list of algorithms that you select appear in the Netlet provider as a drop-down list. The user can choose the required algorithm. If you select only one from the list, the algorithm is fixed, and the user does not have the option to choose the algorithm.
Select "Null" if you are sure that the users are browsing in a safe environment.
Default - The Default Encryption Algorithm specified in the Netlet admin console is used.
URL
Specifies the URL that the browser opens when the user clicks the associated link in the Netlet provider. The browser opens the window for the application and connects to localhost at the local port number specified later in the rule.
You need to specify a relative URL.
URL to the application invoked by the Netlet rule. For example, telnet://localhost:30000.
null – Value that you set if the application is not started by a URL or controlled by the desktop. This is normally true for non-web-based applications.
Download Applet
Indicates whether it is necessary to download an applet for this rule.
Disabled - Do not download an applet.
Enabled - Download the applet from the portal server machine using the loopback port.
Specify the applet details in the format clientport:server:serverport where:
- clientport indicates the destination port on the client. This port must be different from the default loopback port. Assigning the Default Loopback Port for details. Specify a unique client port for each rule.
- server is the name of the server from which to download the applet.
- serverport represents the port on the server used to download the applet.
If true, and if the applet location is not specified, the applet is downloaded from the portal server host.
Extend Session
Indicates that the portal server should not time out when the Netlet connection is active.
Enabled - Extend the portal server session if Netlet connection is active.
Disabled - Do not extend the portal server session even if Netlet connection is active.
Client Port
Port on the client where the Netlet listens.
The value of clientport must be unique. You cannot specify a particular port number in more than one rule.
Specify multiple client ports if you are specifying multiple hosts for multiple connections. See "Static Rule With Multiple Host Connections" for the syntax.
Target Host(s)
Recipient of the Netlet connection.
host - Name of the host to receive the Netlet connection. This is used in a static rule. Use either the simple host name such as siroe, or a fully-qualified DNS-style host name such as siroe.mycompany.com. You can specify multiple hosts to:
- establish connection with each host specified. You need to specify the corresponding client and target ports for each host specified. See "Static Rule With Multiple Host Connections" for the syntax.
- try to connect to any available host from the list of hosts specified. See "Static Rule with Multiple Host Selection" for the syntax.
TARGET - Rules that specify TARGET in the syntax are dynamic rules. TARGET indicates that end-users can specify the required destination host or hosts in the Netlet provider of desktop.
You cannot have a combination of a static host and TARGET in a single rule.
Target Port(s)
The port on the target host
In addition to the host and target, you must specify a destination port.
You can specify multiple destination ports in case of multiple destination hosts. Specify multiple ports in the format port1+port2+port3-port4+port5.
The plus (+) sign between ports numbers indicates the alternative ports for a single target host.
The minus (-) sign between port numbers is the separator between the port numbers for different target hosts.
Here, Netlet tries to connect to the first destination host specified using port1, port2 and port3 in order. If this fails, Netlet tries to connect to the second host using port4 and port5 in that order.
You can configure multiple ports only for static rules.
Types of Rules
There are two types of Netlet rules based on how the destination host is specified in the rule.
Static Rule
A static rule specifies a destination host as a part of the rule. If you create a static rule, the user does not have the option to specify the required destination host. In the following example, sesta is the destination host. See "Netlet Rule Syntax" for the syntax of the rules.
Rule Name
Encryption Algorithm
URL
Download Applet
Extend Session
Client Port
Target Host(s)
Target Port(s)
ftpstatic
RC4
null
false
true
30021
sesta
21
You can configure multiple target hosts and ports for static rules. See "Static Rule With Multiple Host Connections" for an example.
Dynamic Rule
In a dynamic rule, the destination host is not specified as a part of the rule. The user can specify the required destination host in the Netlet Provider. In the following example, TARGET is the placeholder for the destination host. See "Netlet Rule Syntax" for the syntax of the rules.
Rule Name
Encryption Algorithm
URL
Download Applet
Extend Session
Client Port
Target Host(s)
Target Port(s)
ftpdynamic
RC4
null
false
true
30021
TARGET
21
Encryption Algorithm
Based on the encryption algorithm, Netlet rules can be further classified as follows:
- User Configurable Algorithm Rules - In this rule, you can specify a list of algorithms that users can choose from. These optional algorithms appear as a drop-down list in the Netlet provider. The user can choose the required algorithm from the list. In the following example, the user can choose from DES and RC4 algorithms.
Rule Name
Encryption Algorithm
URL
Download Applet
Extend Session
Client Port
Target Host(s)
Target Port(s)
Telnet
DES
null
false
true
30000
TARGET
23
RC4
See "Supported Algorithms" for a list of the algorithms supported by the Netlet and the corresponding keywords.
See "Supported Algorithms" for a list of algorithms supported by the Netlet and the corresponding keywords.
Supported Algorithms
Table 3-2 lists the algorithms supported by the Netlet in the first column, and the keyword used to associate an algorithm in the second column. Use the corresponding keywords to specify the algorithms in the Netlet rules.
Note
Select "Null" only if you are sure that the gateway and the portal server are running in a secure environment.
Table 3-2 List of Supported Algorithms
Algorithm Name
Keyword
Rivest Cipher #4
RC4
Data Encryption Standard
DES
Triple DES/DESede
TripleDES
AES/Rijndael
Rijndael
No Encryption/Null Cipher
Null
Backward Compatibility
Earlier versions of the portal server did not support algorithms as part of the Netlet rules. For backward compatibility with existing rules without algorithms, a default algorithm is used by the rules. An existing rule without algorithms such as:
Rule Name
Encryption Algorithm
URL
Download Applet
Extend Session
Client Port
Target Host(s)
Target Port(s)
Telnet
telnet://localhost:30000
false
true
30000
TARGET
23
is interpreted as:
Rule Name
Encryption Algorithm
URL
Download Applet
Extend Session
Client Port
Target Host(s)
Target Port(s)
Telnet
Default Algorithm
telnet://localhost:30000
false
true
30000
TARGET
23
This is similar to an Administrator Configured Rule with the Encryption Algorithm field chosen as Default. See "Specifying the Default Encryption Algorithm" for details.
Default Ports for Applications
Table 3-3 identifies the reserved ports for various applications and services. The first column lists the application name, and the second column lists the specific reserved port.
* loopback is used internally by the system.
Netlet Rule Examples
This section contains some examples of Netlet rules to illustrate how the Netlet syntax works.
Basic Static Rule
This rule supports a Telnet connection from the client to the machine sesta.
Rule Name
Encryption Algorithm
URL
Download Applet
Extend Session
Client Port
Target Host(s)
Target Port(s)
myrule
RC4
null
false
true
1111
sesta
23
where:
- myrule is the name of the rule.
- RC4 indicates the algorithm to be used.
- null indicates that this application is not invoked by a URL or run through the desktop.
- false indicates that the client does not download an applet to run this application.
- true indicates that the portal server should not time out when the Netlet connection is active.
- 1111 is the port on the client where the Netlet listens for a connection request from the target host.
- sesta is the name of the recipient host in the Telnet connection.
- 23 is the port number on the target host for the connection, in this case the well-known port for Telnet.
The desktop Netlet provider does not display a link, but Netlet automatically starts and listens on the port specified (1111). Instruct the user to start the client software - in this case a Telnet session that connects to localhost on port 1111.
For example, to start the Telnet session, the client needs to type the following on the UNIX command line in a terminal:
Static Rule With Multiple Host Connections
This rule supports a Telnet connection from the client to two machines, sesta and siroe.
Rule Name
Encryption Algorithm
URL
Download Applet
Extend Session
Client Port
Target Host(s)
Target Port(s)
myrule
RC4
null
false
true
1111
sesta
23
1234
siroe
23
where:
- 23 is the port number on the target host for the connection – reserved port for Telnet.
- 1111 is the port on the client where the Netlet listens for a connection request from the first target host sesta.
- 1234 is the port on the client where the Netlet listens for a connection request from the second target host siroe.
The first six fields in this rule are the same as in Basic Static Rule. The difference is that three more fields identify the second target host.
When you add additional targets to a rule, you must add three fields, client port, target host, and target port, for each new target host.
This rule works the same as the previous rule. The Netlet provider does not display any link, but the Netlet automatically starts and listens on the two ports specified (1234). The user needs to start the client software, in this case a Telnet session that connects to localhost on port 1111 or the localhost on port 1234 to connect to host example2.
Static Rule with Multiple Host Selection
Use this rule to specify multiple alternative hosts. If connection to the first host in the rule fails, Netlet tries to connect to the second host specified and so on.
Rule Name
Encryption Algorithm
URL
Download Applet
Extend Session
Client Port
Target Host(s)
Target Port(s)
gojoe
RC4
/gojoe.html
8000:gojoeserver:8080
true
10491
siroe+sesta
35+26+491-35+491
where:
- 10491 is the port on the client where the Netlet listens for a connection request from the target host.
- Netlet tries to establish connection with siroe on port 35, port 26 and port 491 in the same order, depending on which one is available.
- If connections to siroe are not possible, Netlet tries to connect to sesta on port 35 and 491 in the same order.
Dynamic Rule to Invoke a URL
This rule enables a user to configure the destination host required, enabling the user to telnet to various hosts over the Netlet.
Rule Name
Encryption Algorithm
URL
Download Applet
Extend Session
Client Port
Target Host(s)
Target Port(s)
myrule
RC4
telnet://localhost:30000
false
true
30000
TARGET
23
where:
- myrule is the name of the rule.
- RC4 indicates the algorithm to be used.
- telnet://localhost:30000 is the URL invoked by the rule.
- false indicates that no applets are to be downloaded.
- true indicates that the portal server should not time out when the Netlet connection is active.
- 30000 is the port on the client where the Netlet will listen for connection requests for this rule.
- TARGET indicates that the destination server needs to be configured by the user using the Netlet provider.
- 23 is the port on the target host opened by the Netlet, in this case the well-known port for Telnet.
To Run the Netlet After a Rule is Added
After this rule is added, the user must complete some steps to get the Netlet running as expected. The user needs to do the following on the client side:
- Click Edit in the Netlet provider section of the portal server desktop.
The new Netlet rule is listed under Rule Name in the Add New Target section.
- Choose the rule name and type the name of the target host.
- Save the changes.
The user returns to the desktop with the new link visible in the Netlet provider section.
- Click the new link.
A new browser is launched that goes to the URL given in the Netlet rule.
Dynamic Rule to Download an Applet
This rule defines a GO-Joe connection from the client to hosts that are dynamically allocated. The rule downloads a GO-Joe applet from the server on which the applet is located, to the client.
Rule Name
Encryption Algorithm
URL
Downlaod Applet
Extend Session
Client Port
Target Host(s)
Target Port(s)
gojoe
RC4
/gojoe.html
8000:gojoeserve:8080
true
3399
TARGET
58
where:
- gojoe is the name of the rule.
- RC4 indicates the algorithm to be used.
- /gojoe.html is the path of the HTML page containing the applet, relative to the iPS installation directory InstallDir/SUNWps/public_html (in a default installation).
- 8000:server:8080 indicates that port 8000 is the destination port on the client to receive the applet, gojoeserve is the name of the server providing the applet, and 8080 is the port on the server from which the applet is downloaded.
- Indicates that the portal server should not time out when the Netlet connection is active.
- 3399 is the port on the client where the Netlet listens for connection requests of this type.
- TARGET indicates that the destination server needs to be configured by the user using the Netlet provider.
- 58 is the port on the destination server opened by the Netlet, in this case the port for GoJoe. Port 58 is the port that the target host listens to for its own traffic. The Netlet passes information to this port from the new applet.
Creating a Netlet Rule
You can create Netlet rules at a global level in the Service Configuration tab of the identity server admin console. These rules are inherited by any new organization that you create.
You can also create new rules or modify existing rules at the organization, role, or user levels.
Note
This chapter lists the procedures to configure various aspects of the Netlet at the organization level.
To Create a Netlet Rule
- Log in to the identity server admin console as administrator.
- Choose the Identity Management tab.
- Choose the Organization for which you want to create the rule.
- Click the arrow next to Netlet under SRAP Configuration.
The Netlet page is displayed in the right pane.
- Click Add in the Netlet Rules field.
The Add Netlet Rule page is displayed. All the fields of the rule are populated with sample values that you can change as required.
- Type a unique name for the rule in the Rule Name field.
- Specify the required Encryption Algorithms. Select Default to retain the default encryption algorithm. Select Other to choose from the list of available algorithms.
See "To Specify the Default Algorithm" for details on the default algorithm.
- Type the URL to the application to be invoked in the URL field.
- Select the Download Applet checkbox if an applet needs to be downloaded. Type the applet details in the format client port:server host:server port in the associated edit box.
You need to specify the applet details only if the applet needs to be downloaded from a host other than the portal server host. The edit box is disabled if you do not select the checkbox.
- Select the Extend Session checkbox to ensure that the portal server session time is extended while the Netlet session corresponding to this rule is running.
- Type the client port on which Netlet listens in the Client Port field.
- Type the host that will receive the Netlet connection in the Target Host(s) field.
- Type the port on the target host in the target Port(s) field.
- Click Add to List to reflect the last three entries in the Port-Host-Port List field.
- Click Save.
The rule is saved and you are returned to the Netlet page. The new rule name displays in the Netlet Rules list.
Modifying an Existing Netlet Rule
You can modify Netlet rules at a global level from the Service Configuration tab in the admin console. These rules are inherited by any new organization that you create.
You can also modify existing rules at the organization, role, or user levels.
To Modify a Netlet Rule
- Log in to the identity server admin console as administrator.
- Choose the Identity Management tab.
- Choose the Organization for which you want to modify the rule.
- Click the arrow next to Netlet under SRAP Configuration.
The Netlet page is displayed in the right pane.
- Click Edit... next to the rule that you want to modify under the Netlet Rules field.
The Edit Netlet Rule page is displayed.
- Make changes as required and click Save.
The modified rule is saved and you are returned to the Netlet page.
Deleting a Netlet Rule
You can delete Netlet rules at a global level in the Service Configuration tab of the admin console.
To Delete a Netlet Rule
- Log in to the identity server admin console as administrator.
- Choose the Identity Management tab.
- Choose the Organization for which you want to delete the rule.
- Click the arrow next to Netlet under SRAP Configuration.
The Netlet page is displayed in the right pane.
- Select the checkbox next to the rule that you want to delete from the Netlet Rules list.
- Click Delete.
The selected rule is removed from the Netlet Rules list.
Configuring Netlet AttributesOther than the Netlet rules, you need to configure the following attributes of Netlet based on your site’s requirements. These attributes can be configured at the organization or user levels.
When you create a new user, you need to select the Netlet checkbox in the Create User procedure. This will make the Netlet application available to the new user.
You can carry out the following configurations in the Netlet service:
Netlet Attributes at the Service Configuration Level
The attributes at the Service Configuration level serve as a template. Any new organization or user that is created inherits these values by default. You can make changes to the attribute values at the Service Configuration level. The new values are reflected only when new organizations are added. Changes in the attribute values at the Service Configuration level do not affect existing organizations or users.
Netlet Attributes at the Organization Level
If you configure an attribute at the organization level, the attribute becomes available to all the users under that organization.
Netlet Attributes at the User Level
If you configure an attribute at the user level, the attribute value is valid only for that particular user.
All the attributes that can be configured at the organization level can also be configured at the user level. The values set at the user level override the values set at the organization level. See the Sun ONE Identity Server Administration Guide for more information on organization, role and user level attributes.
In addition, some extra attributes can be configured at the user level. If you do not specify these values in the admin console, the user will be asked for this information when a connection is being established through Netlet for the first time. The user will be asked for this information if:
- The user has Internet Explorer 4.x, 5.x or 6.x with Java plug-in (version 1.3.1._01 or 1.3.1_02), has enabled the "Use Browser Settings" option in the Proxies tab of the Java Plug-in Control Panel, and has specified an add-on product or INS file in the "Use automatic configuration script" field in the Local Area Network Settings dialog of Internet Explorer.
- The user has Netscape 6.2 with Java plug-in (version 1.3.1._01 or 1.3.1_02) and has enabled the "Use Browser Settings" option in the Proxies tab of the Java Plug-in Control Panel. Any proxy setting specified by the user is not considered.
In both these cases, Netlet may not be able to determine the browser settings, and hence the user is asked to supply the information.
Browser proxy type
This attribute can take the values DIRECT or MANUAL. If you choose DIRECT from the drop-down list, Netlet connects directly to the gateway host.
Browser proxy host
Specify the required proxy host through which Netlet needs to connect.
Browser proxy port
Specify the port on the proxy host through which Netlet needs to connect.
Browser proxy override list (Comma separated)
Specify the hosts for which you do not want Netlet to connect through the proxy. This list can contain multiple comma-separated hostnames.
Netlet Password
If you have enabled reauthentication in the admin console, the Netlet Authentication dialog displays each time the user connects to an application through Netlet. The user needs to supply the Netlet password. If reauthentication is not enabled in the admin console, the user will not have the option to change the password.
You can change this authentication password for the user in this field. The user can also change this password using the Edit button on the Netlet channel.
If you have not enabled reauthentication, a port warning dialog displays on the user desktop stating the port through which Netlet is trying to establish connection. The Netlet Authentication dialog does not appear.
Note
The port warning dialog also may not appear if you have disabled the option in the Netlet admin console.
To Configure Netlet Attributes at the User Level
- Log in to the identity server admin console as administrator.
- Select the Identity Management tab.
- Select Organizations from the View drop-down list.
- Click the required organization name. The selected organization name is reflected as the location in the top left corner of the admin console.
- Select Users from the View drop-down list for the selected organization.
- Click the arrow next to the required user in the left pane.
The userid page displays in the right pane.
- Scroll down to the Netlet section and click Edit.
The Netlet attributes page displays.
- Make changes to the attribute values as required.
See the procedure for the respective configuration.
- Click Save at the top or bottom of the Netlet page to record the change.
Setting the Conflict Resolution Level
You can set the priority level for all the Netlet attributes. If a user inherits multiple attribute templates, say from an organization and a role assignment, and there is a template conflict between the attributes in the two templates, the template with the highest priority is returned. There are seven settings available ranging from Highest to Lowest.
See the Sun ONE Identity Server Administration Guide for more details on conflict resolution.
To Set the Conflict Resolution Level
- Log in to the identity server admin console as administrator.
- Select the Identity Management tab.
- Select Organizations from the View drop-down list.
- Click the required organization name. The selected organization name is reflected as the location in the top left corner of the admin console.
- Select Services from the View drop-down list.
- Click the arrow next to Netlet under SRAP Configuration.
The Netlet page is displayed in the right pane.
- Select the required level from the Conflict Resolution Level field drop-down list.
Specifying the Default Encryption Algorithm
You need to specify the default algorithm for the Netlet rules. This is useful when using existing rules that did not include the algorithm as a part of the rule. This is a mandatory field. See "Backward Compatibility".
To Specify the Default Algorithm
- Log in to the identity server admin console as administrator.
- Select the Identity Management tab.
- Select Organizations from the View drop-down list.
- Click the required organization name. The selected organization name is reflected as the location in the top left corner of the admin console.
- Click the Service Configuration tab for the selected organization.
- Click the arrow next to Netlet under SRAP Configuration.
The Netlet page displays in the right pane.
- Scroll down to the Default Encryption Algorithm field and select the required algorithm from the drop-down list. See "Supported Algorithms" for a list of supported algorithms.
- Click Save at the top or bottom of the Netlet page to record the change.
Specifying the Key Size for Algorithms
You can specify the key size to be associated with each algorithm in the Key Size Specification field. A larger key size ensures greater security, but the performance is affected. The following table lists the recommended key sizes for various algorithms. The table has two columns. The first column lists the algorithm name, and the second column lists the recommended key size.
To Specify the Key Size for the Algorithms
- Log in to the identity server admin console as administrator.
- Select the Identity Management tab.
- Select Organizations from the View drop-down list.
- Click the required organization name. The selected organization name is reflected as the location in the top left corner of the admin console.
- Click the Service Configuration tab for the selected organization.
- Click the arrow next to Netlet under SRAP Configuration.
The Netlet page displays in the right pane.
- Scroll down to the Key Size Specification field.
- Type the required algorithm name and the key size in the format keyname|keysize and click Add.
The keyname-keysize value is updated in the Key Size Specification list box.
- Click Save at the top or bottom of the Netlet page to record the change.
Assigning the Default Loopback Port
This attribute specifies the port to be used on the client when applets are downloaded through the Netlet. The default value of 8000 is used unless it is overridden in the Netlet rules.
To Assign the Default Loopback Port
- Log in to the identity server admin console as administrator.
- Select the Identity Management tab.
- Select Organizations from the View drop-down list.
- Click the required organization name. The selected organization name is reflected as the location in the top left corner of the admin console.
- Click the Service Configuration tab for the selected organization.
- Click the arrow next to Netlet under SRAP Configuration.
The Netlet page displays in the right pane.
- Scroll down to the Default Loopback Port field and type the desired port number.
- Click Save at the top or bottom of the Netlet page to record the change.
Enabling Reauthentication for Connections
Enable this option if you want the user to enter the Netlet password each time a Netlet connection needs to be established. If you enable this option, the warning popup for connections is not displayed on the user’s desktop. See "Disabling Warning Popup for Connections" for details.
Enabling this option allows the user to change the reauthentication password using the Netlet channel edit option. The initial password is srap-netlet by default.
To Enable Reauthentication for Connections
- Log in to the identity server admin console as administrator.
- Select the Identity Management tab.
- Select Organizations from the View drop-down list.
- Click the required organization name. The selected organization name is reflected as the location in the top left corner of the admin console.
- Click the Service Configuration tab for the selected organization.
- Click the arrow next to Netlet under SRAP Configuration.
The Netlet page displays in the right pane.
- Scroll down to the Reauthentication for Connections field and select the option.
- Click Save at the top or bottom of the Netlet page to record the change.
Disabling Warning Popup for Connections
This attribute displays a message on the user’s desktop warning that someone is trying to connect to Netlet through the listen port. The message displays when the user runs the application over the Netlet, and also when an intruder tries to gain access to the desktop through the listen port.
If you do not want the popup to appear on the user’s desktop, deselect this attribute.
To Enable the Warning Popup for Connections
- Log in to the identity server admin console as administrator.
- Select the Identity Management tab.
- Select Organizations from the View drop-down list.
- Click the required organization name. The selected organization name is reflected as the "location" in the top left corner of the admin console.
- Click the Service Configuration tab for the selected organization.
- Click the arrow next to Netlet under SRAP Configuration.
The Netlet page displays in the right pane.
- Select the Warning Popup for Connections checkbox to enable the warning popup.
- Click Save at the top or bottom of the Netlet page to record the change.
Enabling the Show Checkbox in Port Warning Dialog
A warning popup is displayed on the user’s desktop when Netlet tries to connect to the destination host through a freely available port on the local machine. This warning popup displays on the user’s desktop only if the Warning Popup for Connections option is enabled in the admin console.
You can allow the user to suppress this warning popup by enabling the Show Checkbox in Port Warning Dialog option in the admin console.
To Allow the User to Suppress the Port Warning Dialog
- Log in to the identity server admin console as administrator.
- Select the Identity Management tab.
- Select Organizations from the View drop-down list.
- Click the required organization name. The selected organization name is reflected as the location in the top left corner of the admin console.
- Click the Service Configuration tab for the selected organization.
- Click the arrow next to Netlet under SRAP Configuration.
The Netlet page displays in the right pane.
- Scroll down to the Show Checkbox in Port Warning Dialog field and check the box.
- Click Save at the top or bottom of the Netlet page to record the change.
Setting the Keep Alive Interval
You can set the time interval in minutes for which a Netlet connection is kept alive even if there is no operation.
If you do not specify a value for this attribute, the idle Netlet connection times out with all other portal server idle connections per the "Max idle time (minutes)" value specified in the Session Attributes section of the Identity Server Configuration.
To Set the Keep Alive Interval
- Log in to the identity server admin console as administrator.
- Select the Identity Management tab.
- Select Organizations from the View drop-down list.
- Click the required organization name. The selected organization name is reflected as the location in the top left corner of the admin console.
- Click the Service Configuration tab for the selected organization.
- Click the arrow next to Netlet under SRAP Configuration.
The Netlet page displays in the right pane.
- Scroll down to the Keep Alive Interval (in minutes) field, and type the required time interval.
- Click Save at the top or bottom of the Netlet page to record the change.
Setting the Terminate Netlet at Portal Logout Option
Enable this option if you want to ensure that all connections are terminated when a user logs out of the portal server. This ensures greater security. This option is enabled by default.
Disable this option to ensure that live Netlet connections are operational even after the user has logged out of the portal server desktop.
Note
Disabling this option does not allow the user to make new Netlet connections after logging out of the portal server. Only existing connections are preserved.
To Set the Terminate Netlet at Portal Logout Option
- Log in to the identity server admin console as administrator.
- Select the Identity Management tab.
- Select Organizations from the View drop-down list.
- Click the required organization name. The selected organization name is reflected as the location in the top left corner of the admin console.
- Click the Service Configuration tab for the selected organization.
- Click the arrow next to Netlet under SRAP Configuration.
The Netlet page displays in the right pane.
- Scroll down to the Terminate Netlet at Portal Logout field and select or deselect the option as required.
- Click Save at the top or bottom of the Netlet page to record the change.
Defining Access to Netlet Rules
You can define access to specific Netlet rules for certain organizations, roles or users.
To Define Access to Netlet Rules
- Log in to the identity server admin console as administrator.
- Select the Identity Management tab.
- Select Organizations from the View drop-down list.
- Click the required organization name. The selected organization name is reflected as the location in the top left corner of the admin console.
- Click the Service Configuration tab for the selected organization.
- Click the arrow next to Netlet under SRAP Configuration.
The Netlet page displays in the right pane.
- Scroll down to the Access to Netlet Rules field.
- Type the name of the rule that you want to make available for the selected organization in the Access to Netlet Rules field.
An asterisk (*) in this field indicates that all the defined Netlet rules are available for the selected organization.
- Click Add.
The specified rule is added to the Access to Netlet Rules list.
- Repeat steps 7, 8 and 9 for each Netlet rule that you want to make available.
- Click Save at the top or bottom of the Netlet page to record the change.
Denying Access to Netlet Rules
You can deny access to specific Netlet rules for certain organizations, roles or users.
To Deny Access to Netlet Rules
- Log in to the identity server admin console as administrator.
- Select the Identity Management tab.
- Select Organizations from the View drop-down list.
- Click the required organization name. The selected organization name is reflected as the location in the top left corner of the admin console.
- Click the Service Configuration tab for the selected organization.
- Click the arrow next to Netlet under SRAP Configuration.
The Netlet page displays in the right pane.
- Scroll down to the Deny Netlet Rules field.
- Type the name of the rule to which you want to deny access for the selected organization in the Deny Netlet Rules field.
An asterisk (*) in this field indicates that all the defined Netlet rules are denied access for the selected organization.
- Click Add.
The specified rule is added to the Deny Netlet Rules list.
- Repeat steps 7, 8 and 9 for each Netlet rule for which you want to deny access.
- Click Save at the top or bottom of the Netlet page to record the change.
Allowing Access to Hosts
You can define access to specific hosts for certain organizations, roles or users. This enables you to restrict access to certain hosts. For example, you can set up the Allow list with five hosts to which the user can telnet.
To Allow Access to Hosts
- Log in to the identity server admin console as administrator.
- Select the Identity Management tab.
- Select Organizations from the View drop-down list.
- Click the required organization name. The selected organization name is reflected as the location in the top left corner of the admin console.
- Click the Service Configuration tab for the selected organization.
- Click the arrow next to Netlet under SRAP Configuration.
The Netlet page displays in the right pane.
- Scroll down to the Allowed Hosts field.
- Type the name of the host for which you want to allow access in the Allow Hosts field.
An asterisk (*) in this field indicates that all the hosts in the specified domain are accessible. For example, if you specify *.sesta.com, all the Netlet targets within the sesta.com domain can be executed by the user. You can also specify a wild card IP address such as xxx.xxx.xxx.*.
- Click Add.
The specified host is added to the Allowed Hosts list.
- Repeat steps 7 and 8 for each host that you want to make available.
- Click Save at the top or bottom of the Netlet page to record the change.
Denying Access to Hosts
You can deny access to specific hosts within an organization. Specify the host for which you want to deny access in the Denied Hosts list.
Note
If you have configured a static rule for a particular host, say sesta, and have also included sesta in the Denied Hosts list, the host sesta will not be denied access.
To Deny Access to Hosts
- Log in to the identity server admin console as administrator.
- Select the Identity Management tab.
- Select Organizations from the View drop-down list.
- Click the required organization name. The selected organization name is reflected as the location in the top left corner of the admin console.
- Click the Service Configuration tab for the selected organization.
- Click the arrow next to Netlet under SRAP Configuration.
The Netlet page displays in the right pane.
- Scroll down to the Denied Hosts field.
- Type the name of the host for which you want to deny access in the Denied Hosts field.
An asterisk (*) in this field indicates that the user is denied access to all the hosts within the selected organization. For example, to deny access to all the hosts in the organization sesta, type *.sesta.com in the Denied Hosts field.
To deny access to a specific host, specify the fully qualified name. For example, to deny access to a host abc, type abc.sesta.com.
- Click Add.
The specified domain is added to the Access to Domains list.
- Repeat steps 7 and 8 for each domain that you want to make available.
- Click Save at the top or bottom of the Netlet page to record the change.
Configuring the Netlet ProxyNetlet Proxy is useful for the following reasons:
- To add an additional layer of security.
- To minimize the use of extra IP addresses and ports from the gateway through an internal firewall in a significantly sized deployment environment.
- To restrict the number of open ports between the gateway and the portal server server to 1. This port number can be configured during installation.
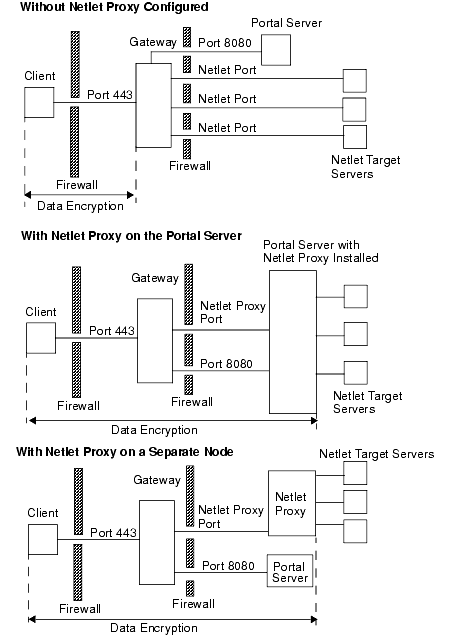
- To extend the secure channel between the client and the gateway, up to the portal server as shown in the "With Netlet Proxy Configured" section of Figure 3-2. The Netlet Proxy offers improved security benefits through data encryption but may increase the use of system resources.
See the Sun ONE Portal Server, Secure Remote Access 6.1 Installation Guide for instructions on installing the Netlet Proxy.
You can:
- Choose to install the Netlet Proxy on the portal server node on or on a separate node.
- Install multiple Netlet proxies and configure them for a single gateway using the admin console. This is useful in load balancing. "To Configure the Netlet Proxy" for details.
- Configure multiple instances of Netlet Proxy on a single machine.
- Point multiple instances of the gateway to a single installation of Netlet Proxy.
Figure 3-2 shows three sample implementations of the gateway and the portal server with and without Netlet Proxy installed. The components include a client, two firewalls, the gateway that resides between the two firewalls, portal server, and Netlet target servers.
The first scenario shows the gateway and portal server without Netlet Proxy installed. Here the data encryption extends only from the client to the gateway. A port is opened in the second firewall for each Netlet connection request.
The second scenario shows the gateway and portal server with Netlet Proxy installed on portal server. In this case, the data encryption extends from the client all the way to the portal server. Since all Netlet connections are routed through the Netlet Proxy, only one port needs to be opened in the second firewall for Netlet requests.
The third scenario shows the gateway and the portal server with the Netlet Proxy installed on a separate node. Installing the Netlet Proxy on a separate node reduces the load on the portal server node. Here again, only two ports need to be opened in the second firewall. One port services requests to the portal server, and the other port routes Netlet requests to the Netlet Proxy server.
Figure 3-2 Implementation of Netlet Proxy
To Configure the Netlet Proxy
- Log in to the identity server admin console as administrator.
- Select the Service Configuration tab.
- Click the right arrow next to Gateway under SRAP Configuration in the left frame.
The Gateway page displays on the right pane.
- Click the required profile.
Edit Gateway Profile page displays in the right pane.
- Scroll down and select the Enable Netlet Proxy check box to enable the Netlet Proxy.
- Type the desired Netlet Proxy host and port in the Netlet Proxy Hosts field, in the format host name:port. Click Add.
Tip
To determine if the port desired is available and unused, from the command line, enter:
port_number is the required port.
- Click Save at the top or bottom of the page to save the changes.
- For the changes to take effect, restart the gateway by typing:
InstallDir/SUNWps/bin/gateway -n gateway profile name start
Restarting the Netlet Proxy
You can configure the Netlet Proxy to restart whenever the proxy is killed accidentally. You can schedule a watchdog process to monitor the Netlet Proxy and restart it if it goes down.
You can also restart the Netlet Proxy manually.
To Restart the Netlet Proxy
In a terminal window, connect as root and do one of the following:
- Start the watchdog process using:
InstallDir/SUNWps/bin/netletd watchdog on
This creates an entry in the crontab and the watchdog process is now active. The watchdog monitors the Netlet Proxy port and brings up the proxy if it goes down.
Note
You need to ensure that Netlet Proxy is running before enabling the watchdog.
To stop the Netlet Proxy, ensure that the watchdog is stopped first.
- Start the Netlet Proxy manually using:
InstallDir/SUNWps/bin/netletd -n profilename start
where profilename is the profile name corresponding to the required gateway instance.
Configuring Multiple Instances of the Netlet Proxy
Use the nlpmultiinstance script to create a new instance of the Netlet Proxy. You can create a new instance in the following scenarios:
Creating a New Instance on a Portal Server Node
Table 3-4 lists the questions that the script asks. The first column lists the question, the second column lists the default value, and the third column has the description.
Table 3-4 Checklist for Creating a new Netlet Proxy Instance on a Portal Server Node
Parameter
Default Value
Description
New Netlet Proxy instance uses portal server instance running on this node
y
The script detects an existing instance of the portal server and asks this question.
Specify y if you want the Netlet Proxy to run with the portal server instance on the same node.
Choose n if you want to use a different instance of the portal server. In this case, the Creating a New Instance on an Separate Server Node checklist applies.
Portal server instance is the default one created during installation
y
Specify which instance of the portal server you want the new Netlet Proxy instance to work with.
If you choose y, the default portal server instance that is created during installation is used with the new Netlet Proxy.
If you choose n, you will be asked to specify the name of the required portal server instance.
New portal server instance created
y
This question is asked only if you have chosen not to use the default portal server instance.
Specify whether the portal server instance that you want to use with your new Netlet Proxy instance has already been created.
If you choose n, you are asked to create the instance first, and the script aborts.
Name of the new portal server instance
portal server instance name
This question is asked only if you have chosen not to use the default portal server instance.
Specify the name of the portal server instance that you want the new Netlet Proxy instance to use.
Port on which the new portal server instance listens
81
This question is asked only if you have chosen not to use the default portal server instance.
Specify the port on which the new portal server instance listens.
Deployment URI
/portal
This question is asked only if you have chosen not to use the default portal server instance.
Specify the deployment URI of the new portal server instance.
Name of the new Netlet Proxy instance
Specify the name of the new Netlet Proxy instance that you want to create.
Port on which the new Netlet Proxy instance listens
10558
Specify the port on which the new Netlet Proxy instance needs to listen. Ensure that this port has not been specified for any other Netlet Proxy instance.
Created a corresponding gateway profile for the new Netlet Proxy instance
y
You are asked if you have created a gateway profile for the new Netlet Proxy instance.
See the procedure To Create a Gateway Profile for details on creating a new gateway profile.
Start the new instance of the Netlet Proxy with the required gateway profile name.
InstallDir/SUNWps/bin/netletd -n profilename start
where profilename is the profile name corresponding to the required gateway instance.
Creating a New Instance on an Separate Server Node
Table 3-5 lists the questions that the script asks. The first column lists the question, the second column lists the default value, and the third column has the description.
Table 3-5 Checklist for Creating a New Netlet Proxy Instance on a Separate Node
Parameter
Default Value
Description
New Netlet Proxy instance uses portal server instance running on this node
n
This question is not asked if the script does not detect an instance of the portal server on this node.
The script detects an existing instance of the portal server and asks this question.
Specify y if you want the Netlet Proxy to run with the portal server instance on the same node.
Choose n if you want to use a different instance of the portal server.
Host name of the Sun™ ONE Directory Server
hostname
This is the machine on which the directory server is installed.
Specify the machine on which directory server was installed for the portal server.
Sub-domain name for hostname
subdomain
This is the sub-domain to which the directory server belongs.
Specify the sub-domain of the machine on which the directory server was installed for the portal server.
Domain name for hostname
domain
This is the domain to which the directory server machine belongs.
Specify the domain of the machine on which the directory server was installed for the portal server.
Port used to access the directory server
389
This is the port which the portal server uses to access the directory server.
Specify the directory server port specified during the portal server installation.
Root suffix of the directory tree
o=isp
This is the default top level organization. Any new organization that you create is created under this organization.
Organization name
subdomain.domain
This is the name of the default organization that is created.
Hostname of portal server
portal server hostname
This is the hostname of the portal server.
sub-domain for portal server hostname
This is the sub-domain to which the portal server machine belongs.
domain name for portal server hostname
This is the domain to which the portal server machine belongs.
Port used to access portal server
80
This is the port used to access the portal server.
Protocol used to access portal server
http
Specify the protocol that is used to access the portal server.
Identity Server deployment URI
/amserver
This is the Identity Server deployment URI. Do not change this value.
Portal server deployment URI
/portal
Specify the deployment URI of the new portal server instance.
Name of the new Netlet Proxy instance
Specify the name of the new Netlet Proxy instance that you want to create.
Port on which the new Netlet Proxy instance listens
10662
Specify the port on which the new Netlet Proxy instance needs to listen. Ensure that this port has not been specified for any other Netlet Proxy instance.
Created a gateway profile for the new Netlet Proxy instance
y
You are asked if you have already created a profile for the new Netlet Proxy instance.
See the procedure To Create a Gateway Profile for details on creating a new gateway profile.
Start the new instance of the Netlet Proxy with the required gateway profile name.
InstallDir/SUNWps/bin/netletd -n profilename start
where profilename is the profile name corresponding to the required gateway instance.
To Configure the Netlet Proxy Watchdog
You can configure the time interval at which the watchdog monitors the status of the Netlet Proxy. This time interval is set to 60 seconds by default. To do this, edit the following line in the crontab:
0-59 * * * * InstallDir/bin/checkgw /var/opt/SUNWps/.gw 5 > /dev/null 2>&1
Sample Netlet RulesTable 3-6 lists sample Netlet rules for some common applications.
The table has 7 columns corresponding to the following fields in a Netlet rule: Rule Name, URL, Download Applet, Client Port, Target Host, Target Port. The last column includes a description of the rule.
Note
Table 3-6 does not list the Cipher and Extend Session fields of the Netlet rule. Assume these to be "RC4" and "true" for the samples provided.
Enabling Netlet LoggingYou can enable logging of Netlet related activities in the gateway admin console. The log files are created in the directory specified in the Log Location attribute as part of the Logging section of the Identity Server Configuration attributes. The log file name has the following convention:
srapNetlet_gateway hostname_gateway profile name
The Netlet log captures the following information:
To Enable Netlet Logging
- Log in to the identity server admin console as administrator.
- Select the Service Configuration tab.
- Click the arrow next to Gateway under SRAP Configuration.
The Gateway page displays.
- Click Edit... next to the gateway profile for which you want to set the attribute.
The Gateway > Edit Gateway Profile page displays.
- Select the Enable Netlet logging checkbox to enable Netlet logging.
- Click Save at the top or bottom of the page to record the changes.
Customizing the NetletYou can customize the text that displays in message windows, in the Netlet provider, and on the Netlet admin console.
To Edit Text on the Netlet Attributes Page
You can edit the text that displays on the Netlet attributes page of the admin console. You need to make the required changes in the following file:
InstallDir/SUNWam/locale/srapNetlet.properties
To Edit Message Text in the Netlet Provider
You can edit the messages that appear in the Netlet provider on the end-user’s desktop. You need to make the required changes in the following file:
InstallDir/SUNWam/locale/srapNetletProvider.properties
To Edit the Error Messages File
You can edit the srapNetletApplet.properties file for messages that appear when Netlet has problems with the browser’s proxy settings. You need to make the required changes in the following file:
InstallDir/SUNWam/locale/srapNetletApplet.properties
To Edit the Netlet Messages File
You can edit the srapNetletServlet.properties file for messages that appear when Netlet is loading. You need to make the required changes in the following file:
InstallDir/SUNWam/locale/srapNetletServlet.properties