| C H A P T E R 2 |
|
Installing the Cabinet Extension on Racks with Gold Hinges |
Use this procedure to install the extension on the rear of all Sun Racks and any rack with a front purple door.
If you need to install a cabinet extension on the front of a rack with the silver alloy doors, see: Installing the Cabinet Extension on the Front of Sun Racks With Silver Alloy Doors.
1. If necessary, remove all power, and disconnect all power and data cables from the Sun Rack and installed equipment.
Follow the manufacturer's recommended shutdown procedures before removing power from any equipment.
2. Pull out the end of the antitilt bar to the fully extended position (FIGURE 2-1).
3. Rotate the foot 90 degrees and adjust the height of the foot so that it rests on the floor.
4. If necessary, lower the four cabinet feet to contact the floor.
Use this procedure to install the extension on the rear of all Sun Racks. This procedure should also be used for any rack with a front purple door.
If you need to install a cabinet extension on a rack with the silver alloy doors (and silver and black hinges) see: Installing the Cabinet Extension on the Front of Sun Racks With Silver Alloy Doors.

|
Caution - The cabinet extension weighs up to 55 lbs and may require two people to safely install. |
1. Determine whether you will extend the front or rear of the cabinet and open that door.
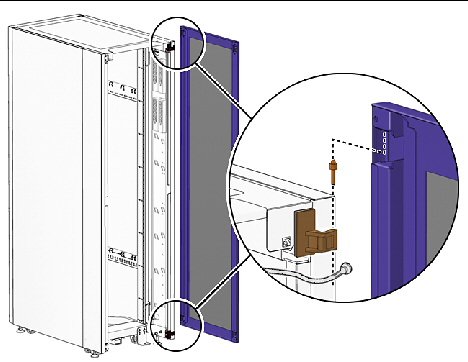
2. Using a 10 mm wrench, disconnect the ground cable from the door (FIGURE 2-2).

3. Lift the door from the hinges and remove the door from the cabinet.
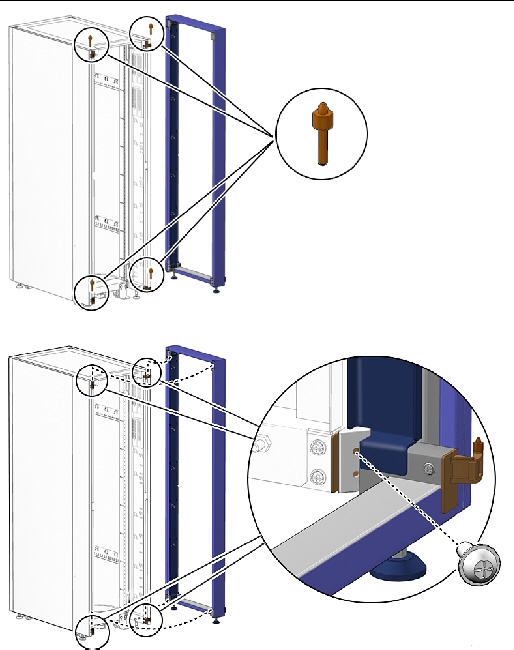
4. Install the two provided hinge pins onto the unused hinges, one on the top of the cabinet and one on the bottom of the cabinet (FIGURE 2-3).

5. Position the cabinet extension over all four hinge pins and lift the cabinet extension into place (FIGURE 2-3).
6. Secure the angle bracket phillips screws into the side of all four hinges (FIGURE 2-3).
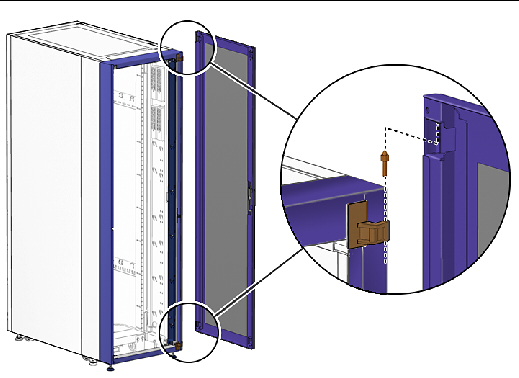
7. Position the door over two of the hinge pins and lift the door onto the cabinet extension (FIGURE 2-4).


|
Caution - The ground cables must be properly attached at three points: the Sun rack, the cabinet extension, and the door. |
8. Secure the cabinet extension ground cables and stabilizer feet. See Securing the Ground Cables and Stabilizer Feet.
Copyright © 2006, Sun Microsystems, Inc. All Rights Reserved.