| C H A P T E R 4 |
|
Installing the Sun Fire Visual Grid System |
This chapter describes how to install the Sun Fire Visual Grid system.
FIGURE 4-1 shows an example of a Sun Fire Visual Grid system networked configuration for one Sun Fire 6800 master and two slaves.
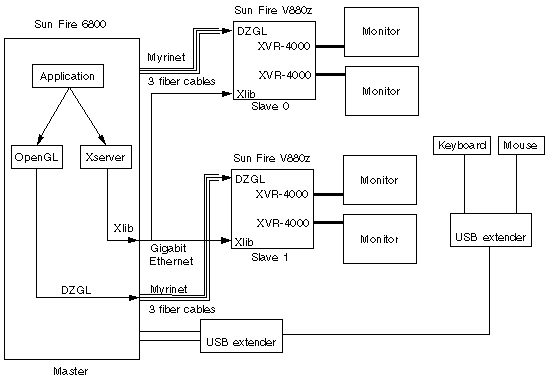
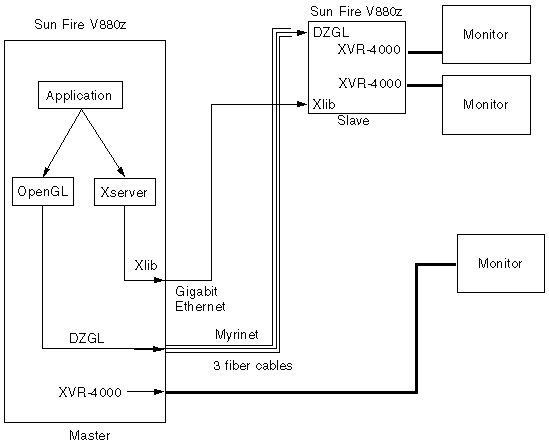
FIGURE 4-1 shows an example of a Sun Fire Visual Grid system networked configuration for one Sun Fire V880z master and one slave.
You need to complete specific hardware prerequisites for a Sun Fire Visual Grid system installation before attempting to go through the software installation procedure. These requirements are described below:
|
Note - All of the following necessary items must be in place before proceeding with the Sun Fire Visual Grid software installation procedure. |
The administration workstation should be a separate computer from the master and slaves. It should be capable of running X Windows and have remote access (rsh or rlogin) to the master. The master should have remote access (rsh or rlogin) to each slave. The administration workstation should be able to log into both master and slaves. See Administration Workstation.
See Setting Up an Ethernet Network.
See Installing a Myrinet Card. Until the Myrinet drivers are installed during the software installation process, the Myrinet boards are "invisible" to the systems. See Verifying the Myrinet Software.
Installing a USB card is not necessary with a Sun Fire V880z, because it already provides USB ports for the keyboard and mouse. See Installing a USB Card.
This is required for a Sun Fire 4800 or Sun Fire 6800 installation because without extender hardware the keyboard and mouse do not reach the displays. See Keyboard, Video, and Mouse Extenders.
A separate workstation is required to administer the Sun Fire Visual Grid software during system installation. This administration workstation must be on the same network as the master in the Sun Fire Visual Grid system configuration (see System Configuration Examples). The administration workstation is used to run the software administration tool, dzadmin, to configure the grid (see Chapter 5).
Using a Gigabit Ethernet network is required for better X Window performance. The Sun Fire Visual Grid system has built-in fiber Gigabit Ethernet hardware.
For each master and slave on the network, take the following steps:
1. Determine which IP network addresses to use for the Gigabit Ethernet.
If the systems are already on a corporate network, then the Gigabit Ethernet network should be on a different subnet. For simplicity, you may want to use a different class B address. For example, if the system is on the corporate network as 195.131.45.155, you might choose the Gigabit Ethernet address somewhere in 195.132.*.*. Each associated master/slave Gigabit Ethernet connection should have the same class B address (for example, 195.132.*.*). If there is a switch handling the Gigabit Ethernet network between the master and slave systems, then each system in the Sun Fire Visual Grid system installation can share the same class B address space on the Gigabit Ethernet network. When there are multiple master/slave point-to-point Gigabit Ethernet connections (for example, a switch is not being used between the master and slave machines and there is more than one slave machine), you must assign a different class B address space to each master/slave pair.
2. Add the Gigabit Ethernet name and IP address of all master and slaves on this subnetwork to the /etc/hosts file of each system.
3. Create a file /etc/hostname.xxx, where xxx is the name of the Gigabit Ethernet port.
On a Sun Fire V880z, the built-in Gigabit Ethernet port is ge0, therefore, the file is /etc/hostname.ge0. On a Sun Fire Enterprise class server, the port may be gen or cen depending on the adapter type.
The /etc/hostname.xxx file should contain a single line with the name of this server on the Gigabit Ethernet network. This name should be unique from the nodename or any other network name of this server. So the master machine might be called "master" and each slave "slaven", where n is the slave number.
4. Create the file /etc/notrouter. Type:
5. Edit the /etc/nsswitch.conf file to check the local hosts file first.
For example, if /etc/nsswitch.conf is configured for nis, find the line:
6. Enable the Gigabit Ethernet port.
To do this, reboot the server.
Using the example nodenames above, it should be possible to use the ping master command from each slave, and the command ping slaven for each slave from the master. Use the ifconfig -a command on each master/slave computer to display the Gigabit Ethernet adapter.
This section provides information for installing the Myrinet hardware and software.
The following describes how to install the Myrinet PCI cards into a Sun Fire 4800/6800 and a Sun Fire V880z.
On a Sun Fire 4800/6800, the Myrinet cards attached to a particular slave must be completely contained within one I/O assembly. The PCI slots are numbered on the side of the I/O assembly boat, and the PCI busses are marked as well. There are two PCI busses that feed into the PCI slots. Install the three cards so that at least one of them is attached to each of the two PCI buses.
The power requirement of a Myrinet card is approximately 11 Watts.
See the Sun Fire 6800/4810/4800/3800 Systems Service Manual for procedures on how to shut down these systems safely before installing or removing any internal boards, and how to reboot the system after installation.
1. Shut down your system and remove the Sun Fire 4800/6800 PCI I/O assembly.
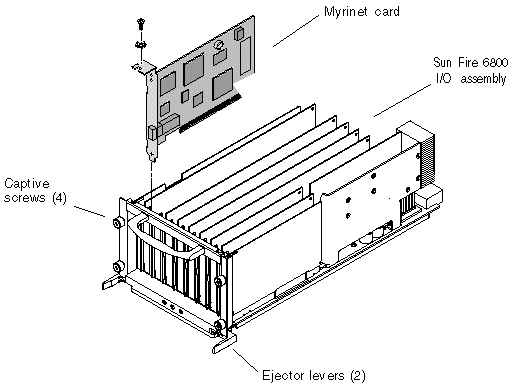
a. Loosen the four I/O assembly captive Phillips screws and pull the ejector levers outward (FIGURE 4-3).
b. Slide out the I/O assembly and place it on an ESD mat close to the system.
2. Attach the antistatic wrist strap to your wrist and connect the strap to the I/O assembly.
3. Lay the I/O assembly on its side.
Locate the PCI slot numbers where the Myrinet cards are to be installed.
4. Position the Myrinet card in the I/O assembly (FIGURE 4-3).
5. Guide the Myrinet card into the I/O assembly PCI slot (slot 7 in this example) (FIGURE 4-3).
a. Insert the faceplate end of the Myrinet card into the appropriate opening in the I/O assembly back panel.
b. Guide the opposite end of the Myrinet card into the card slot.
c. Secure the faceplate to the I/O assembly with the two Phillips screws.
6. Insert and secure filler boards into any other open slots.
7. Replace the I/O assembly into the Sun Fire 4800/6800 chassis.
a. Line up the I/O assembly with the chassis I/O assembly opening and slide the assembly into the chassis.
b. Simultaneously press the two ejector levers inward. Then tighten the four captive Phillips screws snugly by hand.
8. Install the Myrinet cards in the Sun Fire V880z.
See Installing the Myrinet PCI Cards in a Sun Fire V880z.
|
Note - When the Sun Fire Visual Grid software is installed, the Myrinet cards are recognized by the Myrinet software bundled with Sun Fire Visual Grid software. |
On a Sun Fire V880z that is powered down, install each Myrinet card in a separate PCI bus. The Sun Fire V880z has nine PCI slots and three PCI buses. The PCI slots are numbered from the bottom up, starting at 0 and ending at 8. The numbering scheme can be found on the inside of the left door that closes over the PCI slots.
Refer to the following hardware documentation for detailed installation and service information:
1. Identify the slots where you want to install the Myrinet cards.
One card should be installed in one of the PCI slots numbers 0-3 (33 MHz bus), one installed into one of the PCI slots numbered 4-6 (33 MHz bus), and one installed into one the PCI slots numbered 7-8 (66 MHz bus). The 66 MHz slots are physically the highest two PCI slots.
2. Remove the PCI filler panel from the back of the system.
a. Pinch the PCI card retaining clip until it releases from the top of the filler panel and rotate the clip outward.
b. Slide the filler panel out from the rear panel.
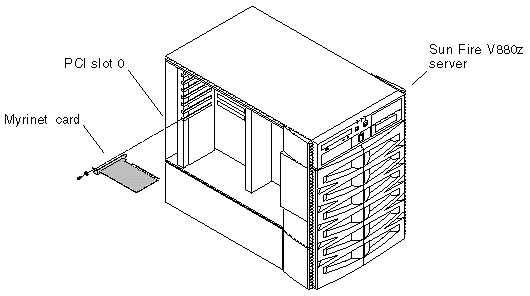
3. Insert the Myrinet cards into the appropriate slots on the I/O board (FIGURE 4-4).
a. Insert the faceplate side of the Myrinet card into the appropriate opening on the rear panel. At the same time, insert the other end of the card into the corresponding groove on the PCI card bracket.
b. Push the card into the slot on the I/O board until the card is fully seated.
 Connect one end of each Myrinet networking fiber cable (three cables per slave) from each Myrinet card in the master to a Myrinet card in the slave.
There are six Myrinet cards for each networked slave--three in the master, three in the slave.
Ensure that the fiber cables connecting the master with each Myrinet card in each slave are properly attached. All connections are point-to-point and there is no network switch involved. See System Configuration Examples.
When cabling the Myrinet cards, the green LED on the cards illuminates once a connection is established over the fiber cabling. If the LED does not light and both master and slave computers are powered on, then there is a problem with the fiber cables, the connection, or device seating.
|
Note - You must only use the Myrinet drivers bundled with the Sun Fire Visual Grid software. Do not use other Myrinet drivers, such as Myrinet drivers available on Myricom's web site. See Verifying the Myrinet Software. |
This procedure only applies to the Sun Fire 4800/6800. Installing a USB card is not necessary with a Sun Fire V880z, since it already provides USB ports for the keyboard and mouse. The USB card can be installed into any PCI slot.
Refer to the Sun Fire 6800/4810/4800/3800 Systems Service Manual (805-7363) for proper procedures on how to shut down the computer safely before installing or removing any internal boards and how to reboot after installation. For a complete set of documentation, select "Servers" at: http://www.sun.com/documentation
1. Shut down your system and remove the Sun Fire 4800/6800 PCI I/O assembly.
Refer to the Sun Fire 6800/4810/4800/3800 Systems Service Manual for details on removing and replacing PCI I/O assemblies.
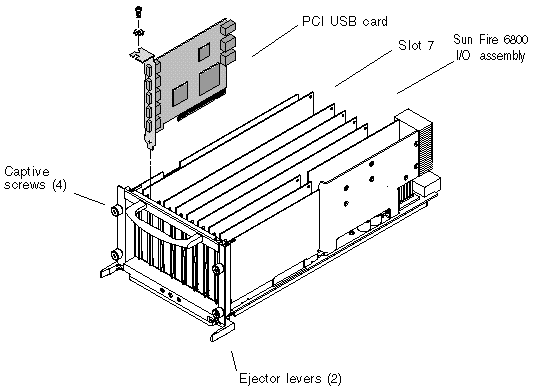
a. Loosen the four I/O assembly captive Phillips screws and pull the ejector levers outward (FIGURE 4-5).
b. Slide out the I/O assembly and place it on an ESD mat close to the system.
2. Attach the antistatic wrist strap and connect it to the I/O assembly.
3. Place the I/O assembly on its side.
4. Position the USB card in the I/O assembly (FIGURE 4-5).
5. Guide the USB card into the I/O assembly slot 7 (FIGURE 4-5). Choose any available slot for the card.
a. Insert the faceplate end of the USB card into the appropriate opening in the I/O assembly back panel.
b. Guide the opposite end of the USB card into the card slot.
c. Secure the faceplate to the I/O assembly with the two Phillips screws.
6. Insert and secure filler boards into any other open slots.
7. Replace the I/O assembly into the Sun Fire 4800/6800 chassis.
a. Line up the I/O assembly with the chassis I/O assembly opening and slide the assembly into the chassis.
b. Simultaneously press the two ejector levers inward and tighten the four captive Phillips screws snugly by hand.
|
Note - In order for the USB PCI card to be recognized by Solaris 8 update 7, you must always reboot the Sun Fire 4800/6800 with the -r flag. |
This section is for first time setup only. Please make sure that you have completed the site preparation requirements (Site Hardware Preparation) before proceeding further.
|
Note - Once the Sun Fire Visual Grid system hardware and software are installed and configured for the first time, upgrading the software is simple. The process is detailed in Upgrading the Sun Fire Visual Grid Software. |
1. If necessary, install the correct version of the Solaris operating environment on each system and upgrade to the proper Solaris operating environment patch level.
See Operating Environment Requirements and Software Patches in Chapter 2.
2. Before starting the software installation, verify that each slave can bring up the X Window system.
For example, log in and start an X Window session (for example, CDE or GNOME) on each Sun XVR-4000 graphics accelerator. A keyboard and mouse be plugged into the USB ports of each slave system, even after the Sun Fire Visual Grid software installation is complete. If not, the X server on the slaves will not be able to start.
If necessary, upgrade to the latest Sun XVR-4000 graphics accelerator drivers. See the Sun Fire V880z Server and Sun XVR-4000 Graphics Accelerator Installation and User's Guide for instructions. Sun OpenGL for Solaris software is bundled with the Sun Fire Visual Grid software.
3. Become superuser and set the frame buffer attributes to the same values for each Sun XVR-4000 graphics accelerator in each system.
|
Note - This step is required only if you plan to run your system in Xinerama mode. If not, this step is optional. |
If you run your system in Xinerama mode, the frame buffer attributes must be set to the same values for each Sun XVR-4000 graphics accelerator in each system. To do this, type the following on each master and slave that has a Sun XVR-4000 graphics accelerator installed:
Where zulun refers to zulu0, zulu1, and so on, as the devices appear in the /dev/fbs directory on each computer.
This step is to ensure that the frame buffers are all set with the same properties. Later, after the installation is complete, these settings can be customized for the particular installation.
4. On each slave, make the master the loghost for the slave by modifying the slave system /etc/hosts file. Also, modify the /etc/syslog.conf file on each slave so that the console output is redirected to the master console output.
If you do not modify these two files, the slave console output is written on the screen, obscuring the window system when this slave is run as a Sun Fire Visual Grid slave computer. See Redirecting the Slave Console Output.
5. Remotely log in to each slave and run the following:
These commands bring down the login screen if it is currently running. These commands cause the login screen for the X Window system not to come up automatically whenever the X Window system is exited or when the Sun Fire Visual Grid system comes up after a reboot. The login screen is not necessary on the slave since the master initiates the X Window system on the slave.
6. Install the software packages on the master and on each slave.
For Sun Fire 4800/6800 computers:
a. Insert the Sun Fire Visual Grid software CD into the CD-ROM drive, become superuser, go to the following directory and install the required patches. Type:
c. Install the Sun Fire Visual Grid software. Type:
d. Respond to the installation prompts.
You need to know whether you are installing the software on a master or slave.
a. Insert the Sun Fire Visual Grid software CD into the CD-ROM drive, become superuser, go to the following directory and install:
b. Respond to the installation prompts.
You need to know whether you are installing the software on a master or slave.
7. Reboot the master and each slave.
No special boot flags are required on a Sun Fire V880z. The Sun Fire 4800/6800, however, requires the -r flag for the boot command to recognize the PCI USB board.
8. With the dzadmin software administration tool, create your system configuration and install it on the master.
You should remotely log in (rlogin) to the master computer from the administration workstation and then run dzadmin. When you are finished with this step, exit the dzadmin tool. Carefully follow the directions the first time using this tool.
See dzadmin Administration Tool.
9. Modify /etc/dt/config/Xservers on the master to match the multi-display installation created in the administration tool (dzadmin).
The Xservers file controls on what frame buffers X Windows appears. The dzadmin tool appends a string to the end of the /etc/dt/config/Xservers file when the dzadmin install button is pushed. Uncomment that line by removing the pound sign (#) in front of it; comment out the old entry by adding a "#" in front of it. Every installation with the dzadmin tool appends a new commented-out X servers string to the end of the Xservers file.
|
Note - The Xservers file on the slave system is always ignored by the software. |
See the Sun Fire V880z Server and Sun XVR-4000 Graphics Accelerator Installation and User's Guide for more details on how to modify the Xservers file.
10. Bring up the window system login screen in Sun Fire Visual Grid mode.
If the window system is running on the master, log out of the session.
On the master, from a remote shell, run the following as superuser:
The window system is reset to the new settings. The X window login screen should now appear. (The command-line output from dzstartup might list an error condition; ignore this message.)
11. On the master, log in through the X Window login screen.
After the window system appears across the frame buffers, run an OpenGL program on each display to verify the installation.
For example, type the following:
If the window system is running in Xinerama mode, there is only one logical display, which enables you to move the program window across the different displays. In a non-Xinerama installation, separately test each display.
See Appendix A, Troubleshooting, or contact your Sun service representative if installation problems occur:
http://www.sun.com/service/online
On each slave, modify the /etc/syslog.conf file so that the output from the console goes to the master console output. If this is not done, console messages appear on the slave screen, obscuring rendering. Modify the /etc/syslog.conf file on each slave as follows.
1. Comment (#) the following line in the file:
# *.err;kern.notice;auth.notice /dev/sysmsg
2. Add the following line to the file right after the commented out line:
*.err;kern.notice;auth.notice @loghost
3. Comment (#) the following line in the file:
4. Add the following line to the file right after the commented out line:
Ensure that the line being replaced is a comment. Add the additional line after the replaced line as shown is this sample /etc/syslog.conf file:
# *.err;kern.notice;auth.notice /dev/sysmsg *.err;kern.notice;auth.notice @loghost # user.err /dev/sysmsg user.err @loghost |
On each slave, designate the master as the loghost. Modify the /etc/hosts file by removing the loghost notation from the slave line to the master line, and by making the master the loghost. Ensure that there is a line in the /etc/hosts file that contains the master IP address. This line should have been added during the Gigabit Ethernet network installation process.
Example original /etc/hosts file:
127.0.0.1 localhost 10.5.28.254 slavehost loghost 11.5.28.254 dzslave0 ## slave gigabit ethernet 11.5.28.28 dzmaster ## master gigabit ethernet |
Example modified /etc/hosts file:
127.0.0.1 localhost 10.5.28.254 slavehost 11.5.28.254 dzslave0 ## slave gigabit ethernet 11.5.28.28 dzmaster loghost ## master gigabit ethernet |
These changes, combined with the /etc/syslog.conf change described earlier in this section, redirects each slave console output to the master in the /var/adm/messages file.
For these changes to take effect, reboot the slave, or more preferably, run the syslog script as superuser in /etc/init.d:
See Appendix A for troubleshooting information.
If the Sun Fire Visual Grid software is being installed for the first time, follow the procedures in Site Hardware Preparation and Installing the Software. If you are upgrading the software in an existing Sun Fire Visual Grid software installation, follow the directions in this section.
The Sun Fire Visual Grid software packages are specific to the Solaris 8 operating environment. The installation script automatically detects the operating environment and installs the correct packages and patches. In addition to Sun Fire Visual Grid software, these packages automatically install the correct version of OpenGL 1.3, a recent OpenGL 1.3 patch, a Java 1.4 runtime environment, and the drivers for the Myrinet cards, as necessary. The entire release is bundled into a single executable that is run from the command line and is menu driven.
|
Note - Install the software upgrade from the command line and not while the Sun Fire Visual Grid software window system is running. |
1. Insert the Sun Fire Visual Grid software CD into the CD-ROM drive, become superuser, go to the following directory, and type:
Respond to the installation prompts. You need to know whether you are installing the software on a master or slave.
If a trustedhosts file already exists on the systems for security reasons (see Chapter 6), the script acknowledges this and retains the trustedhosts settings.
To remove previously installed Sun Fire Visual Grid software packages, use the ./uninstall command, and respond to the removal prompts. An uninstall completely removes the previous installation. However, the install script only installs components that have been updated since the last release, and does not reinstall the other components on the computer.
2. After completing the installation, reboot each master and slave.
Previous state settings, such as an installed system configuration file, remain in effect from release to release. The system should just appear with the previous settings after the software upgrade.
In some complex configurations, it might be desirable to use the same computer interchangably as a master and a slave.
Select the master option when installing software on any computer that may be a master computer, even if it will initially serve as a slave computer. You select master or slave when responding to the software installation script. See Step 6 in Installing the Software.
Modify the trustedhosts file (/etc/openwin/dz/trustedhosts) on each computer to contain all the hosts that may be required. Or, alternatively, remove the trustedhosts file on a computer to enable any computer to administer/control it.
On a slave computer, the trustedhosts file, at a minimum, contains "localhost" and the Gigabit Ethernet hostname of the master computer. On a master, it contains, at a minimum, "localhost" and the output of uname -n on the master. The union of these names is required for a computer's trustedhosts file to be either a master or a slave.
Run the following command sequences from the administration workstation.
To stop a computer from being a master (if you are changing master computers), do the following steps.
1. On the master computer, type:
|
# /etc/init.d/dtlogin stop (stops the X server) # /usr/sbin/dzstartup stop (stops the Sun Fire Visual Grid service) |
Where backup file is the filename you selected as the backup file.
2. Perform any necessary Myrinet recabling after you have executed the above commands.
3. Once a computer is no longer a master, you can add it as a slave to another master computer by running dzadmin on the new master.
4. Once the new configuration is complete in dzadmin, select Actions -> Configure Myrinet Hardware from the administration tool Actions menu.
This automatically reconfigures the Sun Fire Visual Grid system to the new Myrinet hardware setup. See The System Administration Tool Menus for a description of the menus.
5. Select Install to install the configuration.
Manually update the /etc/dt/config/Xservers file on the new master computer. Occasionally, you may need to reboot any computer that was part of the Myrinet recabling before dzadmin successfully installs a new installation on the new master computer.
6. Verify that the old master computer is no longer designated as a master.
To do this, run /usr/sbin/dzstatus on the old master computer.
To stop a computer from being a slave, do the following steps. Perform this if you are keeping the same master computer but removing or changing slave computers:
1. On the master computer, type:
2. Perform any necessary Myrinet recabling after you have executed the above commands.
3. Run dzadmin on the master computer and remove this slave computer from the configuration.
4. Select Install to install the configuration.
Manually update the /etc/dt/config/Xservers file on the master.
6. Restart X window by running /etc/init.d/dtlogin start.
Occasionally, you may need to reboot any computer that was part of the Myrinet recabling before dzadmin successfully installs a new installation on the new master computer.
7. Verify that the slave computer is no longer designated as a slave.
To do this, run /usr/sbin/dzstatus on the slave computer.
Once a Sun Fire Visual Grid system installation has been successfully completed, you can configure all of the remote frame buffers from the master machine. To see a list of frame buffers recognized by the system, type the following on the master machine:
All the frame buffers with dzfb in the name are Sun Fire Visual Grid frame buffers. The following command lists the properties of the first Sun Fire Visual Grid frame buffer:
The following command lists the possible commands:
Using fbconfig to administer a Sun Fire Visual Grid frame buffer is no different than using fbconfig to administer a local Sun XVR-4000 graphics accelerator. Most fbconfig changes require restarting the X server. Log out of the X Window system on the master and log back in. The Sun Fire Visual Grid software automatically restarts the X server on the slaves during this process.
When a slave is running in Xinerama mode, the entire slave system is addressed as a single device from the master system (for example, dzfb0). So using fbconfig on a single device affects both of the slave frame buffers. The fbconfig -list lists only a single device for the slave when it is running in Xinerama mode.
Refer to the Sun Fire V880z Server and Sun XVR-4000 Graphics Accelerator Installation and User's Guide for details on the effect of various fbconfig commands on the Sun XVR-4000 graphics accelerator.
Copyright © 2003, Sun Microsystems, Inc. All rights reserved.