|
|
| iPlanet Certificate Management System Installation and Setup Guide |
Chapter 25 Setting Up CEP Enrollment
iPlanet Certificate Management Server (CMS) can issue certificates to a a wide variely of entities, such as web browsers, SSL-enables servers, routers, virtual private network (VPN) clients, and so on. This chapter explains how you can configure Certificate Management System to issue router and VPN-client certificates.
The chapter has the following sections:
CEP Enrollment
Cisco routers support the use of certificates for authentication, encryption, and tamper detection by using the IP Security (IPSec) protocol. Certificate Management System supports Cisco's PKI protocol, the Certificate Enrollment Protocol (CEP); this protocol runs over HTTP and provides its own form of encryption. For an overview of certificate authority support for IPSec, see the information available at this URL: http://www.cisco.com/warp/public/cc/cisco/mkt/security/
encryp/prodlit/821_pp.htm
You can issue certificates to routers and CEP-compliant Virtual Private Network (VPN) clients using Certificate Management System. Routers use certificates to authenticate each other and to establish an encrypted IPSec channel between them; all TCP/IP communication passes through this encrypted channel.
Note that Certificate Management System by default supports issuance of certificates to routers and VPN clients using the CEP-based enrollment. However, publishing of these certificates to an LDAP-compliant directory is not turned on by default because routers and VPN clients need to have access to an LDAP directory in order to fully support various functions, such as certificate and CRL retrieval. This section explains how to set up a Certificate Manager to issue certificates to routers and CEP-compliant Virtual Private Network (VPN) clients. The section also describes how to configure the Certificate Manager to publish these certificates and certificate revocation lists (CRLs) to an LDAP-compliant directory.
You may configure the Certificate Manager to publish to any LDAP-compliant directory, but if you do not have one available, you can use the one supplied with Certificate Management System. Certificate Management System comes with iPlanet Directory Server, which is an LDAP-compliant directory. When you install Certificate Management System, two instances of Directory Server are automatically created in the same server group in which Certificate Management System is installed—one of the Directory Server instances is identified as the configuration directory and the other internal database. For publishing certificates and CRLs you may use the configuration directory, but not the internal database. The internal database is configured for exclusive use by Certificate Management System; see , Setting Up Internal Database.
There are two ways to set up CEP enrollment:
CEP Enrollment Using the Script The sections that follow explain both ways of CEP enrollment in detail. The recommended is to use the interactive script.
CEP Enrollment Using the Script
Certificate Management System provides a menu-driven, interactive script to automate the CEP enrollment process. To invoke the script:
Go to the Certificate Manager's host system.
Go to this directory: <server_root>
Enter either the following, depending on your system, at the prompt:
% install/perl bin/cert/tools/cepconfig.pl on UNIX
% install\perl bin\cert\tools\cepconfig.pl on Windows NT
The main menu shows up.
This script can be used to configure any instance of CMS.
Configuration tasks include the following:
- Adding/removing CEP services
You can configure different services, responding to different URLs
in CMS. This enables different authentication and policy options to
be set for different types of client (e.g. router and VPN)
- Enabling/disabling LDAP publishing of certificates and CRLs
Quick-and easy set up the publishing directory.
Turns on publishing.
Adds CRL distribution point to certificates.
_____________________________________________________________
Press ENTER to continue....
Follow the on-screen instructions to set up CEP enrollment.
Setting up CEP Enrollment Manually
The information covered in this section explains how to set up CEP enrollment manually. Note that the instructions are written with these assumptions:
That you will publish certificates and CRLs to the configuration directory. For more information about the configuration directory, see Managing Servers with iPlanet Console.
That you will publish certificates and CRLs to the same tree in the configuration directory; you may customize this if you desire. We recommend that you publish to a tree named after the O attribute in your CA signing certificate. Router certificates will also need to have an O inserted in the subject name; this can be done automatically. This section refers to the name of this tree as Base DN. If you want to publish to any other LDAP-compliant directory, read Chapter 19 "Setting Up LDAP Publishing."
To set up CEP enrollment manually, follow these steps:
Step 1. Set up the Directory for Publishing Certificates and CRLs
Step 2. Configure the Certificate Manager for Publishing Certificates and CRLs
Step 3. Set Up Automated Enrollment (optional)
Step 4. Set Up Multiple CEP Services (optional)
Step 1. Set up the Directory for Publishing Certificates and CRLs
Chapter 19 "Setting Up LDAP Publishing contains information on setting up Directory Server for publishing certificates and CRLs—it covers directory schema required for publishing certificates and the attributes to which a Certificate Manager publishes end-entity certificates and CRLs.
For the configuration directory to support publishing of certificates and CRLs, you need to verify two things:
The Directory Server schema—verify that the directory schema can accommodate router and VPN client certificates. You may need to update the Directory Server's schema. The reason for this is, if you plan on publishing certificates from routers, they may need to be published with the same DN as their certificate subject names. For example, if the certificate subject name contains UnstructuredAddress or UnstructuredName components, you may need to add them to the directory schema.
unstructuredAddress, 1.2.840.113549.1.9.7, string
unstructuredName, 1.2.840.113549.1.9.8, string
To modify the schema you can use the Directory Server window, which can be launched from within iPlanet Console. Alternatively, you can prepare an LDIF file with the changes you want to make and then run the LDAP modify command. Check the directory documentation for instructions.
The Directory Server port—note the port number assigned to the configuration directory; it must be 389. If you installed Certificate Management System with the default choices, you may skip this step; the default port assigned to the configuration directory is 389. To find out the port number assigned to Directory Server, check it's configuration file (which is at <server_root>/slapd-*/slapd.oc.conf). Alternatively, you can also find and change the port number from iPlanet Console.
Step 2. Configure the Certificate Manager for Publishing Certificates and CRLs
In this step, you configure the Certificate Manager to issue router and VPN-client certificates with CRL Distribution Point Extension and to publish the certificates to a directory.
Create an instance of the mapper plug-in named LdapExactMapper and of the publisher plug-in named LdapUserCertPublisher. Once you create these instances, you should create a publishing rule for publishing router certificates. For instructions, see Step B. Add Mappers, Publishers, and Publishing Rules.
Note that the publishing rule must be configured to use the mapper and publisher you create for router certificates. In addition, the predicate expression must be set to HTTP_PARAMS.certType==CEP-Request.
Configure CRL publishing details; for instructions, see Step 4. Configure the Certificate Manager to Publish CRLs.
Identify the directory for publishing. For instructions, see Step 5. Identify the Publishing Directory.
Create an instance of the policy plug-in named CRLDistributionPointsExt (following the instructions in Step 4. Add New Policy Rules) for router certificates. This extension, if present in a certificate, enables the user of the certificate to find revocation information pertaining to that certificate. When you create an instance of the CRLDistributionPointsExt plugin, be sure to leave the issuerName and issuerType fields blank and to enter HTTP_PARAMS.certType==CEP-Request in the predicate field.
Stop the Certificate Manager and edit the configuration file to include the following lines:
eeGateway.cep.cep1.appendDN=O=<BASE DN>
eeGateway.cep.cep1.createEntry=true
eeGateway.cep.cep1.entryObjectClass=cep
eeGateway.cep.cep1.url=/cgi-bin/pkiclient.exe
A description for each of the above parameters are provided in Table 25-1.
Once this is done, you may configure the Certificate Manager for automated enrollment. To do so, follow the steps in the next section. If you do not want to configure the server for automated enrollment, restart the server.
Step 3. Set Up Automated Enrollment
As a part of enrolling for a certificate (via CEP), a router administrator or VPN-client user needs to start the enrollment process, which in turn asks the user for information such as the following:
Some of the information a user enters, such as the serial number and IP address, goes in to the subject name in the CEP request. Information such as the CA's identity and enrollment URL enables the router to connect to the valid CA to make the certificate request. The challenge password, if specified, enables the user to authenticate to the server during enrollment and to revoke the certificate, if needed, by presenting the same password again. (See Certificate Issuance to Routers or VPN Clients.)
You can configure the Certificate Manager to use either the challenge password or the subject name (all or a part of it) as an authentication token during a CEP enrollment, thus enabling users to get router certificates without any action on the part of the Certificate Manager agent.
To aid you in implementing the automated CEP enrollment process, Certificate Management System comes with an authentication plug-in module named FlatFileAuth. This plug-in is available in source-code form in the CMS samples package in this directory:
<server_root>/cms_sdk/cms_jdk/samples/authentication
In order for the Certificate Manager to recognize the FlatFileAuth plug-in and use it for authenticating CEP-based certificate requests, you must do the following:
Register the plugin in the CMS authentication framework; for instructions, see Registering an Authentication Module.
Create an instance of the plug-in; for instructions, see Step 4: Add an Authentication Instance. You can do this either via the CMS window or by adding the required parameters to the Certificate Manager's configuration file (CMS.cfg). The configuration parameters of the FlatFileAuth plug-in are listed below.
eeGateway.cep.cep1.authName=flatfile
auths.instance.flatfile.fileName=<full_pathname_of_password_file>
auths.instance.flatfile.authAttributes=pwd
auths.instance.flatfile.keyAttributes=UNSTRUCTUREDNAME
auths.instance.flatfile.pluginName=flatfilePlugin
auths.instance.flatfile.deferOnFailure=false
auths.impl.flatfilePlugin.class=com.netscape.certsrv.authentication
.FlatFileAuth
A description for each of the above listed parameters are provided in Table 25-2.
During CEP enrollment, all the attributes in the subject name and the challenge password are passed to the FlatFileAuth plug-in. The plug-in looks in a prepared file (referred to as the authentication-token file in this document), which consists of a series of entries for each valid enrollee, to determine if the request should be authenticated. For the Certificate Manager to be able to locate the appropriate entry in the authentication-token file before it does any checking of the password, you must identify attributes that are unique in each router request. You do this by setting the keyAttributes parameter of the FlatFileAuth plug-in implementation to the list of attributes which will be unique in the CEP request.
Table 25-3 lists the default attributes set by the router in the request.
You can identify one or more of these attributes as unique attributes in the authentication-token file. For most cases, specifying the UNSTRUCTUREDNAME as the unique attribute will suffice. In this case, you would set the keyAttributes parameter as follows:
auths.instance.flatfile.keyAttributes=UNSTRUCTUREDNAME
However, if this is not unique, you may specify both UNSTRUCTUREDNAME and UNSTRUCTUREDADDRESS as unique attributes. In this case, you would set the keyAttributes parameter as follows:
auths.instance.flatfile.keyAttributes=UNSTRUCTUREDNAME,UNSTRUCTURED
ADDRESS
This will force the server to use both these attributes to locate an entry in the authentication-token file. Note that both the attributes must be present in the request for authentication to succeed.
There's an added advantage in determining unique attributes for it allows you to enforce a rule on the attributes that must be present in the CEP enrollment request. For example, if you would like to enforce that a particular router be assigned to an IP address and host name, you could set the keyAttributes parameter as follows:
auths.instance.flatfile.keyAttributes=UNSTRUCTUREDNAME,UNSTRUCTURED
ADDRESS,SERIALNUMBER
Once an entry has been found in the authentication-token file, the server tests the authentication tokens specified in the authAttributes parameter against those in the file. Only if they all match, the server grants the request. For the purposes of this discussion, let us assume that you define a single authentication token named pwd for the challenge password. In this case, you would set the authAttributes parameter as follows:
auths.instance.flatfile.authAttributes=pwd
In summary, to implement the automated CEP enrollment process, you need to do the following:
Decide on authentication credentials for users.
Prepare a list of your CEP enrollees and assign a password to each enrollee.
Prepare the authentication-token file with the credentials.
Create a text file with CEP-enrollee information. The format of the authentication-token file must be as follows:
<attribute>: <value>
<attribute>: <value>
...
<attribute>: <value>
<attribute>: <value>
Each enrolling user is represented by a sequence of attribute-value pairs, terminated by a blank line or end-of-file (EOF). The attributes can be any part of the subject name from the request, for example SERIALNUMBER, CN, OU, UID, or the challenge password (pwd). An example is shown below:
DN: <DN_for_user1>
UNSTRUCTUREDNAME: router32.siroe.com
UNSTRUCTUREDADDRESS: 101.22.33.124
SERIALNUMBER: 239333
pwd: ff93Kd
DN: <DN_for_user1>
UNSTRUCTUREDNAME: router33.siroe.com
UNSTRUCTUREDADDRESS: 101.22.33.125
SERIALNUMBER: 233455
pwd: 35pww3a
Note that if you specify a DN for a CEP enrollee in the authentication file, the Certificate Manager replaces the subject name requested by that user (router or VPN client) with the one specified in the file.
After you've created entries for all the CEP enrollees, save the file. Also note the complete path to the file; you'll be required to specify this in the next step.
Configure the Certificate Manager to use the FlatFileAuth plug-in to verify predetermined credentials.
Once you have created the authentication file, you should register the FlatFileAuth plug-in implementation in the CMS authentication framework and create an instance (named flatfile) of the registered plug-in. Be sure to specify the full path to your authentication file and save your changes.
Restart the Certificate Manager.
After changing the configuration file, you must restart the server for the changes to take effect. If the server fails to start, check the log file for any error messages.
Provide users with the predetermined authentication credentials.
Send the password you determined to the CEP enrollees, asking them to enter it when they are prompted for the challenge password during CEP enrollment.
Step 4. Set Up Multiple CEP Services
This step is optional.
By default, the CEP service runs on this URL: /cgi-bin/pkiclient.exe
It is possible to set up multiple instances of CEP, each with a different configuration, each listening on a different URL. This is useful if you have different requirements for different types of users. For example, you might want to have one CEP service that authenticates routers and publishes their certificates to the directory and another CEP service that authenticates VPN clients but does not publish their certificates to the directory.
To set up multiple CEP services, use the example below as a guide.
## Router configuration
eeGateway.cep.cep1.appendDN=O=*BASE_DN*
eeGateway.cep.cep1.createEntry=true
eeGateway.cep.cep1.entryObjectClass=cep
eeGateway.cep.cep1.url=/cgi-bin/pkiclient.exe
eeGateway.cep.cep1.authName=flatfile_router
## VPN configuration
eeGateway.cep.cep2.url=/vpnenroll
eeGateway.cep.cep2.authName=flatfile_VPN
## Router authentication parameters in the configuration file
auths.instance.flatfile_router.fileName=
<full_path_to_the_authentication_file>
auths.instance.flatfile_router.authAttributes=pwd
auths.instance.flatfile_router.keyAttributes=UNSTRUCTUREDNAME
auths.instance.flatfile_router.pluginName=flatfile
auths.instance.flatfile_router.deferOnFailure=true
## VPN authentication parameters in the configuration file
auths.instance.flatfile_VPN.fileName=
<full_path_to_the_authentication_file>
auths.instance.flatfile_VPN.authAttributes=pwd
auths.instance.flatfile_VPN.keyAttributes=CN,OU,O
auths.instance.flatfile_VPN.pluginName=flatfile
auths.instance.flatfile_VPN.deferOnFailure=false
## FlatFileAuth plugin registered in the configuration file
auths.impl.flatfile.class=com.netscape.certsrv.authentication.
FlatFileAuth
When setting up multiple CEP services, you can use the cepsubstore attribute to differentiate one CEP service from another. For example, if you're setting up separate CEP services for router and VPN-client certificates and want to set different extensions in these certificates, you can make that happen with the help of predicates; see Table 18-2.
Certificate Issuance to Routers or VPN Clients
In general, issuing a certificate to a router involves the following steps:
Step 1. Before You Begin
Step 2. Generate the Key Pair for the Router
Decide whether you want to submit the certificate request for your router to the Certificate Manager (CA) directly or through a Registration Manager.
Open iPlanet Console, and locate the CMS instance that corresponds to the subsystem of your interest. Make sure that the Certificate Manager is started. If you are planning to submit the request via a Registration Manager, make sure that both the Registration Manager and Certificate Manager (to which the Registration Manager forwards its requests) are started.
Open the CMS window, and verify whether the HTTP port is enabled. If it isn't, enable it; for instructions, see Configuring Port Numbers. If you are requesting the certificate for an earlier version of router software, make sure that the HTTP port number is set to 80; earlier versions of router software can only connect to port 80.
Note the CEP enrollment URL. The URL is in the form http://<hostname>:<HTTP_port>/cgi-bin/pkiclient.exe, where <hostname> is in the <machine_name>.<your_domain>.<domain> form.
Note or print the certificate fingerprint information of the Certificate Manager CA signing certificate. You will be required to compare this with the fingerprint the router will show on the screen.
To locate the fingerprint information:
Go to the end-entity page hosted by the Certificate Manager.
List or search for the CA signing certificate.
Scroll down to the section that says "Certificate fingerprint." 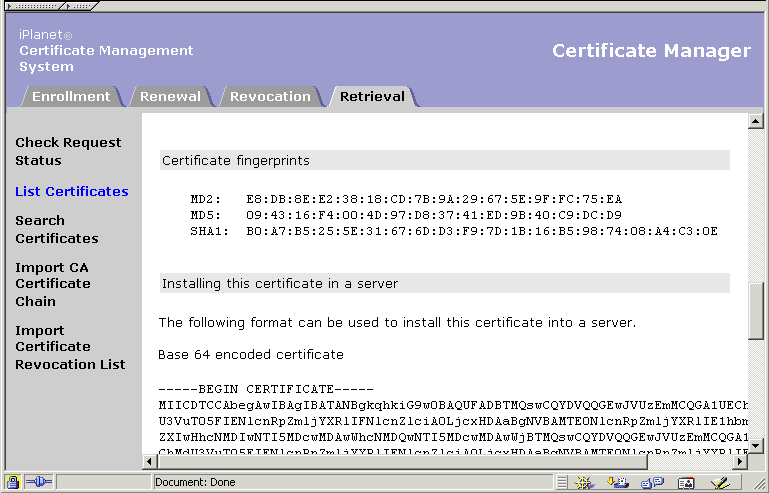
In your router documentation, locate the information specific to requesting certificates for routers. Check the signing algorithm, such as RSA or DSA, and key lengths, such as 512 and 1024, supported by the router. Based on that information, determine the signing algorithm and the key length for the certificate you want to request.
Find out the password that enables you to access the router in privileged mode.
In your router documentation, locate instructions for requesting certificates. You will be required to run the appropriate commands using this documentation.
Step 2. Generate the Key Pair for the Router
Run the appropriate commands for your router, and generate the key pair. You will be required to provide the signing algorithm, such as RSA or DSA, and the key length, such as 512 or 1024. The longer the key length, the more time the router takes to generate the key pair.
Step 3. Request the CA's Certificate
In this part of the operation, you identify the CA to the router, thus enabling the router to authenticate the CA from which it will request the certificate. You also verify whether the router is talking to the right CA; you do this manually.
Run the appropriate command to get the CA certificate.
The command will ask you to specify the following:
An identity for the CA. You can give any identity; choose something you will remember, since you will be required to provide it when you submit the certificate request.
The CA's enrollment URL; this is the enrollment URL you identified in Step 1.
The router gets the CA certificate and displays its fingerprint on your screen.
Verify the fingerprint on your screen with the one you noted down in
Step 1.
If it matches, the router is talking to the right CA.
Step 4. Submit the Certificate Request to the CA
To submit the certificate request to the CA:
Run the appropriate command.
The command will ask you for certain information:
The CA's identity. You specified this in Step 3.
Challenge password. If you enter one, write it down; you will be required to specify this password to revoke the certificate.
Whether you want to include the router's serial number in the request. If you choose to include the serial number, it will be included in the certificate's subject name.
Whether you want to include the router's IP address in the request. If you choose to include the IP address, it will be included in the certificate's subject name.
This step depends on your CA's configuration for router enrollment.
If the CA to which the router submitted the request employs automatic enrollment (or authentication) for routers, the request will get processed by the CA. The CA may return the certificate to the router in the same transaction. If it doesn't, the router checks with the CA at periodic intervals; in the router configuration you can specify how often the router should poll the CA for the certificate and how many attempts it should make. By default, the router checks the CA every minute.
If the CA to which you submitted the request is configured for manual enrollment (or authentication), the request gets queued and awaits approval by an agent.
Note Your router may require additional configuration changes. Be sure to follow the information in your router documentation.
Example
The example below shows the commands and associated outputs for a Cisco router:
# To perform certificate enrollment for a router using CEP, you must be
# in privileged mode, which you do by typing "enable" first, and then
# entering the password.
router> enable
router% config terminal
router(config)#crypto key generate rsa
The name for the keys will be: netscape.mcom.com
Choose the size of the key modulus in the range of 360 to 2048 for your
General Purpose Keys. Choosing a key modulus greater than 512 may take a few
minutes.
How many bits in the modulus [512]:
Generating RSA keys ...
[OK]
router(config)#crypto ca identity test-ca
router(ca-identity)#enrollment url http://ca-hostname.domain.com/cgi-bin/
pkiclient.exe
router(ca-identity)#exit
router(config)#crypto ca authenticate test-ca
Certificate has the following attributes:
Fingerprint: 24D34656 EB830C39 DD9E8179 0A4EBA98
% Do you accept this certificate? [yes/no]: yes
router(config)#crypto ca enroll test-ca
% Start certificate enrollment ..
% Create a challenge password. You will need to verbally provide this
password to the CA Administrator in order to revoke your certificate. For
security reasons your password will not be saved in the configuration.
Please make a note of it.
Password:
Re-enter password:
% The subject name in the certificate will be: router.domain.com
% Include the router serial number in the subject name? [yes/no]: yes
% The serial number in the certificate will be: 08342063
% Include an IP address in the subject name? [yes/no]: yes
Request certificate from CA? [yes/no]: yes
% Certificate request sent to Certificate Authority
% The certificate request fingerprint will be displayed.
% The 'show crypto ca certificate' command will also show the fingerprint.
router(config)# exit
router#show crypto ca certificates
CA Certificate
Status: Available
Certificate Serial Number: 1
Key Usage: Not Set
Certificate
Subject Name
Name: netscape.mcom.com
IP Address: 208.12.63.193
Serial Number: 08342063
Status: Pending
Key Usage: General Purpose
Fingerprint: 91D70D7F D8BF0DFA E13F00B0 6EA706A0 00000000
Previous Contents Index Next
Copyright © 2002 Sun Microsystems, Inc. All rights reserved.
Last Updated October 07, 2002