| C H A P T E R 4 |
|
Adding, Removing, and Replacing Drives |
This chapter gives hardware and software instructions for adding, removing, and replacing disk drives in an array.
This chapter is organized as follows:
Before you can add or remove disk drives, you must remove the bezel from the front of the system. See To Remove the Bezel.
This section contains information on how to add a disk drive while the power is on and the operating system is running. This is called hot-swapping.

|
Caution - These procedures should be performed only by a qualified system administrator. Performing hot-swap operations on an active disk drive can result in data loss or corruption. |
The way you add a disk drive depends on the software application you are using. According to the procedures required by each application, decide where to install the new disk drive, add the drive, and then reconfigure the operating environment.
The following tasks are always done:
2. Physically installing the disk drive
3. Configuring the Solaris operating environment to recognize the drive.
4. Configuring the application to accept the new disk drive.

|
Caution - Use the disposable antistatic wrist strap supplied with the system when you carry out the following procedures. |
1. Remove and untether the front bezel (see To Remove the Bezel, if needed).
2. Select any available slot in the array for the new disk drive.
Make a note of which slot you choose. You need this slot number when configuring the software environment.
4. Store the foam filler in a safe place for future use. The foam filler acts as an air baffle and is needed for the system's internal cooling whenever a disk drive is absent from its slot.
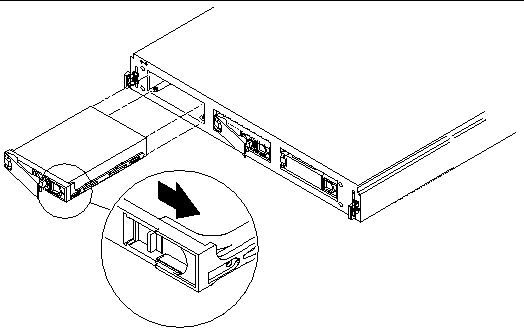
5. Open the locking handle on the disk drive by sliding the latch in the direction marked on it (FIGURE 4-1).

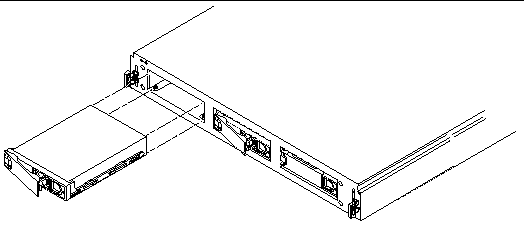
6. Slide the new drive into the vacant slot.
7. Apply equal pressure to both sides of the front of the drive, and firmly push it until the locking handle engages.
The drive should now be flush with the array's front.
8. Close the locking handle fully.
When the drive is firmly installed, it spins up automatically.
9. Determine the SCSI ID of the drive you added.
See To Check the Binary SCSI ID LED Display.
11. Configure the software, as described in Configuring the Software.
When adding a disk drive, you must create a new device entry for the drive in the /devices, /dev/dsk, and /dev/rdsk hierarchies. The new drive is assigned a unique name associated with the slot into which it was installed.
The naming convention for disks attached to a host bus adapter is cwtxdysz, where:
w corresponds to the controller in your system
x corresponds to the SCSI target of the disk
y is the logical unit for the disk drive (always 0)
z is the slice (or partition) on the disk
For example, if the array is connected to a host bus adapter corresponding to controller c2, and a drive is added to the second slot in an array with the SCSI ID switch in the leftmost position (which assigns SCSI IDs 2, 3, and 4 to the drives inside the array), the new drive appears as /dev/dsk/c2t3d0s[0-7] and /dev/rdsk/c2t3d0s[0-7].
2. Use the drvconfig(1M) and disks(1M) commands to add the new device.
# drvconfig # disks |
3. Verify that the new disk has been added.
# ls -l /dev/dsk/c2t3d0s* |
Where c2t3d0s* is the expected device name for the new drive in the third slot.
The new disk drive is now available for use as a block or character device. Refer to the sd(7) man pages for further details.

|
Caution - Only a qualified system administrator should perform these procedures. Performing hot-swap operations on an active disk drive can result in data loss or corruption. |
Use the following procedure to configure a slice (single physical partition) on a disk to be used with a UNIX file system (UFS).
1. Verify that the device label meets your requirements.
You can use the prtvtoc command to inspect the label for your disk. To modify the label, use the format command. Refer to the prtvtoc(1M) and format(1M) man pages for more information.
2. Once you have selected a disk slice for your UFS file system, create a file system on the slice.
# newfs /dev/dsk/cwtxdysz |
Refer to the newfs(1M) man page for more information.
3. If necessary, create a mount point for the new file system:
# mkdir mount-point |
Where mount-point is a fully qualified path name. Refer to the mount(1M) man page for more information.
4. After the file system and mount point have been created, modify the
/etc/vfstab file to reflect the new file system.
See the vfstab(4) man page for more details.
5. Mount the new file system using the mount(1M) command:
# mount /dev/dsk/cwtxdysz mount-point |
Where mount-point is the directory you created.
The file system is now ready to be used.
The array comes configured with 1-inch high drives. The procedures for removing and replacing the drives differ only in the software you use to control the disks. In all cases the disks are hot-swappable.
1. Ensure there is no activity to the drives.
If the Disk Drive LED for that disk drive is flashing green, the drive is still active. When the Disk Drive LED is lit solid green, then the drive is no longer active and it is safe to remove it.
2. Prepare the software environment to remove the drive.
See the documentation that came with your software for application-specific instructions that you might need to perform before you can remove the disk drive.
3. Release the front bezel by pressing the latches on both ends and pulling the bezel away from the array.
See Removing the Front Bezel if needed.
4. Unlatch the drive bracket handle by sliding the latch in the direction indicated in FIGURE 4-2.

5. Pull the bracket handle out and swing it open.
6. Continue to pivot the disk drive bracket handle against the chassis, applying mild pressure, until the drive disconnects.
8. Determine whether you are going to replace the disk drive or not.
1. If necessary, refer to the documentation that came with your VERITAS Volume Manager or Solstice DiskSuite software for any procedures that you might have to perform before you can replace the disk drive.
2. Open the locking handle on the disk drive.
Push in the direction of the arrow to release the latch.
3. Slide the replacement disk drive into the vacant slot.
4. Firmly push the drive until the locking handle engages and the drive is flush with the array's front.
Copyright © 2003, Sun Microsystems, Inc. All rights reserved.