| C H A P T E R 3 |
|
Setting Up and Using the Sun StorEdge Management Portal |
The Sun StorEdge Management Portal contains a preconfigured environment for managing storage devices. This chapter describes basic portal concepts, the contents of the portal package, and the tasks you perform to configure and use the portal.
This chapter contains the following sections:
The portal architecture and infrastructure follow industry standards to bring information into a highly modular, dynamic, and customizable storage desktop built on top of the Java System Portal Server software, which is included in the Java Enterprise System.
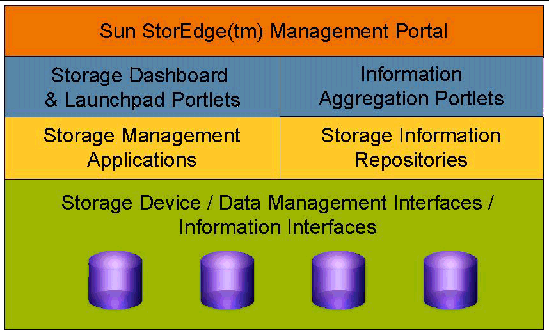
FIGURE 3-1 shows the application tiers that you can have in your environment. The Sun StorEdge Management Portal is portal application software that provides the top two tiers of this application environment.
Information that resides in the portal environment comes from a variety of storage devices and information interfaces in the lower tier of the environment. Generally, users are not exposed to this lower tier, although administrators may have to enter information about the location of the information sources.
When you log in to the Management Portal, you see the storage desktop, within which are a series of portlets, or individual applications. There are two types of portlets:
You log in as either of the two users created as part of the default configuration:
To log in, follow these steps:
1. Go to the portal login page at http://hostname/portal, where hostname is the fully qualified domain name of the management station on which you installed the Management Portal (FIGURE 3-2).
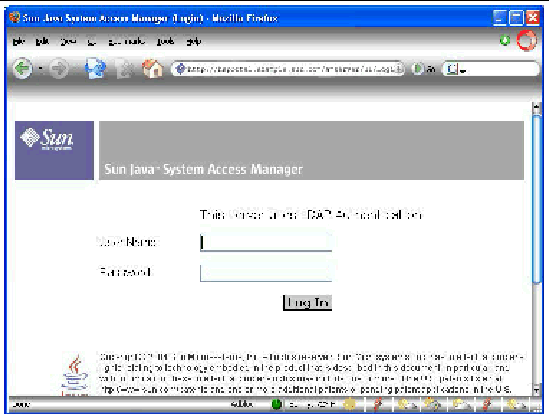
2. On the login page, enter your user name and password (either seadmin and seadmin, or sestorageadmin and sestorageadmin).
The Management Portal installation creates two users: sestorageadmin and seadmin. These users are described in the following subsections.
A Management Portal general user (sestorageadmin) can use the portal to manage and monitor storage devices and data services. This user can also personalize the environment. The following are some of the tasks that a general user can perform:
General users cannot perform "global" administration operations, such as adding additional devices to monitor, configuring performance monitors, and configuring access and authorization to agents residing on a Sun StorEdge 6920 system. These tasks, available from the Administration Tasks portlet, can be performed by the Management Portal Administrator only.
A Management Portal administrator (seadmin) has access to the same functions as the general user. This user can also access functions for administering the Management Portal environment. After the installation and initial configuration are complete, daily administrator functions might include the following, through use of the Administration Tasks portlet:
Many of these operations affect data collection and change the content available to all users. The Sun StorEdge Management Portal centralizes this configuration under a single master administrative ID to ensure a consistent and planned operational profile.
You cannot change the way the Sun StorEdge Management Portal collects data from outside sources, but you can personalize your own environment to control how you view storage. Common desktop operations include the following:
The storage desktop contains several layers of information, as shown in FIGURE 3-3.
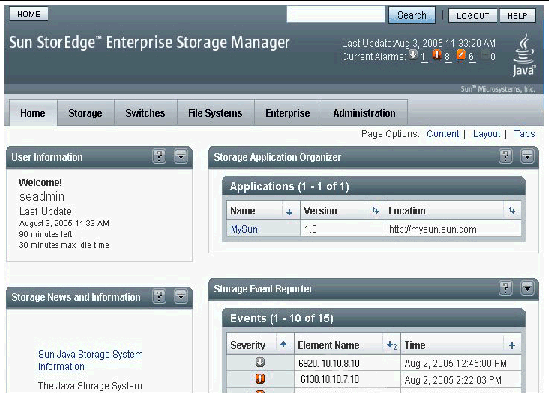
From the desktop, you view individual portlets. A single portlet can be deployed in multiple places with unique content displayed in each instance. For example, you might have several instances of the Storage News and Information portlet on a page or on multiple pages, each displaying different information.
The following subsections describe various desktop elements and how to use them.
The masthead on the storage desktop is visible on all pages of the portal. The masthead includes the following:
Each portlet has a series of controls along the top border, as shown in FIGURE 3-4. To see online help for the portlet, click the question mark Help button. The remainder of the operations are available from the Options menu in the far right corner of the portlet title bar.

When you click the Options menu, the available operations become visible for selection, as shown in FIGURE 3-5.

Options menu commands include the following:
To open the online help, do one of the following:
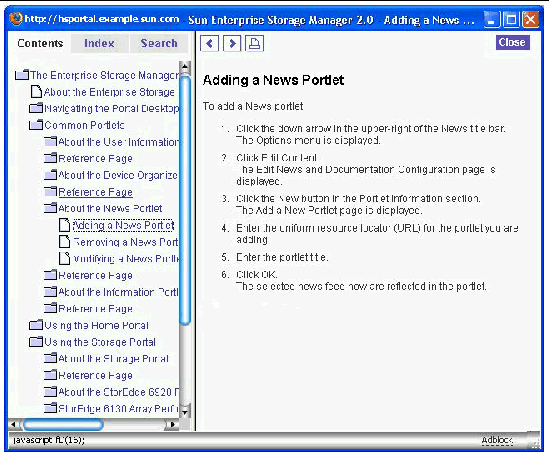
The help window has its own navigation, contents, and search capabilities, as shown in FIGURE 3-6.
You can use the Page Options customization features to modify the layout, content, and pages of the storage desktop so that it contains the information you want in the form and location you want. There are three ways to modify your desktop environment:
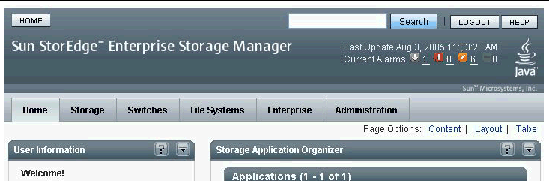
The Page Options links are in the top right corner of the desktop, underneath the masthead and tabs, as shown in FIGURE 3-7.
This section describes the contents and attributes of each of the portlets on the storage desktop. A portlet can be added multiple times on the storage desktop. For example, you may want to add multiple Volume Performance Reporter portlets to display performance information for the 6130 arrays in your storage network. By default, each portlet has separate personalization settings.
The Portal Reporter and Administration Tasks portlets can be accessed by seadmin users only. The following portlets can be accessed by seadmin and sestorageadmin users.
TABLE 3-1 shows the portlets that are specific to individual Sun products.
The following subsections describe each of these portlets.
The Portal Reporter portlet, shown in FIGURE 3-8, enables you to quickly determine the status of various important processes and configurations. It is located on the Administration tab.
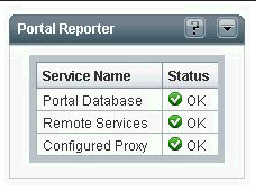
The first two service lights, Portal Database and Remote Services, indicate the availability of the "infrastructure" services, similar to the checkservers command from the /opt/SUNWesmportal/bin directory. If either of the dashboard lights is anything but green, there is a problem with the infrastructure. In this case, restart the server, using the restartportal command.
TABLE 3-2 shows the meanings of the status colors for the third service, Configured Proxy.
Use the Administration Tasks portlet, shown in FIGURE 3-9, to set up the Management Portal. The Administration Tasks portlet is available only to the seadmin user. It is located on the Administration tab.
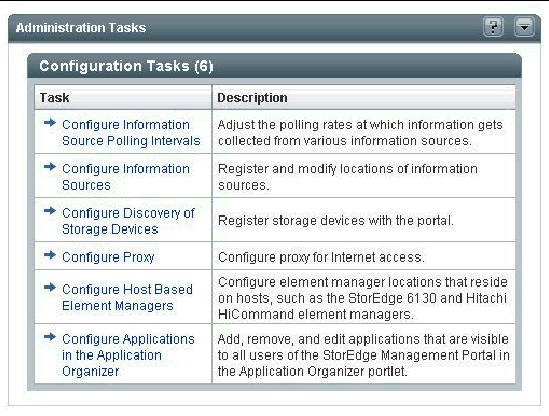
During the initial configuration, you should perform administration tasks in the following order:
1. Configure Information Sources
2. Configure Discovery of Storage Devices
4. Configure Host Based Element Managers
5. Configure Applications in the Application Organizer
6. Configure Information Source Polling Intervals
You use the Configure Information Sources task to register information sources (for example, Data Replication Manager) with the portal. For instructions on using this task, see Configuration Tasks.
You use the Configure Discovery of Storage Devices task to enter the IP addresses of systems that the portal should recognize. Depending on the number of devices that you are attempting to discover, this process can take from a few minutes to several hours.
You use the Configure Proxy task to enter proxy information that the Management Portal infrastructure can use to access information on the Internet. The only content that is currently retrieved from the Internet is RSS information for the Storage News and Information portlets.
After the initial configuration, the tasks you are most likely to use in your daily work are Configure Information Sources and Configure Polling Intervals.
The Event Organizer, shown in FIGURE 3-10, allows you to display an alarm for each registered device in your network. If a device has multiple alarms, the one with the maximum severity will be displayed.
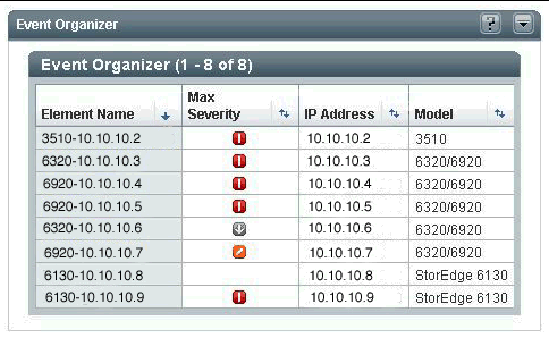
The Event Organizer uses information from the embedded Storage Automated Diagnostic Environment agent.
If you click a device in the Element Name column, the management application for that device is launched, if it is available. Clicking an alarm under Max Severity brings up the Storage Automated Diagnostic Environment where you can find more information on the alarm, such as how to mitigate, acknowledge, or close it, for example. The first time you open the Storage Automated Diagnostic Environment, you are prompted for a user ID and password.
The Storage Event Reporter portlet, shown in FIGURE 3-11, shows all health information for the registered devices in your network.
The Storage Event Reporter portlet is located on the Home tab.
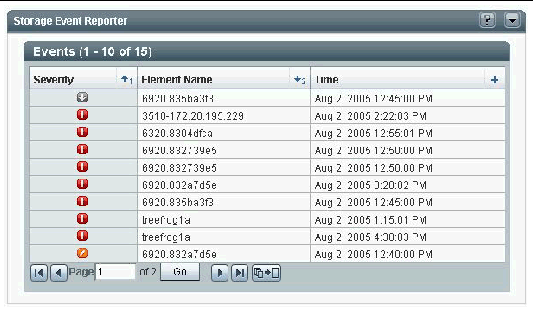
If you click a device in the Element Name column, the management application for that device is launched, if it is available. Clicking an alarm under Severity brings up the Storage Automated Diagnostic Environment where you can find more information on the alarm, such as how to mitigate, acknowledge, or close it, for example. The first time you open the Storage Automated Diagnostic Environment, you are prompted for a user ID and password.
The Storage Application Organizer portlet, shown in FIGURE 3-12, contains a list of web-based applications that are used for general management of the storage environment, such as Sun StorEdge Operations Manager and Data Replication Manager.
The Storage Application Organizer portlet is located on the Home tab.

The portal derives Storage Application Organizer information from three locations:
The primary view of the Storage Application Organizer lists the name of each application and provides a link that launches the application in a new window. The table can be sorted in a variety of ways. By default, as many as ten applications can be shown on the primary view before the pagination controls appear on the bottom of the page.
The Storage News and Information portlet, as shown in FIGURE 3-13, displays channels, which are news, information, and documentation for Sun Microsystems network storage. Typically, a channel is an RSS news feed, but there are also other supported channel protocols, such as Atom.
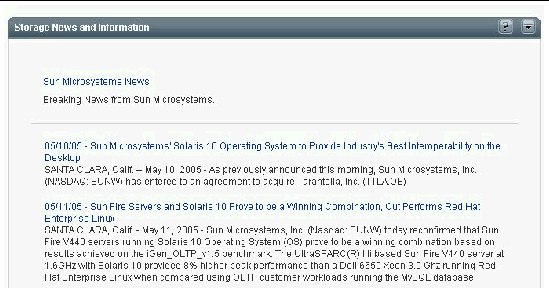
Administrators can add channels through the Administrative Tasks portlet. General users can add personal channels by customizing the Storage News and Information portlet.
The Data Replication Reporter portlet, shown in FIGURE 3-14, uses information from the Sun StorEdge Data Replication Manager 1.0 product to deliver a concise overview of replication sets between Sun StorEdge 6920 systems. All users can use this portlet for a variety of tasks, such as viewing replication sets or viewing the current state of a replication set (Replicating, Suspended, and Synchronizing). The state does not relate to the health of the replication set.
The Data Replication Reporter portlet is located on the SE 6920 subtab of the Storage tab.
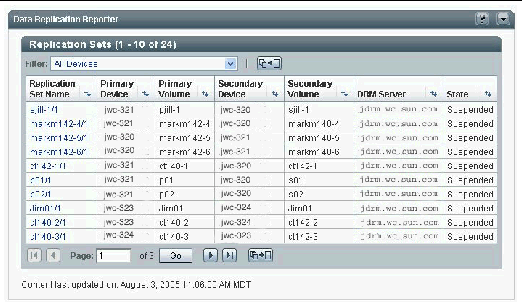
Before you can use Data Replication Manager through the Management Portal, the administrator (seadmin) must perform the following tasks:
1. Configure the Data Replication Reporter portlet.
2. Turn on the Data Replication Manager agent.
These tasks are described in Setting Up the Data Replication Reporter Portlet.
The primary view of the Storage Pool Reporter portlet, shown in FIGURE 3-15, provides aggregate statistics about Sun StorEdge 6920 storage pools based on the storage profile type. Displayed information includes the storage profile type, the number of pools that have this type, the total capacity of all pools of this type, the available capacity from the pools, and the percentage of utilization. The Storage Pool Reporter is located on the SE 6920 subtab of the Storage tab.
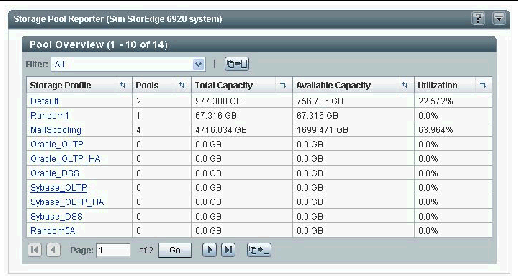
You use Storage Pool Reporter to do the following:
Before you can use Storage Pools through the Management Portal, the administrator (seadmin) must configure the Storage Pools portlet. For instructions, see Setting Up the Storage Pools Portlet.
The Volume Performance Reporter portlet, shown in FIGURE 3-16, provides a view of various performance statistics for a single Sun StorEdge 6130 array. If you have a number of these arrays in your storage network, you might want to set up a portal page with a separate portlet for each. Alternatively, if you have just one array, you might want a separate portlet for each type of statistic.
The Volume Performance Reporter portlet is located on the SE 6130 subtab of the Storage tab.
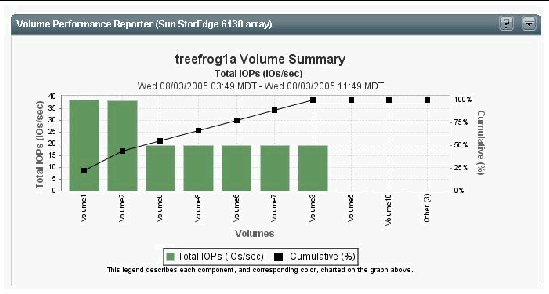
The statistics are presented in the form of a Pareto chart for ease of use. However, a Pareto chart shows only the most active volumes, not all of the volumes. If you are interested in all volumes on a particular array, you can choose to render the information in table format, Pareto chart format, or both.
Clicking on a bar within the Pareto chart takes you to a Time Series chart. This chart depicts the volume's performance over time.
Before you can use the Volume Performance Reporter through the Management Portal, the administrator (seadmin) must configure the Volume Performance Reporter portlet. For instructions, see Setting Up the Volume Performance Reporter Portlet.
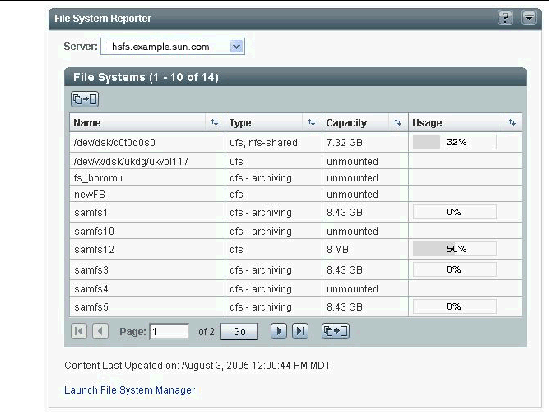
The File System Reporter portlet, shown in FIGURE 3-17, allows you to view the capacity and utilization information for servers in file systems, if you have an instance of the File System Manager software installed on the network. This portlet is located on the File Systems tab.
Before you can use File System Reporter through the Management Portal, the administrator (seadmin) must perform the following tasks:
1. Configure the File System Reporter portlet.
2. Turn on the File System Reporter agent.
These tasks are described in Setting Up the File System Reporter Portlet.
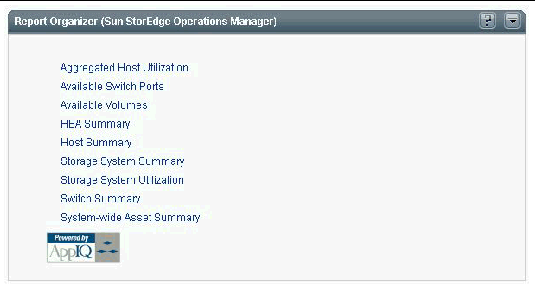
The Report Organizer portlet, shown in FIGURE 3-18, makes reports from the Sun StorEdge Operations Manager available with a single click. This portlet is located on the Enterprise tab.
This section describes the tasks that are involved in configuring portlets and other storage elements for use through the Management Portal. You may not need to complete all of these tasks, depending on what services are included in your particular environment.
You must be the Management Portal administrator (seadmin) user to complete these tasks.
Before Data Replication Manager can be used through the Management Portal, you must configure the Data Replication Reporter portlet and turn on the Data Replication Manager agent as described in this section.
For additional information on configuring Data Replication Manager, see Chapter 4.
1. Click the Administration tab.
2. Click Configure Information Sources in the Administration Tasks portlet.
3. Select Operations > Add Data Replication Information Source from the Information Source table.
4. Enter the properties for Sun StorEdge Data Replication Manager.
The Management Portal queries Data Replication Manager for replication set information. To integrate these products, you must first turn on an agent that is shipped with Data Replication Manager.
1. On the host on which Data Replication Manager is installed, log in to the system using a root password.
2. Edit the file /opt/SUNWrrm/etc/rrmapp.properties to change the value of rrm.xml.enabled to true from false.
# Port for the XML data exporter. Set 'enabled' to true and restart the DRM # server in order to turn on the exporter. # rrm.xml.port=31338 rrm.xml.enabled=true |
3. (Optional) Change the port number that the interface will use when communicating with the Data Replication Manager portlet.
This change must be made both in the rrmapp.properties file and in the Data Replication Manager portlet so that the interface and portlet can communicate.
4. Restart the Data Replication Manager server:
Before you can use the Storage Pools Portlet, you must configure Storage Pools in the Administration Tasks portlet, using the following procedure:
1. Click the Administration tab.
2. Click Configure Information Sources in the Administration Tasks portlet.
3. Select Operations > Add Storage Pools Information Source from the Information Source table.
All discovered 6920 arrays will be listed in the table. Select an array that you wish to add and provide the login credentials for that device.
Before you can use the Volume Performance Reporter portlet, you must configure it, as follows:
1. Click the Administration tab.
2. Click Configure Information Sources in the Administration Tasks portlet.
3. Select Operations > Add Volume Performance Information Source from the Information Source table.
6. Edit the content of the Volume Performance Reporter.
All discovered 6130 arrays will be listed in the table. Select the array on which you want to report.
File System Manager is the browser interface tool used to manage the Sun StorEdge SAM-FS and QFS file systems. Before you can use File System Manager through the Management Portal, you must configure the File System Reporter portlet and turn on the File System Manager agent as described in this section.
1. Click the Administration tab.
2. Click Configure Information Sources in the Administration Tasks portlet.
3. Select Operations > Add File System Information Source from the Information Source table.
4. Enter the File System Manager host name, default port, and optional description.
The File System Manager 2.0 software is packaged and delivered as part of the
SAM-FS 4.4 and QFS 4.4 products. The Management Portal queries File System Manager for file system capacity information. To integrate these products, you must turn on an agent that is shipped with the File System Manager 2.0 and above.
1. On the host on which File System Manager is installed, log in to the system using a root password.
2. Start the agent using the following command:
Several storage element types use "host-based element managers." These are element managers that reside on a service processor that is not bundled within the storage device itself. These elements include Sun StorEdge 6120 (T3), 6130, and 9900 models, as well as Hitachi 9900 series arrays.
If the location of an element manager cannot be derived automatically, you must enter it manually, as follows:
1. Click the Administration tab.
2. Click the Configure Host-based Element Managers task in the Administration Tasks portlet.
3. Enter the name of the host on which the element manager is installed.
The Sun StorEdge Management Portal will determine the URL.
When you install the Management Portal, the following two command-line utilities are installed in the /opt/SUNWesmportal/bin directory:
You must be root to execute these utilities, and you must supply the Java System Access Manager amAdmin password.
To change the user password, see the Java System Access Manager documentation at http://docs.sun.com/app/docs/prod/java.sys/.
This section describes how to complete administrative tasks that you might need to perform while using the Management Portal.
To manually start, restart, or stop the servers used as a part of the Management Portal, you use the scripts located in the /opt/SUNWesmportal/bin directory. You must be logged in as root to make use of the scripts.
|
Note - These scripts do not accept additional parameters (for example, -h or -?). Execution of the script occurs immediately after entering the script name on the command line. |
The scripts and their functions are as follows:
Database backups occur daily through the use of a cron job. However, you can also make an immediate backup through the use of a script.
With database backups, discovered devices, historical data that can be used for performance monitoring, and the latest device scans are all stored. Backing up the database does not back up individual users, individual user configurations, or any desktop personalization.
Before you can back up the database, you must first stop all Management Portal database clients. Use the following procedure to stop the clients, back up the database, and restart the clients:
2. Stop the clients by entering the following commands:
3. Change the directory to the location of the scripts.
4. Run the database backup script.
5. After the backup is complete, restart the Management Portal clients by entering the following commands:
The backup is located in the /opt/SUNWesmportal/util/psql/backup directory.
There may be up to five backups in this directory. By default, the restore process uses the latest backup.
Before you can restore the database, you must first stop all Management Portal database clients. Use the following procedure to stop the clients, restore the database, and restart the clients:
2. Stop the clients by entering the following commands:
3. Change the directory to the location of the scripts.
4. Run the database backup script.
5. After the restore is complete, restart the Management Portal clients by entering the following commands:
Copyright © 2005, Sun Microsystems, Inc. All Rights Reserved.