| C H A P T E R 7 |
|
Tutorial--Section 2.1 Prepare Application to Access SQL Database |
This chapter describes how to expand the application and prepare the Web Application Framework application to access a SQL Database.
Expand the existing application by adding a SQL-based model and a page to display that model's data.
Link the two application pages together so they show coordinated data.
The remainder of the tutorial assumes the presence of an RDBMS database which is used as a prerequisite for introducing you to some additional Web Application Framework features.
There is no requirement for an Web Application Framework application to access an RDBMS. Therefore, your actual applications might not access an RDBMS, but rather some other enterprise system that requires another form of preparation, setup, and connection.
The steps that follow rely on the IDE's preconfiguired Pointbase Database which is auto-started whenever the IDE trys to use the preconfigured JDBC connections to the samples database. Also, the automatically installed Sun Java System Application Server includes preconfigured database connection resources. Each new Web Application Framework application will be preconfigured with a datasource matching the pre-existing Pointbase samples database connection resources. In this way the new developers can very quickly use Web Application Framework and the Pointbase samples database; no additional configuration is required.
You can create a JDBC Datasource using the Web Application Framework JDBC Datasource wizard.
However, by default, one was created for you that points to the PointBase sample database that ships with the IDE.
If you need to create additional JDBC Datasources for a different database other than the one used in the tutorial, use the following steps.
(Otherwise, read over to become familiar with this topic, or skip to the Tomcat (and other non-JNDI containers) SQL Connection Preparation section.)
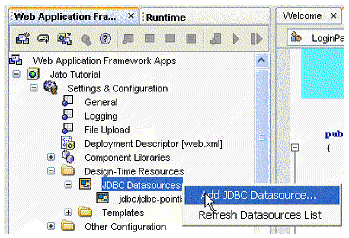
1. Under the Web Application Framework web application node (Jato Tutorial), expand the Settings & Configuration folder.
2. Expand the Design-Time Resources folder.
3. Right-click the JDBC Datasources node.

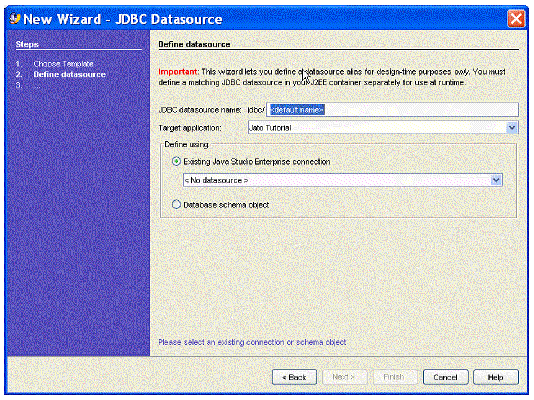
The Define JDBC datasource panel displays.

5. Enter the preferred datasource name in the New datasource name textbox.
6. In the Select connection combo box, select the appropriate JDBC connection.
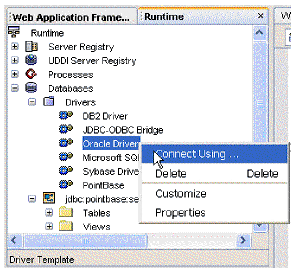
If the connection you need does not exist, you must create one. This is performed by a tool that is outside the scope of the Web Application Framework tools. You need to select the Runtime window, expand the Databases node, expand the Drivers node, right-click the desired driver node, and select Connect Using. You might need to add a driver for your database before you can add a connection. See the IDE online help for more details.

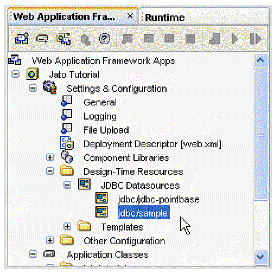
A new JDBC Datasource node is created.

1. Expand the Application Classes folder.
2. Expand the jatotutorial package folder.
3. Double-click the JatoTutorialAppServletBase class to open it.
There is a lot of commented-out event code in here with comments describing what you can do with the events. Ignore them as you do not need any of them for this tutorial application.
You need to add a static initializer to perform the following:
a. Instruct theWeb Application Framework not to use JNDI lookups
b. Load the PointBase JDBC driver
c. Map the JDBC Datasource (jdbc/jdbc-pointbase) to the PointBase sample database's JDBC connection URL
The following code sample shows the code that needs to be added to the JatoTutorialAppServletBase class. Only the bold code needs to be added. Much of the code/comments from the JatoTutorialAppServletBase class has been omitted here.
Your application will now use a JDBC URL directly to make a connection to the database instead of using the connection pooling via JNDI.
Important: If you value performance in your Web application, use JNDI for production.
You can get the PointBase client library from the following directory:
<studio-install-dir>/appserver7/pointbase/client_tools/lib/
Copyright © 2004, Sun Microsystems, Inc. All Rights Reserved.