Chapter 13 Setting Up Terminals and Modems (Tasks)
This chapter provides step-by-step instructions for setting up terminals and modems using Admintool. This is a list of the step-by-step instructions in this chapter.
For overview information about terminals and modems, see Chapter 12, Managing Terminals and Modems (Overview).
Setting Up Terminals and Modems
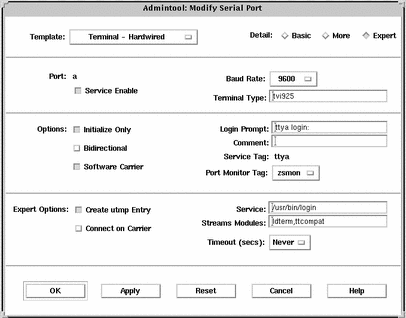
When setting up serial port information, start Admintool, and select Serial Ports from the Browse menu. Select a serial port from the Serial Ports window and then choose Modify from the Edit menu to bring up the Modify Serial Port window. This window provides access to the port templates and provides information on the port in three levels of detail--Basic, More, and Expert.
Note -
The Modify Serial Port window appears in the Basic detail mode. To view More or Expert details, select the More or Expert option from the Detail menu.
The descriptions of each item in the Modify Serial window are listed in the table below.
Table 13-1 Modify Serial Port Window Items|
Detail |
Item |
Description |
|---|---|---|
|
Basic |
Port |
Lists the port or ports you selected from Serial Ports main window. |
|
|
Service |
Specifies that the service for the port is turned on (enabled). |
|
|
Baud Rate |
Specifies the line speed used to communicate with the terminal. The line speed represents an entry in the /etc/ttydefs file. |
|
|
Terminal Type |
Shows the abbreviation for the type of terminal, for example, ansi or vt100. Similar abbreviations are found in /etc/termcap. This value is set in the $TERM environment variable. |
|
More |
Option: Initialize Only |
Specifies that the port software is initialized but not configured. |
|
|
Option: Bidirectional |
Specifies that the port line is used in both directions. |
|
|
Option: Software Carrier |
Specifies that the software carrier detection feature is used. If the option is not checked, the hardware carrier detection signal is used. |
|
|
Login Prompt |
Shows the prompt displayed to a user after a connection is made. |
|
|
Comment |
Shows the comment field for the service. |
|
|
Service Tag |
Lists the service tag associated with this port--typically an entry in the /dev/term directory. |
|
|
Port Monitor Tag |
Specifies the name of the port monitor to be used for this port. Note: The default monitor is typically correct. |
|
Expert |
Create utmpx Entry |
Specifies that a utmpx entry is created in the accounting files upon login. Note: This item must be selected if a login service is used. See the Service item. |
|
|
Connect on Carrier |
Specifies that a port's associated service is invoked immediately when a connect indication is received. |
|
|
Service |
Shows the program that is run upon connection. |
|
|
Streams Modules |
Shows the STREAMS modules that are pushed before the service is invoked. |
|
|
Timeout (secs) |
Specifies the number of seconds before a port is closed if the open process on the port succeeds and no input data is received. |
Setting Up Terminals
The table below describes the menu items (and their default values) when setting up a terminal using Serial Ports.
Table 13-2 Terminal - Hardwired Default Values|
Detail |
Item |
Default Value |
|---|---|---|
|
Basic |
Port |
-- |
|
|
Service |
Enabled |
|
|
Baud Rate |
9600 |
|
|
Terminal Type |
-- |
|
More |
Option: Initialize Only |
no |
|
|
Option: Bidirectional |
no |
|
|
Option: Software Carrier |
yes |
|
|
Login Prompt |
login: |
|
Comment |
Terminal - Hardwired |
|
|
|
Service Tag |
-- |
|
|
Port Monitor Tag |
zsmon |
|
Expert |
Create utmpx Entry |
yes |
|
|
Connect on Carrier |
no |
|
|
Service |
/usr/bin/login |
|
|
Streams Modules |
ldterm,ttcompat |
|
|
Timeout (secs) |
Never |
Setting Up Modems
The table below describes the three modem templates available when setting up a modem using Serial Ports.
Table 13-3 Modem Templates|
Modem Configuration |
Description |
|---|---|
|
Dial-In Only |
Users can dial in to the modem but cannot dial out. |
|
Dial-Out Only |
Users can dial out from the modem but cannot dial in. |
|
Bidirectional |
Users can either dial in or out from the modem. |
The table below describes the default values of each template.
Table 13-4 Modem Template Default Values|
Detail |
Item |
Modem - Dial-In Only |
Modem - Dial-Out Only |
Modem - Bidirectional |
|---|---|---|---|---|
|
Basic |
Port |
-- |
-- |
-- |
|
|
Service |
Enabled |
Enabled |
Enabled |
|
|
Baud Rate |
9600 |
9600 |
9600 |
|
|
Terminal Type |
-- |
-- |
-- |
|
More |
Option: Initialize Only |
yes |
no |
no |
|
|
Option: Bidirectional |
no |
no |
yes |
|
|
Option: Software Carrier |
no |
no |
no |
|
|
Login Prompt |
login: |
login: |
login: |
|
|
Comment |
Modem - Dial-In Only |
Modem - Dial-Out Only |
Modem - Bidirectional |
|
|
Service Tag |
-- |
-- |
-- |
|
|
Port Monitor Tag |
zsmon |
zsmon |
zsmon |
|
Expert |
Create utmpx Entry |
yes |
yes |
yes |
|
|
Connect on Carrier |
no |
no |
no |
|
|
Service |
/usr/bin/login |
/usr/bin/login |
/usr/sbin/login |
|
|
Streams Modules |
ldterm,ttcompat |
ldterm,ttcompat |
ldterm,ttcompat |
|
|
Timeout (secs) |
Never |
Never |
Never |
The table below describes the default values for the Initialize Only template.
Table 13-5 Initialize Only - No Connection Default Values|
Detail |
Item |
Default Value |
|---|---|---|
|
Basic |
Port |
-- |
|
|
Service |
Enabled |
|
|
Baud Rate |
9600 |
|
|
Terminal Type |
-- |
|
More |
Option: Initialize Only |
yes |
|
|
Option: Bidirectional |
no |
|
|
Option: Software Carrier |
no |
|
|
Login Prompt |
login: |
|
|
Comment |
Initialize Only - No Connection |
|
|
Service Tag |
-- |
|
|
Port Monitor Tag |
zsmon |
|
Expert |
Create utmpx Entry |
yes |
|
|
Connect on Carrier |
no |
|
|
Service | /usr/bin/login |
|
|
Streams Modules |
ldterm,ttcompat |
|
|
Timeout (secs) |
Never |
How to Start Admintool
-
Verify that the following prerequisites are met. To use Admintool, you must:
-
Have a bit-mapped display monitor. The Admintool software can be used only on a system with a console that is a bit-mapped screen such as a standard display monitor that comes with a Sun workstation.
-
Be running an X Window System, such as the CDE environment.
-
Be a member of the sysadmin group (group 14).
If you want to perform administration tasks on a system with an ASCII terminal as the console, use Solaris commands instead.
-
-
Start Admintool.
$ admintool &
The Users main window is displayed.
How to Set Up a Terminal
-
Start Admintool, if it's not already running.
See "How to Start Admintool" for more information on starting Admintool.
-
Select Serial Ports from the Browse menu.
The Serial Ports menu is displayed.
-
Select the port or ports that will be used with a terminal.
-
Choose Modify from the Edit menu.
The Modify Serial Port window appears in the Basic Detail mode. To enter additional details, select either the More or Expert Detail modes.
-
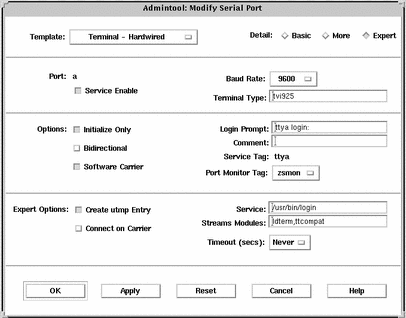
Choose Terminal-Hardwired from the Use Template menu.
See Table 13-2 for a description of the Terminal-Hardware menu items.
-
Change values of template entries if desired.
-
Click on OK to configure the port.
-
Use the pmadm command to verify the terminal service has been added.
$ pmadm -l -s ttya
Example--Completed Modify Window to Set Up a Terminal
How to Set Up a Modem
-
Start Admintool, if it's not already running.
See "How to Start Admintool" for more information on starting Admintool.
-
Select Serial Ports from the Browse menu.
The Serial Ports menu is displayed.
-
Select the port or ports that will be used with a modem.
-
Choose Modify from the Edit menu.
The Modify Serial Port window appears in the Basic Detail mode. To enter additional details, select either the More or Expert Detail modes.
-
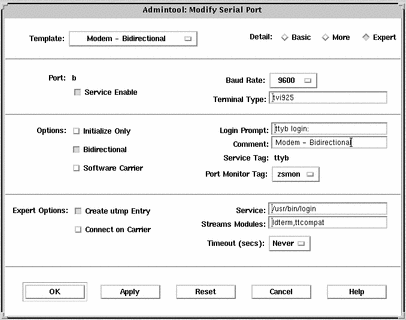
Choose the modem configuration template from the Use Template menu that meets or most closely matches your modem service.
See Table 13-3 for a description of each template.
See Table 13-4 for the default values of each template. If a UUCP service will be used to dial in to your modem on a Solaris system, see "How to Set Up a Modem for Use With UUCP" for the rest of the procedure.
-
Change values of template entries if desired.
-
Click on OK to configure the port.
-
Use the pmadm command to verify the modem service has been configured for use with UUCP.
$ pmadm -l -s ttyb
Example--Completed Modify Window to Set Up a Modem
How to Set Up a Modem for Use With UUCP
UUCP sends information to a service using seven bits and even parity. Solaris modem configurations use eight bits and no parity for internationalization purposes. To set up your modem service to work with UUCP, follow these instructions.
-
Start Admintool, if it's not already running.
See "How to Start Admintool" for more information on starting Admintool.
-
Select Serial Ports from the Browse menu.
The Serial Ports menu is displayed.
-
Select the port or ports that will be used with a modem.
-
Choose Modify from the Edit menu.
The Modify Serial Port window appears in the Basic Detail mode. For additional details, select either the More or Expert Detail modes.
-
Select Other from the Baud Rate menu.
A window listing baud rates from the /etc/ttydefs file is displayed.
-
Enter a baud rate that provides seven bit, even parity service. Click on OK.
-
Change values of other template entries if desired.
-
Click on OK to configure the port.
-
Use the pmadm command to verify the modem service has been configured for use with UUCP.
$ pmadm -l -s ttya
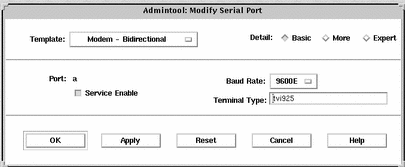
Example--Completed Modify Window to Set Up a Modem for Use With UUCP
In this example, the 9600E baud rate was selected. This provides a service with a 9600 baud rate, seven bits, and even parity.
How to Initialize a Port
-
Start Admintool, if it's not already running.
See "How to Start Admintool" for more information on starting Admintool.
-
Select Serial Ports from the Browse menu.
The Serial Ports menu is displayed.
-
Select the port or ports that you want to initialize.
-
Choose Modify from the Edit menu.
The Modify Serial Port window appears in the Basic Detail mode. To enter additional details, select either the More or Expert Detail modes.
-
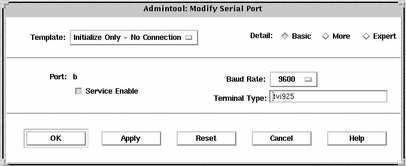
Choose Initialize Only - No Connection from the Use Template menu.
See Table 13-5 for a description of the Initialize Only - No Connection template.
-
Click on OK to initialize the port.
-
Use the pmadm command to verify the port has been disabled.
$ pmadm -l -s ttyb
Example--Completed Modify Window to Initialize a Port
How to Disable a Port
-
Start Admintool, if it's not already running.
See "How to Start Admintool" for more information on starting Admintool.
-
Select Serial Ports from the Browse menu.
The Serial Ports menu is displayed.
-
Select the port or ports that you want to disable.
-
Choose Modify from the Edit menu.
-
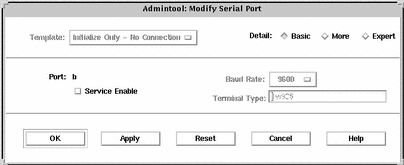
Click on the Service Enable button to disable the port service in the Modify window.
This button acts as a toggle switch to enable or disable a port service.
-
Click on OK to disable the port.
-
Use the pmadm command to verify the port service has been disabled.
$ pmadm -l -s ttya
Example--Completed Modify Window to Disable a Port
How to Remove a Port Service
-
Start Admintool, if it's not already running.
See "How to Start Admintool" for more information on starting Admintool.
-
Select the port or ports that has a service you want to delete.
-
Choose Delete from the Edit menu.
You are asked if you really want to delete the service for the specified port or ports. You can cancel the delete operation or continue with it.
-
Use the pmadm command to verify the port service has been deleted.
$ pmadm -l -s ttya
Troubleshooting Terminal and Modem Problems
If users are unable to log in over serial port lines after you have added a terminal or modem and set up the proper services, consider the following possible causes of failure.
-
Check with the user.
Malfunctions in terminals and modem use are typically reported by a user who has failed to log in or dial in. For this reason, it is best to begin troubleshooting by checking for a problem on the desktop.
Some common reasons for login failure include:
-
Login ID or password is incorrect.
-
Terminal is waiting for X-ON flow control key (Control-q).
-
Serial cable is loose or unplugged.
-
Terminal configuration is incorrect.
-
Terminal is shut off or otherwise has no power.
-
-
Check the terminal.
Continue to troubleshoot by checking the configuration of the terminal or modem. Determine the proper ttylabel for communicating with the terminal or modem. Verify that the terminal or modem settings match those of the ttylabel.
-
Check the terminal server.
If the terminal checks out, continue to search for the source of the problem on the terminal or modem server. Use the pmadm command to verify that a port monitor has been configured to service the terminal or modem and that it has the correct ttylabel associated with it.
$ pmadm -l -t ttymon
Examine /etc/ttydefs and double check the label definition against the terminal configuration. Use sacadm to check the port monitor's status. Use pmadm to check the service associated with the port the terminal uses.
-
Check the serial connection.
If the Service Access Controller is starting the TTY port monitor and pmadm reports that the service for the terminal's port is enabled, and if the terminal's configuration matches the port monitor's, then continue to search for the problem by checking the serial connection. A serial connection comprises serial ports, cables, and terminals. Test each of these parts by using it with two other parts that are known to be reliable.
Test all of the following:
-
Serial ports
-
Modems
-
Cables
-
Connectors
-
-
Do not use Admintool to modify serial port settings if the serial port is being used as a console. The correct procedure for changing console settings is by modifying the following line in the /etc/inittab file:
co:234:respawn:/usr/lib/saf/ttymon -g -h -p "`uname -n` console
login: " -T terminal_type -d /dev/console -l console -m
ldterm,ttcompat
-
If you are connecting a modem to an IA based system, verify the modem is supported by viewing the Solaris 8 (Intel Platform Edition) Hardware Compatibility List.
- © 2010, Oracle Corporation and/or its affiliates
