Creating Hot Spare Pools
This section describes how to create hot spare pools, add slices to hot spare pools, and assign hot spare pools to metadevices.
Preliminary Information for Creating Hot Spare Pools
-
A hot spare pool is a collection of slices (hot spares) reserved by DiskSuite to be automatically substituted in case of a slice failure in either a submirror or RAID5 metadevice. Hot spares provide increased data availability for mirrors and RAID5 metadevices.
-
Hot spare pools are used by mirrors and RAID5 metadevices. In the case of a mirror, the hot spare pool is associated with the submirrors.
-
A hot spare slice can be assigned to one or more hot spare pools.
-
A hot spare pool can be associated with multiple submirrors or RAID5 metadevices. However, a submirror or RAID5 metadevice can only be associated with one hot spare pool.
-
Replacement is based on a first fit for the failed slice, and follows the order specified in the hot spare pool.
-
Hot spares are not intended to remain a permanent part of your configuration. They need to be replaced with repaired or new slices.
-
Hot spares cannot contain state database replicas.
-
Ideally, slices added to the hot spare pool should be attached to different controllers. This ensures availability of data due to controller error or failure.
-
Do not associate hot spares of the wrong size with submirrors or RAID5 metadevices.
-
Do not assign a hot spare pool to a submirror in a one-way mirror.
-
Do not have all hot spares within a hot spare pool marked as in-use. If this happens, either add additional hot spares to the hot spare pool, or repair the slices that have been hot spare replaced.
-
Hot spare pools may be allocated, deallocated, or reassigned at any time unless a slice in the hot spare pool is being used to replace an errored slice in a metadevice it is associated with.
How to Create a Hot Spare Pool (DiskSuite Tool)
You can create an empty hot spare pool, and add hot spares later if necessary. If you choose to do so, skip Step 4 and Step 5 in this task.
-
Make sure you have met the prerequisites ("Prerequisites for Creating DiskSuite Objects") and have read the preliminary information ("Preliminary Information for Creating Hot Spare Pools").
-
Click the Hot Spare Pool template.
An unassigned and uncommitted Hot Spare Pool object appears on the canvas. The metadevice name is automatically assigned.
-
[Optional] Change the default hot spare pool name.
Display the object's pop-up menu and choose Info. Type the new metadevice name in the Device Name field and click Attach. Then click Close.
-
Click Slices to open the Slice Browser.
-
Select the slices and drag them into the Hot Spare Pool object.
Use Control-click to select multiple slices.
-
Click the top rectangle of the Hot Spare Pool object then click Commit.
-
To verify that the hot spare pool was committed, display the Configuration Log.
Example -- Committed Hot Spare Pool Object
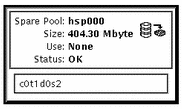
This example shows a committed hot spare pool object, hsp000, consisting of slice c0t1d0s2.

Where to Go From Here
To add hot spares to the hot spare pool, refer to "How to Add a Hot Spare Slice to a Hot Spare Pool (DiskSuite Tool)". After creating the hot spare pool, you need to associate it with a submirror or RAID5 metadevice. See "How to Associate a Hot Spare Pool (DiskSuite Tool)".
How to Create a Hot Spare Pool (Command Line)
After checking the prerequisites ("Prerequisites for Creating DiskSuite Objects"), and the preliminary information ("Preliminary Information for Creating Hot Spare Pools"), use the metainit(1M) command to create a hot spare pool. Refer to the metainit(1M) man page for more information.
Example -- Creating a Hot Spare Pool
# metainit hsp001 c2t2d0s2 c3t2d0s2 hsp001: Hotspare pool is setup |
The hot spare pool hsp001 contains two disks as the hot spares. The system verifies that the hot spare pool has been set up.
Where to Go From Here
To add more hot spares to the hot spare pool, refer to "How to Add a Hot Spare Slice to a Hot Spare Pool (Command Line)". After creating the hot spare pool, you need to associate it with a submirror or RAID5 metadevice. See "How to Associate a Hot Spare Pool (Command Line)".
How to Associate a Hot Spare Pool (DiskSuite Tool)
A hot spare pool must exist before it can be associated with a submirror or RAID5 metadevice.
-
Make sure you have met the prerequisites ("Prerequisites for Creating DiskSuite Objects") and have read the preliminary information ("Preliminary Information for Creating Hot Spare Pools").
-
Double-click the mirror or RAID5 metadevice in the Objects list.
The object appears on the canvas.
-
Choose Hot Spare Pools from the Browse menu then choose a hot spare pool object from the list.
The hot spare pool should have slices the same size or larger than the submirrors in the mirror, or the slices in the RAID5 metadevice. Ideally, the Hot Spare Pool contains hot spares that are on a different controller than the slices in the metadevice.
-
Drag the Hot Spare Pool object to the top of the metadevice object.
-
Click the top rectangle of the metadevice object then click Commit.
-
To verify that the hot spare pool was associated, display the Configuration Log.
Example -- Hot Spare Pool Associations
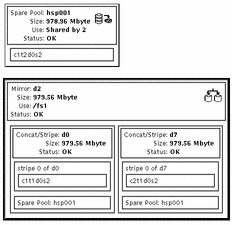
This example shows a hot spare pool associated with two submirrors.

How to Associate a Hot Spare Pool (Command Line)
After checking the prerequisites ("Prerequisites for Creating DiskSuite Objects"), and the preliminary information ("Preliminary Information for Creating Hot Spare Pools"), use the metaparam(1M) command to associate a hot spare pool. Refer to the metaparam(1M) man page for more information.
Example -- Associating a Hot Spare Pool with Submirrors
# metaparam -h hsp100 d10
# metaparam -h hsp100 d11
# metastat d0
d0: Mirror
    Submirror 0: d10
      State: Okay
    Submirror 1: d11
      State: Okay
...

d10: Submirror of d0
    State: Okay
    Hot spare pool: hsp100
...


d11: Submirror of d0
    State: Okay
    Hot spare pool: hsp100
...
|
The -h option associates a hot spare pool, hsp100, with two submirrors, d10 and d11, of a mirror, d0. The metastat command shows that the hot spare pool is associated with the submirrors.
Example -- Associating a Hot Spare Pool with a RAID5 Metadevice
# metaparam -h hsp001 d10
# metastat d10
d10: RAID
    State: Okay
    Hot spare pool: hsp001
...
|
The -h option associates a hot spare pool named hsp001 with a RAID5 metadevice named d10. The metastat command shows that the hot spare pool is associated with the RAID5 metadevice.
How to Add a Hot Spare Slice to a Hot Spare Pool (DiskSuite Tool)
You can add a slice to one or more hot spare pools. When a hot spare is added, the existing order of the hot spares is preserved. The new hot spare is added at the end of the list of hot spares in the hot spare pool that is specified.
-
Make sure you have met the prerequisites ("Prerequisites for Creating DiskSuite Objects") and have read the preliminary information ("Preliminary Information for Creating Hot Spare Pools").
-
Double-click an existing Hot Spare Pool object in the Objects list.
The object appears on the canvas.
-
Click Slices to open the Slice Browser.
-
Select a slice then drag it into the Hot Spare Pool object.
If the hot spare pool already contains slices, locate a slice of the same or greater size than the slice(s) in the hot spare pool.
-
Click the top rectangle of the Hot Spare Pool object then click Commit.
-
To verify that the hot spare pool was committed, display the Configuration Log.
Example -- Hot Spare Pool with Two Slices
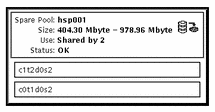
This example shows a hot spare pool that initially consisted of one slice, c1t2d0s2. Slice c0t1d0s2 was added and the hot spare pool was committed.

How to Add a Hot Spare Slice to a Hot Spare Pool (Command Line)
After checking the prerequisites ("Prerequisites for Creating DiskSuite Objects"), and the preliminary information ("Preliminary Information for Creating Hot Spare Pools"), use the metahs(1M) command to add a slice to a hot spare pool. Refer to the metahs(1M) man page for more information.
Note -
The added hot spare follows whatever hot spares already exist in the hot spare pool.
Example -- Adding a Hot Spare Slice to One Hot Spare Pool
# metahs -a hsp001 /dev/dsk/c3t0d0s2 hsp001: Hotspare is added |
The -a option adds the slice /dev/dsk/c3t0d0s2 to hot spare pool hsp001. The system verifies that the slice has been added to the hot spare pool.
Example -- Adding a Hot Spare Slice to All Hot Spare Pools
# metahs -a -all /dev/dsk/c3t0d0s2 hsp001: Hotspare is added hsp002: Hotspare is added hsp003: Hotspare is added |
The -a and -all options add the slice /dev/dsk/c3t0d0s2 to all hot spare pools configured on the system. The system verifies that the slice has been added to all hot spare pools.
How to Change the Associated Hot Spare Pool (DiskSuite Tool)
You can change a hot spare pool's association at any time as long as none of its slices are currently in use as hot spares.
-
Make sure you have met the prerequisites ("Prerequisites for Creating DiskSuite Objects") and have read the preliminary information ("Preliminary Information for Creating Hot Spare Pools").
-
Double-click the Mirror or RAID5 object with the hot spare pool association to be changed in the Objects list.
The object appears on the canvas.
-
Double-click the Hot Spare Pool object in the Objects list to use as the replacement.
The object appears on the canvas.
-
Drag the Hot Spare Pool object onto the rectangle in the submirror or RAID5 object containing the hot spare pool to be replaced.
-
Click inside the top rectangle of the object then click Commit.
-
To verify that the hot spare pool was committed, display the Configuration Log.
Note -To avoid data fabrication, DiskSuite does not allow hot sparing of a metadevice if it contains slices in the "Last Erred" state. For more information, refer to "Overview of Replacing and Enabling Slices in Mirrors and RAID5 Metadevices".
Example -- Mirror Object with Hot Spare Pool Associations
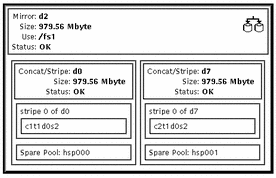
This example shows a mirror that started with hot spare pool hsp000 associated with each submirror. Submirror d7 is now associated with hsp001.

How to Change the Associated Hot Spare Pool (Command Line)
After checking the prerequisites ("Prerequisites for Creating DiskSuite Objects"), and the preliminary information ("Preliminary Information for Creating Hot Spare Pools"), use the metaparam(1M) command to change the metadevice's associated hot spare pool. For more information, refer to the metaparam(1M) man page.
Example -- Changing the Hot Spare Pool Association
# metastat d4
d4: RAID
    State: Okay
    Hot spare pool: hsp001
...
# metaparam -h hsp002 d4
# metastat d4
d4: RAID
    State: Okay
    Hot spare pool: hsp002
...
|
In this example, the hot spare pool hsp001 is currently associated with a RAID5 metadevice named d4. The hot spare pool association is changed to hsp002. The metastat command shows the hot spare pool association before and after.
- © 2010, Oracle Corporation and/or its affiliates
