| Sun Fire X4500/X4540 Server Windows Operating System Installation Guide |
| C H A P T E R 8 |
|
Update the Critical Server-Specific Drivers |
This chapter describes how to update the Windows Server 2003 or Windows Server 2008 installation with server-specific device drivers.
This chapter contains the following sections:
The procedures in this chapter assume that you already:
| Note - The _x_x_x number identifies the version of the package (for example, InstallPack_1_1_4.zip). |
If you plan on installing the optional Disk Control and Monitoring (DCM) software for a Sun Fire X4500 or X4540 running Windows Server 2003 R2 or R2 SP2 (for a description of DCM see Installing Supplemental Software), you must first install the Microsoft .NET Framework Version 2.0 Redistributable Package, and the IPMI System Management driver. Perform the following steps:
1. Install the Microsoft .NET Framework version 2.0 package.
2. On the taskbar, click Start, then click Control Panel.
3. In Control Panel, double-click Add/Remove Programs.
4. In Add/Remove Programs, click Add/Remove Windows Components, and select “Microsoft .NET Framework 2.0”.
The .NET framework is installed. Proceed the next step.
7. Install the IPMI System Management driver and the Disk Monitoring and Control software.
Sun provides a wizard to install Sun server-specific drivers and supplemental software. The Sun Fire Installation Package wizard may be started using one of the following methods: from the main menu of your server’s Tools and Drivers CD, or from the InstallPack_x_x_x.exe executable file. Directions for using either method are described below.
|
1. Start the Sun Fire Installation Package software using one of the following methods:
The Sun Fire Install Package dialog box (shown below) displays.
| Note - Screen examples shown here are for the Sun Fire X4540 server. If you have a Sun Fire X4500, the examples will appear slightly different, but the actions to perform are the same. |
FIGURE 8-1 Sun Fire Installation Package Dialog Box Example

2. Click Next to accept the default settings.
Note that you should always accept the “Platform-specific drivers” to ensure that the most recent versions of the drivers are installed. Sun also recommends accepting the “Supplemental software” to ensure you can take full advantage of the server’s feature set. The Install Pack notice dialog box displays.
FIGURE 8-2 Install Pack Notice Dialog Box Example

3. Review the Important Note and then click Next.
The Welcome to the Sun Fire Installation Wizard displays.
FIGURE 8-3 Sun Fire Installation Wizard Example

The End User License Agreement page appears.
FIGURE 8-4 End User License Agreement Page

5. Select “I accept this agreement”, and then click Next.
The platform-specific drivers are installed (see FIGURE 8-5). A green check mark verifies that each driver has been successfully installed.
FIGURE 8-5 Finished Installing Page Example

The System Settings Change dialog box displays (see FIGURE 8-6).
FIGURE 8-6 System Settings Change Dialog Box

7. If you accepted the default settings in Step 2, click No to proceed to Installing Supplemental Software.
If you are not installing the Supplemental Software, click Yes to restart your computer.
There are supplemental software components available for your Sun Fire server. You have two options for installation: Typical, where basic choices are made for you (as indicated in the table below), and Custom, which is a superset of Typical and includes all software components of Typical plus additional software components you can select.
|
Disk Control and Monitoring Utility--Manages disk drives and reports to the BMC disk drive status and Field Replaceable Unit (FRU) information. Fully described in Disk Control and Monitoring. |
|||
|
ipmitool--Command line utility that reads the sensor data repository (SDR) and displays sensor values, System Event Log (SEL), Field Replaceable Unit (FRU) inventory information, gets and sets LAN configuration parameters, and performs chassis power control operations via the BMC (also called the Service Processor). For Windows Server 2003 installations. After installation, refer to Completing the IPMItool Installation) |
|||
|
IPMI System Management Driver (Sun Microsystems)--Windows driver that reads the sensor data repository (SDR) and displays sensor values, System Event Log (SEL), Field Replaceable Unit (FRU) inventory information. Installs for supported Windows Server 2003 versions earlier than R2 only, is not applicable for Windows Server 2003 R2 versions or Windows Server 2008. |
|||
|
Intel NIC Teaming--teaming features include fault tolerance, load balancing, link aggregation, and Virtual LAN (VLAN) tagging After installation, refer to Using Intel NIC Teaming (X4500 Server Only). |
|||
|
NVIDIA Network Access Manager (NAM)--Ethernet interface configuration, optimization and teaming solution available for servers with integrated NVIDIA Gigabit Ethernet. After installation, refer to Using the NVIDIA Network Access Manager for Windows Server 2003 (X4540 Server Only). |
|||
|
AMD MCAT--Machine Check Analysis Tool (MCAT) is a command line utility that takes Windows System Event Log (.evt) file as an argument and decodes the MCA error logs into human readable format. |
|||
|
AMD Power Monitor--AMD Power Monitor is intended to show the current frequency, voltage, utilization and power savings of each core on each processor in the system. |
|
If you selected Supplemental Software at the initial Installation Package page (see FIGURE 8-1) in Step 2, and selected No in Step 7, the Supplemental Software dialog box displays:
FIGURE 8-7 Supplemental Software Dialog Box

1. Click Next to accept the Typical settings, or select Custom to choose the options to install (see descriptions in TABLE 8-1).
Component installation wizards will guide you through the installation of each of the selected supplemental software components.
2. Once the supplemental software has been installed, click Finish.
3. Click Yes at the System Setting Change dialog box to restart your system. If you ran the Sun Fire Installation Package software from the Tools and Drivers CD, remove it now.
Proceed to the next section to learn more about Supplemental software.
This section lists additional information about Sun supplemental software for your server. This information includes:
Disk Control and Monitoring (DCM) is a multi-document application for the Sun Fire X4500 or X4540 server running Microsoft Windows Server 2003 R2 or Windows Server 2003 R2 SP2 operating system. DCM assists with drive insertion and removal, reports changes in disk configuration and, using the Microsoft IPMI system management driver, synchronizes the disk FRU (Field Replaceable Unit) information with information stored in the Sun Fire X4500 or X4540 server’s Baseboard Management Controller (BMC, also known as the Service Processor).
For complete information on installing and using DCM, please refer to Disk Control and Monitoring.
Intel® PROSet for Windows Device Manager is an extension to the Windows Device Manager. When you install the NIC Teaming supplemental software for your Sun Fire X4500 server, Intel PROSet software configuration tabs are automatically added to the network adapters listed in Device Manager.
| Note - For information about identifying the active network connections on your server, refer to Appendix A, Configure Windows Network Communication Settings With Multiple Network Interfaces. |
To access the functions available for your server’s network interface, do the following:
1. From the Taskbar, click Start, and then click Run.
The run dialog box is displayed.
2. In the Open list, type devmgmt.msc, and then click OK.
The Device Manager dialog box is displayed.
3. Expand the Network adapters group and select the first adapter.
4. Right-click the selection and click Properties.
The adapter properties dialog box is displayed.
FIGURE 8-8 Intel NIC Adapter Properties
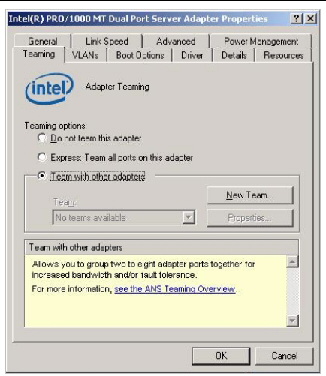
5. To setup NIC teaming, click the Teaming tab.
The teaming options are displayed (see FIGURE 8-8).
6. Select Team with other adapters and then click New Team.
The New Team Wizard is displayed.
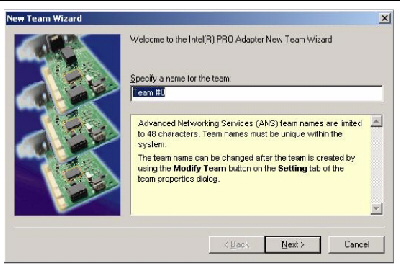
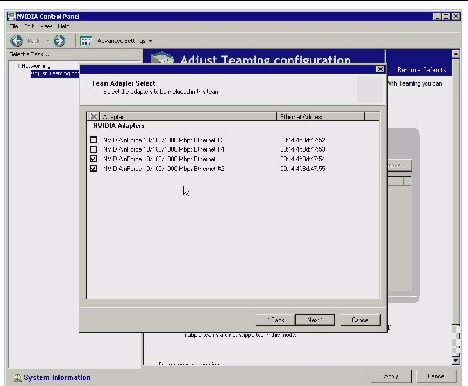
7. Click Next. The Adapter Selection page is displayed.
FIGURE 8-10 Adapter Selection Page

8. Select the adapters to be included in the team from the list of installed adapters and then click Next.
The wizard will guide you through the configuration and setup of your team.
For more information on setting up NIC teaming for your environment, refer to the Intel Connectivity web page on “Advanced Networking Services--Teaming” at:
http://support.intel.com/support/network/sb/CS-009747.htm
Additionally, you may download the complete set of Intel Network Connections User Guides for your server’s network adapters at:
http://support.intel.com/support/network/sb/cs-009715.htm
If you elect to do a custom installation of Sun supplemental software, you can select NVIDIA Network Access Manager (NAM) to be installed on your Sun Fire X4540 server. When installed, you can use NAM features to optimize your server’s network performance, increase its network bandwidth and provide for optimal throughput in case one of your network adapters stops functioning.
| Note - For information about identifying the active network connections on your server, refer to Appendix A, Configure Windows Network Communication Settings With Multiple Network Interfaces. |
The NVIDIA Network Access Manager software includes:
| Note - You may not use both NVIDIA FirstPacket and NVIDIA Teaming together. You can only configure your server to use one or the other. |
To access the functions available for your server’s network interface, do the following at your server once NAM has been installed:
1. From your Windows taskbar, click Start, and then click Programs.
2. Open the NVIDIA Corporation program group.
3. Click the Network Access Manager folder, and then click Web-based Interface.
At the web interface, see FIGURE 8-11, you can setup Ethernet settings and teaming for your NVIDIA integrated network interfaces using the wizards.
FIGURE 8-11 Windows Server 2003: Network Access Manager page
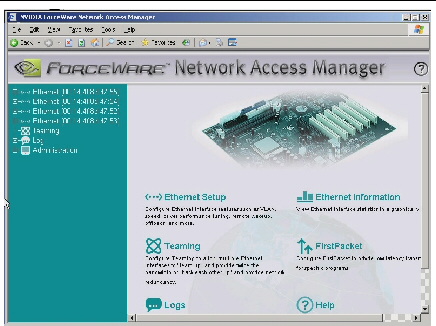
4. For example, if you wanted to set up NIC teaming, you would click the Teaming link.
5. Select Enable from the Teaming Configuration drop-down menu, and then click Apply. Refer to FIGURE 8-12.
You will see the unpopulated Teaming Table displayed.

6. To select the network interfaces to team, and configure the teaming options, click the Create Team button.
The wizard will display the network interfaces available for teaming (see FIGURE 8-13).
FIGURE 8-13 Network Interface List
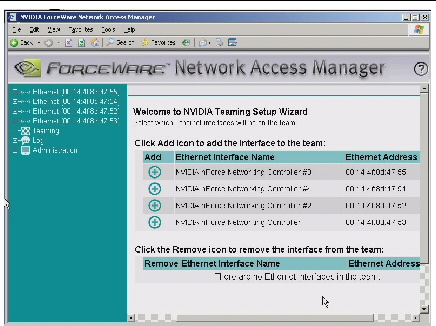
7. From the available list of Ethernet Interface Names, add available interfaces to the team by clicking the Add icon. You can have two or more in a team.
8. After selecting the interfaces to be teamed, click the Next button (located at the bottom of the page).
The wizard will guide you through the configuration and setup of your team.
| Note - Once you confirm the team to be created, the server’s network interface and Network Access Manager will need to restart to configure the new settings. |
For more information about using NVIDIA networking options through either the web-based or CLI interface, refer to the documentation and online help installed with the product.
If you elect to do a custom installation of Sun supplemental software, you can select NVIDIA Network Access Manager (NAM) to be installed on your Sun server. When installed, you can use NAM features to optimize your server’s network performance, increase its network bandwidth and provide for optimal throughput in case one of your network adapters stops functioning. For Windows Server 2008, NVIDIA Ethernet settings are done through the NVIDIA Control Panel.
The NVIDIA Control Panel software is used to set up network interface Teaming. This tool allows you to combine all the NVIDIA Ethernet interfaces on your system to form a team, resulting in increased bandwidth and network fail-over redundancy.
| Note - For information about identifying the active network connections on your server, refer to Appendix A, Configure Windows Network Communication Settings With Multiple Network Interfaces. |
To access the functions available for your server’s network interface, do the following at your server once NAM has been installed:
1. From your Windows taskbar, click Start, and then click Programs.
2. Open the NVIDIA Corporation program group, click the NVIDIA Control Panel folder, and then click Control Panel.
You will be prompted to select the Standard or Advanced interface. You can setup teaming for two or more network interfaces. An example of the Advanced interface is shown in FIGURE 8-14.
FIGURE 8-14 Windows Server 2008: NVIDIA Control Panel Networking Page

3. For example, if you wanted to set up NIC teaming and select your on settings, instead of the using the optimal defaults, you would select Use Custom Teaming Configuration.
The Custom Teaming Configuration wizard starts and displays the network interfaces available for teaming (see FIGURE 8-15).
FIGURE 8-15 Ethernet Teaming List
4. Select the network interfaces you wish to team, and then click
The wizard will guide you through the configuration and setup of your team.
For more information about using NVIDIA networking options refer to the documentation and online help installed with the product.
The IPMItool is a command line utility that reads the sensor data repository (SDR) and displays sensor values, System Event Log (SEL), Field Replaceable Unit (FRU) inventory information, gets and sets LAN configuration parameters, and performs chassis power control operations via the server’s Service Processor. IPMItool is supplemental software and may be installed using the server’s Tools and Drivers CD or using the Installpack_x_x_x.exe executable file (described earlier in this chapter).
Once installed, the IPMItool may be used to access your server’s Service Processor (or another Sun server’s Service Processor) in the following ways:
| Note - The IPMI System Management driver is also required for using the Disk Control and Monitoring (DCM) software. Use the instructions listed here to ensure that the driver is properly installed. |
To use IPMItool, ensure that you have completed the requirements specified for your Windows Server version:
If you have a supported Windows Server 2003 version earlier than R2:
For Windows Server 2003 R2 or R2 SP2:
|
|
Do the following before attempting to use the IPMItool through the Windows operating system:
1. Install the Microsoft IPMI System Management driver:
a. In Control Panel, open Add/Remove Programs.
The Add/Remove Programs dialog is displayed.
b. Click Add/Remove Windows Components.
The Windows Components Wizard dialog is displayed.
c. Highlight Management and Monitoring Tools component, and then click Details.
The Management and Monitoring Tools page is displayed.
e. Read the warning and then click OK.
The Management and Monitoring Tools page is displayed.
The Windows Components Wizard dialog is displayed.
The Hardware Management component is installed.
2. Instantiate the IPMI System Management driver.
3. On the Taskbar, click Start, and then click Run.
The Run dialog box is displayed.
rundll32 ipmisetp.dll,AddTheDevice
The IPMI System Management driver is instantiated.
5. To ensure that the IPMI System Management driver is installed, repeat steps 1a through 1c, above.
For information about using the IPMItool, refer to your Sun Integrated Lights Out Manager 2.0 User’s Guide (820-1188). For more information on standard IPMItool commands, please see:
| Sun Fire X4500/X4540 Server Windows Operating System Installation Guide | 820-0407-18 |
Copyright © 2009 Sun Microsystems, Inc. All rights reserved.
 To Update the Server-Specific Drivers