| C H A P T E R 2 |
|
Creating Custom Filters and Connectors |
This chapter describes how to create your own custom filters and connectors. The Sun Java System RFID Software Toolkit includes a sample template for creating a filter. The procedures in this chapter use the RFID Software Toolkit in conjunction with the NetBeans IDE, version 4.1 to describe the creation of a sample custom filter. The following topics are included:
The Sun Java System RFID Software Toolkit includes a NetBeans plug-in (.nbm), com-sun-autoid-toolkit.nbm, that contains various templates and code examples. One of these templates is the EPCTypeFilter. You can us it to simplify the creation of custom components for the RFID Software. The RFID Software Toolkit .nbm contains source templates to use as a basis for your custom code.
To install the RFID Software Toolkit NetBeans plug-in, you first download and install the NetBeans 4.1 IDE. Then, you need to set up your development environment using the following procedures:
|
1. Download NetBeans 4.1 from http://java.sun.com/j2se/1.4.2/download-netbeans.html.
2. Install the NetBeans IDE according to the instructions.
3. Use the following procedures to set up the NetBeans environment for your RFID component development.
|
1. Download the RFID Software Toolkit, RfidToolkit.zip, from the Sun Partner Advantage web site http://partneradvantage.sun.com/.
The software toolkit is available at the following URL: http://partneradvantage.sun.com/protected/partners/technology
/rfid/ once you log in to the membership center.
2. Unzip the file to a directory on your system.
3. After launching NetBeans, choose Tools  Update Center.
The Update Center Wizard appears.
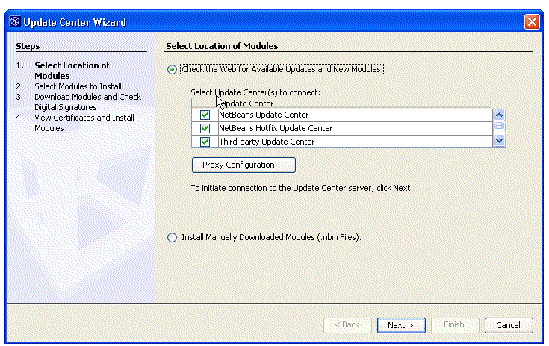
4. Select Install Manually Downloaded Modules (.nbm files) and click Next.
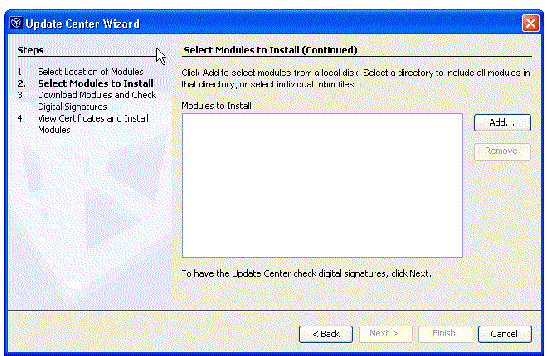
5. Click Add and browse to the com-sun-autoid-toolkit.nbm file from the unzipped RfidToolkit.zip archive.
6. Select the NBM and click OK.
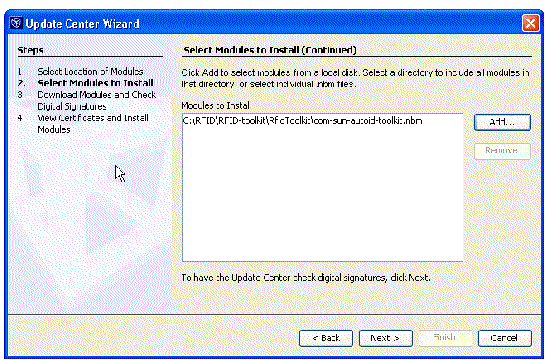
The RfidToolkit appears in the Include in Install list.
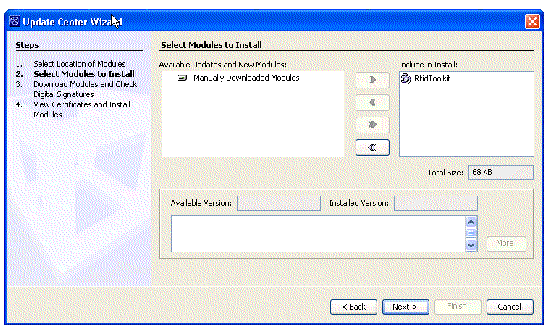
8. Click Next and accept the license agreement by clicking Accept.
You see a short visual cue that the IDE updater is installing the module.
9. When the installation is complete, click Next.
The View Certificates and Install Modules page appears.
10. Select the check box next to RfidToolkit - version 3.
An Unsigned Module dialog box appears.
11. Select Yes and click Finish.
Now you are ready to set up your samples. To use the RFID filter project, proceed to the next section.
|
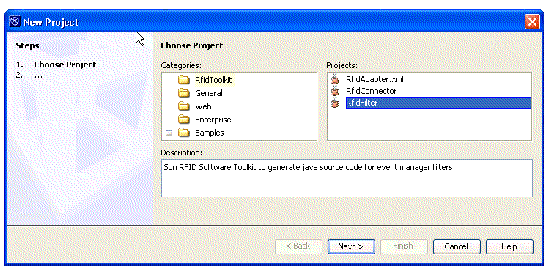
1. In NetBeans, choose File  New Project.
The New Project wizard appears.
2. Under Categories, select RfidToolkit.
3. Under Projects, select RfidFilter.
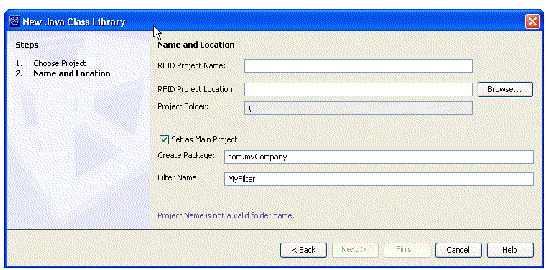
5. In the RFID Project Name field, type EPCTypeFilter.
Notice that when you type the RFID Project Name, the IDE automatically suggests this name for the name of the RFID Project Folder.
6. For the RFID Project Location field, click Browse, navigate to any directory on your computer and create a new folder called Projects.
Your RFID projects will be stored in this location.
7. Confirm that Set as Main Project is selected.
8. In the Create Package field, type the value, com.mycompany.
This is the package name of the filter.
9. In the Filter Name field, type EPCTypeFilter.
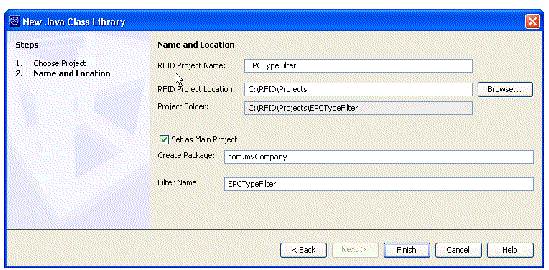
Your RFID filter project appears in the Projects window.
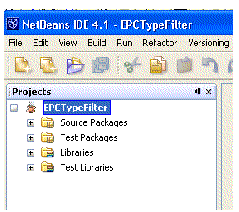
|
Note - To use the built-in JUnit tests, you need to add JAR files to the RFID library. Continue to the next procedure. |
|
Use this procedure to create a library that is used for both the RFID filter and connector projects.
1. In the IDE Projects window, under the EPCTypeFilter node, right-click Libraries.
2. Select Add Library from the context menu.
A dialog appears. You need to create a new library called RFID.
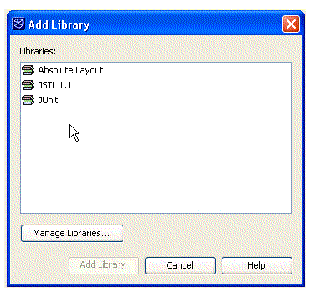
3. Click Manage Libraries in the dialog.
4. Click New Library and type the following values:
6. Under Libraries, confirm that the RFID library is selected.
7. Now add the required JAR files as listed for your platform by performing these steps for each of the JAR files to be added:
a. Click Add Jar/Folder on the right hand side of the dialog.
b. Browse to the JAR file location and select the JAR file.
c. Click Add Jar/Folder to add the JAR file to the library.
The following tables show the location of the JAR files for each supported platform.
8. When you are finished adding the JAR files to the RFID library, confirm that your Library class path is complete.
The dialog should appear similar to the following screen capture (from a Windows system).
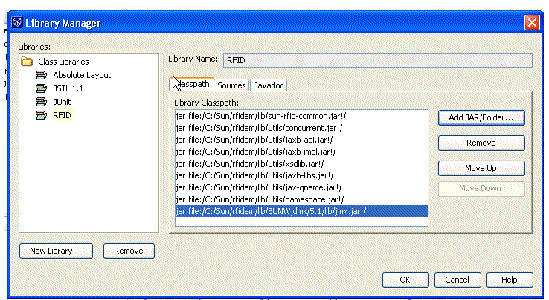
This takes you back to the Add Library dialog. You only add a Library once.
10. Select the RFID library from the list and click Add Library.
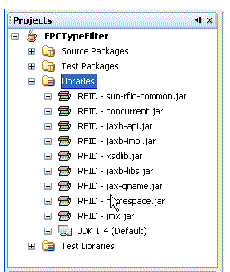
The libraries appear in the Projects windows as shown in the following screen capture. You should now be able to build and test successfully.
|
1. Right-click EPCTypeFilter project in the Projects window.
2. Select Clean and Build Project from the context menu.
The project should compile with no errors.
3. Right-click EPCTypeFilter again and select Test Project from the context menu.
A successful test is indicated by the message "Build Successful" in the bottom panel.
An unsuccessful test indicates the specific failure as the last item in the output window. If the test fails, it is likely that you do not have all of the RFID libraries added to the project. See To Create the RFID Library for the Custom Component Examples for the complete list of required libraries and instructions for adding them.
At this point, you have a sample filter that builds and test cleanly. Proceed to the next section to learn more about customizing the sample filter.
This section shows how EPCTypeFilter was created using the NetBeans IDE. To follow these steps, you must have Netbeans 4.1 installed properly with the com-sun-autoid-toolkit.nbm module installed and the RFID libraries configured as described in the previous section, Setting Up Your NetBeans Environment.
This section contains the following procedures:
EPCTypeFilter is an example filter that screens for specific EPC types and sizes. It is a real-world example of a filter that you can usefully deploy. It contains enough detail to enable you to use the ideas on filter development of all types.
EPCTypeFilter filters out identifiers that do not match the set of EPC types that are configured in the filter. For example, if the EPCTypeFilter is configured to accept SGLN Identifiers (identifiers of class com.sun.autoid.identity.EPC_SGLN_64 or com.sun.autoid.identity.EPC_SGLN_96), then all Identifier objects that are not of type SGLN are excluded from the filter's output.
Similarly, EPCTypeFilter filters out Identifier objects that do not match the configured EPC sizes. So if EPCTypeFilter is configured to accept only 96-bit tags, then all Identifier objects representing tags of other sizes are excluded from the filter's output.
You can use multiple rules. You can specify that the filter only accept SGLN and SSCC Identifiers from 96-bit tags. The result is that Identifier objects of class com.sun.autoid.identity.EPC_SGLN_96 and com.sun.autoid.identity.EPC_SSCC_96 pass through EPCTypeFilter.
The first step in creating a functional EPCTypeFilter example is to define the properties that are needed for configuring the filter. The filter description makes it clear that you need two properties:
It is good practice to add a description of these types to the Javadoc comments. The procedure starts by completing the class documentation.
|
2. If the EPCTypeFilter project is not open, open it.
3. Modify the class documentation to include text that describes the filter's functionality and the new configuration properties that you are adding to EPCTypeFilter.
a. Expand the Source Packages node in the Projects window.
b. Expand the com.mycompany node.
c. Double-click EPCTypeFilter.java.
The source code appears in the Source Editor of the IDE.
d. Modify the class documentation to look like the following:
As you can see, the properties, EPCTypes and EPCSizes, are used to identify the types and sizes of EPCs that pass through EPCTypeFilter.
4. Add a Map object to hold the configuration.
Because the filtering process uses this field, it is important that the information be stored in a manner that enables the filter to quickly determine whether or not a specific Identifier object should pass through or be excluded. The example uses a Map object for this purpose. The key is the Identifier object's class. A Boolean value indicates whether the class is passed through the filter. This implements the essence of the filtering mechanism as simple, fast look up. Add the epcMap field at the end of the list of fields near the top of the class as follows:
5. Now initialize the epcMap object.
This code creates entries in the epcMap for every available type of EPC. Initially all entries are set to Boolean.FALSE, indicating that none of the EPCs are accepted. In a subsequent step, the filter reads the Properties object passed to the constructor and directs that information to the initialization method so the appropriate entries are set to Boolean.TRUE, indicating that they should pass through the filter. Add the initializeEPCMap method after the constructor as follows:
The sample filter takes advantage of the format of the EPC class names to populate the map. The form holds true, except for the com.sun.autoid.identity.DoD_64 and com.sun.autoid.identity.DoD_96 classes. These are dealt with by catching the ClassNotFound exception that results from trying to instantiate an EPC_DoD_64 or EPC_DoD_96 class, and trying the form that is not preceded by "EPC_".
6. To complete the initialization of the map, read the EPCTypes and EPCSizes properties from the Properties object that is passed to the constructor.
The types and sizes are represented as comma-separated Identifier objects matching the name and size of the allowed identifiers. For example, if the EPCTypes is set to "SGLN,DoD" and EPCSizes is set to "64,96", EPCTypeFilter is configured to accept all Identifier objects of class as follows:
Knowing that the property is a String containing a comma-separated list and the initializeEPCMap method accepts a collection, the final initialization code converts the comma-separated list into a collection and call the initialization method. Add this code to the constructor:
7. Add code to modify the processOneIdentifier method to filter out all Identifier objects that were not specified in the configuration.
This modification requires getting the class of the Identifier object and checking the epcMap contents to see whether the Identifier object should pass through or be rejected.
Change the processOneIdentifier method as follows:
An Identifier object is accepted by adding the object to the identifiersToSend Collection object. Only Identifier objects that are added to this Collection object are sent. The code that sends the event can be found in the process method.
With this code modification, the EPCTypeFilter example is complete. The example shows the initialization of the filter, the scheme used to determine if an EPC type should be accepted or rejected by the filter, and the mechanics of filtering the Identifier objects.
|
1. Save the EPCTypeFilter.java file.
2. Right-click the EPCTypeFilter node in the Projects window.
3. Select Clean and Build Project from the context menu.
You see BUILD SUCCESSFUL at the bottom of the output window.
A JUnit test is created as part of the filter template. This test needs to be modified because your new filter requires initialization of the EPCTypes and EPCSizes properties.
|
1. Expand the Test Packages node in the Projects window.
2. Expand the com.sun.rfid.filter node.
3. Double-click the EPCTypeFilterTest.java file.
The JUnit test source code appears in the main window.
4. Modify the setUp method to initialize the EPCTypes and EPCSizes properties.
You have initialized EPCTypeFilter to accept only Identifier objects of type SGLN and SSCC, of both 96-bit and 64-bit sizes. This filter now accepts Identifier objects of the following classes:
You can run the test now to see if it is working.
5. Right-click the EPCTypeFilter node in the Projects window.
6. Select Test Project from the context menu.
7. Check the output window for the result.
You find that the test indicates a failure as follows:
Testcase: testProcessIdentifierListEvent(com.sun.rfid.filter.EPCTypeFilterTest): FAILED Expected 13 identifiers expected:<13> but was:<4> |
This message indicates the filter is actually working. Of the 13 Identifier objects passed in to this filter, only four were accepted. To fix this last problem, proceed to the next step.
8. Modify the testProcessIdentifierEvent method in the EPCTypeFilterTest.java file.
With this modification, the unit test now specifies how many Identifier objects to expect in the result.
9. Modify the testProcessIdentifierListEvent method in the EPCTypeFilterTest.java file.
This change again indicates how many Identifiers are expected to pass through the filter.
Change the JUnit code as follows:
10. Modify the testProcessDeltaEvent method in the EPCTypeFilterTest.java file.
This modification is specific to the DeltaEvents method and is the same modification as in Step 8 and Step 9.
11. Save the EPCTypeFilterTest.java file and test the filter again. (See Step 5 through Step 7).
Look for "BUILD SUCCESSFUL" in the last line of the output window.
This section describes how to integrate the EPCTypeFilter custom filter into the RFID Event Manager. The RFID Configuration Manager enables you to connect various RFID Event Manager components (adapter, filters and connectors) to create a processing chain known as Business Processing Semantics (BPS). See Sun Java System RFID Software 3.0 Administration Guide for more details. For this example, you use the RFID Configuration Manager to add the EPCTypeFilter custom filter to an existing BPS, the default Demo Configuration Object.
|
1. If you have not already done so, start the RFID Configuration Manager.
2. Add the new EPCTypeFilter to the RFID Configuration Manager and configure its properties by using these steps:
a. From the RFID Configuration Manager menu, choose Roles  Edit.
Edit.
The RFID Role and Component Editor window appears.
b. In the navigation tree, under the Roles node, select the Demo role.
Set up the filter properties as shown in the following screen capture.
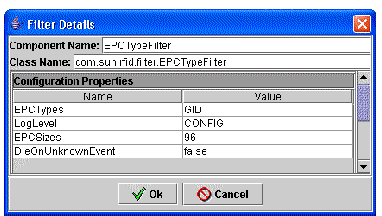
The EPCTypeFilter filter is added to the navigation tree in the left pane.
3. Add the EPCTypeFilter to the Demo Role by following these steps:
a. In the navigation tree, expand the Components node and expand the Filters node.
b. Right-click EPCTypeFilter and choose Add to Role from the contextual menu.
A dialog box appears and prompts you to assign a unique name to this component.

c. Type RfidEPCTypeFilter and click Ok.
The RfidEPCTypeFilter component appears in the drawing pane.
4. Connect the components in the necessary order by following these steps:
a. Select and right-click the arrow that connects the Rfid Delta filter and the RfidFile logger components.
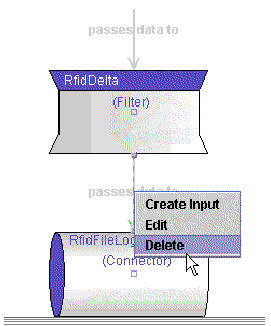
b. Choose Delete from the contextual menu.
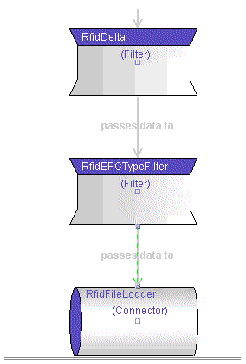
c. Connect the RfidDelta component to the RfidEPCTypeFilter component.
To do so, click the port (the small square at the center of each component) on the RfidDelta component and drag a line to the RfidEPCTypeFilter component.
d. Connect the RfidEPCTypeFilter to the RfidFile logger component.
Click the port on the RfidEPCTypeFilter component and drag a line to the RfidFile logger component. The drawing pane shows the new component flow as seen in the following screen capture.
5. Add the JAR file for the new EPCTypeFilter component by following these steps:
a. From the RFID Role and Component Editor menu, choose Plug-in  Add Implementation Class JAR.
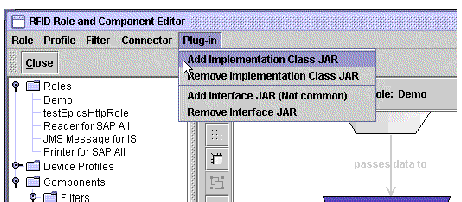
b. Use the file chooser to navigate to the EPCTypeFilter.jar, select the JAR file and click Ok.
6. Close the RFID Role and Component Editor window.
7. Delete any existing Demo Configuration Object.
This is necessary so that you can create a new Demo Configuration Object to pick up the changes that you made to the Demo role.
8. Create a new Demo Configuration Object by using the following steps:
b. Select Demo as the Base Role.
c. In the Configuration Object Name field, type EPCTypeFilter.
d. Select the PMLReader as the Input Point and click Ok.
9. Choose File  Save and save your new EPCTypeFilter Configuration Object.
Now you are ready to start the RFID Event Manager and use the new Demo Configuration Object.
The Sun Java System RFID Software Toolkit NetBeans plug-in (.nbm), com-sun-autoid-toolkit.nbm, also contains a template called RfidConnector. You can use it to simplify the creation of custom connectors for the RFID Software.
To install the RFID Software Toolkit NetBeans plug-in, you first download and install the NetBeans 4.1 IDE. Then, if you have not already done so, you need to set up your development environment using the following procedures:
|
1. Follow the steps in the procedure To Set Up the Example Filter Project with one change. In Step 3, select RfidConnector instead of RfidFilter.
For the purposes of this example, name your sample connector project, RFIDConnector.
2. Confirm the default name for the connector, MyConnector.
3. If you have not already done so, perform the procedure To Create the RFID Library for the Custom Component Examples to create the necessary RFID library.
This library is used for both the sample filter and the sample connector.
4. Now, make the following changes to the sample code so that the project will build correctly:
a. Open the file, MyConnector.java.
b. In the IDE's Source editor, search for the following line of code and remove the line of code from the java source file:
c. Search for the following line of code:
d. Change this line to the following:
e. Search for the following line of code:
f. Just after this line of code, add the following code:
5. Right-click the RFIDConnector project in the Projects window.
6. Select Clean and Build from the context menu.
The project should compile with no errors.
7. Now you can read through the comments in this code and modify it to create your custom connector.
Copyright © 2006, Sun Microsystems, Inc. All Rights Reserved.