| Sun StorEdge 3000 Family Configuration Service 2.5 User’s Guide |
| C H A P T E R 3 |
|
Starting and Setting Up Sun StorEdge Configuration Service |
This chapter explains how to start Sun StorEdge Configuration Service and provides an overview of the main window, which displays attached storage devices. It also describes procedures you need to follow before you can configure and monitor an array. Topics covered in this chapter include:
This section explains how to start Sun StorEdge Configuration Service.
| Note - You must be superuser (administrator) to run the console. |
Because the console does not receive event alerts unless it is running, after configuring the array, always leave Sun StorEdge Configuration Service running in its minimized mode on the console workstation. Or, instead of keeping the console running, you can use Sun StorEdge Diagnostic Reporter, a companion utility of Sun StorEdge Configuration Service that runs as a background service that sends messages from the hosts and array to specified email addresses. For details, refer to the Sun StorEdge 3000 Family Diagnostic Reporter User’s Guide. For another method of receiving event alerts, see Sending SNMP Traps Without Using Sun StorEdge Configuration Service.
| Note - You cannot use Sun StorEdge Configuration Service and the Sun StorEdge CLI at the same time to configure, monitor, or maintain an array. |
| Note - For Sun StorEdge Configuration Service to view and manage an array, each HBA card must be connected to the primary controller. |
|
|
For Windows 2000, choose Start  Programs Sun StorEdge 3000 Family Configuration Service.
For Windows 2003, choose Start All Programs Sun StorEdge 3000 Family Configuration Service.
When the program initializes for the first time, the main window is blank. The Add Server window is displayed, prompting you to add servers to the Managed Servers list of the console you are using. For details on adding servers, see To Add Servers.
Whenever you start the program after the first time and after you have selected Managed Servers, the main window displays server icons for the servers on the Managed Servers list.
The main window includes a menu bar, tabs, and a toolbar for access to key functions.

The following figure shows the main menu options.

Located below the menu bar, the toolbar provides icons that give you quick access to commonly used functions. Select an icon to activate its function. Toolbar icons are displayed both as active or inactive (grayed), depending on what resources are available in the main window.
Located below the toolbar, tabs enable you to quickly move to other Sun StorEdge Configuration Service views.

|
Click to go to the main Sun StorEdge Configuration Service window. |

|
Click to go to LUN Filter View. (Fibre Channel and SATA only.) |
See To Verify Storage Configurations for a description of typical device icons displayed for a configured array.
As the array becomes fully configured, the main window displays multiple components. The physical drives that make up the logical drives are displayed by default; however, to make the main window more manageable to navigate, you can choose not to display the physical (hard) drives by deselecting View Display HDD under LD.
The program follows standard Java programming language keyboard and navigation operation.
On UNIX systems, if the console locks up during use, you can stop Sun StorEdge Configuration Service, and then close and reopen the window without affecting the agent.
1. At the command prompt, type:
The window is displayed again without affecting the agent.
This section contains the following setup procedures, which you need to follow before you can configure and monitor an array:
|
You need to assign a server to manage a controller. Before you can configure a server, you need to add it to the Managed Servers list through Server List Setup.
1. Start Sun StorEdge Configuration Service if it is not already running.
2. Choose File Server List Setup.
The Server List Setup window is displayed.

3. (Optional) Organize the servers into groups:
Depending on how many servers you have and where they are located, it might be helpful to organize them into groups. For example, if you have multiple servers in separate storage rooms, you might want to create groups based on location.
a. Click Groups in the Server List Setup window.
The Group List Setup window is displayed. Type a name in the Group Name field and click Add.

b. To delete a group, select the group name from the Available Groups list and click Delete.
c. When you are finished adding and deleting groups, click OK.
The Server List Setup window is displayed.
a. Click Add under the Available Servers list.
The Add Server window is displayed.

b. Type the name of the server in the Server name field and press Return.
The Server name identifies the server. If this name is in your network’s name server database, Sun StorEdge Configuration Service determines the server’s IP address and displays it in the IP Address field.
If the program cannot find an IP address for the name, the name was either typed incorrectly or has not been recorded in the server’s name database.
c. If required, type the server’s TCP/IP address in the IP Address field.
Storage management can be enabled in-band using fibre channel or SCSI host connections or out-of-band through the Ethernet port. For details on using TCP/IP for out-of-band management, see In-Band and Out-of-Band Storage Management.
If the program has not already displayed the IP address (as described in the previous step), type the IP address manually.
Selecting Get IP Address by Name, located below the IP Address field, is another method of having the program search for the IP address and display it automatically. As mentioned in the previous step, it works only if your network has a name server database and you have typed the server name as it is recorded in the database. Otherwise, you must type the IP address manually.
d. (Optional) To set up Sun StorEdge Configuration Service so that a password is not required to monitor the server, type the ssmon password that was assigned when Sun StorEdge Configuration Service was installed.
See To Log In and Out for more information on passwords.
5. Select or Deselect Automatic Discovery of servers:
a. Select No for Auto Discovery if you need a very secure environment where access even to server inventory data is restricted.
When you select No, the program does not retrieve server information when starting up. The server’s icon appears color-coded white (instead of active purple) to indicate it is undiscovered. When you double-click an undiscovered server, Sun StorEdge Configuration Service prompts you for the ssmon user password. Optionally, you can also select the server and select File Login.
Select Yes for Auto Discovery to retrieve all information available about this server when the console is started.
b. If you select Yes for Auto Discovery, type the same monitor password that was typed earlier when the ssmon user was set up on the server (or group of servers if you have a domain or a DNS tree).
Once the server(s) have been established using Auto Discovery, you do not need to type the ssmon password when you log in to Sun StorEdge Configuration Service; you automatically have monitoring privileges. However, whenever you choose a command to perform administration or configuration activities, you are prompted with a login dialog box to change your level of security by typing the password for either the ssadmin or ssconfig user that was established earlier.
6. (Optional) Set email addresses:
a. If you want Sun StorEdge Configuration Service to send event messages using email, select the Mailing Lists tab and continue with the following directions.
You might want to type your own email address and the addresses of selected users for the purpose of receiving information about events on the server.
| Note - Instead of keeping the console running in the foreground, you can use Sun StorEdge Diagnostic Reporter, a companion utility of Sun StorEdge Configuration Service that runs as a background service that sends messages from the hosts and array to specified email addresses. For details, refer to the Sun StorEdge 3000 Family Diagnostic Reporter User’s Guide. To ensure that Sun StorEdge Configuration Service receives email, see Email and SNMP for information on setting traps. For another method of receiving event alerts, see Sending SNMP Traps Without Using Sun StorEdge Configuration Service. You can also use the Sun StorEdge Automated Diagnostic Environment (StorADE) application to monitor the status of your array. |

b. For each user, type an email address in the Mail Address field.
c. In the Severity list box, scroll through the list of severity levels and choose from the following options:
Critical - A message that requires intervention by the network administrator, such as failure of a device, power supply, or fan.
Warning - Messages that generally indicate internal program events. If you see a large number of these messages, it might mean that there is a problem with the server or the network.
Informational - Messages about the devices on the server that do not require
intervention by the network administrator.
Whatever level you choose, you receive event messages for that level and any other levels at a higher severity. If you choose Informational, for example, you are notified of any critical event. Conversely, if you want to be notified of only critical situations, select Critical, and you are not notified of any Informational or Warning events.
To delete a user from the list, select the mail address and click Delete from List.
e. Specify the mail server to be used.
Note that the Setup Mail Server button toggles with Change Mail Server, depending on whether a mail server has been defined previously.
For new setups, click Setup Mail Server. A Mail Server Setup window similar to the following is displayed.
 Server address.")
f. Type the IP address or name of the Simple Mail Transfer Protocol (SMTP) mail server that is delivering the email messages to the destination addresses specified earlier, and click OK.
The Add Server window is displayed showing the Mailing Lists tab.
7. Complete the Add Server function:
a. (Optional) If you want this server to be part of a group, select the Grouping tab.
The Add Server window is displayed.

b. Select the Group list box to view the choices available, select a group, and click OK.
8. If you want to add more servers, repeat Steps 3 through 7 for each server.
9. Move the servers you want this console to control to the Managed Servers list.
10. When you are finished adding servers, click OK to return to the main window.
| Note - If the array is attached to multiple hosts and an agent is installed on each host, each host’s IP address must be entered and added to the Managed Servers list. |
|
1. Choose File Server List Setup.
The Server List Setup window is displayed.

2. Select the server you want to delete from the Managed Servers list.
The server is moved to the Available Servers list.
|
The log in and log out functions provide security within the program. Administrative functions require access logins and passwords to prevent the possibility of one administrator reallocating or removing storage resources belonging to other clients and hosts without authorization.
After installing Sun StorEdge Configuration Service, you should have assigned separate passwords for the following three levels of security:
| Note - In the event that one of these usernames is already in use, either modify the existing username, use one of the other Sun StorEdge Configuration Service usernames, or combine the two roles. |
For more information on setting up users and passwords, refer to the Sun StorEdge 3000 Family Software Installation Guide.
| Note - See Step 4d under To Add Servers for information on how to set up Sun StorEdge Configuration Service so that monitoring does not require the ssmon password. |
1. To log in, choose File Login, and type the assigned password for the specified level of security.
If the ssmon password was specified when the server was added, you do not have to log in to monitor the server. If the ssmon password was not specified when the server was added, whenever the console starts up, you need to log in as ssmon to monitor the server.

Maintain continuous access only as the monitoring user. When you select a command that requires the administration or configuration level, a login dialog box is displayed and you log into that level with the appropriate password. After completing your activity, log out.
2. To log out, choose File Logout.
When you log out from the administration or configuration level, you are given the option of logging out to the monitoring mode or logging out from the server entirely.

|
To manage and monitor an array, the agent needs to have access to a host logical unit number (LUN) mapped to a partition of a logical drive assigned to the primary controller of the array. The agent ignores all host LUNs mapped to a partition of a logical drive assigned to a secondary controller in a redundant configuration of an array. See RAID Basics for a discussion of logical drives and LUNs.
Perform the following procedure to assign a server to manage an array.
| Note - Sun StorEdge Configuration Service can monitor and manage up to 32 arrays at one time. However, console response time can decrease as the number of arrays increases. |
1. Make sure all directly attached servers were added following the directions in To Add Servers.
This ensures that all Host names are present under Controller Assignments.
2. From the main window, choose Array Administration Controller Assignment.
The Assign Server to Manage a RAID Controller window is displayed.
3. Select the controller that you want to manage.
4. Select a server from the Server to manage this controller list and click Apply.
This enables the selected server to manage an array controller. It also disables all other servers listed from managing the same array.

5. Click Close to close the view.
As shown in the following example, the main window shows the controller device icons only under the server where the monitoring is enabled for this array.

When you assign a server to manage a controller, information regarding the managing server is produced. Sun StorEdge Configuration Service stores this information on a controller and uses it to keep track of the managing server. In the event a server is shut down, for maintenance for example, and you try to assign another server to manage the controller, Sun StorEdge Configuration Service reads the stored server information from the controller and warns you that the controller is being managed already.
You can view the managing server name by choosing the firmware application menu called “view and edit Host luns Edit Host-ID/WWN Name List.” (Refer to the Sun StorEdge 3000 Family RAID Firmware User’s Guide for your array for information about accessing the firmware application.)

If you want to change a server assignment, for example, because you are moving an array to a new location, before you move the array, you need to unassign the managing server following the steps in To Unassign the Managing Server.
If you have already moved the array, when the array starts up, you might see a warning message that the controller is already being managed by another server. Because the “force” option doesn’t unassign the agent of the original server, only override the current server assignment after you have unassigned the original managing server. If you do not manually unassign the original server, it continues to monitor and manage the unit along with the new server.
After you have unassigned a server, you can also manually delete the server following the steps in To Manually Delete a Server Using the Terminal Window.
|
1. From the main window, choose Array Administration Controller Assignment.
2. Select the array controller for which you want to unassign a server.
3. From the Server to manage this controller list, select none, and click Apply.
5. Select the server you want to manage the controller following the steps in To Assign a Server to Manage a Controller.
Refer to the Sun StorEdge 3000 Family RAID Firmware User’s Guide for your array for information about accessing the firmware application.
1. From the Main Menu, choose “view and edit Host luns Edit Host-ID/WWN Name List sscsMgr Delete Host-ID/WWN Name List.”
|
Agent parameters specify how you want to connect to your storage. This section provides steps to configure parameters such as polling time, periodic device discovery time, smart monitoring, out-of-band storage management, and enabling JBOD support.
1. From the main window, choose View Agent Options Management.
The Agent Options Management window is displayed.

2. For Monitoring Frequency, type the interval time in seconds that you want to poll for status.
This value is the interval between successive polling for any status change of devices, controllers, and enclosure monitoring by the agent. The default value is 60 seconds. If you want the console to update more frequently with device status changes, decrease this value.
| Note - Increasing the polling interval could negatively impact error messaging under heavy I/O load. |
3. For Periodic Device Discovery Time, type the value in minutes you want to check for new devices.
The periodic device discovery value is used to determine how often each device ID is scanned for a new device. The default value of 0 specifies not to scan for new devices. Note that device IDs are scanned less frequently as the numerical value increases.
Conversely, device IDs are scanned more frequently as the numerical value decreases. Five minutes is the minimum value.
4. For Interval of trap generation for an event, type the amount of time in seconds between the sending of each trap message.
If the value is 60 seconds or greater, a message is sent at that interval, for that particular trap, until the event is cleared or corrected. For example, if a fan fails, a message regarding that fan failure is sent every 60 seconds until fixed.
If the value is 0, Sun StorEdge Configuration Service (and therefore Sun StorEdge Diagnostic Reporter) sends only one message regarding that particular event. For example, if a fan fails, only one email is sent.
5. For Timeout of heartbeat lost, set the amount of time in minutes to wait between the sending of failed server messages.
The default value is 15 minutes; the value range is 1 to 30 minutes.
6. To Enable SMART Monitoring, select the check box.
SMART monitoring is a method for hard drives to report predicted failures. Most disk vendors supply drives with this feature. The agent monitors this feature by issuing an unsolicited request sense. SMART monitoring can be turned off if this request causes conflicts with the underlying host operating system device drivers. For more information on SMART monitoring, refer to the Sun StorEdge 3000 Family RAID Firmware User’s Guide for your array.
7. To Enable JBOD support, see To Enable JBOD Support.
8. The parameters under Controller Primary Agent Information, including the Password fields, pertain to out-of-band management.
See In-Band and Out-of-Band Storage Management for information about configuring these parameters.
9. If you have changed any of the previous options, click OK to save your changes.
10. Click Close to finish the procedure.
Use Just a Bunch of Disks (JBOD) support only when you have a JBOD connected directly to the server. This enables you to monitor the peripheral device condition and events. If you have a JBOD connected to the RAID array, the RAID controllers monitor the JBOD condition and events for you.
| Note - Enabling JBOD support could impact I/O. |
1. From the main window, choose View Agent Options Management.
The Agent Options Management window is displayed.
2. Select Enable JBOD support.
For details on monitoring a JBOD, see Monitoring JBODs.
|
Once you have installed Sun StorEdge Configuration Service and have added all the servers for storage that you want managed, you need to verify the storage configurations.
| Note - Most arrays are shipped preconfigured. If you want to completely remove the existing configuration and start over, see Full Configuration. If you want to change the current configuration or add to it, see Updating the Configuration. |
1. Make sure the server icon is online (that is, the server symbol is purple).
2. Observe the main window and check the storage configuration.
3. If you have multiple managed servers, select the server you want to check.
If the server icon is not purple, determine the server’s state (see TABLE 6-1). If the server’s icon has a satellite dish attached to it  , the server might be in thediscovery process and is available after a short delay.
4. Click the container symbol that appears to the left of the server whose storage you want to check.
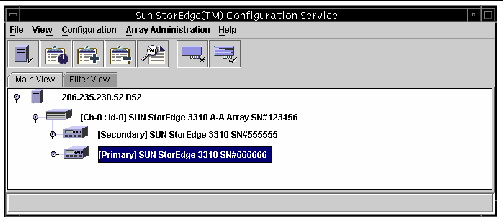
The program graphically displays each controller connected to the server as shown in the following figure.
5. To see other details, click the container symbol  next to the controller whose storage you want to check.
If the array has not yet been configured, no logical drives (LUNs for controllers) are displayed.
If the array has been fully configured, the Sun StorEdge Configuration Service displays its associated devices. It looks similar to the devices displayed in the following example.

Selecting the container symbol  to the left of any logical drive displays its assigned physical drives.
| Note - You can choose to view the physical (hard) drives that make up the logical drives by selecting or deselecting View Display HDD under LD.
|
Your configuration might differ dramatically from that shown in the previous figure depending on the products you have installed.
If the array is not configured, see Full Configuration for instructions on configuring it.
6. Check the RAID level and logical drive structure.
7. If the array is already configured and the configuration meets your needs, continue with the next section.
If you would like to change the configuration, see Full Configuration.
|
Even though logical drive configuration information is stored on controllers and on the physical drives attached to them, extreme circumstances, such as fire can occur, causing damage to both the controller and the drives. Keep multiple backup copies of your current logical drive configuration on some form of external media other than the array. Keep at least one backup copy in a vault or secured location off site. A backup copy of the configuration enables you to restore the configuration to a new controller without having to completely reconfigure the array. If you do not have a backup copy of the current configuration, data could be lost. The saved configuration includes controller parameter settings and LUN mapping.
Always save your controller configuration to a file whenever you:
To restore a configuration from a file, see To Restore a Logical Drive Configuration.
1. Select the controller with the configuration you want to save.
2. Choose Configuration Save Configuration.
The Save Configuration window is displayed.

3. Navigate to the required drive and folder to locate the configuration file(s) to be updated, indicated by a .cfg extension.
Save the file(s) to a diskette or a drive external to the array. That is, maintain copies of these configuration files off site.
4. Specify the configuration file name and click Save.
The Save Configuration window is displayed.

5. Type a description of the configuration you are saving and click OK.
The controller configuration information is saved to a .cfg file.
When you are satisfied with your storage configuration, you can partition the new device through the OS.
|
The following steps are general guidelines. For detailed information, read about creating partitions and file systems in your Sun Solaris OS manual.
1. For the Sun StorEdge 3310 SCSI array or the Sun StorEdge 3320 SCSI array only, make sure the Solaris OS can recognize multiple logical unit numbers (LUNs) under the same ID. You might need to modify /kernel/drv/sd.conf for additional LUN assignments. For information on how to modify this file, refer to the Sun StorEdge 3000 Family Installation, Operation, and Service Manual for your array.
2. Make sure the Solaris OS recognizes the new device and LUNs. For detailed steps, refer to the Sun StorEdge 3000 Family Installation, Operation, and Service Manual for your array.
3. Label a new device by typing:
The format command displays the system disk as well as other drives attached to the array.

A new device must be labeled with the format command before it can be set up for use by the array. When the format command is initiated, the devices that are available for use are displayed.
4. Select the device to be used.
5. Type the word partition to view the existing partition table.
After typing partition, you must type print to view the existing partition table.
6. Edit the partition table as necessary and label it if changes are made.
7. Create file systems on the partitions using the newfs command.
8. Mount the file systems by using the mount command or by editing /etc/vfstab and using the mountall command.
|
The following steps are general guidelines; for detailed information, refer to your Windows 2000 and Windows 2003 documentation.
1. For Windows 2000, choose Start Settings Control Panel Administrative Tools Computer Management Disk Management.
For Windows 2003, choose Start Administrative Tools Computer Management Disk Management.
Make sure you can see the new drives marked by the disk icon  under Disk Management.
2. Right-click the disk for which you want to write a signature, and select Write Signature.

3. Select the disk for which you want to create a partition, and click OK.
4. Right-click the drive (where the drive capacity is shown), and select Create Partition.

5. Respond appropriately to the partition wizard prompts.
|
When you are satisfied with your storage configuration, you need to create at least one logical volume on the server.
The following steps are general guidelines. For detailed information, read about creating logical volumes in your AIX OS manual.
1. Determine that the drives are being recognized by the host by typing:
Ensure that the disks have been assigned a PVID (physical volume identifier). This information displays in the second column. If no PVID is assigned, the column displays “None.”
2. If no PVID is assigned, open smitty and choose Devices Fixed Disks Change /Show Characteristics Assign Physical Volume Identifier.
3. In smitty, create a volume group.
Choose System Storage Management Logical Volume Manager Volume Groups Add a Volume Group.
4. In smitty, create a file system.
Choose System Storage Management File Systems Add/Change/Show/Delete File Systems.
|
When you are satisfied with your storage configuration, you need to create at least one logical volume on the server.
The following steps are general guidelines. For detailed information, read about creating logical volumes in your HP-UX OS manual.
1. Determine that the drives are being recognized by the host by typing:
2. Start a System Administration Manager (sam) session.
3. Choose Disks and File Systems Volume Groups.
4. From the Actions menu at the top of the window, click Create.
5. In the Create New Volume Group Name window, click Select New Volume Group Name, type a name for the New Volume Group, and click OK.
6. In the Create New Volume Group window, click Select Disk(s), select the drive(s) that are going to be in the Volume Group, and click OK.
7. In the Create New Volume Group window, click Define New Logical Volume(s).
a. In the LV name field, type a name for the logical volume.
b. Using the value displayed in the Approx Free Mbytes field, which specifies Mbytes left in the volume group, determine the size of the new logical volume.
Although you can create multiple logical volumes, you must create at least one. If you are creating one logical volume with the full capacity of the volume group, type the number displayed in the Approx Free Mbytes field. If you are creating multiple logical volumes, specify the size of each and type the size of the first logical volume.
c. In the Mount Directory field, type the directory where you want to mount the logical volume, and click Add.
d. To add more logical volumes, repeat Steps a-c.
e. When you have finished adding logical volumes, click OK.
8. In the Create New Volume Group window, click OK.
9. When you have finished creating logical volumes, close the Disk and File System window and close sam.
Sun StorEdge Configuration Service is now installed, set up, and ready to use. See the following chapters for additional tasks:
| Sun StorEdge 3000 Family Configuration Service 2.5 User’s Guide | 817-3337-18 |
Copyright © 2009 Sun Microsystems, Inc. All rights reserved.
 To
To 


