File Menu
Items on the File menu handle opening, including, and saving files. Click MENU on the File button to display the File menu.
Whenever a command cannot be performed, the corresponding menu item is dimmed. For example, Save is dimmed when there is no new data to be saved.
New
Use the New menu to clear the current audio file or select a new audio data format. Press MENU on New and drag to the right to display a pop-up menu with format choices. (If you click SELECT on New, the display canvas is cleared and retains the current format.) The selected audio format stays in effect until the next New operation (or other operation that loads a new audio file, such as Open). When recording a new file, you have the option of saving in the current format or in a new format.
If there is an unsaved sound file in the display canvas, a confirmation message appears, saying that the file is modified and asking if you want to discard the edited data. Click SELECT on the Continue button to clear the display canvas and begin recording. The confirmation message can be disabled in the Edit Properties... window.
You cannot undo a New operation.
Audio Format Choices
Click SELECT on the format of your choice. You can retain the current format or choose one of the standard formats--Voice, CD, or DAT. (If an audio format is not supported by the audio hardware, the corresponding menu item is disabled.) User defined formats may also be included and you can choose New Format... to define a new format.
New Format...
Click SELECT on the New Format... choice in the New menu to select, create, or edit the characteristics of a recording format. The Audio Tool: New Format window, shown in Figure 11-13, is displayed.
Figure 11-13 Audio Tool: New Format Window
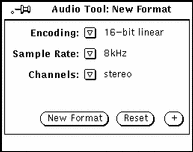
Encoding:
Open this menu with a MENU click to select a type of encoding. Then, click SELECT on your choice of 8-bit m-law, 8-bit A-law, or 16-bit linear. The 16-bit linear encoding provides better accuracy (signal-to-noise ratio) than the two 8-bit encodings. However, the 16-bit linear encoding requires twice the storage capacity. Stereo audio data must use 16-bit linear encoding to play on a machine with stereo capability.
Sample Rate:
Open this menu with a MENU click to select a sample rate. Higher sample rates provide better high-frequency response (at the cost of larger file sizes). Click SELECT on your choice.
Channels:
Open this menu with a MENU click and click SELECT on your choice of channels (mono or stereo).
New Format Button
Click SELECT on the New Format button to clear the current audio file and reset the data format to match the currently selected audio format.
Reset Button
Click SELECT on the Reset button to restore the panel so that it displays the current audio format.
+ Button
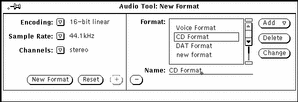
Click SELECT on the + button in the New Format window to display an extended window, shown in Figure 11-14. The Format scrolling list displays the formats available to you. Note that formats are stored on a per-user basis, so that the formats listed (other than the standard Voice, CD, and DAT) have been created under your user name.
Note -
Audio formats and preferences are stored in the $HOME/.audiorc file (where $HOME is the name of your home directory).
You can use the New Format window to name a format type to appear in the New and Save As... menus. You can also use this window to add, change, or delete an audio format.
Click SELECT the - button to close the extended part of the New Format window.
Figure 11-14 New Format Window Extensions
To create a new format:
-
Select the new format's encoding, sample rate, and number of channels from the lefthand part of the window.
-
Type the new format's name in the Name: field.
-
Click SELECT on the Add button.
The new format is added to the bottom of the list. To add the new format elsewhere, click MENU on Add and choose Before, After, Top, or Bottom. The new format will appear in the list of formats.
Open...
Open... enables you to open a directory or file. Click SELECT on the Open...
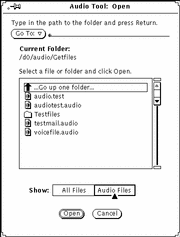
menu item to display the Audio Tool: Open window, shown in Figure 11-15. This window contains
a "browser" that can be used to locate particular directories within a file system.
Figure 11-15 Audio Tool: Open Window
Go To:
To change directories, type the pathname of the new directory in the Go To: field, then click SELECT on the Go To: button or press Return. Notice that if you click MENU on the Go To: button, a directory stack is displayed that includes the recently visited directories, as well as the directories specified in the AUDIOPATH environment variable.
Path Scrolling List
The scrolling list displays the names of directories and files. Double-click SELECT on the first item in the scrolling list to move to the parent directory. Double-click SELECT on any of the directories in the scrolling list (indicated by folder icons) to change the current directory.
All Files Button and Audio Files Button
If you click SELECT on the All Files button, the path scrolling list displays the names of all directories and files. However, non-audio files are dimmed and cannot be loaded.
If you click SELECT on the Audio Files button, the scrolling list displays the names of audio files only; other file types are omitted from the display.
Open Button
Click SELECT on this button to open the specified audio file and load it into Audio Tool's display canvas. If the selected item is a directory, click SELECT to open the directory.
You can also open a sound file by following these steps.
-
Scroll to the directory that contains the specific file.
-
Double-click SELECT on the directory.
-
Double-click SELECT on the audio file icon glyph.
The specified file is loaded into the display canvas.
Note -If the audio hardware of your computer does not support the audio format of a file that you're trying to open, Audio Tool displays the conversion pop-up shown in Figure 11-16.
Figure 11-16 File Conversion Pop-Up

Click SELECT on the Convert button to convert the file into a format that is supported by your computer's hardware. Click SELECT on the Load button to load the file into Audio Tool's canvas. If you load the file, you will not be able to play it. However, you can perform editing operations on the file (such as cutting and pasting segments) and save the result into a new format.
Cancel Button
Click SELECT this button to close the Open window.
If you open a compressed audio file, the conversion can take a long time. The Cancel button remains active and can be used to cancel the in-progress load conversion.
Save
Save enables you to save changes made to the current audio file. Click SELECT on the Save menu item to save the file.
If a file has been named and previously saved, clicking SELECT on Save replaces the old copy with the current version.
If the audio data has not been saved previously, or has not yet been edited, the Audio Tool: Save As window is displayed. The Save item is dimmed if no audio file is loaded (following a New operation, for example) or if the audio file has not been edited since a previous Save.
Save As...
Save As... enables you to save a copy of the current sound file to a new file. Click SELECT on the Save As... menu item to display the Audio Tool: Save As window (Figure 11-17).
To save a file, enter its name into the Save As field and click SELECT on the Save button.
Figure 11-17 Audio Tool: Save As Window
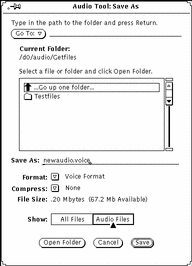
The Go To: button and field, Current Folder: field, scrolling list, All Files and Audio Files buttons, and the Cancel button work the same as their counterparts in the Open window. The Save As window has additional items that the Open window does not have. Use the Format: and Compress: menus to save an audio file in different formats.
Format:
Click MENU on the Format button to display the list of formats. The standard formats are Current, Voice, DAT, or CD. Click SELECT on Current Format to match the format that is being used in the display canvas.
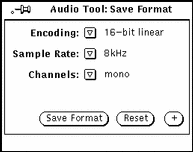
In the list of formats, click SELECT on New Format... to display the Audio Tool: Save Format window (Figure 11-18). Use the selections in this window to save the audio data in a different format. The buttons in the window work the same as the buttons in the Audio Tool: New Format window (described on "New Format...").
Figure 11-18 Audio Tool: Save Format Window
Compress:
Click MENU on the Compress button to display a list of compression techniques. The choices are:
-
None--no compression. This choice provides the best audio quality, loads and saves files the fastest, but consumes the most disk space.
-
4-bit G.721 ADPCM--2:1 compression. This is a good choice for voice files and adequate for music. It uses 50% less disk space than no compression.
-
3-bit G.723 ADPCM--8:3 compression. This is an adequate choice for voice files, but may be unacceptable for some music. It uses 62.5% less space than no compression.
If the size of a file is a concern, choose compression. If loading time is a concern, choose no compression. A compressed file uses less disk space but requires additional loading time because it must be decompressed before it is used. Also, if you choose to compress a file, the audio encoding specified by New Format... is ignored. When you load a compressed file, the format may change from its previous choice (e.g., if you compress an A-law file and reload, the file format changes to m-law).
File Size:
The File Size field displays the storage requirements of the file (when Audio Tool writes it to disk) and the amount of free disk space that you have available in the file system that contains the selected folder.
Open Folder
Click SELECT on the Open Folder button to open a folder that you have selected in the file scrolling list.
Cancel Button
Click SELECT on the Cancel button to close the Save As window.
If you save a compressed audio file, the conversion can take a long time. The Cancel button remains active and can be used to cancel the in-progress save conversion.
Save Button
Click SELECT on this button to save the specified audio file. If the file selection is not made, this button is dimmed.
Include...
Include... enables you to insert audio data from another file into the current file. Click SELECT on the Include... menu item to display the Audio Tool: Include window. This window is similar to the Open window shown in Figure 11-15, with the Include button replacing the Open button, and the addition of the Open Folder button. Choose the file you want to include, then click SELECT on the Include button to insert the selected file into the display canvas at the play position pointer. Note that if the file selection is not made, the Include button is dimmed.
Note -
You can include only files whose formats match the current audio format. All other files are dimmed (if All Files is selected) or are removed from the scrolling list (if Audio Files is selected).
- © 2010, Oracle Corporation and/or its affiliates
