| Sun StorageTek 2500 Series Array Hardware Installation Guide |
| A P P E N D I X A |
|
Configuring iSCSI on the Sun StorageTek 2510 Array |
This appendix describes initial configuration of iSCSI on the Sun StorageTek 2510 Array. It contains the following sections:
The following overview lists the major steps to configure the data host and target storage after setting up the array and installing the management software.
For the full procedure go to Configuring iSCSI - Detailed
1. Configure an iSCSI port for each controller on the storage array.
a. Note its iSCSI Qualified Name (IQN) of the host.
b. Configure static discovery of the target ports.
3. In the Sun StorageTek Common Array Manager software:
a. Configure an initiator with the data host IQN.
c. Map the volume to the initiator through the host or host group.
a. Link the initiator and target volume, if needed.
b. Verify that you see the created volume.
5. Use system administration commands in the OS to mount/read/write to the volume.
Configuring iSCSI requires an understanding of the following concepts.
A NIC is an input/output (I/O) adapter that connects a host to a computer network. The host central processing unit (CPU) must process the Small Computer System Interface (SCSI) information in Ethernet frames.
Ethernet NICs require a software initiator. The iSCSI initiator runs on the data host and converts SCSI commands into iSCSI commands to send and receive data over the Ethernet connection to a target storage system. iSCSI initiators are operating system specific. Examples are provided for configuring initiators in Solaris and Windows. Consult your operating system documentation for Linux.
The following sections detail the steps in planning, cabling, and configuring iSCSI:
The first two sections contain tables listing each step in configuring iSCSI:
You can use the procedures in conjunction with examples for Solaris and Windows.
For an example of configuring iSCSI on a Solaris host, go to iSCSI Configuration Example Using Solaris.
For an example of configuring iSCSI on a Windows host, go to iSCSI Configuration Example Using Windows.
For an example of configuring iSCSI on a Linux host, consult your Linux OS documentation.
The RDAC driver for LINUX supports the Sun StorageTek 2510 Array. To download:
1. Go to www.sun.com
4. Select Systems Administration >> Storage Management, and scroll down to the StorageTek 2500 Series offerings.
This section details the steps to prepare for iSCSI and complete the hardware installation before beginning configuration.
This section describes the steps to configure iSCSI on the data host and in the Common Array Manager software. It contains the following sections:
For an example of configuring iSCSI on a Solaris host, go to iSCSI Configuration Example Using Solaris.
For an example of configuring iSCSI on a Windows host, go to iSCSI Configuration Example Using Windows.
Step 1 requires you to identify the target ports IP address (minimum one for each controller) on the Port Summary page noted below.

If you need to configure the iSCSI ports to change the IP address or the listening port, display the Port Summary and select a port to display the Port Details page. Consult the online help for configuration help.

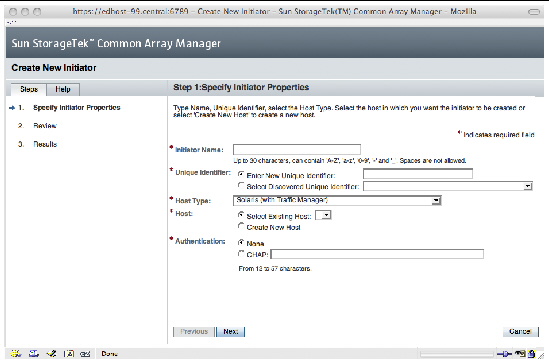
After creating an initiator on a data host, you need to add information about the initiator to the management software.
Selecting Create New Initiator launches a wizard.
Add the following information:
(The identifier can also be in EUI or NAA format. See the online help for the syntax of these formats.)
IQN syntax example: iqn.2001-04.com.example:storage:diskarrays-sn-a8675309:
The wizard will allow you to assign the initiator to a host or host group. You use the host or host group to map the initiator to a volume.
You will also have to enter a CHAP secret on the Target Details page.
For more information about authentication, go toConfiguring Mutual Authentication for an iSCSI Session for reference the online help.
This section describes additional features for configuring iSCSI on the Sun StorageTek 2510 Array. It contains the following sections:
In addition to the initial iSCSI configuration discussed in this guide, the Common Array Manager has online help to document modifying every feature and the fields on every iSCSI page.
iSCSI topics in the online help include:
Page help in the online help includes:
In a secure environment, authentication is not required because only trusted initiators can access the targets.
In a less secure environment, the target cannot determine if a connection request is truly from a given host. In that case, the target can authenticate an initiator by using the Challenge-Handshake Authentication Protocol (CHAP).
CHAP authentication uses the notion of a challenge and response, which means that the target challenges the initiator to prove its identity. For the challenge/response method to work, the target must know the initiator's secret key and the initiator must be set up to respond to a challenge.
You can configure mutual authentication for an iSCSI session so that both the iSCSI initiator and iSCSI target use a CHAP secret.
For security purposes, Sun Microsystems recommends that the initiator and CHAP secrets be unique.
You can add CHAP secrets when creating an initiator or add it later to an initiator and target.
1. Click Sun StorageTek Common Array Manager.
The navigation pane and the Storage System Summary page are displayed.
2. In the navigation pane, expand the storage array you want to work with.
The navigation tree is expanded for that array.
3. Expand Physical Devices and choose Initiators.
The Initiator Summary page is displayed.
4. Select the initiator for which you want to configure mutual authentication.
The Initiator Details page is displayed.
5. In the Authentication field, select CHAP and enter a CHAP secret.
6. Enter the CHAP secret again in the validation field.
8. In the navigation pane, expand the storage array you want to work with.
The navigation tree is expanded for that array.
9. Expand Physical Devices and choose iSCSI Target.
The iSCSI Target Details page is displayed.
10. In the iSCSI Target Authentication section, select CHAP and enter the CHAP secret.
| Sun StorageTek 2500 Series Array Hardware Installation Guide | 820-0015-14 |
Copyright © 2009 Sun Microsystems, Inc. All rights reserved.