| Sun StorageTek 2500 Series Array Hardware Installation Guide |
| A P P E N D I X C |
|
iSCSI Configuration Example Using Windows |
This appendix shows an example of configuring iSCSI on a Windows data host (Windows 2003 Server is the recommended platform) in the following sections:
1. Download the latest iSCSI initiator tool from Microsoft
http://www.microsoft.com/downloads/details.aspx?FamilyID=12cb3c1a-15d6-4585-b385-befd1319f825&DisplayLang=en
2. Click the downloaded .exe file to launch the install wizard.
3. Follow the instructions in the wizard until you click Finish on the last screen.
This installs the Microsoft iSCSI initiator.
4. Verify that you see the iSCSI initiator tool in the Control Panel (Start >> Control Panel).
5. Install the Sun StorageTek Common Array Manager software on the management host and register the target array.
Follow the instruction in the Sun StorageTek Common Array Manager Installation Guide.
1. Review the port settings in the Common Array Manager software and change the IP addresses if necessary.
The IP address are on the Port Summary page. The addresses can be changed or set to DHCP on the Port Details Page.


2. Configure the iSCSI initiator tool to be able to map the volume created on the storage array.
a. Launch the iSCSI initiator tool from the control panel.
By default, the installation places the shortcut to the iSCSI initiator applet on the desktop.
b. Note the IQN (iSCSI Qualified Name) of the iSCSI initiator.

3. In the CAM software, create the initiator with the IQN of the data host.
Refer to Adding Initiator Information for details.
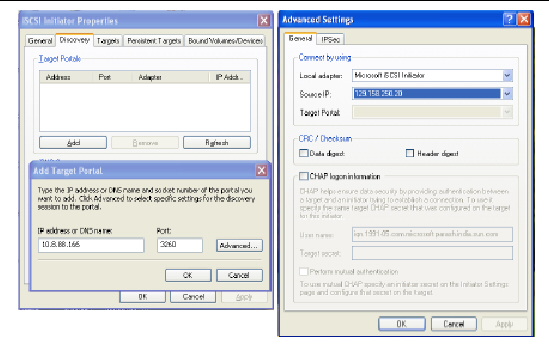
4. In the iSCSI initiator tool, go to the Discovery tab. In the Target Portals section, add the IP address of one of the iSCSI ports on your storage array for the target discovery.

5. Note that the Link status of the port you are adding should be UP.
6. In the Add Target Portal pop up above, click on the Advanced button and select the Local adapter as Microsoft iSCSI Initiator and in the Source IP. Then select the IP of the system where the initiator is installed.
8. The target should get discovered as seen in the screen shot below.

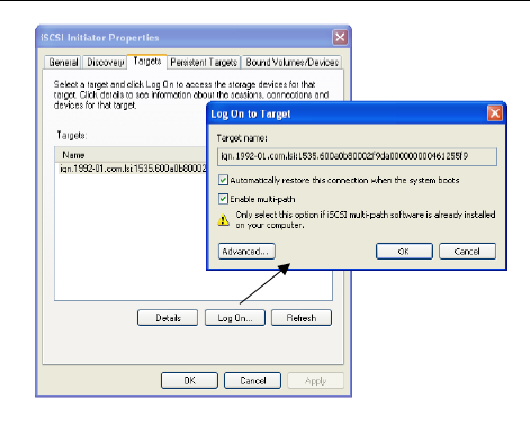
9. Go to the Targets tab, click on the target listed there and press Log on button.
10. Enable both the check boxes and click on the Advanced button in the pop up.
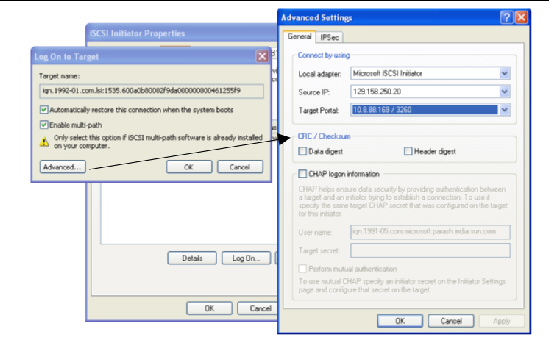
11. In the Advanced settings tab, select local adapter as the Microsoft iSCSI Initiator.
12. For source IP, enter the system IP where the initiator is running.
13. For target portal enter the IP address you have discovered in the previous step.
After this, the status of the target should be shown as Connected.
15. Repeat Steps 7 to 14 for each target (minimum one target per controller).
16. In the Common Array Management software, configure the following using the Common Array Management documentation (Install Guide or online help) to:
17. Launch the Computer Management application in Windows and open Disk Management.
You should be able to see the mapped volume on your host.

| Sun StorageTek 2500 Series Array Hardware Installation Guide | 820-0015-14 |
Copyright © 2009 Sun Microsystems, Inc. All rights reserved.