Adding a Patient Profile on the Patient EDM
This section provides the step-by-step instructions you need in order to add patientprofiles to the master index database. When you add a patient profile, you are actually creating a system record. The master index application calculates the SBR portion of the patient profile when you commit the system record to the database.
Adding a patient profile includes the following steps:
Steps 1, 2, and 3 must be performed in the order given. Steps 4 through 8 can be performed in any order.
Step 1: Obtain Information about the Patient
Before you begin to add a new patient to the master index application, you should obtain certain information about the patient. For example, by default you must enter the patient’s first and last names, SSN, date of birth in order to save the patient profile. You should provide as much information as is available for each patient. If necessary, review the descriptions of the fields you encounter while adding a new patient. These descriptions, provided throughout this section, will help you to determine the information you need to specify for each new patient. Once you have the information, continue to Step 2: Specify a System and Local ID.
Step 2: Specify a System and Local ID
Each patient profile is associated with at least one system record. Before you add demographic data to a patient profile, you must specify the patient’s local ID in a specific system. This creates the system record component of the patient profile.
Figure 35 Create System Record - System and Local ID
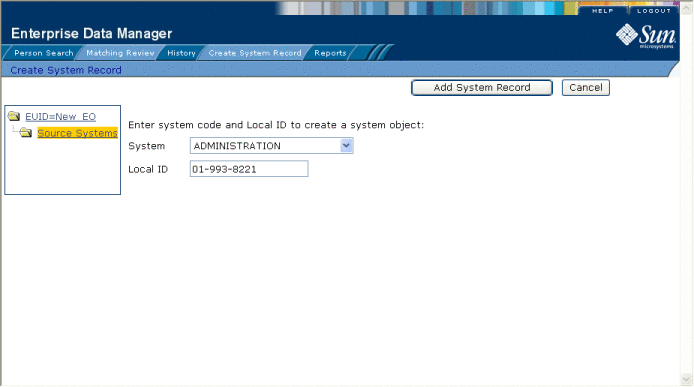
 To Specify a System and Local ID
-
On the Patient EDM main menu, select Create System Record.
The Create System Record page appears.
-
Select the system in which you want to add the new profile.
-
Enter the local ID for the new profile.
Note –By default the name of this field is Local ID, but it might have been customized for your implementation.
-
Click Add System Record.
The page changes to display demographic fields.
-
Continue to Step 3: Specify Demographic Information.
Step 3: Specify Demographic Information
When you add a new patient to the master index application, you need to enter certain information such as the patient’s name, social security number, and certain demographic information.
Figure 36 Create System Record - Demographic Information
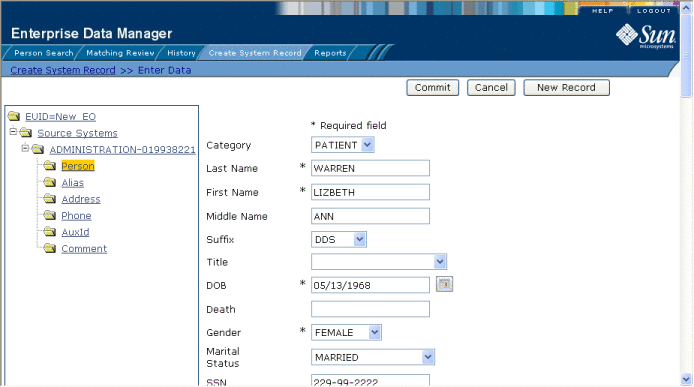
 To Specify Demographic Information
-
Complete Step 2: Specify a System and Local ID.
-
On the Create System Record page, enter the patient’s demographic information (for more information, see About Demographic Fields on the Patient EDM).
-
Do one of the following:
-
To specify additional information about the patient, continue to Step 4: Specify Alias Information.
-
To save the patient profile without specifying additional information, skip to Step 9: Save the Patient Profile.
-
Step 4: Specify Alias Information
After you specify the required demographic information for a patient, you can specify any alias names for that patient. Once you add an alias, it appears in the patient profile tree on the left side of the Create System Record page.
Figure 37 Create System Record - Alias Information
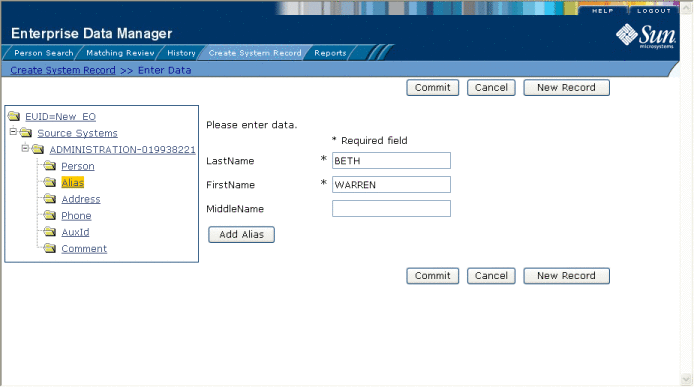
 To Specify Alias Information
-
Complete Step 3: Specify Demographic Information.
-
In the EUID tree in the left portion of the Create System Record page, select Alias.
The page changes to display alias fields.
-
On the Create System Record page, enter the patient’s alias information (for more information, see About Alias Fields on the Patient EDM).
-
In the lower left portion of the page, click Add Alias.
-
Repeat steps 3 and 4 for each alias name you want to add.
-
If you add an alias name in error, highlight the alias in the EUID tree, and then click Remove Alias.
The alias name is removed from the tree.
-
Do one of the following:
-
To specify additional information about the patient, continue to Step 5: Specify Address Information.
-
To save the patient profile without specifying additional information, skip to Step 9: Save the Patient Profile.
-
Step 5: Specify Address Information
When you add a new patient to the master index application, you can specify information about the various addresses associated with a patient, such as their home and business addresses.
Figure 38 Create System Record - Address Information
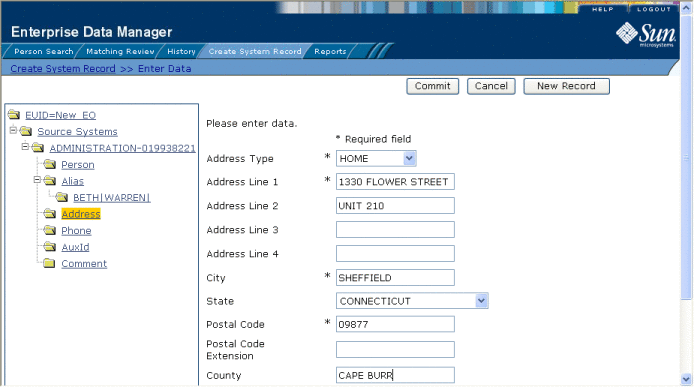
 To Specify Address Information
-
Complete Step 4: Specify Alias Information.
-
In the EUID tree in the left portion of the Create System Record page, select Address.
The page changes to display address fields.
-
On the Create System Record page, fill in the address fields (for more information, see About Address Fields on the Patient EDM).
-
In the lower portion of the page, click Add Address.
-
Repeat steps 3 and 4 for each address you need to add to the patient profile.
-
If you add an address in error, highlight the address type in the EUID tree, and then click Remove Address.
The address is removed from the EUID tree.
-
Do one of the following:
-
To specify additional information about the patient, continue to Step 6: Specify Telephone Information.
-
To save the patient profile without specifying additional information, skip to Step 9: Save the Patient Profile.
-
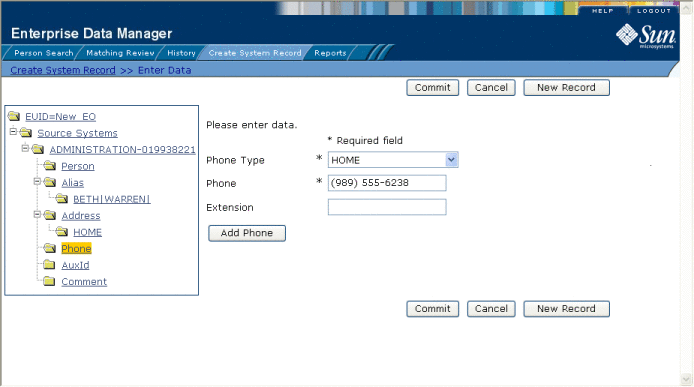
Step 6: Specify Telephone Information
When you add a new patient to the master index application, you can specify information about the various telephone numbers associated with a patient, such as their home, cellular, and business telephone numbers.
Figure 39 Create System Record - Telephone Information
 To Specify Telephone Information
-
Complete Step 5: Specify Address Information.
-
In the EUID tree in the left portion of the Create System Record page, select Phone.
The page changes to display telephone fields.
-
On the Create System Record page, fill in the telephone fields (for more information, see About Telephone Fields on the Patient EDM).
-
In the lower portion of the page, click Add Phone.
-
Repeat steps 3 and 4 for each telephone number you need to add to the patient profile.
-
If you add a telephone number in error, highlight the telephone type in the EUID tree, and then click Remove Phone.
The number is removed from the tree.
-
Do one of the following:
-
To specify additional information about the patient, continue to Step 7: Specify Auxiliary IDs.
-
To save the patient profile without specifying additional information, skip to Step 9: Save the Patient Profile.
-
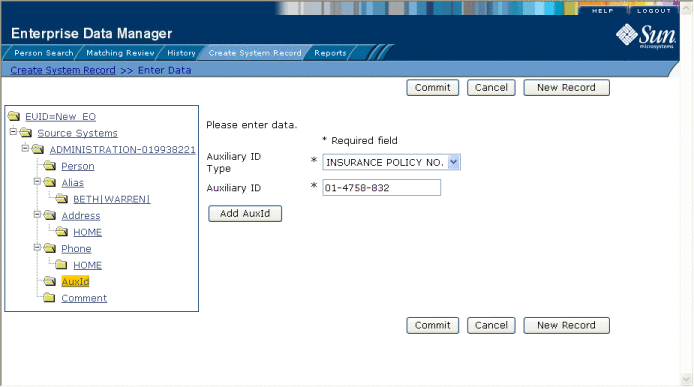
Step 7: Specify Auxiliary IDs
When you add a new patient to the database, you can specify auxiliary IDs for the patient. These IDs do not necessarily uniquely identify the patient profile, and several profiles might have the same ID.
Figure 40 Create System Record - Auxiliary IDs
 To Specify Auxiliary IDs
-
Complete Step 6: Specify Telephone InformationStep 6: Specify Telephone Information.
-
In the EUID tree in the left portion of the Create System Record page, select AuxId.
The page changes to display auxiliary ID fields.
-
On the Create System Record page, fill in information about the auxiliary ID (for more information, see About Auxiliary ID Fields on the Patient EDM).
-
In the lower portion of the page, click Add AuxId.
-
Repeat steps 3 and 4 for each auxiliary ID you need to add to the patient profile.
-
If you add an auxiliary ID in error, highlight the auxiliary ID in the EUID tree, and then click Remove AuxId.
The auxiliary ID is removed from the tree.
-
Do one of the following:
-
To specify additional information about the patient, continue to Step 8: Add Comments to the Patient Profile.
-
To save the patient profile without specifying additional information, skip to Step 9: Save the Patient Profile.
-
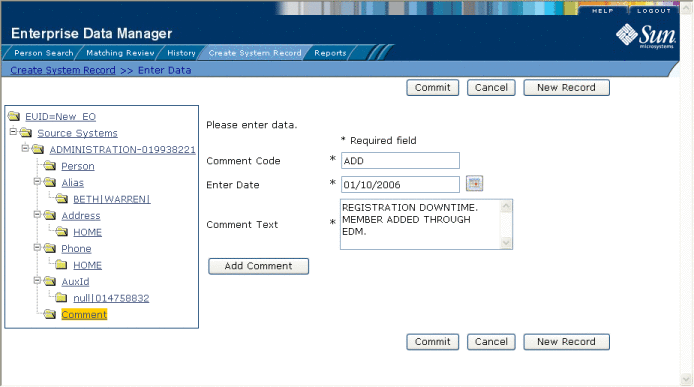
Step 8: Add Comments to the Patient Profile
When you add a new patient to the master index application, you can specify miscellaneous information about the patient or patient profile in the form of free-text comments.
Figure 41 Create System Record - Comment Information
 To Add Comments
-
Complete Step 7: Specify Auxiliary IDs.
-
In the EUID tree in the left portion of the Create System Record page, select Comment.
The page changes to display comment fields.
-
On the Create System Record page, fill in the comment fields (for more information, see About Comment Fields on the Patient EDM).
-
In the lower portion of the page, click Add Comment.
-
Repeat steps 3 and 4 for each comment you need to add to the patient profile.
-
If you add a comment in error, highlight the comment code in the EUID tree, and then click Remove Comment.
The comment is removed from the tree.
-
Continue to Step 9: Save the Patient Profile.
Step 9: Save the Patient Profile
After you specify all the required information for a patient profile, save the profile to the database or the information you entered will be lost.
 To Save the Patient Profile
-
Complete Step 1: Obtain Information about the Patient through Step 8: Add Comments to the Patient Profile.
-
Click Commit.
A confirmation dialog box appears.
Note –The confirmation dialog box informs you whether a new profile was added to the database, a new profile was added and it has potential duplicates, or an existing profile was updated with the information you entered.
-
On the confirmation dialog box, click OK.
The new patient profile is saved to the database.
-
To add another patient profile, click New Record, and then repeat the steps beginning with Step 1: Obtain Information about the Patient.
- © 2010, Oracle Corporation and/or its affiliates
