Comparing Patient Information
You can compare a patient profile before and after a specific transaction occurred, two different patient profiles, or different components within one profile. The following topics provide the step-by-step instructions you need in order to compare patient information in a master index application.
Using the Comparison function of the Patient EDM, you can compare two patient profiles side-by-side to check for similarities and differences. You can also compare different components of the same patient profile. From the EUID trees, you can select the type of information to view and whether to view SBR or system record information.
Viewing a Patient's Transaction History
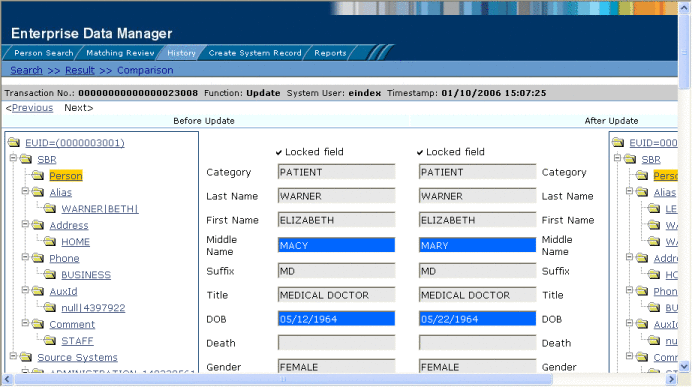
Using the History function, you can view historical information for a specific patient, and compare the patient’s profile before and after a specific transaction occurred to determine what information was modified as a result of the transaction. The Transaction History page contains an EUID tree for the before image and one for the after image. From the EUID trees you can specify the type of information to view and whether to view SBR or system record information.
The image on the left side of the Transaction History Comparison page reflects the patient’s information before the transaction occurred. The image on the right reflects the patient’s information after the transaction occurred. If the displayed record has no historical data, then the message There is nothing to show in this area appears in the left side of the page.
Figure 22 Transaction History Comparison Page
 To View a Transaction History
-
Obtain information about the patient, such as the EUID, a system in which the patient was registered, or a specific transaction performed against the patient’s profile.
Note –To access a transaction history, you can perform a search for a patient profile, display the profile on the View/Edit page, and then click Transaction History, or you can perform the steps described here.
-
On the Patient EDM main menu, click History.
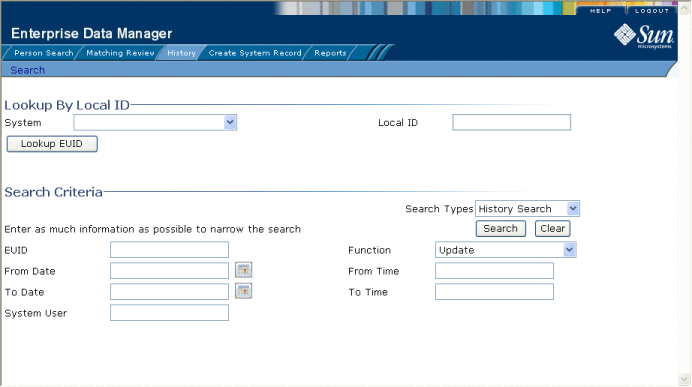
The Transaction History Search page appears.
Figure 23 Transaction History Search Page
-
Select History Search from the Search Types drop-down list.
-
Do one of the following:
-
To search for a record by system and local ID, enter the system and local ID in the upper section of the window and then click Lookup EUID.
If an EUID is found, it is populated into the EUID field in the Search Criteria section.
-
To search by EUID or transactional information, enter the search criteria for the patient you want to view (for more information, see About Transaction History Search Fields on the Patient EDM).
-
-
On the Transaction History Search page, click Search.
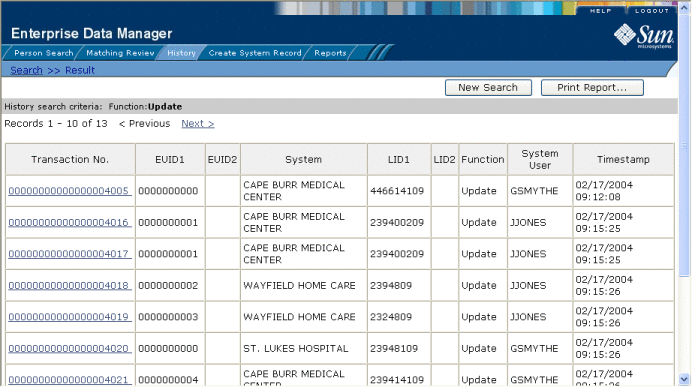
If more than one transaction matches the search, the Transaction History Result page appears with a list of matching profiles (for more information, see About Transaction History Results Fields on the Patient EDM).
Figure 24 Transaction History Results
-
If the Transaction History Result page appears, click the transaction number of the transaction you want to view. (If an asterisk appears next to a transaction, it means the transaction history cannot be accessed.)
The Transaction History Comparison page appears, displaying information in the SBR with any differences between the before and after image highlighted in blue.
-
Select the type of information you want to view from the EUID trees on both sides of the page (for more information, review the instructions and field descriptions under Viewing Patient Profiles).
Note –If you select different types of information from the two sides, differences are not highlighted (for example, if you view SBR address data on one side and system record address data on the other side; or if you view SBR address data on one side and SBR phone data on the other).
-
If you are viewing a merge transaction, additional options appear in the upper left portion of the page, allowing you to view different images for the transaction (see Figure 25).
-
If you are viewing an unmerge transaction, additional options appear in the upper right portion of the page, allowing you to view different images for the transaction (see Figure 26).
About Transaction History Search Fields on the Patient EDM
The fields located on the Transaction History Search page allow you to specify search criteria for the transactions you want to view. Note that the “Lookup By Local ID” section is customizable and might have been changed for your implementation.
Table 11 Transaction History Search Fields|
In this field … |
type or select ... |
|---|---|
|
Lookup By Local ID Section | |
|
The system in which the local ID is known. |
|
|
The local ID corresponding to the record you want to find and the system selected in the previous field. This field name might be different for your implementation. |
|
|
Search Criteria Section | |
|
The patient’s enterprise-wide unique identifier assigned by the master index application. |
|
|
The type of transaction that caused the patient’s profile to change. See Table 13 for more information about transaction types. |
|
|
The beginning date for the search. The query is performed for transactions that fall between the From Date and To Date. |
|
|
The beginning time for the search using 24-hour notation. The query is performed for transactions that fall between the From Time and To Time on the specified dates. If no time is entered, the default value is 00:01 (12:01 A.M.). |
|
|
The ending date for the search. |
|
|
The ending time for the search using 24-hour notation. If no time is entered, the default value is 24:00. |
|
|
The login ID of the user who performed the transaction for which you are searching. |
About Transaction History Results Fields on the Patient EDM
The fields located on the Transaction History Result page help you identify a specific patient profile and transaction to view. Additional fields might be added to this page by the system administrator. The LID fields and the last name and first name fields are configurable and might have been changed for your implementation.
Table 12 Transaction History Results Fields|
This field … |
displays this information … |
|---|---|
|
The sequential identification code of the transaction that caused the transaction history record. |
|
|
The enterprise-wide unique identification number of the first patient profile involved in the transaction. |
|
|
The enterprise-wide unique identification number of the second patient profile involved in the transaction. |
|
|
The name of the system in which the transaction that created the history record occurred. |
|
|
The local ID of the first system record involved in the transaction. |
|
|
The local ID of the second system record involved in the transaction. This is only used for system record merges, unmerges, and transfers. |
|
|
The type of transaction that changed the patient profile and caused the history record to be written. See Table 13 for a description of each transaction type. |
|
|
The login ID of the user who performed the transaction. |
|
|
The date and time the transaction occurred. |
|
|
The patient's first name. |
|
|
The patient's last name. |
Transaction History Transaction Types on the Patient EDM
Each transaction performed by the master index application is assigned a transaction type, indicating the type of action that was performed. Table 13 lists and describes each transaction type.
Table 13 Transaction Type Descriptions|
Transaction Type |
Description |
|---|---|
|
This transaction type is assigned when a new patient profile is added to the database, whether it is through a direct add or through reversing an assumed match. |
|
|
This transaction type is assigned when a deactivated patient profile is reactivated. |
|
|
This transaction type is assigned when an active patient profile is deactivated. |
|
|
This transaction type is assigned when two patient profiles are merged. |
|
|
This transaction type is assigned when two patient profiles are unmerged. |
|
|
This transaction type is assigned when two system records are merged. |
|
|
This transaction type is assigned when a system record is transferred from one patient profile to another. |
|
|
This transaction type is assigned when two system records are unmerged. |
|
|
This transaction type is assigned when a patient profile is modified in any way other than those described above. This includes such transactions as modifying a patient profile, reversing an assumed match, deactivating or reactivating a system record, and adding or removing a child object (such as an address or telephone number). |
Comparing two Patient Profiles
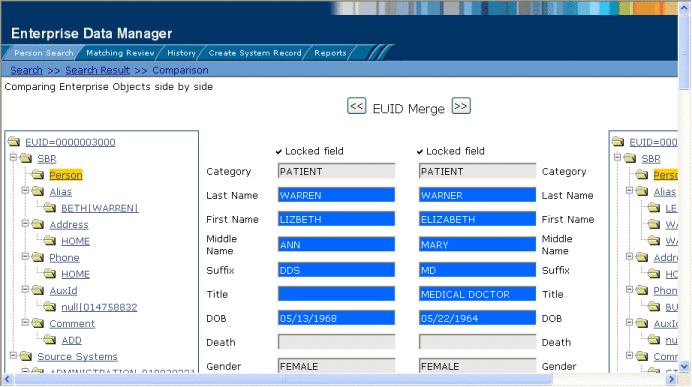
To compare two different patient profiles, you must perform a search for the profiles to compare and then select them from the results list. The Comparison page contains an EUID tree on each side of the page, one for each profile you are comparing.
Figure 27 Comparison Page - Two Patient Profiles
 To Compare twoPatient Profiles
-
Perform a search for the patient profiles you want to compare, as described in Searching for Patient Profiles.
Note –If you know the EUIDs of the patient profiles to compare, use the Comparison Lookup to retrieve those profiles.
-
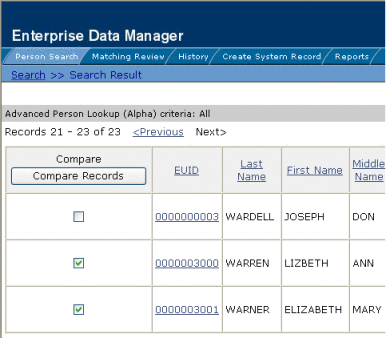
On the search results list, select the check boxes to the left of the two patient profiles you want to compare.
Figure 28 Selecting Two Profiles to Compare
-
In the first cell of the results table, click Compare Records.
The Comparison page appears with SBR information displayed with any differences between the two profiles highlighted.
-
To view and compare different types of information, select the type of information you want to view from the EUID trees on both sides of the page (for more information, review the instructions and field descriptions under Viewing Patient Profiles).
Note –If you select different types of information from the two sides, differences are not highlighted (for example, if you view SBR address data on one side and system record address data on the other side; or if you view SBR address data on one side and SBR phone data on the other).
-
To merge patient information, do either of the following:
-
To combine the two patient profiles, see Merging Patient Profiles.
-
To combine two system records in the displayed patient profiles, see Merging System Records on the Patient EDM.
-
Comparing Records in one Patient Profile
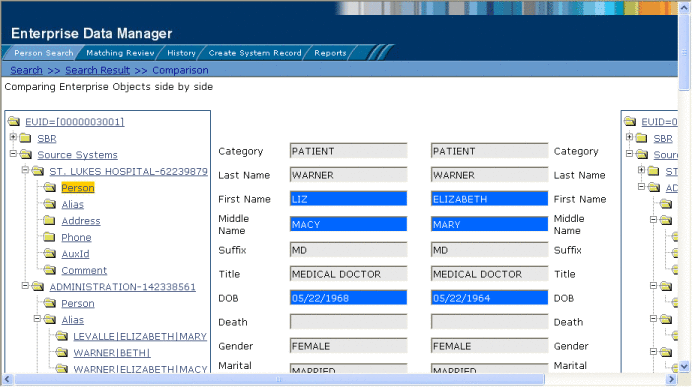
To compare different components of one patient profile, you must perform a search for that profile and then select it from the results list. The Comparison page contains an EUID tree on each side of the page, both containing the most current version of the profile you are comparing.
Figure 29 Comparison Page - One Patient Profile
 To Compare Records in one Patient Profile
-
Perform a search for the patient profile you want to view, as described in Searching for Patient Profiles.
-
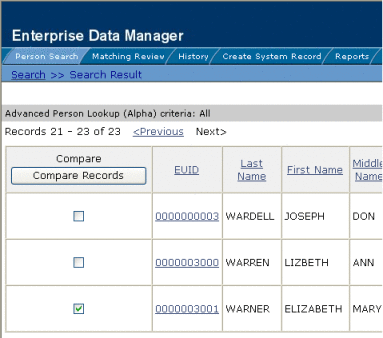
On the search results list, select the check box to the left of the patient profile you want to compare.
Figure 30 Selecting one Profile to Compare
-
In the first cell of the results table, click Compare Records.
The Comparison page appears with SBR information displayed.
-
To view and compare different types of information, select the type of information you want to view from the EUID trees on both sides of the page (for more information, review the instructions and field descriptions under Viewing Patient Profiles).
Note –If you select different types of information from the two sides, differences are not highlighted (for example, if you view SBR address data on one side and system record address data on the other side; or if you view SBR address data on one side and SBR phone data on the other). However, if you view two different types of addresses the differences are highlighted.
-
To merge two system records in the displayed patient profile, see Merging System Records on the Patient EDM.
- © 2010, Oracle Corporation and/or its affiliates


