Creating a Runtime Environment
Projects are run within domains, which contain the logical resources required by the Project at run time. Each domain contains a single instance of an application server and a single instance of a message server. The domains, in turn, are defined within runtime Environments, which represent the physical resources required to implement the Project. The Environment also contains information about external systems with which the Project interacts.
The following sections provide instructions on how to define a runtime Environment in which to run your Java CAPS Project. If you have any questions or problems, see the Java CAPS web site at http://goldstar.stc.com/support.
The basic procedure for setting up an Environment is described in Building a Runtime Environment.
Additional details about environmental components and relevant features of the user interface are provided in the following topics:
Building a Runtime Environment
You can build a runtime Environment by using the context menu system in the NetBeans Services window together with the Environment Editor. This section contains a brief outline of the procedure. Specific, in-context descriptions can be found in the various tutorials found in the Java CAPS documentation.
Using the Environment Editor
The Environment Editor provides a canvas in which you create and customize a runtime Environment. Here you can see the various components (Logical Hosts, servers, and external systems) included in the selected Environment.
Clicking an Environment icon in the Services window invokes the Environment Editor, which provides a canvas in which you can create and customize an Environment.
Here you can see the various components (domains, servers, and external systems) included in the selected Environment. New Environments are added through the use of the CAPS Environments context menu. Components are added to the Environment by selecting options in the Environment and Logical Host context menus.
 To create and populate a runtime Environment
-
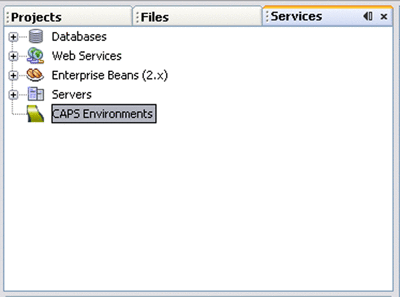
In the NetBeans Services window, right-click the CAPS Environments node to display its context menu.
Figure 1 Services Window: CAPS Environment Node
-
Select New Environment, and assign an appropriate name.
-
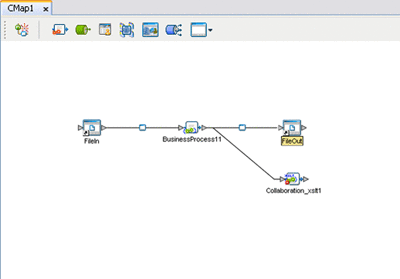
Right-click the Environment to display its context menu, and create the components you need. As a simple example, if you are creating an Environment to which to deploy the Project depicted in the following figure, you need the components listed below.
Figure 2 Example Project Connectivity Map
-
A new Logical Host (see Adding Logical Hosts and Domains).
-
A new Application Server (see Adding Application Servers).
-
A new message server (see Adding Message Servers).
-
Two new File External Systems, one Inbound and one Outbound.
-
-
Name the Environmental components appropriately.
-
Configure the components as described in the appropriate Configuration topic
Using the Environment Context Menu
Right-clicking an Environment in the NetBeans Services window displays the context menu shown below, which lists the default set of components. Additional external systems may be displayed in your user interface, depending upon which adapters you have installed.
Figure 3 Environment Context Menu
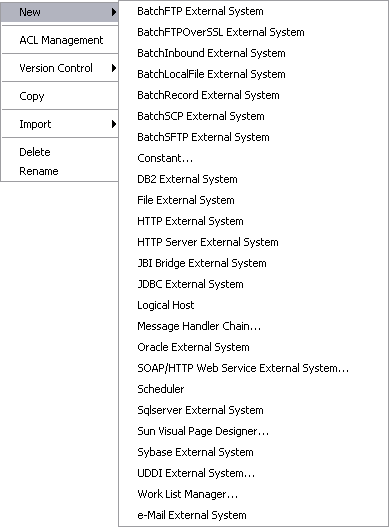
External systems that are not listed in the following table are accessed through the corresponding adapter. You should consult the documentation for the specific adapter for information.
Table 1 Environment Context Menu Options|
Option |
Function |
|
|---|---|---|
|
New |
Constant |
Presents a dialog with which you can add a constant to the selected Environment. See Adding Environmental Constants. |
|
Logical Host |
Adds a new Logical Host to the selected Environment. See Adding Logical Hosts and Domains. |
|
|
SOAP/HTTP Web Service External System |
Adds a SOAP/HTTP Web Service External System to the selected Environment. See Adding SOAP/HTTP Web Service External Systems. |
|
|
Scheduler |
Presents a dialog with which you can add a new scheduling component to the selected Environment. See Adding Scheduler External Systems. |
|
|
UDDI External System |
Adds a UDDI External System to the selected Environment. See Adding UDDI External Systems. |
|
|
ACL Management |
Presents a dialog with which an Administrator can assign read/write privileges to users for the selected Environment.
|
|
|
Version Control |
Version History |
Presents a dialog with which you can track the version history for the selected Environment. The version history for an Environment that has been cut and pasted is preserved, since there can be only one instance of it. The version history for an Environment that has been copied and pasted is not preserved, since there can be multiple instances of it; the version number for each pasted instance is reset. |
|
Check In |
Presents a dialog with which you can check in a new version of the selected Environment. |
|
|
Check Out |
Presents a dialog with which you can check out the current version of the selected Environment. |
|
|
Undo Check Out |
Presents a dialog with which you can reverse the last checkout of the selected Environment. |
|
|
Make Latest |
Presents a dialog with which you can check in the retrieved version of the selected Environment, making it the latest version. |
|
|
Tag |
Presents a dialog with which you can specify a tag to attach to the selected Environment. |
|
|
Copy |
Copies the selected Environment, including its components (“deep copy”), after which you can paste it to the same Repository branch multiple times. Once it has been pasted, you can rename it. All changes must be committed before you can copy the Environment. You can copy and paste an Environment even when another user has the Environment checked out.
|
|
|
Import |
Enables you to import a SOAP message handler archive. |
|
|
Delete |
Deletes the selected Environment, subject to the following conditions:
|
|
|
Rename |
Activates the field, allowing you to rename the selected Environment. |
|
Note –
All Environment component names should contain only alphanumeric characters (letters and numbers), dashes, and underscores.
Using Environment Component Context Menus
Right-clicking an Environment component in the NetBeans Services window displays its context menu. All components other than the Logical Host have a context menu such as that shown in the figure below.
Figure 4 Environment Component Context Menu
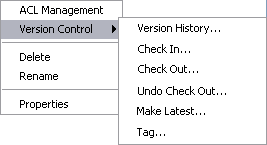 Table 2 Project Component Context
Menu Options
Note –
All Environment component names should contain only alphanumeric characters (letters and numbers), dashes, and underscores.
Environment Components
The CAPS Environment node in the NetBeans Services window deals with physical resources, including application and message servers, as shown in the following figure. The Environments it displays also contain information about external systems which may be involved with a Java CAPS configuration. The Services window is used in conjunction with the Environment Editor’s canvas to create and configure the components of a runtime Environment.
Each component under an Environment node has an icon to identify the component type. Right-clicking on a component displays a context menu for that component, from which you can select various options. Only those menu options that are allowed for the component in its current state are enabled.
The icons described in the following table appear under each Environment node.
Table 3 Environment Component Icons|
Icon |
Function |
|---|---|
|
Represents a Logical Host or Domain, which contains the various logical components and files that are required at run time. See Adding Logical Hosts and Domains. |
|
|
Represents a Sun Java System Application Server, which manages the Collaborations and other process interactions of a Project. The application server is deployed to a Logical Host (domain). See Adding Application Servers. |
|
|
Represents a Sun Java System Message Queue, which is the default message server for Java CAPS. It is used to store and forward system messages, and is deployed to a Logical Host. See Adding Message Servers. |
|
|
Represents a Sun JMS IQ Manager, which is an alternate message server for Java CAPS, or a Unified JMS Resource Adapter. Both components are deployed to a Logical Host. See Adding Message Servers. |
|
|
Represents an Environmental Constant, which you can use to automate adapter and message destination configuration changes. See Defining Constants and Variables for additional information. |
|
|
Represents a SOAP/HTTP Web Services External System, which acts as a container for a Web Services External Application. See Developing Java CAPS Projects for additional information. |
|
|
Represents a UDDI External System, which acts as a container for a UDDI Registry. |
|
|
Represents an External System that is accessed through an adapter (a generic icon is shown). See the individual adapter documentation regarding these external systems. |
|
|
Represents a Work List Manager (WLM) External System, which acts as a container for a WLM. |
Adding Environmental Constants
Environmental constants are name-value pairs that are visible across the Environment. Selecting the New > Constant option from the Environment context menu presents the following dialog box, in which you define the constant.
Figure 5 Create Environmental Constant Dialog
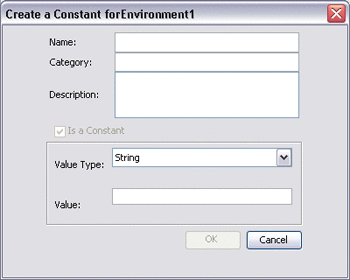
See Defining Constants and Variables for additional information.
Note –
When you create an Environmental constant, you assign a permanent value to it which cannot be overridden.
Adding Logical Hosts and Domains
Figure 6 Logical Host Icon
You can create this component by selecting the New > Logical Host option from the Environment context menu in the NetBeans Services window.
A domain is an instance of a Logical Host; that is, the Logical Host used in Java CAPS acts as a directory for the domains, which are the actual runtime components. Each domain consists of two main components: an integration (or application) server and a message server.
All configuration of the individual domains is performed from either the Domain Manager or the command line.
Note –
The Java CAPS runtime components, which include domains and any Projects or components deployed to them, provide their full functionality independent of the Repository.
Right-clicking a Logical Host in the NetBeans Services window displays the context menu shown below.
Figure 7 Logical Host Context Menu
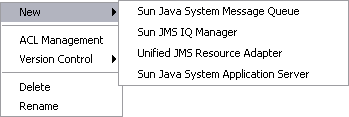 Table 4 Logical Host Context Menu
Options
Table 4 Logical Host Context Menu
Options|
Option |
Function |
|
|---|---|---|
|
New |
Sun Java System Message Queue |
Adds a new Sun Java System Message Queue to the selected Logical Host. See Adding Message Servers. |
|
Sun JMS IQ Manager |
Adds a new Sun JMS IQ Manager to the selected Logical Host. See Adding Message Servers. |
|
|
Unified JMS Resource Adapter |
Adds a new Unified JMS Resource Adapter to the selected Logical Host. |
|
|
Sun Java System Application Server |
Adds a new Sun Java System Application Server to the selected Logical Host. |
|
|
ACL Management |
Presents a dialog with which an Administrator can assign read/write privileges to users for the selected Logical Host.
|
|
|
Version Control |
Accesses the version control features for the selected component. |
|
|
Delete |
Deletes the selected Logical Host, subject to the following conditions:
|
|
|
Rename |
Activates the field, allowing you to rename the selected Logical Host. Note that all Environment component names should contain only alphanumeric characters (letters and numbers), dashes, and underscores. |
Adding Application Servers
Figure 8 Application Server Icon
The Logical Host contains one or more instances of a Java EE-compatible application server. This server is the engine that runs Collaborations for processing business logic, and adapters for communicating with external applications. The application server provides services for security, transactions, business rules execution, and connectivity management. Java CAPS contains the Sun Java System Application Server and the Sun JMS IQ Manager.
You can add this component to the Environment by selecting the New > [Application Server Type] option from the Logical Host context menu in the NetBeans Services window, which presents a dialog box in which you enter the component name. Right-clicking the Application Server in the Service window displays its context menu. See Using Environment Component Context Menus.
Adding Message Servers
Figure 9 Message Server Icon
You add the message server component to the Environment by selecting the New > [Message Server Type] option from the Logical Host context menu in the NetBeans Services window, which presents a dialog box in which you enter the component name. Right-clicking the Message Server in the Service window displays its context menu. See Using Environment Component Context Menus.
Adding Scheduler External Systems
Figure 10 Scheduler External System Icon
In an Environment, a Scheduler represents an external system to which you deploy a Scheduler Adapter created in a Project. Selecting the New > Scheduler option from the Environment context menu in the NetBeans Services window adds the Scheduler External System to the selected Environment. Right-clicking the Scheduler displays its context menu. See Using Environment Component Context Menus.
Adding SOAP/HTTP Web Service External Systems
Figure 11 SOAP/HTTP Web Service External System Icon
A SOAP/HTTP Web Service External System represents a system containing a Web Services Application. You create this component by selecting the New > SOAP/HTTP Web Service External System option from the Environment context menu in the NetBeans Services window, which presents the following dialog box.
Figure 12 Create SOAP/HTTP WS External System Dialog
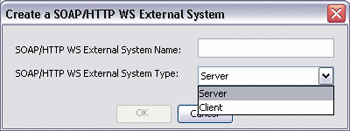
Entering a name, specifying whether it is a Client or Server, and clicking OK adds the SOAP/HTTP External System to the selected Environment. Right-clicking the SOAP/HTTP Web Service External System in the NetBeans Services window displays its context menu (see Using Environment Component Context Menus).
Adding UDDI External Systems
Figure 13 UDDI External System Icon
A UDDI External System represents a UDDI Registry server in a runtime Environment. You create this component by selecting the New > UDDI External System option from the Environment context menu in the NetBeans Services window, which presents a dialog box in which you enter the component name.
Note –
You can create only one UDDI External System per runtime Environment.
Entering a name and clicking OK adds the UDDI External System to the selected Environment. Right-clicking the UDDI External System in the NetBeans Services window displays its context menu. See Using Environment Component Context Menus for additional information.
- © 2010, Oracle Corporation and/or its affiliates
