Using the Environment Context Menu
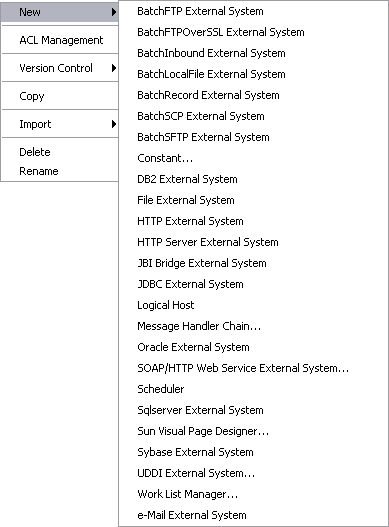
Right-clicking an Environment in the NetBeans Services window displays the context menu shown below, which lists the default set of components. Additional external systems may be displayed in your user interface, depending upon which adapters you have installed.
Figure 3 Environment Context Menu

External systems that are not listed in the following table are accessed through the corresponding adapter. You should consult the documentation for the specific adapter for information.
Table 1 Environment Context Menu Options|
Option |
Function |
|
|---|---|---|
|
New |
Constant |
Presents a dialog with which you can add a constant to the selected Environment. See Adding Environmental Constants. |
|
Logical Host |
Adds a new Logical Host to the selected Environment. See Adding Logical Hosts and Domains. |
|
|
SOAP/HTTP Web Service External System |
Adds a SOAP/HTTP Web Service External System to the selected Environment. See Adding SOAP/HTTP Web Service External Systems. |
|
|
Scheduler |
Presents a dialog with which you can add a new scheduling component to the selected Environment. See Adding Scheduler External Systems. |
|
|
UDDI External System |
Adds a UDDI External System to the selected Environment. See Adding UDDI External Systems. |
|
|
ACL Management |
Presents a dialog with which an Administrator can assign read/write privileges to users for the selected Environment.
|
|
|
Version Control |
Version History |
Presents a dialog with which you can track the version history for the selected Environment. The version history for an Environment that has been cut and pasted is preserved, since there can be only one instance of it. The version history for an Environment that has been copied and pasted is not preserved, since there can be multiple instances of it; the version number for each pasted instance is reset. |
|
Check In |
Presents a dialog with which you can check in a new version of the selected Environment. |
|
|
Check Out |
Presents a dialog with which you can check out the current version of the selected Environment. |
|
|
Undo Check Out |
Presents a dialog with which you can reverse the last checkout of the selected Environment. |
|
|
Make Latest |
Presents a dialog with which you can check in the retrieved version of the selected Environment, making it the latest version. |
|
|
Tag |
Presents a dialog with which you can specify a tag to attach to the selected Environment. |
|
|
Copy |
Copies the selected Environment, including its components (“deep copy”), after which you can paste it to the same Repository branch multiple times. Once it has been pasted, you can rename it. All changes must be committed before you can copy the Environment. You can copy and paste an Environment even when another user has the Environment checked out.
|
|
|
Import |
Enables you to import a SOAP message handler archive. |
|
|
Delete |
Deletes the selected Environment, subject to the following conditions:
|
|
|
Rename |
Activates the field, allowing you to rename the selected Environment. |
|
Note –
All Environment component names should contain only alphanumeric characters (letters and numbers), dashes, and underscores.
- © 2010, Oracle Corporation and/or its affiliates
