 To Configure Startup Classes
-
Locate the Change Center in the upper-left corner of the Administration Console.
-
Click on Lock & Edit to lock the editable configuration hierarchy for the domain. This enables you to make changes using the Administration Console. This also allows you to modify, add or delete items in the domain.
Note –The Release Configuration in the Change Center allows others to edit the domain and ensures no pending changes exist.
-
Expand Environment from the Domain tree structure on the left panel of the console.
-
Select Startup & Shutdown Classes from the tree structure to configure a new startup class.
-
Click New from the Summary of Startup and Shutdown Classes page.
Note –This page summarizes the startup and shutdown classes that are configured in the current domain. You must deploy each class on one or more specific servers.
This displays Configure a New Startup or Shutdown Class page.
-
Select Startup Class from the list and click Next.
-
Enter a name for the Startup Class in Startup Class Properties page that you will use to identify the configuration of your Java class.
Note –You can create multiple named configurations for any given class. After you have created a class configuration, you cannot change its name. Instead, delete the configuration and create a new one with a new name.
The following properties will be used to identify the class you are configuring. Enter the following values,
-
Click Next.
Tip –Click the Next and Forward buttons to navigate forward and backwards during installation.
-
Select the newly created target exampleServer from the Select Targets page. Then, click Finish.
You can select one or more servers or deploy the class to all servers in a cluster.
The following message appears on the right panel of the screen.
Startup class created successfully.
-
Click on Activate Changes in the Change Center.
The following message appears on the right panel of the screen.
All changes have been activated. No restarts are necessary.
-
Click on Lock & Edit in the Change Center to modify the settings for the SunMicrosystems_Startup.
-
On the Startup and Shutdown Classes page, click on the new startup class SunMicrosystems_Startup.
-
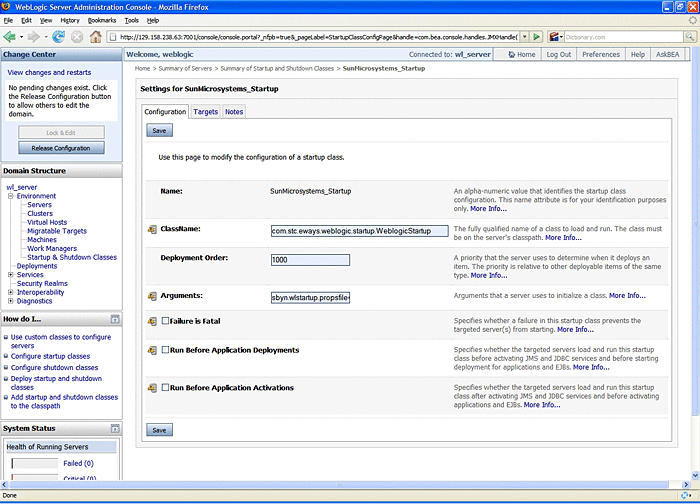
On the Settings for SunMicrosystems_Startup page, the following default values are displayed and is as shown in Figure 1–1.
-
Name: SunMicrosystems_Startup
-
Class Name: com.stc.eways.weblogic.startup.WeblogicStartup
-
Deployment Order: 1000
Note –This is the default value.
-
Arguments: sbyn.wlstartup.propsfile=BEA- HOME\weblogic92\server\lib\weblogic.startup.properties (where BEA-HOME is the home directory of the WebLogic Server.)
Figure 1–1 WebLogic Server Console - Create a New StartupClass

-
-
Click Save.
The following message appears on the right panel of the screen.
Settings updated successfully.
-
Click on Activate Changes in the Change Center to activate these changes.
The following message appears on the right panel of the screen.
All changes have been activated. No restarts are necessary.
Note –Not all changes take effect immediately, some require a restart.
- © 2010, Oracle Corporation and/or its affiliates
