Designing Custom Encoders
The following sections provide preliminary instructions on how to set up Custom Encoders in JBI projects. This material is scheduled to be enhanced by 12/15/2008. If you have any questions or problems, see the Java CAPS web site at http://goldstar.stc.com/support.
This document covers the following topics:
Additional information is provided in the following sections:
Understanding the Encoder Framework
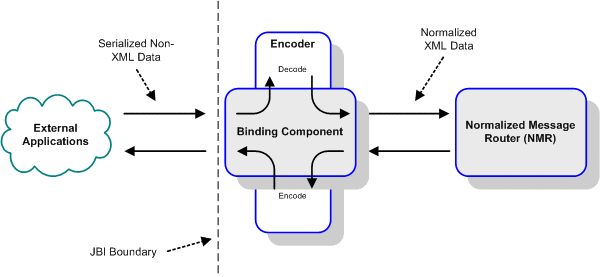
An Encoder is a bidirectional software component that transforms an XML message into a non-XML message, and vice versa. The term encoding has a very specific meaning within this context, representing act of transforming an XML message into a non-XML message. The act of transforming a non-XML message into an XML message is termed decoding. Despite its name, the Encoder performs both functions.
XML is used as a common data format for processing within GlassFish ESB. In general, most data used in external applications is in some non-XML, serialized format; hence, the need for an Encoder.
A very highly simplified illustration of the data flow to and from GlassFish ESB is shown in the following diagram. The area to the right of the JBI boundary represents GlassFish ESB, while the area to the left of the boundary represents whatever external applications are communicating with GlassFish ESB.
Three sets of information define the runtime behavior of an Encoder:
-
Encoder Type, also known as encoding style, defines the high-level encoding rules for a specific type of encoding and applies globally to all encoders of that type. The specific type of encoding relates to the data format used by the external application or communications protocol that is sending data to, or receiving data from, GlassFish ESB. Examples include SAP, Oracle DBMS, HL7, SWIFT, and X12. Encoding rules include:
-
A grammar to scan an input message in its external representation, and rules on mapping the result to the internal representation (an operation known as decoding or parsing).
-
Rules on generating the external representation of an output message from the internal representation (an operation called encoding or serialization).
-
-
Detailed Encoding Rules are specific to a single instance of an Encoder Type. These rules include:
-
Delimiters
-
Field Lengths
-
Data offsets
-
-
The Abstract Message Structure specifies the logical structure of the messages being processed. This metadata is represented as XML schema (XSD), and may be viewed and edited by an XSD viewer/editor.
Abstract Message Structure
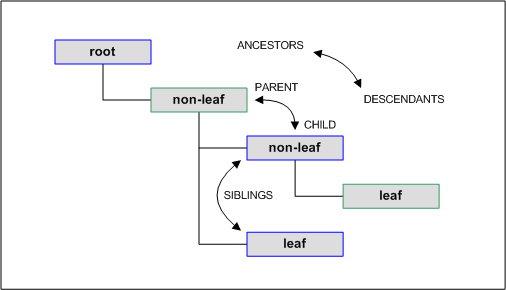
The runtime message structure is composed of a hierarchical system of nodes. These nodes are characterized by terms indicating their relationships with each other:
Parent, Child, and Sibling Nodes
Any subnode of a given node is called a child node, and the given node, in turn, is the child’s parent. Sibling nodes are nodes on the same hierarchical level under the same parent node. Nodes higher than a given node in the same lineage are ancestors and those below it are descendants.
Figure 1 Encoder Node Relationships
Root Nodes
The root node is the highest node in the tree structure, and has no parent. This node is a global element and represents the entire message. It may have one or more child nodes, but can never have sibling nodes or be repeating. The name of the root node can be edited.
Non-leaf Nodes
Non-leaf nodes, which can have children, provide the framework through which this data is accessed and organized. They are of complex types.
There are two major types of non-leaf nodes (aside from a root node, which is a special case):
-
Sequence group nodes, which provide organizational grouping for purposes such as repetition. In XSD, they are of complexType of a sequence of elements.
-
Choice group nodes, which represent sets of alternatives— only one of which is valid at any given time for an instance of that node. For example, a choice node named order might have two children, respectively named domestic and overseas. For each order instance, only one of these children will be present. In XSD, they are of complexType of a choice group of elements.
Leaf Nodes
Leaf nodes have no children, and normally carry the actual data from the message. They are of simple types such as string.
The basic node types are fixedLength and delimited. See Encoding Properties for information about other node types.
-
With fixedLength data, the length of the unit of data is always the same. The position of the data within the message string is described by byte offset and length.
-
With delimited data, the length of the unit of data is variable. Information is separated by a pre-determined system of delimiters defined within the properties of the Encoder (see Specifying Delimiters).
Creating the Abstract Message Definition
In the absence of a predefined representation of the metadata describing the data format, you must manually create the Abstract Message Definition and apply the Custom Encoder. To begin this process, you must create an XSD and apply the Custom Encoder, as follows:
 To Apply the Custom Encoder to an XSD
-
In your project, right—click to access the project context menu and add a new XML Schema.

You will need to develop the XSD node structure to match the parsing of the serialized message stream being processed. This process is described in the topics following this one.
-
In the resulting XSD, right—click to access its context menu and select Encoder > Apply Custom Encoder.
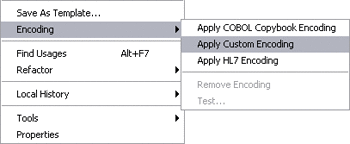
-
Once the Encoder has been applied, a special encoding node will automatically be added as a child node of an annotation node.

-
By right-clicking the encoding node and selecting Properties, you can edit the encoding rules for the individual elements.

-
After applying the Encoder, the context menu changes as shown in the following illustration. Reapplying the Encoder resets the parameters for all nodes to their default values. The node structure you have created will be preserved.
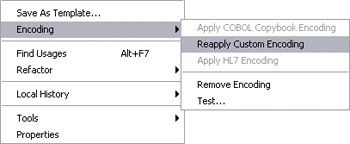
Editing Encoding Properties
Once the encoding style is applied, you can edit detailed encoding rules at the node level using the special encoding node under the element's annotation node.
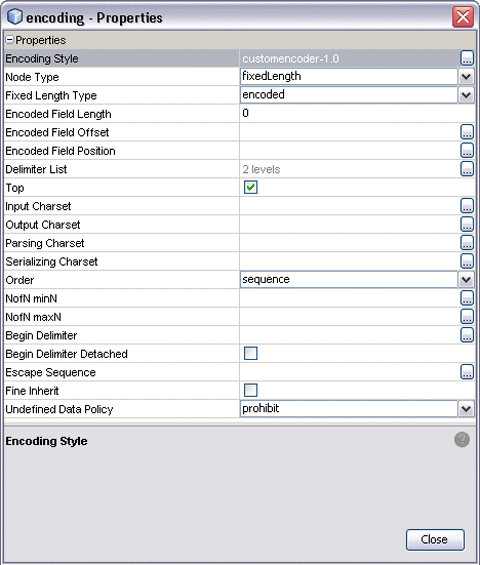
The following figure shows the majority of encoding properties associated with various nodes.
Figure 2 Encoding Properties Dialog
Encoding Properties
Table 1 General Properties|
Name |
Description |
|---|---|
|
Encoding Style |
Specifies the encoding style, for example: customencoder-[version]. |
|
Node Type |
Specifies the format for parsing and serialization. The options are:
The default value is delimited. See also Node Type Default Values (following this table) for more information. |
|
Delimiter List |
Opens the Delimiter List Editor. See Specifying Delimiters for information. |
|
Order |
Specifies the ordering of the selected group node or complex type element node’s children during the parsing process.
Does not apply to choice element nodes. See Order Property for additional information. |
Table 2 Root Node Properties
|
Name |
Description |
|---|---|
|
Top |
Specifies whether or not parsing/serializing encoding is supported for descendant nodes. The default value is true (checked box). |
|
Input Charset |
Specifies the character set of the input data. This is only needed if the parsing is done upon byte array data and the character set that the byte array data is encoded against is not safe for delimiter scanning. If this property is not specified, the value specified for the Parsing Charset property will be used. This property is displayed only when the Top property is set to true (checked box). Applies to root node only. See Data Encoding for additional information. |
|
Output Charset |
Specifies the character set of the output data if it needs to be different from the serializing character set. If this property is not specified, the value specified for the Serializing Charset property will be used. This property is displayed only when the Top property is set to true (checked box). SeeData Encoding for additional information. Note – This character set may be unsafe for delimiter scanning. |
|
Parsing Charset |
Specifies the character set used to decode byte array data into string during parsing. It is recommended to use UTF-8 for DBCS data, since the hex value of some ASCII delimiter may coincide with a hex value contained within a double-byte character. This property is displayed only when the Top property is set to true (checked box). SeeData Encoding for additional information. |
|
Serializing Charset |
Specifies the character set used to encode string data into byte array data during serialization of the data. This property is displayed only when the Top property is set to true (checked box). SeeData Encoding for additional information. |
|
Escape Sequence |
Global-level escape sequence, which should be set only at the root level. This property is displayed only when the top property is set to true (checked box).. |
|
Fine Inherit |
When set to true (checked box), enables the following delimiters to be inherited individually from the parent nodes:
Otherwise, once a delimiter level is specified for a child node, it overrides the relevant delimiter level as a whole on parent nodes. This setting is global, so the flag only needs to be set on a root element. The default value is false (unchecked box). Displayed only when the top property is set to true (checked box). |
|
Undefined Data Policy |
Specifies whether or not undefined (trailing) data is allowed and/or will be mapped. This property is displayed only when the top property is set to true (checked box). The options are as follows:
This setting is global, so the flag only needs to be set on a root element. |
Table 3 Leaf Node Properties
|
Name |
Description |
|---|---|
|
Match |
Defines match pattern. If alignment is regex, then this field holds the regex match pattern. See Matching Data Patterns for more information. |
|
No Match |
Flag indicating if the match condition should be reverted. The flag acts as a logical NOT against the match condition. See Matching Data Patterns for more information. |
|
Alignment |
Defines the alignment mode for a match pattern. See Matching Data Patterns for more information. |
|
NofN minN |
Specifies the minimum number of child nodes that must contain data. If absent, then so such constraint exists. |
|
NofN maxN |
Specifies the maximum number of child nodes that must contain data. If absent, then so such constraint exists. |
|
MinOcc |
Specifies the minimum number of occurrences of a repeating node. The value specified here overrides the minOccurs value in XSD's element declaration. This property is needed only when the order is mixed; so in the XSD, repeating choice group must be used, and the minOccurs specified in the XSD does not actually represent the minimum occurrence. |
|
MaxOcc |
Specifies the maximum number of occurrences of a repeating node. The value specified here overrides the maxOccurs value in XSD's element declaration. This property is needed only when the order is mixed; so in the XSD, repeating choice group must be used, and the maxOccurs specified in the XSD does not actually represent the maximum occurrence. |
|
Scavenger Chars |
Specifies the characters to be stripped out when parsing the data, if they appear at the start of the byte stream for this element. |
|
Output Scavenger 1st Char |
Specifies the character to be stripped out when serializing the data, if it appears as the first character of the output byte stream from this element (even occurring before the begin delimiter, if any). |
|
Delimiter |
Displayed for delim Node Type only. Once delimiters are specified, the value field displays the delimiter characters (read only). |
|
Begin Delimiter |
Once begin delimiters are specified, the value field displays the delimiter characters (read only). |
|
Begin Delimiter Detached |
Specifies whether the begin delimiter is anchored or detached. The default value is false (unchecked box), indicating an anchored delimiter. |
|
Array Delimiter |
Displayed for array Node Type only. Once delimiters are specified, the value field displays the delimiter characters (read only). |
|
Fixed Length |
Displayed for fixedLength Node Type only. The options are:
|
|
Length |
Displayed only for fixedLength Node Type with the regular option. Specifies the length of the field in terms of bytes (as a positive integer). The default value is 0. |
|
Offset |
Displayed only for fixedLength Node Type with the regular option. Specifies the offset of the field in terms of bytes (as a positive long integer) from the zero position where the first sibling starts. The default value is 0. |
|
Encoded Field Length |
Displayed only for fixedLength Node Type with the encoded option, and specification is required. Specifies the length of the encoded field in terms of bytes (as a positive integer). The default value is 0. |
|
Encoded Field Offset |
Displayed only for fixedLength Node Type with the encoded option, and specification is optional. Specifies the offset in terms of bytes (as a positive long integer) from the position where the first sibling starts. |
|
Encoded Field Position |
Displayed only for fixedLength Node Type with the encoded option, and specification is required. Specifies the offset in terms of bytes (as a positive long integer) between the current parsing position and the position from which the Encoded Field Length is defined. |
|
Length From End |
Displayed only for fixedLength Node Type with the deducted from end option. |
Node Type Default Values
The basic default value for the nodeType property is delimited. If, however, the node is the child of a parent node whose Node Type is fixedLength or transient, then the child takes on the same Node Type as the parent. See the following table for additional information.
Note –
This rule does not apply to Choice Element nodes.
Table 4 Node Type Default Values
|
Parent |
Child |
|---|---|
|
array |
delimited |
|
delimited |
delimited |
|
fixed |
fixed |
|
group |
delimited |
|
transient |
transient |
Order Property
To illustrate how the order property works, consider the simple tree structure shown in the following diagram, where a is an element node, b is a non-repeating field node, and c is a repeating field node. The value set for the order property allows the field nodes to appear as shown in following table.
Figure 3 Order Property Example
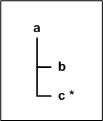 Table 5 Order Property Example
|
Value |
Allowed Node Order |
|---|---|
|
sequence |
b, c1, c2 |
|
any |
b, c1, c2, or c1, c2, b |
|
mixed |
b, c1, c2, or c1, c2, b, or c1, b, c2 |
Data Encoding
For GlassFish ESB to correctly handle data in byte-oriented protocol, the encoding method for inbound and outbound Encoders and the native code used for parsing must be specified in the Encoding properties. If you do not specify otherwise, UTF-8 is assumed to be the encoding method in each case.
Supporting UTF-8 by default allows the use of the Unicode character set in both ASCII and non-ASCII based environments without further specification. GlassFish ESB also supports ASCII for English, Japanese, and Korean locales, and the localized country-specific encoding methods shown in the following table.
The data encoding you specify when configuring the Encoding properties modifies the Java methods used for encoding and decoding. The encoding and decoding processes differ from one another depending upon which Java method you use, and whether you are encoding to or decoding from bytes or strings. The diagrams shown in About Data Parsing and Serialization illustrate these differences.
The encoding options available to you depend on the locale specified by your version of GlassFish ESB. UTF-8 is the default in all locales.
Table 6 Partial Listing of Supported Encoding Options According to Locale|
English |
Japanese |
Korean |
Simplified Chinese |
Traditional Chinese |
|---|---|---|---|---|
|
UTF-8 |
UTF-8 |
UTF-8 |
UTF-8 |
UTF-8 |
|
ASCII |
ASCII |
ASCII |
GB2312 |
Big5 |
|
EBCDIC |
EUC-JP |
EUC-KR | ||
|
UTF-16 |
SJIS |
MS949 | ||
|
MS932 |
Matching Data Patterns
One of the parsing techniques that can be applied to the decoding of an input data stream is that of matching a specific byte pattern within a data sequence. You can accomplish this in a Custom Encoder by using the Match and Align field-node properties, when the Node Type is either delimited or fixedLength. During the decode operation, a field is successfully matched if it complies with the value of the Match property, interpreted according to the value of the Align property, as set for that field.
Defining Byte Patterns
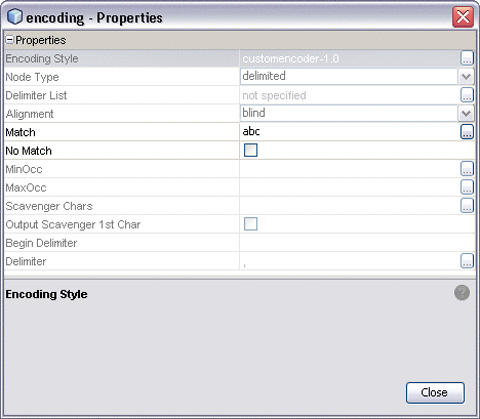
The value you enter for the Match property defines the byte pattern for the data you want to match. As an example, a value of abc has been entered into the value field shown in the following figure. This provides a reference for the Alignment property, as shown in the next section.
If the Node Type property is set to fixedLength, and the Fixed Length Type property is specified as determined by regex match, the Alignment property is automatically set to regex and the regular expression (regex) must be entered into the Match value field.
Selecting the No Match check box reverses the situation, resulting in a match if the field contents (data) are not equal to the byte pattern entered in the Match field.
Figure 4 Match Property
Specifying Pattern Alignment
The align property supplements the match property, specifying criteria on which to base the match. The default value is blind; if this is specified, the match property has no meaning.
Figure 5 Align Property Menu
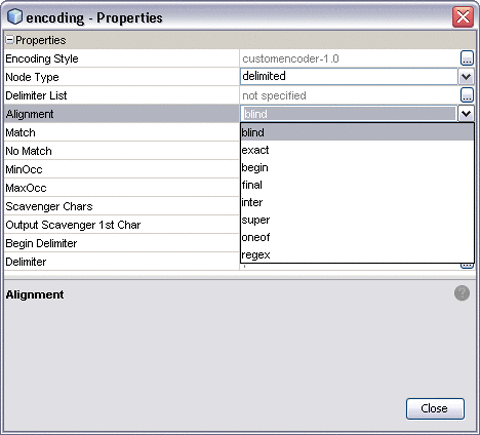 Table 7 Align Parameter Options
|
Option |
Description |
|---|---|
|
blind |
Always performs a match (pass-through). Any value set for the Match property is ignored. This is the default value. |
|
exact |
When an input byte sequence exactly matches the specified byte pattern (for example, [abc]), the decode method matches the field to the input byte sequence. |
|
begin |
When the leading bytes of an input byte sequence match the value set for the Match property (for example, [abc......]), the decode method matches the field to the input byte sequence. |
|
final |
When the trailing bytes of an input byte sequence match the value set for the Match property (for example, [......abc]), the decode method matches the field to the input byte sequence. |
|
inter |
When the input byte sequence contains a byte pattern that includes the value set for the Match property, (for example, [...abc...]), the decode method matches the field to the input byte sequence. |
|
super |
When an input byte sequence is a subsequence of the value set for the Match property (for example, [bc]), the decode method matches the field to the input byte sequence. |
|
oneof |
If the value set for the Match property is a repeating pattern of the form <separator><value>... (for example, [\mon\wed\fri]), and the input byte sequence contains a byte pattern that matches one of the <value> entries (for example, [wed]), the decode method matches the field to the input byte sequence. |
|
regex |
When an input byte sequence exactly matches the regular expression specified in the Match property, the decode method matches the field to the input byte sequence. The Alignment property is automatically set to regex when the Fixed Length Type property is specified as determined by regex match. |
Note –
The value entered for the match property is interpreted as a Latin1 string, rather than following the specified encoding.
Specifying Delimiters
Delimiter List
You can define a set of delimiters — a delimiter list — for any node in the hierarchical data structure. This delimiter list is used in the external data representation for that node and its descendents. A delimiter list defined for any non-root node overrides the effect of any ancestor node’s delimiter list on both the node itself and its descendents.
Delimiters are defined using the Delimiter List Editor, as illustrated in the following figure. The editor is invoked by clicking the delim property value field in the node's property dialog box and clicking the ellipsis (…) button, or by double-clicking the field. See Defining a Delimiter List for additional information.
Clicking within a field in the Delimiter List Editor enables the field for editing. After typing a value into a field, you must press Enter to set the value. Clicking the drop-down menu button in one of the following three fields displays its menu, as illustrated in the following figure.
-
Type
-
Optional
-
Terminator
Figure 6 Delimiter List Editor: Left Side
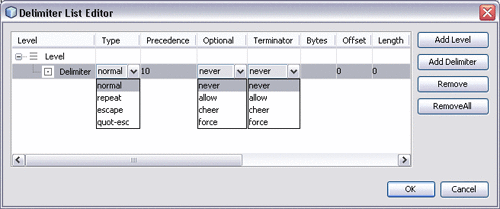
Figure 7 Delimiter List Editor: Right Side
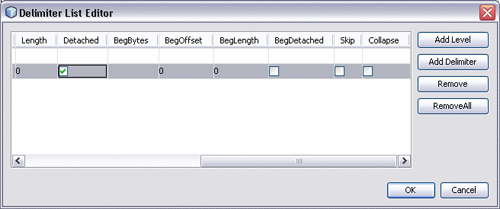 Table 8 Delimiter List Editor Command
Buttons
Table 8 Delimiter List Editor Command
Buttons|
Command |
Action |
|---|---|
|
Add Level |
Adds a new level after the selected level. |
|
Add Delimiter |
Adds a new delimiter after the selected delimiter, or to the bottom of list under the selected level. |
|
Remove |
Deletes the selected line item (level or delimiter) from the list. |
|
Remove All |
Deletes all items (levels and delimiters) from the list. |
|
OK |
Saves your entries and closes the editor. |
|
Cancel |
Discards your entries and closes the editor. |
Delimiter Properties
Table 9 Delimiter Properties|
Property |
Description |
|---|---|
|
Level |
Assigns consecutive sets of delimiter parameters to delimited nodes in the Encoder node hierarchy. See Delimiter Levels for additional information. |
|
Type |
Specifies how the delimiter is used. See Delimiter Type for additional information. |
|
Precedence |
Indicates the priority of a certain delimiter, relative to other delimiters. See Precedence for additional information. |
|
Optional |
Specifies how delimiters for optional nodes are to be handled when the nodes are absent from the input instance or when their fields are empty. See Optional for additional information. Note – Does not apply to children of choice element nodes. |
|
Terminator |
Specifies how delimiters are to be handled for a specific terminator node in the Encoder tree. See Terminator for additional information. |
|
Bytes |
Specifies the characters (bytes) to use to end the delimited data for the specified level. Delimiters can have begin bytes, end bytes, or both. The term “bytes” (by itself) always indicates end bytes. See Delimiter Characters (Bytes) for additional information. |
|
Offset |
Offset of the delimited data field in bytes from the beginning of the data stream (byte 0). Value must be a non-negative integer; the default is 0. |
|
Length |
Length of the data field in bytes, if it is of fixed length. Value must be positive integer. Entering a value clears the Bytes field |
|
Detached |
When checked, indicates that the specified delimiter is a detached, or non-anchored, delimiter, and does not have to appear at a fixed position. |
|
BegBytes |
Specifies the characters (bytes) to use to begin the delimited data for the specified level. Delimiters can have begin bytes, end bytes, or both. See Delimiter Characters (Bytes) for additional information. |
|
BegOffset |
Offset of the fixed-length data field in bytes from the beginning of the data stream (byte 0). Value must be a non-negative integer; the default is 0. |
|
BegLength |
Length of the data field in bytes, if it is of fixed length and has a beginning delimiter. Value must be positive integer. Entering a value clears the Bytes field |
|
BegDetached |
When checked, indicates that the specified delimiter is a detached (non-anchored) beginning delimiter, and does not have to appear at a fixed position. |
|
Skip |
When checked, skips identical leading delimiters. The delimiters may be defined either as begin bytes or end bytes. The purpose of this flag is to facilitate parsing tabular data. |
|
Collapse |
When checked, collapses identical, consecutive end delimiters into a single delimiter. As with the Skip flag, the purpose of this flag is to facilitate parsing tabular data. |
Delimiter Levels
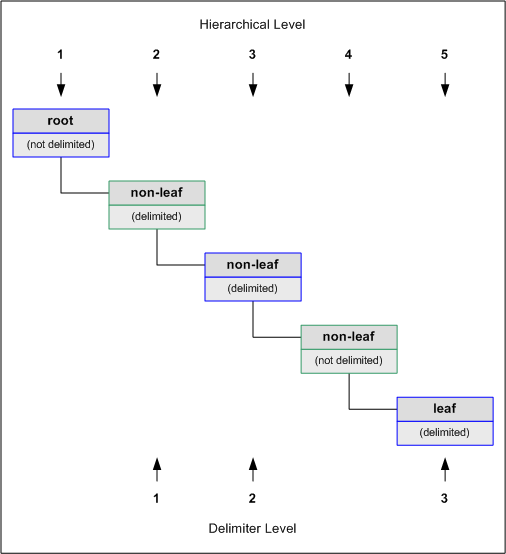
Delimiter levels are assigned in order to those hierarchical levels of an Encoder that contain at least one node that is specified as being delimited. If none of the nodes at a particular hierarchical level is delimited, that hierarchical level is skipped in assigning delimiter levels.
Delimiter lists are typically specified on the root node, so that the list applies to the entire Encoder. The root node itself is typically not delimited, so that Level 1 would apply to those nodes that are children of the root node. See the following figure and example.
Figure 8 Encoder Hierarchical and Delimiter Levels
For example, if you want to parse the following data:
a^b|c^d|e |
you might create a Custom Encoder as follows:
In this example, the delimiter list is specified on the root node, which is not delimited; therefore, the list has two levels:
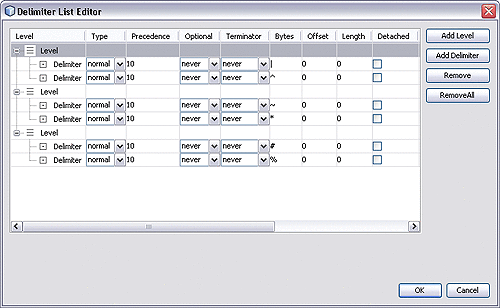
The Level 1 delimiter (|) applies to element_1, element_2, and field_5. The Level 2 delimiter (^) applies to field_1 - field_4.
If the root node is set to be delimited, the Level 1 delimiters will then apply to it. Using the above example, the Level 2 delimiter (^) would then apply to element_1, element_2, and field_5, and a new Level 3 delimiter would apply to field_1 - field_4.
Delimiter lists can be much more complex than this very simple example. For instance, you can create multiple delimiters of different types at any given level, and you can specify a delimiter list on any node within the Encoder— not only the root node as shown in the example. See Defining a Delimiter List for a step-by-step description of the procedure for creating a Delimiter List.
Delimiter Type
The Delimiter Type property specifies whether the delimiter is a terminator at the end of the byte sequence (normal), a separator between byte sequences in an array (repeat) or an escape sequence.
Table 10 Delimiter Type Options|
Option |
Description |
|---|---|
|
normal |
Indicates the delimiter is a normal delimiter. |
|
repeat |
Indicates the delimiter is a delimiter that delimits repetitive fields (nodes). If a node is defined to be repetitive, then a repeat delimiter can be used to delimit the repetitive occurrences, while a normal delimiter terminates the repitition. For example, a^b^c1~c2~c3~c4~c5^ where '~' is a delimiter that delimits repetitive nodes and '^' is a normal delimiter that terminates repetitive nodes. |
|
escape |
Indicates the delimiter is an escape delimiter. The purpose of escape delimiter is to escape special bytes , such as delimiters, using predefined escape sequences. Once the bytes of the escape delimiter are matched, no action is taken except that the search is continued at the position immediately following the delimiter bytes. |
|
quot-esc |
The quot-esc delimiter is used to escape special bytes using quotation style escaping, that is, whatever appears within the (double) quotes is escaped. For example, assume that ',' (comma) is a normal delimiter. To escape ',' in the data, either we can use an escape sequence such as <data>\,<data> or we can use quotation marks such as "<data>,<data>". The bytes defined in the quot-escape delimiter represent the quotation marks. |
Escape Option
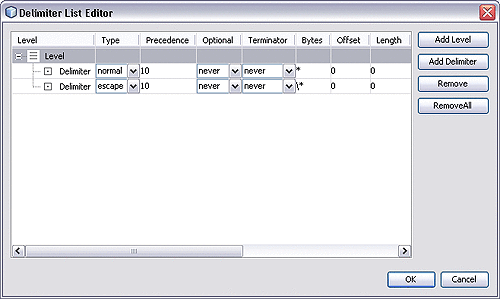
An escape delimiter is simply a sequence that is recognized and ignored during parsing. Its purpose is to allow the use of escape sequences to embed byte sequences in data that would otherwise be seen as delimiter occurrences.
For example, if there is a normal delimiter “+” at a given level, and we define an escape delimiter “\+” as shown in the following figure, then aaa+b\+c+ddd will parse as three fields: aaa, b\+c, and ddd. If the escape delimiter were not defined, the sequence would then parse as four fields: aaa, b\, c, and ddd.
Figure 9 Delimiter Type - Escape
If there is only an escape delimiter on a given level, however, it presents a no delimiter defined situation for delim and array nodes.
Precedence
Precedence indicates the priority of a certain delimiter, relative to the other delimiters. Precedence is used to resolve delimiter conflicts when one delimiter is a copy or prefix of another. In case of equal precedence, the innermost prevails.
By default, all delimiters are at precedence 10, which means they are all considered the same; fixed fields are hard-coded at precedence 10. Delimiters on parent nodes are not considered when parsing the child fields; only the child’s delimiter (or if it is a fixed field, its length). The range of valid precedence values is from 1 to 100, inclusive. The higher the value, the higher the precedence. Delimiters with higher precedence have a greater chance to be matched.
Changing the precedence of a delimiter will cause it to be applied to the input data-stream in different ways. For example:
-
root
-
element (type delim, delimiter = “^”, repeat)
-
field_1 (type fixed, length = 5)
-
field_2 (type fixed, length = 8, optional)
Although this will parse ”abcde12345678^zyxvuABCDEFGH’, it will not parse the text ”abcde^zyxvuABCDEFGH’ even though the second fixed field is optional. The reason is that the element’s delimiter is ignored within the fixed field because they have the same precedence. If you want the element’s delimiter to be examined within the fixed field data, you must change its precedence, for example:
root
-
element (type delim, delimiter = “^”, repeat, precedence = 11)
-
field_1 (type fixed, length = 5)
-
field_2 (type fixed, length = 8, optional)
This will successfully parse the text ”abcde^zyxvuABCDEFGH’.
A similar argument can be applied to delimited child nodes. The parser normally attempts to match the child delimiter— setting the precedence to 11 forces the parser to match the parent delimiter first.
-
Optional
The Optional property specifies how delimiters for optional nodes are to be handled when the nodes are absent from the input instance or when their fields are empty.
Table 11 Optional Mode Options|
Option |
Rule |
|---|---|
|
never |
If the node is absent, the delimiter is not allowed in either input or output. |
|
allow |
If the node is absent, the delimiter is allowed in input but will not be emitted in output. |
|
cheer |
If the node is absent, the delimiter is allowed in input and will also be emitted in output. |
|
force |
If the node is absent, the delimiter must appear in input and will be emitted in output. Note – Only this option allows trailing delimiters for a sequence of absent optional nodes. |
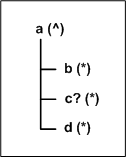
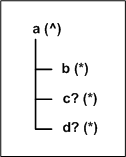
As illustrative examples, consider the tree structures shown in the following figure and table, where the node a has a caret (^) as its delimiter, and the child nodes b, c, and d all have asterisks (*) as their delimiters.
-
Example 1: Child node c is optional. (Child nodes c and d must have different values for the match parameter.)
Figure 10 Optional Mode Property (Example 1)
|
Option |
Input |
Output |
|---|---|---|
|
never |
b*d^ |
b*d^ |
|
allow |
b**d^ |
b*d^ |
|
cheer |
b**d^ |
b**d^ |
|
force |
b**d^ |
b**d^ |
-
Example 2: Child nodes c and d are both optional.
Figure 11 Optional Mode Property (Example 2)
|
Option |
Input |
Output |
|---|---|---|
|
never |
b^ |
b^ |
|
allow |
b^, b*^, or b**^ |
b^ |
|
cheer |
b^, b*^, or b**^ |
b**^ |
|
force |
b**^ |
b**^ |
Terminator
The Terminator property specifies whether or not the delimiter should appear for the last node of current level. For example, it determines whether data should look like "a,b,|" or "a,b|" assuming "," (comma) is the current level delimiter and "|" (pipe) is the parent level delimiter.
The delimiter that terminates the last child of the level in question is referred to as the terminator.
Table 12 Terminator Mode Options|
Option |
Rule |
|---|---|
|
never |
Specifies that the delimiter is not allowed to be a terminator in input and will not be emitted as terminator in output. |
|
allow |
Specifies that the delimiter is allowed to be a terminator in input but will not be emitted as terminator in output. |
|
cheer |
Specifies that the delimiter is allowed to be a terminator in input and will be emitted as terminator in output. |
|
force |
Specifies that the delimiter must appear as a terminator in input and will also be emitted as terminator in output. |
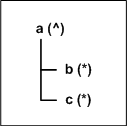
Consider the tree structure shown in the following figure, where the node a has a caret (^) as its delimiter, and its child nodes b and c have asterisks (*) as their delimiters.
Figure 12 Terminator Mode Property Example
|
Option |
Input |
Output |
|---|---|---|
|
never |
c^ |
c^ |
|
allow |
c^ or c*^ |
c^ |
|
cheer |
c^ or c*^ |
c*^ |
|
force |
c*^ |
c*^ |
Delimiter Characters (Bytes)
Note –
There is essentially no limitation on what characters you can use as delimiters; however, you obviously want to avoid characters that can be confused with data or interfere with escape sequences, as described in Escape Option. The backslash (\) is normally used as an escape character; for example, the HL7 protocol uses a double backslash as part of an escape sequence that provides special text formatting instructions. Additionally, a colon ( :) is used as a literal in system-generated time strings. This can interfere with recovery procedures, for example following a Domain shutdown.
Escape Sequences
Use a backslash (\) to escape special characters. The following table lists the currently supported escape sequences.
Table 13 Escape Sequences|
Sequence |
Description |
|
|---|---|---|
|
\ |
\ |
Backslash |
|
\ |
b |
Backspace |
|
\ |
f |
Linefeed |
|
\ |
n |
Newline |
|
\ |
r |
Carriage return |
|
\ |
t |
Tab |
|
\ |
ddd |
Octal number* |
|
\ |
xdd |
Hexadecimal number** |
*For octal values, the leading variable d can only be 0 - 3 (inclusive), while the other two can be 0 - 7 (inclusive). The maximum value is \377.
**For hexadecimal values, the variable d can be 0 - 9 (inclusive) and A - F (inclusive, either upper or lower case). The maximum value is \xFF.
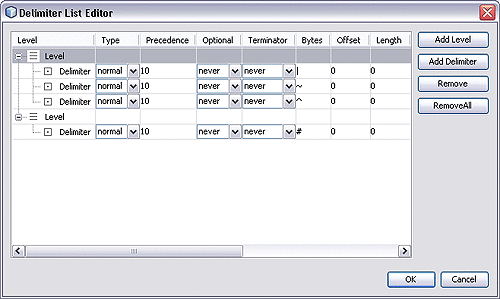
Multiple Delimiters
You can specify multiple delimiters at a given level; for example, if you specify |, ~, and ^ as delimiters for a specific level, the parser will accept any of these delimiters:
-
root
-
element (delimiters = “|”, “~”, “^”)
-
field_1 (delimiter = “#”)
-
field_2 (delimiters = “|”, “~”, “^”)
This will successfully parse the data abc|def, abc~def, and abc^def.
-
Figure 13 Multiple Delimiter Example
Anchored and Detached Delimiters
Anchored delimiters must be the starting and ending characters of the specified element.
Begin and End Delimiters
Begin delimiters mark the beginning of a fixed-length field, whereas end delimiters mark the end of a field. Usually, the term “delimiter” by itself refers to an end delimiter. We use the term “end delimiters” for clarification when begin delimiters are also present.
Begin delimiters are used to signify the beginning of a fixed-length data field. Since the data field is of fixed length, no delimiter is required to mark the end of the field. Use the Begin Delimiter or Begin Delimiter Detached property to specify it.
Constant and Embedded Delimiters
Constant delimiters remain unchanged at runtime. Embedded delimiters are embedded in the data, and thus are determined dynamically at runtime. Standard embedded delimiters are specified by the Offset and Length delimiter properties, while embedded begin delimiters are specified by the BegOffset and BegLength delimiter properties.
Defining a Delimiter List
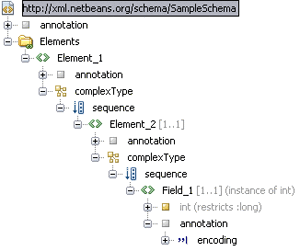
As an example, we shall create a delimiter list for the simple Encoder structure shown in the following figure.
Figure 14 Sample Encoder Tree
 To create a delimiter list
-
In the XSD Editor, select the node for which you want to define a set of delimiters (this example uses the root node, which is designated Element_1). By default, the value for the Node Type property is set to delimited and the value for the Delimiter List property appears as not specified.
Note –The Node Type values for elements and fields also are delimited by default, so they automatically pick up the delimiters specified for their ancestors unless you define new delimiter lists for them.
-
Click the ellipsis (…) button in the Delimiter List value field to display the Delimiter List Editor, which is initially blank.
-
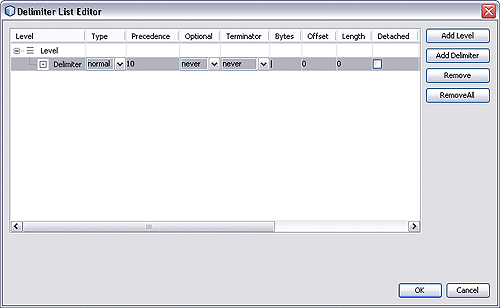
Click Add Level to add a level to the delimiter list, then click Add Delimiter to add a delimiter to the selected level. Click in the Bytes field to activate it for editing and type in the delimiter characters.
-
Press Enter to set the delimiter value. The list should appear as shown in the following figure.
Figure 15 Delimiter List Editor - Add Delimiter
-
Continue adding levels and delimiters as required, as shown in the following figure.
Figure 16 Delimiter List Editor - Add Levels and Delimiters
-
Click OK to close the editor and save your work.
-
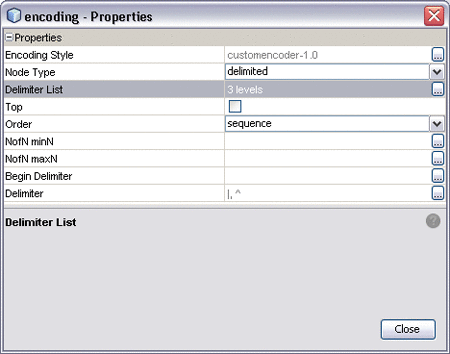
The value for the Delimiter List property will now indicate the number of delimiter levels that are specified, as shown in the following figure.
Figure 17 Element_1 - Delimiters Specified
-
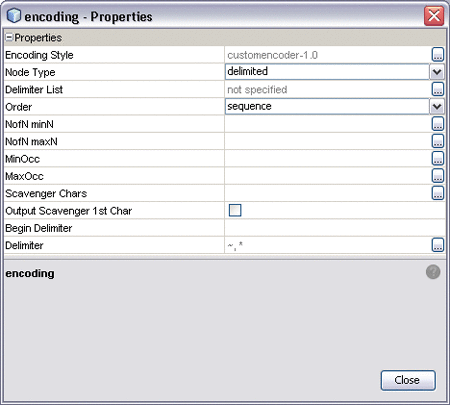
The properties for Element_2 are displayed in the following figure. It automatically picks up the delimiters for Level 2, since the existing delimiter list is defined for Element_1. Defining another delimiter list here would override the existing list.
Figure 18 Element_2 Properties
-
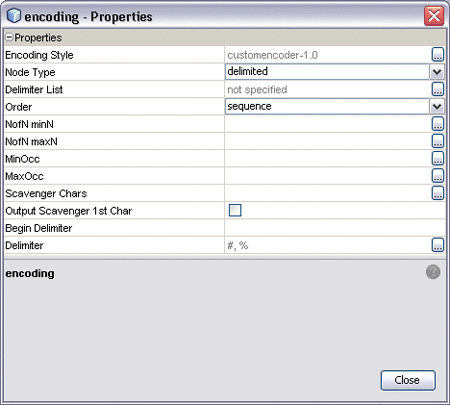
Leave the Node Type property for Field_1 set to delimited; it automatically picks up the delimiters for Level 3 from the list defined for Element_1, as displayed in the following figure. Again, the Delimiter List property remains not specified.
Figure 19 Field_1 Properties
-
Once you have defined your delimiter list, you should test the Encoder to verify that it parses correctly.
Validating and Testing the Custom Message Definition
Validating the Custom Message Definition
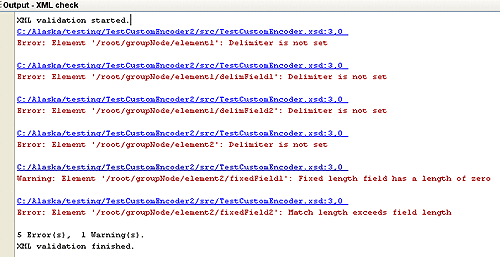
You can validate the encoding rules, along with the message definition in XML format, by clicking the validation button in the XSD Editor. If encoding rules are present, they are validated following validation of the XML grammar and semantics. An example output showing multiple errors is shown in the following figure.
Figure 20 Example Validation Result
Testing the Encoder Runtime Behavior
The Encoder Tester allows you to test the Encoder's runtime behavior at design time. To display the tester dialog, right-click the XSD file to display its context menu and select Encoder > Test, as shown in the following figure.
Figure 21 Starting the Encoder Tester

The Test Encoding dialog is shown in the following figure. The various fields are described briefly in the table following the figure. After the Decode test is complete, the result is placed in an XML file inside the current project. This file can then be validated as described in the preceding section. There is no automatic method for validating the Encode result, however.
Figure 22 Test Encoding Dialog
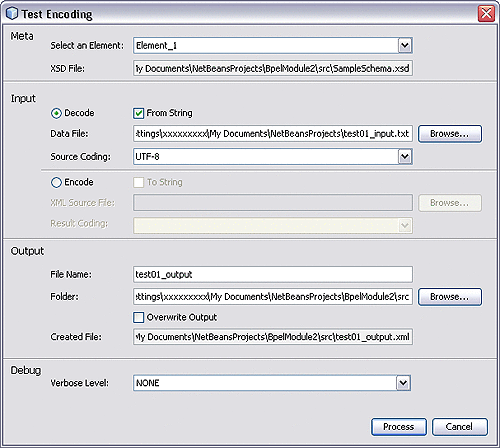 Table 14 Test Encoding Dialog Fields
|
Section |
Field Caption |
Description |
|---|---|---|
|
Meta |
Select an Element |
Specifies the top-level element whose structure you want to test. |
|
XSD File |
Identifies the XSD file you have selected for testing. |
|
|
Input |
Decode/Encode |
Option buttons to select the direction of data flow for the test. Specifies whether encoding or decoding behavior is being tested. |
|
From/To String |
Specifies that the input or output data is in string format. If not checked, byte format is assumed. |
|
|
Data File |
Specifies the data file to use in the Decode test. |
|
|
XML Source File |
Specifies the source file to use in the Encode test. |
|
|
Source/Result Coding |
Specifies the encoding of the serialized data. See Data Encoding |
|
|
Output |
File Name |
Specifies the file name to use for the test result. |
|
Folder |
Specifies the folder in which you want the output file to be placed. |
|
|
Overwrite Output |
Specifies whether or not you want to overwrite any existing output file having the same name. |
|
|
Created File |
Confirms that the output file has been created, along with the location. |
|
|
Debug |
Verbose Level |
Specifies the level of detail contained in the log file. The options are:
|
Using Custom Encoders in JBI Projects
Using a Custom Encoder in a JBI Project is described in the following procedure.
 To Use a Custom Encoder in a JBI Project
-
Import the XSD into a WSDL using the WSDL context menu.
-
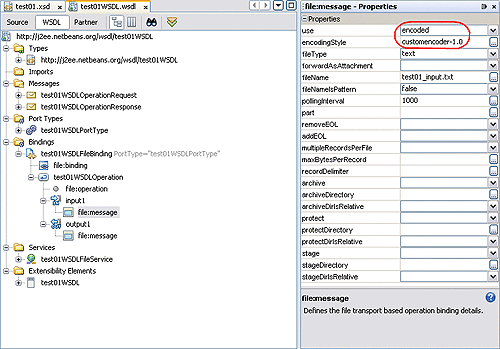
Configure the individual binding component's inbound or outbound message type as encoded and set the encoding style to customencoder-1.0. See the following figure as an example.
Figure 23 File Message Property Configuration
About Data Parsing and Serialization
The parsing and serializing operations require data to be in byte-array form, so different methods for encoding and decoding data must be used to accommodate different input and output data formats. These different methods incorporate various stages of character conversion using specific character sets.
Encoding Process
Internally, the encoder requires the data input and output to be in bytes. The encoding process uses the serializing charset, as illustrated in the following figure.
Figure 24 Encoding Process

encodeToString() Method
The encodeToString() method requires conversion to produce an output string after encoding from a byte[] field. This method also requires conversion when encoding from a string field, since the parser requires the data in bytes, and conversion again to produce an output string. The encodeToString() process uses the serializing charset, as illustrated in the following figure.
Figure 25 encodeToString()

encodeToBytes() Method
The encodeToBytes() method requires conversion to produce bytes after encoding from a string field. Following serialization, this method also requires conversion to produce an output (in bytes) having a different format from that used by the parser. If the same format is desired, then the output charset is left undefined, the serializing charset property is substituted by default, and the double conversion is bypassed. The encodeToBytes() process uses both the serializing charset and the output charset, as illustrated in the following figure.
Figure 26 encodeToBytes()

encodeToStream() Method
Encodes an XML representation of a message into an OutputStream object, encoded in custom format.
encodeToWriter() Method
Encodes an XML representation of a message into a Writer object, encoded in custom format.
Decoding Process
Internally, the decoding process requires conversion when decoding to a string field, since the input is in bytes as required by the parser. The decoding process uses the parsing charset, as illustrated in the following figure.
Figure 27 Decoding Process

decodeFromString() Method
The decodeFromString() method requires conversion of the input string, since the parser requires the data in bytes. This method requires a second conversion when decoding to a string field. The decodeFromString() process uses the parsing charset, as illustrated in the following figure.
Figure 28 decodeFromString()

decodeFromBytes() Method
The decodeFromBytes() method requires conversion if the input data has a different byte format from that used by the parser. If the same format is desired, then the input charset is left undefined, the parsing charset is substituted by default, and the double conversion is bypassed. After parsing, this method requires further conversion if decoding to a string field. The decodeFromBytes() process uses both the input charset and the parsing charset, as illustrated in the following figure.
Figure 29 decodeFromBytes()

decodeFromStream() Method
Decodes an InputStream object encoded in custom format into an XML-encoded message.
decodeFromReader() Method
Decodes a Reader object encoded in custom format into an XML-encoded message.
Setting Delimiters
The following figure illustrates how the delimiter gets set and passed into the parser.
Figure 30 Setting Delimiters
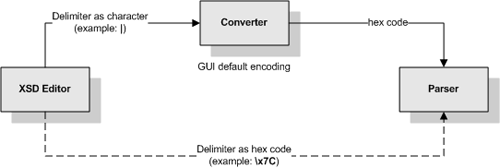
As an example, if you select a delimiter in the XSD Editor by hex code (such as \x7C), it is passed directly into the parser. If you type the delimiter in as a pipe (|), however, then the pipe character is first converted to hex code, using the GUI’s encoding, and then sent to the parser.
- © 2010, Oracle Corporation and/or its affiliates
