MLLP V2 and the Sample Projects
Minimal Lower Layer Protocol Release 2 (MLLP V2.0) is a message transport protocol, and is required for all message transport protocols used to transport HL7 Version 3 content. This protocol wraps the HL7 message to indicate the beginning and end of each message.
The following topics provide instruction on how to set up the MLLP database, and describe MLLP V2.0 and the MLLP V2.0 sample Project provided with the TCP/IP HL7 Adapter:
Creating and Configuring the MLLP V2.0 Database
Using the HL7 Adapter with MLLP V2.0 transport scenarios requires an MLLP database. This topic describes the steps to connect to Sun's Java Database (based on the Apache Derby database) and run the MLLP V2.0 database scripts.
The TCP/IP HL7 Adapter supports the following database platforms for the MLLP database:
-
DB2
-
Java DB (Derby)
-
Oracle
-
Microsoft SQL Server
-
Sybase
Perform the following steps in the order given to set up the MLLP database:
 To Create and Connect to the Database
-
Create a database instance using your database platform tools. If you are using a Java DB database, perform the following steps to create the database:
-
On the NetBeans Services window, expand Databases.
-
Right-click Java DB, and then click Create Database.
The Create Java DB Database dialog box appears.
-
Enter a name for the database, along with a login user name and password.
-
Click OK.
The database appears in the list of databases on the Services window.
-
-
Make sure your database instance is running.
-
For Oracle, DB2, SQL Server, and Sybase databases, do the following:
-
Copy the database driver file to JavaCAPS_Home/appserver/lib.
-
Under Databases on the NetBeans Services window, right-click Drivers and then select New Driver.
The New JDBC Driver dialog box appears.
-
Click Add, and then brows to and select the database driver file.
-
Select or look for the driver class to use.
-
Accept the default name or enter a name for the driver.
-
Click OK.
-
In the Drivers list on the Services window, right-click the driver you just added and click Connect Using.
The New Database Connection dialog box appears.
-
Enter the connection information for the database instance you created for MLLP and then click OK.
The new database connection appears in the Databases list.
-
-
On the NetBeans Services window, right-click the MLLP database, and click Connect.
NetBeans connects to the database and the icon changes for that database. The following figure illustrates a Java DB connection.
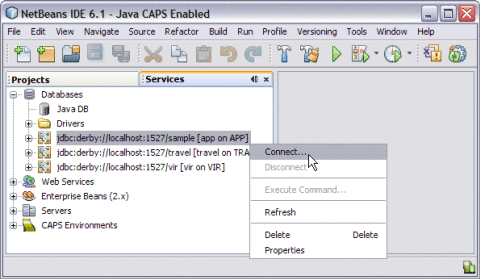
Note –A broken icon represents that the database is not connected.
 To Run the MLLP V2.0 Database Scripts
You can either run the MLLP database scripts from NetBeans or from a SQL editor. The following steps take you through running the scripts from NetBeans.
-
On the NetBeans IDE, click the Projects tab.
-
Expand CAPS Components Library > Adapters > HL7 > Database Scripts.
-
Right-click db_platform_install.sql; for example, derby_install.sql.
-
Click Open.
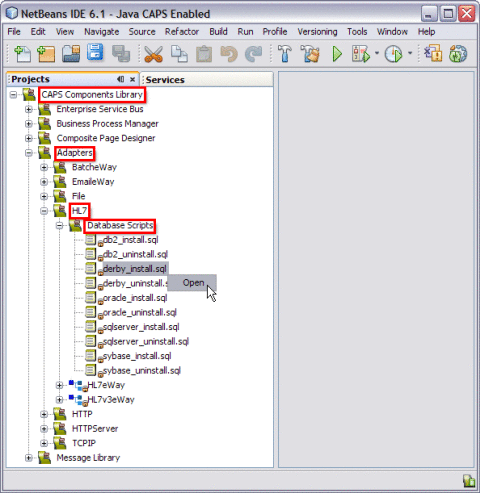
This opens the SQL Editor window along with the SQL Statement.
CREATE TABLE HL7MESSAGELOG (MESSAGEID VARCHAR(250), APPLICATIONID VARCHAR(250) ,
REQUESTMESSAGE CLOB, RESPONSEMESSAGE CLOB, STATUS SMALLINT, CREATEDTIME TIMESTAMP,
LASTUPDATEDTIME TIMESTAMP)
-
In the SQL Editor toolbar, click in the Connection field and select the database connection from the drop-down list.
-
In the toolbar, click Run SQL.
A message appears in the Output panel indicating whether the script was run successfully.
-
To view the new tables, return to the Services window, right-click the database connection, and then click Refresh. Expand the database connection and then Tables to view the database.
 To Create the Connection Pool and JDBC Resource
In order to connect to the database, you need to define a JDBC connection pool and JDBC resource using the GlassFish Admin Console or the command-line interface.
-
Start the GlassFish server.
-
To create the connection pool and JDBC resource, follow the instructions under Creating a JDBC Connection Pool in Sun GlassFish Enterprise Server 2.1 Administration Guide.
Use the information from the database connection you created earlier in To Create and Connect to the Database.
 Associating the MLLP Database With the Adapter
Once you create the MLLP database, you can connect to it from the inbound TCP/IP HL7 Adapter. You do this in the HL7 External Systems properties located in the CAPS Environment you create for the HL7 Project. This procedure assumes you have already created the Environment and that it includes an HL7 External System.
-
On the NetBeans Services window, expand CAPS Environments, and then expand the HL7 Environment you created for your Project.
-
Right-click the HL7 External System, and select Properties.
The Properties Editor appears.
-
In the left pane, expand HL7 Inbound eWay.
-
Select Database Settings.
-
In the JNDI Name of the JDBC Datasource property, enter the JNDI name of the JDBC Resource you created under To Create the Connection Pool and JDBC Resource.
-
Click OK.
MLLP V2 Content Exchange Model
MLLP Release 2 is a reliable message transport protocol. It guarantees in order delivery and at least once delivery of HL7 content. HL7 content is framed in a block and sent to the destination system. The destination system acknowledges the receipt of the message by returning a commit acknowledgement message. The MLLP V2 acknowledgement protocol is synchronous: the source system will not send new HL7 content until an acknowledgement for the previous HL7 content has been received.
Figure 23 Interaction Diagram
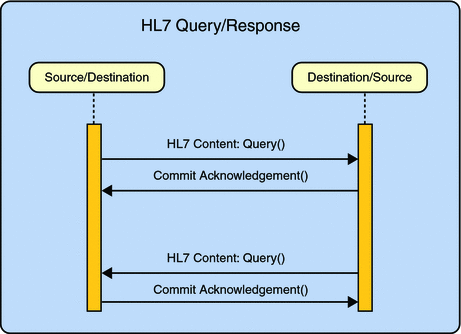
If the HL7 content (a query in the example below) triggers the sending of HL7 content (a response) by the destination system, then this HL7 content is framed in a block and sent. MLLP has no knowledge of the HL7 content, nor does it base any part of its behavior on HL7 content. With the TCP/IP HL7 Adapter, a database is used to persist the message.
In inbound mode, once the message is received by the HL7 Adapter, it is persisted into the database and a commit acknowledgement is sent to the sender before the HL7 message is passed to the Collaboration level. If the persistence fails, a negative acknowledgement is sent to the sender and the Collaboration receives null as its message. Inside the Collaboration, the message received is null and the Collaboration returns without proceeding.
If the message received is a duplicate message and if an ACK/NAK is already available in the persistence database, the same is retrieved from the database and sent to the sender. The Collaboration receives null as the received message.
In outbound mode, the message is sent to the sender and waits for the commit acknowledgement or negative acknowledgement from the receiver. If the adapter receives a negative acknowledgement, the message is sent again until the configured maximum number of retries is made.
Standard Inbound HL7 V2 Collaboration Overview over MLLPV2
In the MLLP V2 sample Projects, the inbound HL7 V2 Collaboration, jcdHL7Inbound, contains Message Libraries (previously called OTDs) for the HL7 Resource Adapter, JMS Data, HL7 ACK, JMS Journal, and JMS Error, as well as the Generic HL7 Event. The Collaboration works with its own internal code and the properties configuration files.
The following topics describe the business logic defined in the jcdHL7Inbound Collaboration for MLLP V2:
-
HL7 V2 Standard Inbound Message Mode Data Flow over MLLPV2 — Part 1
-
HL7 V2 Standard Inbound Message Mode Data Flow over MLLPV2 — Part 2
-
HL7 V2 Standard Inbound Message Mode Data Flow over MLLPV2 — Part 3
HL7 V2 Standard Inbound Message Mode Data Flow over MLLPV2 — Part 1
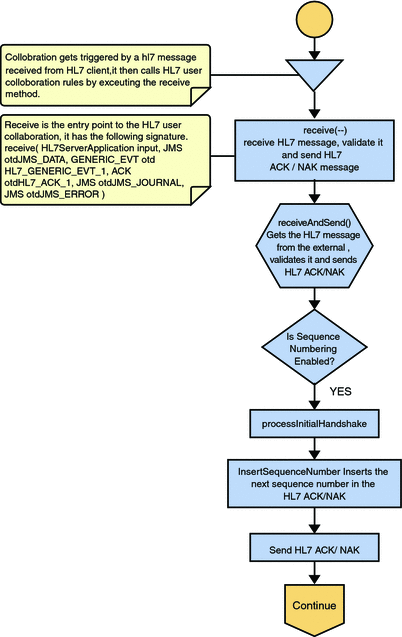
Once the message is received, the Collaboration determines whether the message needs to be validated. The HL7 V2 message is then validated making sure that the message structure is correct. Various fields in the MSH segment of the message are also validated, such as Version ID and Sending Facility. If these fields do not match the configuration, a NAK is returned.
If sequence numbering is enabled the Collaboration checks to see if the messages sequence number is valid. If the sequence number is not valid, the adapter sends a NAK.
The validated HL7 V2 message moves on to processInitialHandshake() and the sequence numbers are synchronized. The sequence number within the message is checked against the expected sequence number. If the numbers match, the Collaboration sends an ACK, if not it sends a NAK. The ACK or NAK includes information from various fields of the incoming MSA segment. The ACKs level of acknowledgement is set to A (acknowledgement is sent when the message is successfully received) or C (acknowledgement is sent after the message is successfully processed).
Figure 24 HL7 V2 Standard Inbound Message Mode Data Flow over MLLPV2 — Part 1
HL7 V2 Standard Inbound Message Mode Data Flow over MLLPV2 — Part 2
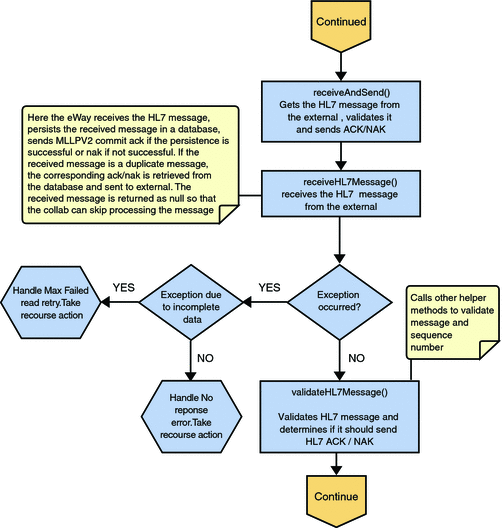
The Collaboration receives the HL7 V2 message from the external using receiveHL7message(). If an exception occurs due to incomplete data, and the adapter fails to read the data within the configured number of retries, the associated recourse action is taken. If the exception is due to no response, the associated recourse action is taken.
Figure 25 HL7 V2 Standard Inbound Message Mode Data Flow over MLLPV2 — Part 2
HL7 V2 Standard Inbound Message Mode Data Flow over MLLPV2 — Part 3
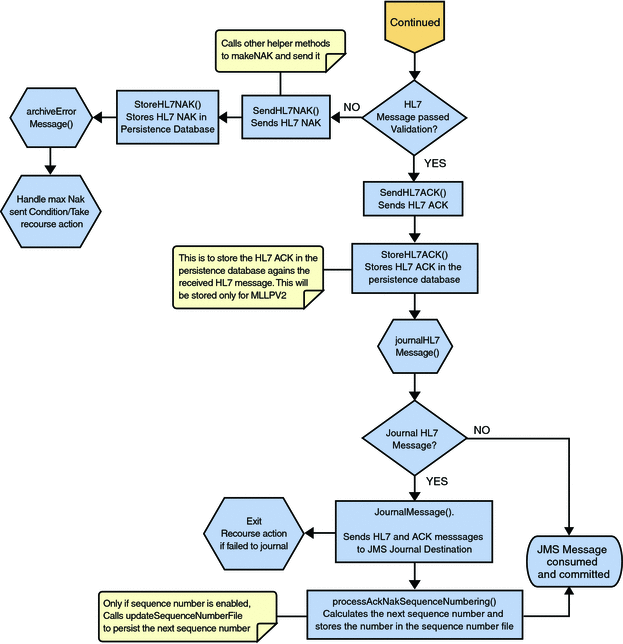
If no exception occurs, validateHL7Message() is called, which validates the message to determine whether to ACK or NAK the message. Other helper methods are also called to validate the HL7 message.
If the HL7 message does not pass validation, the Collaboration calls makeNak() and sendHL7Nak() to create and send the NAK to the external system. The HL7 message, with the NAK, is archived to the error queue. If the number of consecutive NAKs sent surpasses the maximum number of retries, the associated recourse action is taken.
If the HL7 message passes validation, the Collaboration calls makeAck() and sendHL7Ack() to create and send the ACK to the external system. The HL7 ACK/NAK messages are stored in the persistent database. This ACK/NAK is stored against the inbound HL7 message received.
After the ACK is sent, the HL7 message and the ACK are journaled to the JMS queue journal destination. If the message fails to journal the associated recourse action is taken.
If sequencing numbering is enabled, the processAckNakSequenceNumbering method calculates the next sequence number and stores the number in the sequence number file by calling the updateSequenceNumberFile method to persist the next sequence number.
Figure 26 HL7 V2 Standard Inbound Message Mode Data Flow over MLLPV2 — Part 3
- © 2010, Oracle Corporation and/or its affiliates
