Sending a JMS Text Message
This topic provides instructions for sending a JMS message to a destination (Queue2). For purposes of this exercise, the message content to Queue2 is "Hello " concatenated with the message content received from the onMessage() method from Queue1. For more information about receiving JMS messages, see Receiving a JMS Text Message.
Perform the following steps to send a JMS text message:
 To Create an Admin Object Resource
-
Start the GlassFish server and use a browser to connect to the Admin Console.
The URL for the Admin Console is http://HostName:PortNumber. The default port number is 4848.
-
In the left navigation bar, expand Resources and Connectors, and then select Admin Object Resources.
-
Click New.
-
For this exercise, enter the following values:
-
JNDI Name = jms/Queue2
-
Resource Type = javax.jms.Queue
-
Resource Adapter = sun-jms-adapter
-
-
Click Next.
-
Enter Queue2 in the Name property.
This is the physical destination name of the resource.
-
Click Finish.
 To Define a JMS Session Instance
You need to create a JMS message, object, or message producer to send a message to Queue2 once the JMS message is received inside the MDB file of the onMessage() method.
-
Launch the NetBeans IDE and open the Message-Driven Bean file you created in To Create the JCA Message-Driven Bean.
The file is located in the Enterprise Beans node of the JMSJCASample project.
-
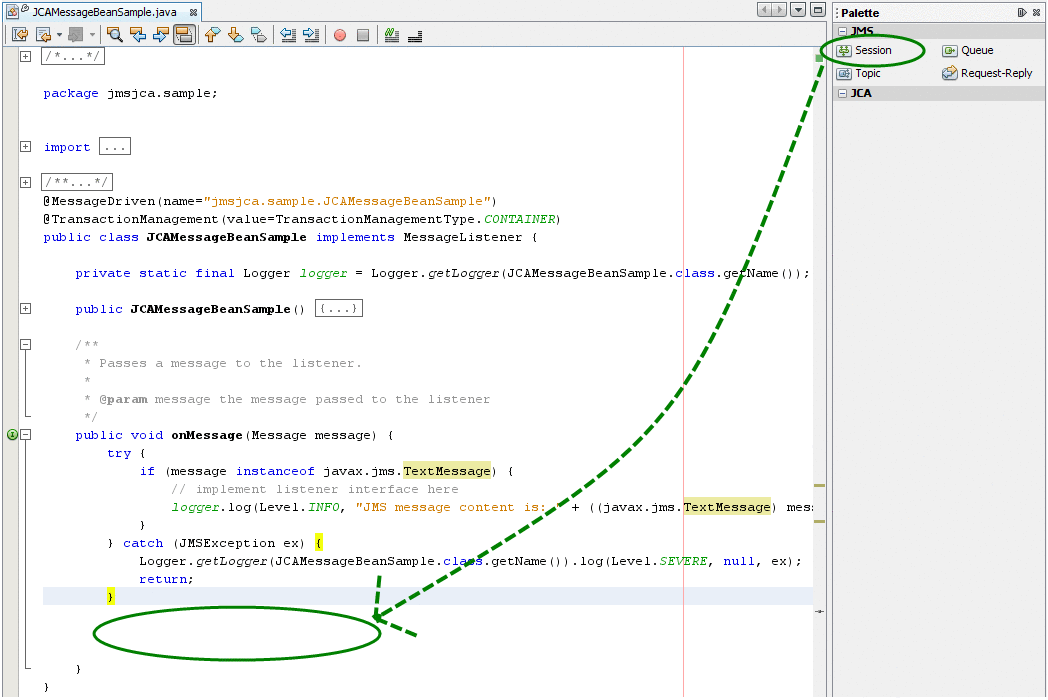
Drag-and-drop the Session icon from the Palette panel on the right side to the inside of the onMessage() method, as shown in the figure below:
Figure 12 JCA Message Bean Sample — Session

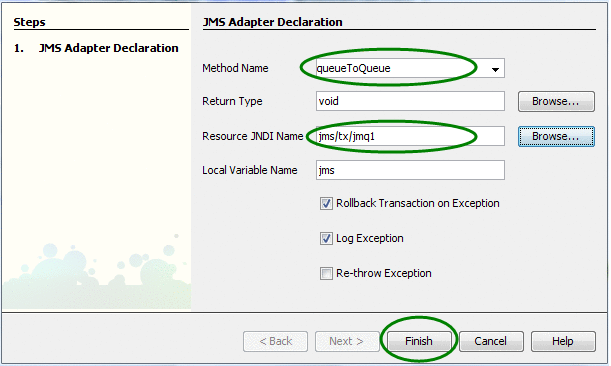
The JCA Wizard dialog box appears.
-
For this exercise, enter the following values:
-
Method Name = queueToQueue
-
Resource JNDI Name = jms/tx/jmq1
Figure 13 JCA Adapter Declaration

-
-
Click Finish.
Several Java code fragments is generated as a result, in particular the queueToQueue(...) method, which can be implemented to process the incoming message.
-
Save the MDB file.
 Create a Reference to the Destination Object
Creating a reference to the destination object allows a message to be sent to the destination object in the Java code. For this exercise, the destination object is Queue2.
-
In the NetBeans IDE, open the Message-Driven Bean file you created in To Create the JCA Message-Driven Bean.
The file is located in the Enterprise Beans node of the JMSJCASample project.
-
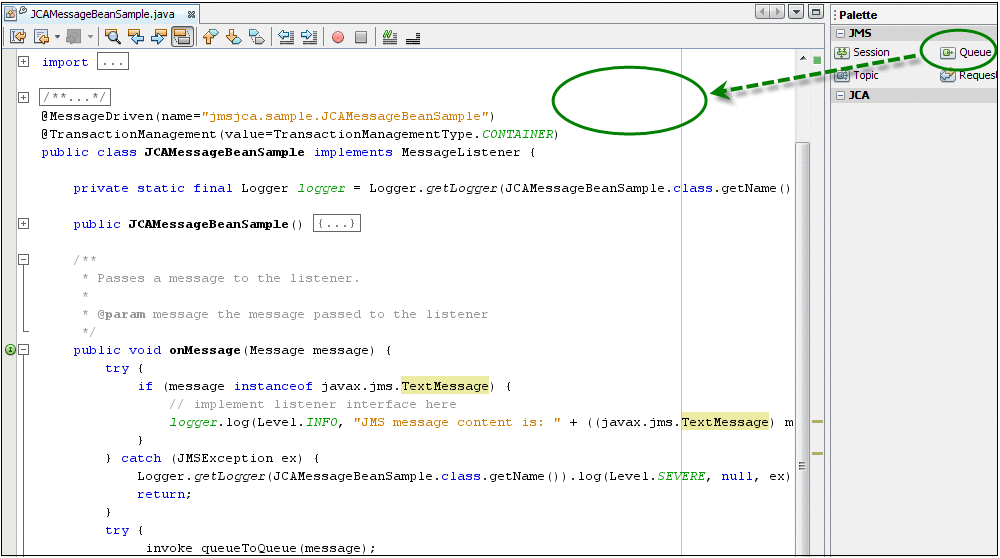
Drag-and-drop the Queue icon from the Palette panel on the right to any place in Java editor, as shown below.
Figure 14 JCA Message Bean Sample — Queue

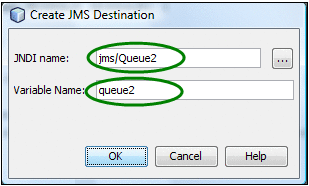
The Create JMS Destination dialog box appears.
-
For this exercise, enter the following information into the fields:
-
JNDI Name = jms/Queue2 (You can select this value by clicking the ellipsis button and expanding the tree.)
-
Variable Name = queue2
Figure 15 Create JMS Destination

-
-
Click OK.
-
Write the actual code to create a new JMS message and send it to Queue2.
The code fragment inside the queueToQueue(...) method should be similar to the example shown below:
private void queueToQueue(Message message, javax.jms.Session jmsSession)
           throws java.lang.Exception {
    if (message instanceof javax.jms.TextMessage)  {
        String oldContent = ((javax.jms.TextMessage) message).getText();
        javax.jms.TextMessage newMessage = jmsSession.createTextMessage("Hello "
               + oldContent);
        jmsSession.createProducer(queue2).send(newMessage);
    }
}
Note –The above code has been wrapped to fit onto the page.
-
Save the changes.
 To Test the Sample Code
To test that JMS messages are being properly passed from Queue1 to Queue2, complete the following steps.
-
Right-click on the Project node and select Build.
-
After the build process is complete, right-click on the Project node, and then select Undeploy and Deploy.
-
Use your preferred JMS client to send a text message to Queue1 (located at mq://localhost:7676,).
-
Use another JMS client (or the same client) to receive a text message from Queue2 in the JMS server (located at mq://localhost:7676,).
- © 2010, Oracle Corporation and/or its affiliates
