

|
| |
| Sun Java System Application Server Platform Edition 8 Developer's Guide | |
Chapter 3
Assembling and Deploying J2EE ApplicationsThis chapter describes Sun Java System Application Server modules and how these modules are assembled separately or together in an application.
Sun Java System Application Server modules and applications include J2EE standard elements and Sun Java System Application Server specific elements. Only Sun Java System Application Server specific elements are described in detail in this chapter.
The following topics are presented in this chapter:
Overview of Assembly and DeploymentApplication assembly (also known as packaging) is the process of combining discrete components of an application into a single unit that can be deployed to a J2EE-compliant application server. A package can be classified either as a module or as a full-fledged application. This section covers the following topics:
Modules
A J2EE module is a collection of one or more J2EE components of the same container type (for example, web or EJB) with deployment descriptors of that type. One descriptor is J2EE standard, the other is Sun Java System Application Server specific. Types of J2EE modules are as follows:
- Web Application Archive (WAR): A web application is a collection of servlets, HTML pages, classes, and other resources that can be bundled and deployed to several J2EE application servers. A WAR file can consist of the following items: servlets, JSPs, JSP tag libraries, utility classes, static pages, client-side applets, beans, bean classes, and deployment descriptors (web.xml and optionally sun-web.xml).
- EJB JAR File: The EJB JAR file is the standard format for assembling enterprise beans. This file contains the bean classes (home, remote, local, and implementation), all of the utility classes, and the deployment descriptors (ejb-jar.xml and sun-ejb-jar.xml). If the EJB component is an entity bean with container managed persistence, a .dbschema file and a CMP mapping descriptor, sun-cmp-mapping.xml, must be included as well.
- Application Client Container JAR File: An ACC client is a Sun Java System Application Server specific type of J2EE client. An ACC client supports the standard J2EE Application Client specifications, and in addition, supports direct access to the Sun Java System Application Server. Its deployment descriptors are application-client.xml and sun-application-client.xml.
- Resource RAR File: RAR files apply to J2EE CA connectors. A connector module is like a device driver. It is a portable way of allowing EJB components to access a foreign enterprise system. Each Sun Java System Application Server connector has a J2EE XML file, ra.xml.
Package definitions must be used in the source code of all modules so the classloader can properly locate the classes after the modules have been deployed.
Because the information in a deployment descriptor is declarative, it can be changed without requiring modifications to source code. At run time, the J2EE server reads this information and acts accordingly.
Sun Java System Application Server also supports lifecycle modules. See Chapter 10, "Developing Lifecycle Listeners," for more information.
EJB JAR and Web modules can also be assembled as separate JAR or WAR files and deployed separately, outside of any application, as in the following figure.
Figure 3-1 Module Assembly and Deployment

Applications
A J2EE application is a logical collection of one or more J2EE modules tied together by application deployment descriptors. Components can be assembled at either the module or the application level. Components can also be deployed at either the module or the application level.
The following diagram illustrates how components are assembled into modules and then assembled into a Sun Java System Application Server application EAR file ready for deployment.
Figure 3-2 Application Assembly and Deployment

Each module has a Sun Java System Application Server deployment descriptor and a J2EE deployment descriptor. The Sun Java System Application Server Administration Console uses the deployment descriptors to deploy the application components and to register the resources with the Sun Java System Application Server.
An application consists of one or more modules, an optional Sun Java System Application Server deployment descriptor, and a required J2EE application deployment descriptor. All items are assembled, using the Java ARchive (.jar) file format, into one file with an extension of .ear.
J2EE Standard Descriptors
The J2EE platform provides assembly and deployment facilities. These facilities use WAR, JAR, and EAR files as standard packages for components and applications, and XML-based deployment descriptors for customizing parameters.
J2EE standard deployment descriptors are described in the J2EE specification, v1.4. You can find the specification here:
To check the correctness of these deployment descriptors prior to deployment, see The Deployment Descriptor Verifier.
The following table shows where to find more information about J2EE standard deployment descriptors.
Sun Java System Application Server Descriptors
Sun Java System Application Server uses additional deployment descriptors for configuring features specific to the Sun Java System Application Server. The sun-application.xml and sun-web.xml files are optional; all the others are required.
The DTD schema files for all the Sun Java System Application Server deployment descriptors are located in the install_dir/lib/dtds directory. Do not edit these files.
To check the correctness of these deployment descriptors prior to deployment, see The Deployment Descriptor Verifier.
The following table lists the Sun Java System Application Server deployment descriptors and their schema files. For complete descriptions of these files, see Chapter 5, “Deployment Descriptor Files.”
Note
The Sun Java System Application Server deployment descriptors must be readable and writable by the file owners.
Naming Standards
Names of applications and individually deployed EJB JAR, WAR, and connector RAR modules (as specified by the name attributes in the domain.xml file) must be unique within a Sun Java System Application Server domain. Modules of the same type within an application must have unique names. In addition, for entity beans that use CMP,.dbschema file names must be unique within an application.
If you do not explicitly specify a name, the default name is the first portion of the file name (without the .war or .jar extension). Modules of different types can have the same name within an application, because the directories holding the individual modules are named with _jar, _war and _rar suffixes. This is the case when you use the Administration Console, the asadmin command, or the deploytool to deploy an application or module. See Tools for Deployment.
Make sure your package and file names do not contain spaces or characters that are illegal for your operating system.
If you are writing your own JSR 88 client to deploy applications to the Sun Java System Application Server using the following API, the name of the application is taken from the display-name entry in the J2EE standard deployment descriptor, because there is no file name in this case.
javax.enterprise.deploy.spi.DeploymentManager.distribute(Target[], InputStream, InputStream)
Neither the Administration Console, the asadmin command, nor the deploytool uses this API.
For details about domain.xml, see the Sun Java System Application Server Reference. For more information about JSR 88, see the JSR 88 page:
http://jcp.org/en/jsr/detail?id=88
Directory Structure
When you deploy an application, the application is expanded to an open directory structure, and the directories holding the individual modules are named with _jar, _war and _rar suffixes. If you use the asadmin deploydir command to deploy a directory instead of an EAR file, your directory structure must follow this same convention.
Module and application directory structures follow the structure outlined in the J2EE specification. Here is an example directory structure of a simple application containing a web module, an EJB module, and a client module.
Here is an example directory structure of an individually deployed connector module.
+ MyConnector/
|--- readme.html
|--- ra.jar
|--- client.jar
|--- win.dll
|--- solaris.so
'--+ META-INF/
|--- MANIFEST.MF
'--- ra.xml
Runtime Environments
Whether you deploy an individual module or an application, deployment affects both the file system and the server configuration. See the following Module runtime environment and Application runtime environment figures.
Module Runtime Environment
The following figure illustrates the environment for individually deployed module-based deployment.
Figure 3-3 Module runtime environment
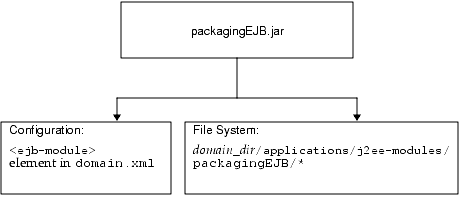
For file system entries, modules are extracted as follows:
domain_dir/applications/j2ee-modules/module_name
domain_dir/generated/ejb/j2ee-modules/module_name
domain_dir/generated/jsp/j2ee-modules/module_nameThe applications directory contains the directory structures described in Directory Structure. The generated/ejb directory contains the stubs and ties that an ACC client needs to access the module; the generated/jsp directory contains compiled JSPs.
Lifecycle modules (see Chapter 10, "Developing Lifecycle Listeners") are extracted as follows:
domain_dir/applications/lifecycle-modules/module_name
Configuration entries are added in the domain.xml file as follows:
<server>
<applications>
<type-module>
...module configuration...
</type-module>
</applications>
</server>The type of the module in domain.xml can be lifecycle, ejb, web, or connector. For details about domain.xml, see the Sun Java System Application Server Reference.
Application Runtime Environment
The following figure illustrates the environment for application-based deployment.
Figure 3-4 Application runtime environment
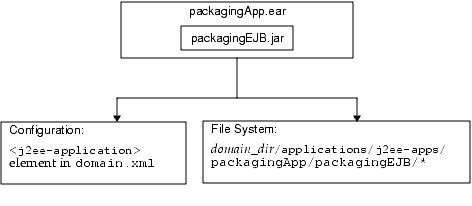
For file system entries, applications are extracted as follows:
domain_dir/applications/j2ee-apps/app_name
domain_dir/generated/ejb/j2ee-apps/app_name
domain_dir/generated/jsp/j2ee-apps/app_nameThe applications directory contains the directory structures described in Directory Structure. The generated/ejb directory contains the stubs and ties that an ACC client needs to access the module; the generated/jsp directory contains compiled JSPs.
Configuration entries are added in the domain.xml file as follows:
<server>
<applications>
<j2ee-application>
...application configuration...
</j2ee-application>
</applications>
</server>For details about domain.xml, see the Sun Java System Application Server Reference.
Classloaders
Understanding Sun Java System Application Server classloaders can help you determine where and how you can position supporting JAR and resource files for your modules and applications.
In a Java Virtual Machine (JVM), the classloaders dynamically load a specific java class file needed for resolving a dependency. For example, when an instance of java.util.Enumeration needs to be created, one of the classloaders loads the relevant class into the environment. This section includes the following topics:
The Classloader Hierarchy
Classloaders in the Sun Java System Application Server runtime follow a hierarchy that is illustrated in the following figure.
Figure 3-5 Classloader runtime hierarchy
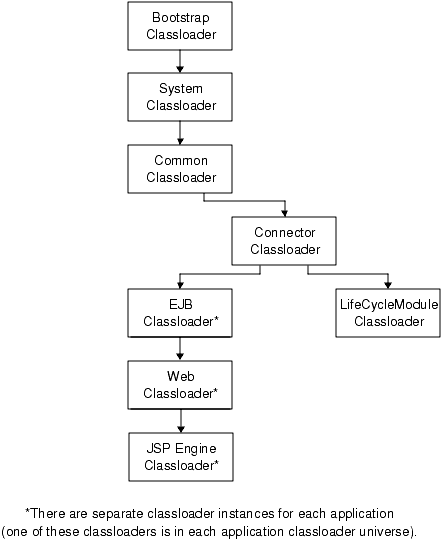
Note that this is not a Java inheritance hierarchy, but a delegation hierarchy. In the delegation design, a classloader delegates classloading to its parent before attempting to load a class itself. A classloader parent can be either the System Classloader or another custom classloader. If the parent classloader can’t load a class, the findClass() method is called on the classloader subclass. In effect, a classloader is responsible for loading only the classes not available to the parent.
The Servlet specification recommends that the Web Classloader look in the local classloader before delegating to its parent. You can make the Web Classloader follow the delegation model in the Servlet specification by setting delegate="false" in the class-loader element of the sun-web.xml file. It’s safe to do this only for a web module that does not interact with any other modules.
The default value is delegate="true", which causes the Web Classloader to delegate in the same manner as the other classloaders. You must use delegate="true" for a web application that accesses EJB components or that acts as a web service client or endpoint. For details about sun-web.xml, see “The sun-web.xml File” on page 151.
The following table describes Sun Java System Application Server classloaders.
Table 3-3 Sun Java System Application Server Classloaders
Classloader
Description
Bootstrap
The Bootstrap Classloader loads all the JDK classes.
System
The System Classloader loads most of the core Sun Java System Application Server classes. It is created based on the classpath-prefix, server-classpath, and classpath-suffix attributes of the java-config element in the domain.xml file. The environment classpath is included if env-classpath-ignored="false" is set in the java-config element.
Common
The Common Classloader loads classes in the domain_dir/lib/classes directory, followed by JAR and ZIP files in the domain_dir/lib directory. No special classpath settings are required. The existence of these directories is optional; if they don’t exist, the Common Classloader is not created.
Connector
The Connector Classloader is a single classloader instance that loads individually deployed connector modules, which are shared across all applications.
LifeCycleModule
The LifeCycleModule Classloader is the parent classloader for lifecycle modules. Each lifecycle module’s classpath is used to construct its own classloader.
EJB
The EJB Classloader loads the enabled EJB classes in a specific enabled EJB module or J2EE application. One instance of this classloader is present in each classloader universe. The EJB Classloader is created with a list of URLs that point to the locations of the classes it needs to load.
Web
The Web Classloader loads the servlets and other classes in a specific enabled web module or J2EE application. One instance of this classloader is present in each classloader universe. The Web Classloader is created with a list of URLs that point to the locations of the classes it needs to load.
JSP Engine
The JSP Engine Classloader loads compiled JSP classes of enabled JSPs. One instance of this classloader is present in each classloader universe. The JSP Engine Classloader is created with a list of URLs that point to the locations of the classes it needs to load.
Classloader Universes
Access to components within applications and modules installed on the server occurs within the context of isolated classloader universes, each of which has its own EJB, Web, and JSP Engine classloaders.
- Application Universe: Each J2EE application has its own classloader universe, which loads the classes in all the modules in the application.
- Individually Deployed Module Universe: Each individually deployed EJB JAR, web WAR, or lifecycle module has its own classloader universe, which loads the classes in the module.
Note
A resource such as a file that is accessed by a servlet, JSP, or EJB component must be in a directory pointed to by the classloader’s classpath. For example, the web classloader’s classpath includes these directories:
module_name/WEB-INF/classes
module_name/WEB-INF/libIf a servlet accesses a resource, it must be in one of these directories or it will not be loaded.
Circumventing Classloader Isolation
Since each application or individually deployed module classloader universe is isolated, an application or module cannot load classes from another application or module. This prevents two similarly named classes in different applications from interfering with each other.
To circumvent this limitation for libraries, utility classes, or individually deployed modules accessed by more than one application, you can include the relevant path to the required classes in one of these ways:
Using the System Classloader
To use the System Classloader, do one of the following, then restart the server:
Using the System Classloader makes an application or module accessible to any other application or module across the domain.
Using the Common Classloader
To use the Common Classloader, copy the JAR and ZIP files into the domain_dir/lib directory or copy the .class files into the domain_dir/lib/classes directory, then restart the server.
Using the Common Classloader makes an application or module accessible to any other application or module across the domain.
Using the Java Optional Package Mechanism
To use the Java optional package mechanism, copy the JAR and ZIP files into the domain_dir/lib/ext directory, then restart the server.
Using the Java optional package mechanism makes an application or module accessible to any other application or module across the domain. For example, this is the recommended way of adding JDBC drivers to the Sun Java System Application Server.
Packaging the Client JAR for One Application in Another Application
By packaging the client JAR for one application in a second application, you allow an EJB or web component in the second application to call an EJB component in the first (dependent) application, without making either of them accessible to any other application or module.
As an alternative for a production environment, you can have the Common Classloader load client JAR of the dependent application as described in Using the Common Classloader. Server performance is better, but you must restart the server to make the dependent application accessible, and it is accessible across the domain.
To package the client JAR for one application in another application:
- Deploy the dependent application.
- Add the dependent application’s client JAR file to the calling application.
- For a calling EJB component, add the client JAR file at the same level as the EJB component. Then add a Class-Path entry to the MANIFEST.MF file of the calling EJB component. The Class-Path entry has this syntax:
Class-Path: filepath1.jar filepath2.jar ...
Each filepath is relative to the directory or JAR file containing the MANIFEST.MF file. For details, see the J2EE specification, section 8.1.1.2, “Dependencies.”
- For a calling web component, add the client JAR file under the WEB-INF/lib directory.
- For most applications, packaging the client JAR file with the calling EJB component should suffice. You do not need to package the client JAR file with both the EJB and web components unless the web component is directly calling the EJB component in the dependent application. If you need to package the client JAR with both the EJB and web components, set delegate="true" in the class-loader element of the sun-web.xml file. This changes the Web Classloader so it follows the standard classloader delegation model and delegates to its parent before attempting to load a class itself.
- Deploy the calling application.
Assembling Modules and ApplicationsAssembling (or packaging) modules and applications in Sun Java System Application Server conforms to all of the customary J2EE-defined specifications. The only difference is that when you assemble in Sun Java System Application Server, you include Sun Java System Application Server-specific deployment descriptors (such as sun-web.xml and sun-ejb-jar.xml) that enhance the functionality of the application server.
This section covers the following topics:
Tools for Assembly
The Sun Java System Application Server provides these methods for assembling a module or an application:
deploytool
You can use the deploytool, provided with Sun Java System Application Server, to assemble J2EE applications and modules, configure deployment parameters, perform simple static checks, and deploy the final result. For more information about using the deploytool, see the J2EE 1.4 Tutorial:
http://java.sun.com/j2ee/1.4/docs/tutorial/doc/index.html
Apache Ant
Ant can help you assemble and deploy modules and applications. For details, see Apache Ant Assembly and Deployment Tool.
The Deployment Descriptor Verifier
The verifier tool validates both J2EE and Sun Java System Application Server specific deployment descriptors against their corresponding DTD files and gives errors and warnings if a module or application is not J2EE and Sun Java System Application Server compliant. You can verify deployment descriptors in EAR, WAR, RAR, and JAR files.
The verifier tool is not simply an XML syntax verifier. Rules and interdependencies between various elements in the deployment descriptors are verified. Where needed, user application classes are introspected to apply validation rules.
The verifier is integrated into Sun Java System Application Server deployment, the deploytool, and the sun-appserv-deploy Ant task. You can also run it as a stand-alone utility from the command line.
When you run the verifier during Sun Java System Application Server deployment, the output of the verifier is written to the tempdir/verifier-results/ directory, where tempdir is the temporary directory defined in the operating system. Deployment fails if any failures are reported during the verification process. The verifier also logs information about verification progress to the standard output.
This section covers the following topics:
Command Line Syntax
The verifier tool’s syntax is as follows:
verifier [options] file
The file can be an EAR, WAR, RAR, or JAR file.
The following table shows the options for the verifier tool.
Table 3-4 Verifier Options
Short Form
Long Form
Description
-v
--verbose
Turns on verbose mode.
-d output_dir
--destdir
Writes test results to the output_dir, which must already exist. By default, the results files are created in the current directory.
-r level
--reportlevel level
Sets the output report level to one of the following values:
-n
--notimestamp
Does not append the timestamp to the output file name.
-h or -?
--help
Displays help for the verifier command. If you use this option, you do not need to specify an EAR, WAR, RAR, or JAR file.
-V
--version
Displays the verifier tool version. If you use this option, you do not need to specify an EAR, WAR, RAR, or JAR file.
-u
--gui
Opens a graphical interface for performing verification. If you use this option, you do not need to specify an EAR, WAR, RAR, or JAR file. For more information, see the verifier online help.
For example, the following command runs the verifier in verbose mode and writes all the results of static verification of the ejb.jar file to the output directory ResultsDir:
verifier -v -r a -d ResultsDir ejb.jar
The results files are ejb.jar_verifier.timestamp.txt and ejb.jar_verifier.timestamp.xml. The format of the timestamp is yyyyMMddhhmmss.
If the verifier runs successfully, a result code of 0 is returned. This does not mean that no verification errors occurred. A non-zero error code is returned if the verifier fails to run.
Ant Integration
You can integrate the verifier into an Ant build file as a target and use the Ant call feature to call the target each time an application or module is assembled. This is because the main method in com.sun.enterprise.tools.verifier.Verifier is callable from user Ant scripts. The main method accepts the arguments described in the Verifier Options table.
Example code for an Ant verify target is as follows:
<target name="verify">
<echo message="Verification Process for ${testfile}"/>
<java classname="com.sun.enterprise.tools.verifier.Verifier"
fork="yes">
<sysproperty key="com.sun.enterprise.home"
value="${appserv.home}"/>
<sysproperty key="verifier.xsl"
value="${appserv.home}/verifier/config" />
<!-- uncomment the following for verbose output -->
<!--<arg value="-v"/>-->
<arg value="${assemble}/${ejbjar}" />
<classpath path="${appserv.cpath}:${java.class.path}"/>
</java>
</target>Sample Results Files
Here is a sample results XML file:
<static-verification>
<ejb>
<failed>
<test>
<test-name>
tests.ejb.session.TransactionTypeNullForContainerTX
</test-name>
<test-assertion>
Session bean with bean managed transaction demarcation test
</test-assertion>
<test-description>
For [ TheGreeter ] Error: Session Beans [ TheGreeter ] with [ Bean ] managed transaction demarcation should not have container transactions defined.
</test-description>
</test>
</failed>
</ejb>
...
</static-verification>Here is a sample results TXT file:
---------------------------
STATIC VERIFICATION RESULTS
---------------------------
----------------------------------
NUMBER OF FAILURES/WARNINGS/ERRORS
----------------------------------
# of Failures : 3
# of Warnings : 6
# of Errors : 0
-----------------------------
RESULTS FOR EJB-RELATED TESTS
-----------------------------
--------------
FAILED TESTS :
--------------
Test Name : tests.ejb.session.TransactionTypeNullForContainerTX
Test Assertion : Session bean with bean managed transaction demarcation test
Test Description : For [ TheGreeter ]
Error: Session Beans [ TheGreeter ] with [ Bean ] managed transaction demarcation should not have container transactions defined.
...
---------------
PASSED TESTS :
---------------
Test Name : tests.ejb.session.ejbcreatemethod.EjbCreateMethodStatic
Test Assertion : Each session Bean must have at least one non-static ejbCreate method test
Test Description : For [ TheGreeter ] For EJB Class [ samples.helloworld.ejb.GreeterEJB ] method [ ejbCreate ] [ samples.helloworld.ejb.GreeterEJB ] properly declares non-static ejbCreate(...) method.
...
-----------
WARNINGS :
-----------
Test Name : tests.ejb.businessmethod.BusinessMethodException
Test Assertion : Enterprise bean business method throws RemoteException test
Test Description :
Test Name : tests.ejb.ias.beanpool.IASEjbBeanPool
Test Assertion :
Test Description : WARNING [IAS-EJB ejb] : bean-pool should be defined for Stateless Session and Message Driven Beans
...
---------------------
NOTAPPLICABLE TESTS :
---------------------
Test Name : tests.ejb.entity.pkmultiplefield.PrimaryKeyClassFieldsCmp
Test Assertion : Ejb primary key class properly declares all class fields within subset of the names of the container-managed fields test.
Test Description : For [ TheGreeter ] class com.sun.enterprise.tools.verifier.tests.ejb.entity.pkmultiplefield.Primary KeyClassFieldsCmp expected Entity bean, but called with Session.
Test Name : tests.ejb.entity.ejbcreatemethod.EjbCreateMethodReturn
Test Assertion : Each entity Bean may have zero or more ejbCreate methods which return primary key type test
Test Description : For [ TheGreeter ] class com.sun.enterprise.tools.verifier.tests.ejb.entity.ejbcreatemethod.EjbCrea teMethodReturn expected Entity bean, but called with Session bean.
...
-----------------------------------
RESULTS FOR OTHER XML-RELATED TESTS
-----------------------------------
---------------
PASSED TESTS :
---------------
Test Name : tests.dd.ParseDD
Test Assertion : Test parses the deployment descriptor using a SAX parser to avoid the dependency on the DOL
Test Description : PASSED [EJB] : [ remote ] and [ home ] tags present.
PASSED [EJB]: session-type is Stateless.
PASSED [EJB]: trans-attribute is NotSupported.
PASSED [EJB]: transaction-type is Bean.
...Assembling a WAR Module
To assemble a WAR module, follow these steps:
- Create a working directory, and copy the contents of your web module into it.
- Create two deployment descriptor files with these names: web.xml (required) and sun-web.xml (optional). For more information about sun-web.xml, see Chapter 5, “Deployment Descriptor Files.”
Tip
The first time, you can assemble the WAR module and create the deployment descriptors using the deploytool. The resulting WAR file can be extracted to yield the deployment descriptors.
- Execute this command to create the WAR file:
jar -cvf module_name.war *
Tip
The assembly process can be automated using the Ant tool. To learn more, see Apache Ant Assembly and Deployment Tool.
Assembling an EJB JAR Module
To assemble an EJB JAR module, follow these steps:
- Create a working directory, and copy the contents of your module into it.
- Create two deployment descriptor files with these names: ejb-jar.xml and sun-ejb-jar.xml (both required). If the EJB component is an entity bean with container-managed persistence, you must also create a .dbschema file and a sun-cmp-mapping.xml file. For more information about sun-ejb-jar.xml and sun-cmp-mapping.xml, see Chapter 5, “Deployment Descriptor Files.”
Tip
The first time, you can assemble the EJB JAR module and create the deployment descriptors using the deploytool. The resulting EJB JAR file can be extracted to yield the deployment descriptors.
- Execute this command to create the JAR file:
jar -cvf module_name.jar *
Tip
The assembly process can be automated using the Ant tool. To learn more, see Apache Ant Assembly and Deployment Tool.
Note
According to the J2EE specification, section 8.1.1.2, “Dependencies,” you cannot package utility classes within an individually deployed EJB module. Instead, package the EJB module and utility JAR within an application using the JAR Extension Mechanism Architecture. For other alternatives, see Circumventing Classloader Isolation.
Assembling a Lifecycle Module
To assemble a lifecycle module, follow these steps:
- Create a working directory, and copy the contents of your module into it.
- Execute this command to create the JAR file:
jar -cvf module_name.jar *
Tip
The assembly process can be automated using the Ant tool. To learn more, see Apache Ant Assembly and Deployment Tool.
For general information about lifecycle modules, see Chapter 10, "Developing Lifecycle Listeners."
Assembling an Application
To assemble an application, follow these steps:
- Create a working directory, and copy the contents of your application into it, including all modules.
- Create two deployment descriptor files with these names: application.xml (required) and sun-application.xml (optional). For more information about sun-application.xml, see Chapter 5, “Deployment Descriptor Files.”
Tip
The first time, you can assemble the application and create the deployment descriptors using the deploytool. The resulting EAR file can be extracted to yield the deployment descriptors.
- Execute this command to create the J2EE application EAR file:
jar -cvf app_name.ear *
Tip
The assembly process can be automated using the Ant tool. To learn more, see Apache Ant Assembly and Deployment Tool.
Assembling an ACC Client
This section provides some brief pointers for assembling ACC clients. For more detailed information, see Chapter 9, "Developing Java Clients." To assemble an ACC client JAR module, follow these steps:
- Create a working directory, and copy the contents of your module into it.
- Create deployment descriptor files with these names: application-client.xml and sun-application-client.xml (both required). For more information about sun-application-client.xml, see “The sun-application-client.xml file” on page 237
Tip
The first time, you can assemble the client JAR module and create the deployment descriptors using the deploytool. The resulting client JAR file can be extracted to yield the deployment descriptors.
- Execute this command to create the client JAR file:
jar -cvfm module_name.jar META-INF/MANIFEST.MF *
Tip
The assembly process can be automated using the Ant tool. To learn more, see Apache Ant Assembly and Deployment Tool.
For a brief description of how to deploy an ACC client and prepare the client machine, see Deploying an Application Client.
Assembling a J2EE CA Resource Adapter
This section provides some brief pointers for assembling J2EE CA resource adapters. To assemble a connector RAR module, follow these steps:
- Create a working directory, and copy the contents of your module into it.
- Create the deployment descriptor file with this name: ra.xml. The ra.xml file is required for deploying a connector to the application server. This file is based on the J2EE CA specification and is packaged with the connector.
Tip
The first time, you can assemble the RAR module and create the deployment descriptors using the deploytool. The resulting RAR file can be extracted to yield the deployment descriptors.
- Execute this command to create the RAR file:
jar -cvf module_name.rar *
Tip
The assembly process can be automated using the Ant tool. To learn more, see Apache Ant Assembly and Deployment Tool.
Deploying Modules and ApplicationsThis section describes the different ways to deploy J2EE applications and modules to the Sun Java System Application Server. It covers the following topics:
Deployment Errors
If an error occurs during deployment, the application or module is not deployed. If a module within an application contains an error, the entire application is not deployed. This prevents a partial deployment that could leave the server in an inconsistent state.
The Deployment Life Cycle
After an application is initially deployed, it may be modified and reloaded, redeployed, disabled, re-enabled, and finally undeployed (removed from the server). This section covers the following topics related to the deployment life cycle:
Dynamic Deployment
You can deploy, redeploy, and undeploy an application or module without restarting the server. This is called dynamic deployment.
Although primarily for developers, dynamic deployment can be used in operational environments to bring new applications and modules online without requiring a server restart. Whenever a redeployment is done, the sessions at that transit time become invalid. The client must restart the session.
Note
You can overwrite a previously deployed application by using the --force option of asadmin deploy or by checking the appropriate box in the Administration Console during deployment. However, you must remove a preconfigured resource before you can update it.
Disabling a Deployed Application or Module
You can disable a deployed application or module without removing it from the server. Disabling an application makes it inaccessible to clients.
To disable an application or module, you can do one of the following:
- Set enabled="false" for the application or module in the domain.xml file. For details about domain.xml, see the Sun Java System Application Server Reference.
- Use the Administration Console:
- Login to the Administration Console by going to the following URL in your web browser:
http://host:port/asadmin
For example:
http://localhost:4848/asadmin
- Open the Applications component.
- Go to the page for the type of application or module. For example, for a web application, go to the Web Applications page.
- Click on the name of the application or module you wish to disable.
- Uncheck the Status Enabled box.
- Click Save.
Dynamic Reloading
If dynamic reloading is enabled (it is by default), you do not have to redeploy an application or module when you change its code or deployment descriptors. All you have to do is copy the changed JSP or class files into the deployment directory for the application or module. The server checks for changes periodically and redeploys the application, automatically and dynamically, with the changes.
This is useful in a development environment, because it allows code changes to be tested quickly. In a production environment, however, dynamic reloading may degrade performance. In addition, whenever a reload is done, the sessions at that transit time become invalid. The client must restart the session.
To enable dynamic reloading, you can do one of the following:
- Use the Administration Console:
- Login to the Administration Console by going to the following URL in your web browser:
http://host:port/asadmin
For example:
http://localhost:4848/asadmin
- Open the Applications component.
- Go to the Applications page.
- Check the Reload Enabled box to enable dynamic reloading.
- Enter a number of seconds in the Reload Poll Interval field to set the interval at which applications and modules are checked for code changes and dynamically reloaded. The default is 2.
- Click on the Save button.
In addition, to load new servlet files, reload EJB related changes, or reload deployment descriptor changes, you must do the following:
Automatic Deployment
Automatic deployment, also called autodeployment, involves copying an application or module file (JAR, WAR, RAR, or EAR) into a special directory, where it is automatically deployed by the Sun Java System Application Server. To undeploy an automatically deployed application or module, simply remove its file from the special autodeployment directory. This is useful in a development environment, because it allows new code to be tested quickly.
Autodeployment is enabled by default. To enable and configure or to disable autodeployment, you can do one of the following:
- Use the Administration Console:
- Login to the Administration Console by going to the following URL in your web browser:
http://host:port/asadmin
For example:
http://localhost:4848/asadmin
- Open the Applications component.
- Go to the Applications page.
- Check the Auto Deploy Enabled box to enable autodeployment, or uncheck this box to disable autodeployment.
- Enter a number of seconds in the Auto Deploy Poll Interval field to set the interval at which applications and modules are checked for code changes and dynamically reloaded. The default is 2.
- You can change the Auto Deploy Directory if you like. The default is domain_dir/autodeploy. You can enter an absolute or relative path. A relative path is relative to domain_dir.
- You can check the Verifier Enabled box to verify your deployment descriptor files. This is optional. For details about the verifier, see The Deployment Descriptor Verifier.
- Check the Precompile Enabled box if you would like any JSPs to be precompiled.
- Click on the Save button.
- Edit the following attributes of the domain.xml file’s applications element:
- autodeploy-enabled="true" enables autodeployment; false disables it.
- autodeploy-polling-interval-in-seconds sets the interval at which the autodeployment directory is checked for changes.
- autodeploy-dir sets the location of the autodeployment directory. You can enter an absloute or relative path. A relative path is relative to domain_dir.
- autodeploy-verifier-enabled verifies your deployment descriptor files. This is optional. For details about the verifier, see The Deployment Descriptor Verifier.
- autodeploy-jsp-precompilation-enabled precompiles any JSPs.
Tools for Deployment
This section discusses the various tools that can be used to deploy modules and applications. The deployment tools include:
Apache Ant
Ant can help you assemble and deploy modules and applications. For details, see Apache Ant Assembly and Deployment Tool.
The deploytool
You can use the deploytool, provided with Sun Java System Application Server, to assemble J2EE applications and modules, configure deployment parameters, perform simple static checks, and deploy the final result. For more information about using the deploytool, see the J2EE 1.4 Tutorial:
http://java.sun.com/j2ee/1.4/docs/tutorial/doc/index.html
JSR 88
You can write your own JSR 88 client to deploy applications to the Sun Java System Application Server. For more information, see the JSR 88 page:
http://jcp.org/en/jsr/detail?id=88
See Naming Standards for application and module naming considerations.
The FastJavac Compiler
By default, Sun Java System Application Server uses the built-in JDK compiler to compile applications during deployment. You can also use Sun ONE Studio’s FastJavac compiler, which has a faster compilation rate, during deployment.
To use the FastJavac compiler, you must configure the administration server’s domain.xml file with the path to the compiler. Edit the java-config element as follows:
<java-config java-home="/install_dir/jdk" server-classpath="classpath" ... >
...
<jvm-options>
-Dcom.sun.aas.deployment.java.compiler=/install_dir/studio5/bin/fastjavac/fastjavac.sun
</jvm-options>
...
<property name="com.sun.aas.deployment.java.compiler.options"
value="-jdk /install_dir/jdk" />
...
</java-config>The asadmin Command
You can use the asadmin command to deploy or undeploy applications and individually deployed modules on local servers. This section describes the asadmin command only briefly. For full details, see the Sun Java System Application Server Administration Guide.
To deploy a lifecycle module, see Deploying a Lifecycle Module.
asadmin deploy
The asadmin deploy command deploys a WAR, JAR, RAR, or EAR file. The syntax is as follows, with defaults shown for optional parameters that have them:
asadmin deploy --user user [--virtualservers virtual_servers] [--contextroot contextroot] [--force=true] [--precompilejsp=false] [--verify=false] [--name component_name] [--upload=true] [--retrieve local_dirpath] [--dbvendorname dbvendorname] [--createtables=false] --dropandcreatetables=false] [--uniquetablenames=false] [--enable=true] [--deploymentplan deployment_plan] filepath
For more information about the --dbvendorname, --createtables, --dropandcreatetables, and --uniquetablenames parameters, see Automatic Mapping Options.
For more information about the optional general asadmin parameters (--password, --passwordfile, --host, --port, --secure, --terse, --echo, and --interactive), see the Sun Java System Application Server Administration Guide.
For example, the following command deploys an individual EJB module:
asadmin deploy --user joeuser packagingEJB.jar
If upload is set to false, the filepath must be an absolute path on the server machine.
asadmin deploydir
The asadmin deploydir command deploys an application or module in an open directory structure. The structure must be as specified in Directory Structure. The location of the dirpath under domain_dir/applications/j2ee-apps or domain_dir/applications/j2ee-modules determines whether it is an application or individually deployed module.
The syntax is as follows, with defaults shown for optional parameters that have them:
asadmin deploydir --user user [--virtualservers virtual_servers] [--contextroot contextroot] [--force=true] [--precompilejsp=false] [--verify=false] [--name component_name] [--dbvendorname dbvendorname] [--createtables=false] --dropandcreatetables=false] [--uniquetablenames=false] dirpath
For more information about the --dbvendorname, --createtables, --dropandcreatetables, and --uniquetablenames parameters, see Automatic Mapping Options.
For example, the following command deploys an individual EJB module:
asadmin deploydir --user joeuser packagingEJB
If upload is set to false, the filepath must be an absolute path on the server machine.
Note
On Windows, if you are deploying a directory on a mapped drive, you must be running Sun Java System Application Server as the same user to which the mapped drive is assigned, or Sun Java System Application Server won’t see the directory.
asadmin undeploy
The asadmin undeploy command undeploys an application or module. The syntax is as follows, with defaults shown for optional parameters that have them:
asadmin undeploy --user user [--droptables=false] [--cascade=false] component_name
For more information about the --droptables parameter, see Automatic Mapping Options.
For example, the following command undeploys an individual EJB module:
asadmin undeploy --user joeuser packagingEJB
The Administration Console
You can use the Administration Console to deploy modules and applications to both local and remote Sun Java System Application Server sites. To use this tool, follow these steps:
- Login to the Administration Console by going to the following URL in your web browser:
http://host:port/asadmin
For example:
http://localhost:4848/asadmin
- Open the Applications component.
- Go to the page for the type of application or module. For example, for a web application, go to the Web Applications page.
- Click on the Deploy button. (You can also undeploy, enable, or disable an application or module from this page.)
- If your application or module is in an archive file rather than an open directory structure, click Yes next to Upload File.
- Enter the full path to the module or application directory or archive file (or click on Browse to find it), then click on the Next button.
- Enter the module or application name.
- For an application or web module, enter the context root.
- Assign the application or web module to one or more virtual servers by entering the virtual server names.
- You can also redeploy the module or application if it already exists (called forced deployment) by checking the If Exists Redeploy box. This is optional.
- You can check the Verifier Enabled box to verify your deployment descriptor files. This is optional. For details about the verifier, see The Deployment Descriptor Verifier.
- Other fields are displayed depending on the type of module. Check appropriate boxes and enter appropriate values. Required fields are marked with asterisks (*).
- Click on the Finish button.
To deploy a lifecycle module, see Deploying a Lifecycle Module.
Deployment by Module or Application
You can deploy applications or individual modules that are independent of applications. The runtime and file system implications of application-based or individual module-based deployment are described in Runtime Environments.
Individual module-based deployment is preferable when components need to be accessed by:
Modules can be combined into an EAR file and then deployed as a single module. This is similar to deploying the modules of the EAR independently.
Deploying a WAR Module
You deploy a WAR module as described in Tools for Deployment.
You can precompile JSPs during deployment by checking the appropriate box in the Administration Console or by using the --precompilejsp option of the asadmin deploy or asadmin deploydir command. The sun-appserv-deploy and sun-appserv-jspc Ant tasks also allow you to precompile JSPs.
You can keep the generated source for JSPs by adding the -keepgenerated flag to the jsp-config element in sun-web.xml. If you include this property when you deploy the WAR module, the generated source is kept in domain_dir/generated/jsp/j2ee-apps/app_name/module_name if it is in an application or domain_dir/generated/jsp/j2ee-modules/module_name if it is in an individually deployed web module.
For more information about JSP precompilation, see “Compiling JSPs: The Command-Line Compiler” on page 280. For more information about the -keepgenerated property, see “JSP Elements” on page 178.
Deploying an EJB JAR Module
You deploy an EJB JAR module as described in Tools for Deployment.
You can keep the generated source for stubs and ties by adding the -keepgenerated flag to the rmic-options attribute of the java-config element in domain.xml. If you include this flag when you deploy the EJB JAR module, the generated source is kept in domain_dir/generated/ejb/j2ee-apps/app_name/module_name if it is in an application or domain_dir/generated/ejb/j2ee-modules/module_name if it is in an individually deployed EJB JAR module. For more information about the -keepgenerated flag, see the Sun Java System Application Server Reference.
Generation of stubs and ties is performed asynchronously, so unless you request their generation during deployment (for example, using the --retrieve option of the asadmin deploy command), stubs and ties are not guaranteed to be available immediately after deployment. You can use the asadmin get-client-stubs command to retrieve the stubs and ties whether or not you requested their generation during deployment. The syntax is as follows:
asadmin get-client-stubs --user user --appname app_name local_dirpath
Deploying a Lifecycle Module
For general information about lifecycle modules, see Chapter 10, "Developing Lifecycle Listeners."
You can deploy a lifecycle module using the following tools:
The asadmin Command
To deploy a lifecycle module, use the asadmin create-lifecycle-module command. The syntax is as follows, with defaults shown for optional parameters that have them:
asadmin create-lifecycle-module --user user --classname classname [--classpath classpath] [--loadorder load_order_number] [--failurefatal=false] [--enabled=true] [--description text_description] [--property (name=value)[:name=value]*] modulename
For more information about the optional general asadmin parameters (--password, --passwordfile, --host, --port, --secure, --terse, --echo, and --interactive), see the Sun Java System Application Server Administration Guide.
For example:
asadmin create-lifecycle-module --user joeuser --classname RMIServer MyRMIServer
To undeploy a lifecycle module, use the asadmin delete-lifecycle-module command. The syntax is as follows, with defaults shown for optional parameters that have them:
asadmin delete-lifecycle-module --user user module_name
For example:
asadmin delete-lifecycle-module --user joeuser MyRMIServer
To list the lifecycle modules that are deployed, use the asadmin list-lifecycle-modules command. The syntax is as follows, with defaults shown for optional parameters that have them:
asadmin list-lifecycle-modules --user user
For example:
asadmin list-lifecycle-module --user joeuser
The Administration Console
You can also use the Administration Console to deploy a lifecycle module. Follow these steps:
- Login to the Administration Console by going to the following URL in your web browser:
http://host:port/asadmin
For example:
http://localhost:4848/asadmin
- Open the Applications component.
- Go to the Lifecycle Modules page.
- Click on the New button.
- Enter the following information:
- Name (required) - The name of the lifecycle module.
- Class Name (required) - The fully qualified name of the lifecycle module’s class file.
- Classpath (optional) - The classpath for the lifecycle module. Specifies where the module is located. The default location is under the application root directory.
- Load Order (optional) - Determines the order in which lifecycle modules are loaded at startup. Modules with smaller integer values are loaded sooner. Values can range from 101 to the operating system’s MAXINT. Values from 1 to 100 are reserved.
- On Load Failure Prevent Server Startup (optional) - Determines whether the server is shut down if the lifecycle module fails. The default is false.
- Status Enabled (optional) - Determines whether the lifecycle module is enabled. The default is true.
- Description (optional) - A text description of the lifecycle module.
- Click on the OK button.
Deploying an Application Client
Deployment is only necessary for application clients that communicate with EJB components. To deploy an application client:
- Assemble the necessary client files (as described in Assembling an ACC Client).
- Assemble the EJB components to be accessed by the client.
- Package the client and EJB components together in an application.
- Deploy the application as described in Tools for Deployment. You can use the --retrieve option to get the client JAR file.
You can also use the asadmin get-client-stubs command to retrieve the stubs and ties whether or not you requested their generation during deployment. The syntax is as follows:
asadmin get-client-stubs --user user --appname app_name local_dirpath
- The client JAR contains the ties and necessary classes for the ACC client. Copy this file to the client machine, and set the APPCPATH environment variable on the client to point to this JAR.
If you wish to execute the client on the Sun Java System Application Server machine to test it, you can use the appclient script in the install_dir/bin directory. The only required option is -client. For example:
appclient -client converterClient.jar
The -xml parameter specifies the location of the sun-acc.xml file.
Before you can execute an ACC client on a different machine, you must prepare the client machine:
- You can use the package-appclient script in the install_dir/bin directory to create the ACC package JAR file. This is optional. This JAR file is created in the install_dir/lib/appclient directory.
- Copy the ACC package JAR file to the client machine and unjar it.
- Configure the sun-acc.xml file, located in the appclient/appserv/lib/appclient directory by default if you used the package-appclient script.
- Configure the asenv.conf (asenv.bat on Windows) file, located in appclient/appserv/bin by default if you used the package-appclient script.
- Copy the client JAR file to the client machine. You are now ready to execute the client.
For more detailed information about the appclient and package-appclient scripts, see Chapter 9, "Developing Java Clients."
Deploying a J2EE CA Resource Adapter
You deploy a connector module as described in Tools for Deployment. After deploying the module, you must configure it as described in the following document:
http://developers.sun.com/prodtech/appserver/reference/techart/as8_connectors
Access to Shared Frameworks
When J2EE applications and modules use shared framework classes (such as utility classes and libraries) the classes can be put in the path for the System Classloader or the Common Classloader rather than in an application or module. If you assemble a large, shared library into every module that uses it, the result is a huge file that takes too long to register with the server. In addition, several versions of the same class could exist in different classloaders, which is a waste of resources. For more information, see Circumventing Classloader Isolation.
Apache Ant Assembly and Deployment ToolYou can use the automated assembly features available through Ant, a Java-based build tool available through the Apache Software Foundation:
Ant is a Java-based build tool that is extended using Java classes. Instead of using shell commands, you declare the assembly steps using an XML document. Each task is run by an object that implements a particular task interface.
Apache Ant 1.5.4 is provided with Sun Java System Application Server. The sample applications provided with Sun Java System Application Server have Ant build.xml files; see “Sample Applications” on page 33.
Make sure you have done these things before using Ant:
This section covers the following Ant-related topics:
For information about standard Ant tasks, see the Ant documentation:
http://computing.ee.ethz.ch/sepp/ant-1.5.4-ke/manual/index.html
Ant Tasks for Sun Java System Application Server 8
Use the Ant tasks provided by Sun Java System Application Server for assembling, deploying, and undeploying modules and applications, and for configuring the server. The tasks are as follows:
sun-appserv-deploy
Deploys any of the following.
Subelements
The following table describes subelements for the sun-appserv-deploy task. These are objects upon which this task acts.
Table 3-5 sun-appserv-deploy Subelements
Element
Description
A component to be deployed.
A set of component files that match specified parameters.
Attributes
The following table describes attributes for the sun-appserv-deploy task.
Table 3-6 sun-appserv-deploy Attributes
Attribute
Default
Description
file
none
(optional if a component or fileset subelement is present, otherwise required) The component to deploy. If this attribute refers to a file, it must be a valid archive. If this attribute refers to a directory, it must contain a valid archive in which all components have been exploded. If upload is set to false, this must be an absolute path on the server machine.
name
file name without extension
(optional) The display name for the component being deployed.
type
determined from the file or directory name extension
(optional) The type of component being deployed. Valid types are application, ejb, web, and connector. If not specified, the file (or directory) extension is used to determine the component type: .ear for applicaton, .jar for ejb, .war for web, and .rar for connector. If it’s not possible to determine the component type using the file extension, the default is application.
force
true
(optional) If true, the component is overwritten if it already exists on the server. If false, sun-appserv-deploy fails if the component exists.
retrievestubs
client stubs not saved
(optional) The directory where client stubs are saved. This attribute is inherited by nested component elements.
precompilejsp
false
(optional) If true, all JSPs found in an enterprise application (.ear) or web application (.war) are precompiled. This attribute is ignored for other component types. This attribute is inherited by nested component elements.
verify
false
(optional) If true, syntax and semantics for all deployment descriptors are automatically verified for correctness. This attribute is inherited by nested component elements.
contextroot
file name without extension
(optional) The context root for a web module (WAR file). This attribute is ignored if the component is not a WAR file.
upload
true
(optional) If true, the component is transferred to the server for deployment. If the component is being deployed on the local machine, set upload to false to reduce deployment time. If a directory is specified for deployment, upload must be false.
virtualservers
default virtual server only
(optional) A comma-separated list of virtual servers to be deployment targets. This attribute applies only to application (.ear) or web (.war) components and is ignored for other component types.
user
admin
(optional) The user name used when logging into the application server.
password
none
The password used when logging into the application server.
host
localhost
(optional) Target server. When deploying to a remote server, use the fully qualified host name.
port
4848
(optional) The administration port on the target server.
sunonehome
see description
(optional) The installation directory for the local Sun Java System Application Server 8 installation, which is used to find the administrative classes. If not specified, the command checks to see if the sunone.home parameter has been set. Otherwise, administrative classes must be in the system classpath.
Examples
Here is a simple application deployment script with many implied attributes:
<sun-appserv-deploy
file="${assemble}/simpleapp.ear"
password="${password}" />Here is an equivalent script showing all the implied attributes:
<sun-appserv-deploy
file="${assemble}/simpleapp.ear"
name="simpleapp"
type="application"
force="true"
precompilejsp="false"
verify="false"
upload="true"
user="admin"
password="${password}"
host="localhost"
port="4848"
sunonehome="${sunone.home}" />This example deploys multiple components to the same Sun Java System Application Server running on a remote server:
<sun-appserv-deploy password="${password}" host="greg.sun.com"
sunonehome="/opt/sun" >
<component file="${assemble}/simpleapp.ear"/>
<component file="${assemble}/simpleservlet.war"
contextroot="test"/>
<component file="${assemble}/simplebean.jar"/>
</sun-appserv-deploy>This example deploys the same components as the previous example because the three components match the fileset criteria, but note that it’s not possible to set some component-specific attributes. All component-specific attributes (name, type, and contextroot) use their default values.
<sun-appserv-deploy password="${password}" host="greg.sun.com"
sunonehome="/opt/sun" >
<fileset dir="${assemble}" includes="**/*.?ar" />
</sun-appserv-deploy>sun-appserv-undeploy
Undeploys any of the following.
Subelements
The following table describes subelements for the sun-appserv-undeploy task. These are objects upon which this task acts.
Table 3-7 sun-appserv-undeploy Subelements
Element
Description
A component to be deployed.
A set of component files that match specified parameters.
Attributes
The following table describes attributes for the sun-appserv-undeploy task.
Table 3-8 sun-appserv-undeploy Attributes
Attribute
Default
Description
name
file name without extension
(optional if a component or fileset subelement is present or the file attribute is specified, otherwise required) The display name for the component being undeployed.
file
none
(optional) The component to undeploy. If this attribute refers to a file, it must be a valid archive. If this attribute refers to a directory, it must contain a valid archive in which all components have been exploded.
type
determined from the file or directory name extension
(optional) The type of component being undeployed. Valid types are application, ejb, web, and connector. If not specified, the file (or directory) extension is used to determine the component type: .ear for applicaton, .jar for ejb, .war for web, and .rar for connector. If it’s not possible to determine the component type using the file extension, the default is application.
user
admin
(optional) The user name used when logging into the application server.
password
none
The password used when logging into the application server.
host
localhost
(optional) Target server. When deploying to a remote server, use the fully qualified host name.
port
4848
(optional) The administration port on the target server.
sunonehome
see description
(optional) The installation directory for the local Sun Java System Application Server 8 installation, which is used to find the administrative classes. If not specified, the command checks to see if the sunone.home parameter has been set. Otherwise, the administrative classes must be in the system classpath.
Examples
Here is a simple application undeployment script with many implied attributes:
<sun-appserv-undeploy name="simpleapp" password="${password}" />
Here is an equivalent script showing all the implied attributes:
<sun-appserv-undeploy
name="simpleapp"
type="application"
user="admin"
password="${password}"
host="localhost"
port="4848"
sunonehome="${sunone.home}" />This example demonstrates using the archive files (EAR and WAR, in this case) for the undeployment, using the component name and type (for undeploying the EJB component in this example), and undeploying multiple components.
<sun-appserv-undeploy password="${password}">
<component file="${assemble}/simpleapp.ear"/>
<component file="${assemble}/simpleservlet.war"/>
<component name="simplebean" type="ejb"/>
</sun-appserv-undeploy>sun-appserv-component
Enables or disables the following J2EE component types that have been deployed to Sun Java System Application Server 8.
You don’t need to specify the archive to enable or disable a component: only the component name is required. You can use the component archive, however, because it implies the component name.
Subelements
The following table describes subelements for the sun-appserv-component task. These are objects upon which this task acts.
Table 3-9 sun-appserv-component Subelements
Element
Description
A component to be deployed.
A set of component files that match specified parameters.
Attributes
The following table describes attributes for the sun-appserv-component task.
Table 3-10 sun-appserv-component Attributes
Attribute
Default
Description
action
none
The control command for the target application server. Valid values are enable and disable.
name
file name without extension
(optional if a component or fileset subelement is present or the file attribute is specified, otherwise required) The display name for the component being enabled or disabled.
file
none
(optional) The component to enable or disable. If this attribute refers to a file, it must be a valid archive. If this attribute refers to a directory, it must contain a valid archive in which all components have been exploded.
type
determined from the file or directory name extension
(optional) The type of component being enabled or disabled. Valid types are application, ejb, web, and connector. If not specified, the file (or directory) extension is used to determine the component type: .ear for applicaton, .jar for ejb, .war for web, and .rar for connector. If it’s not possible to determine the component type using the file extension, the default is application.
user
admin
(optional) The user name used when logging into the application server.
password
none
The password used when logging into the application server.
host
localhost
(optional) Target server. When enabling or disabling a remote server, use the fully qualified host name.
port
4848
(optional) The administration port on the target server.
sunonehome
see description
(optional) The installation directory for the local Sun Java System Application Server 8 installation, which is used to find the administrative classes. If not specified, the command checks to see if the sunone.home parameter has been set. Otherwise, the administrative classes must be in the system classpath.
Examples
Here is a simple example of disabling a component:
<sun-appserv-component
action="disable"
name="simpleapp"
password="${password}" />Here is a simple example of enabling a component:
<sun-appserv-component
action="enable"
name="simpleapp"
password="${password}" />Here is an equivalent script showing all the implied attributes:
<sun-appserv-component
action="enable"
name="simpleapp"
type="application"
user="admin"
password="${password}"
host="localhost"
port="4848"
sunonehome="${sunone.home}" />This example demonstrates disabling multiple components using the archive files (EAR and WAR, in this case) and using the component name and type (for an EJB component in this example).
<sun-appserv-component action="disable" password="${password}">
<component file="${assemble}/simpleapp.ear"/>
<component file="${assemble}/simpleservlet.war"/>
<component name="simplebean" type="ejb"/>
</sun-appserv-component>sun-appserv-admin
Enables arbitrary administrative commands and scripts to be executed on the Sun Java System Application Server 8. This is useful for cases where a specific Ant task hasn’t been developed or a set of related commands are in a single script.
Subelements
none
Attributes
The following table describes attributes for the sun-appserv-admin task.
Table 3-11 sun-appserv-admin Attributes
Attribute
Default
Description
command
none
(exactly one of these is required: command, commandfile, or explicitcommand) The command to execute. If the user, password, host, or port attributes are also specified, they are automatically inserted into the command before execution. If any of these options are specified in the command string, the corresponding attribute values are ignored.
commandfile
none
(exactly one of these is required: command, commandfile, or explicitcommand) The command script to execute. If commandfile is used, the values of all other attributes are ignored. Be sure to end the script referenced by commandfile with the exit command; if you omit exit, the Ant task may appear to hang after the command script is called.
explicitcommand
none
(exactly one of these is required: command, commandfile, or explicitcommand) The exact command to execute. No command processing is done, and all other attributes are ignored.
user
admin
(optional) The user name used when logging into the application server.
password
none
(optional) The password used when logging into the application server.
host
localhost
(optional) Target server. If it is a remote server, use the fully qualified host name.
port
4848
(optional) The administration port on the target server.
sunonehome
see description
(optional) The installation directory for the local Sun Java System Application Server 8 installation, which is used to find the administrative classes. If not specified, the command checks to see if the sunone.home parameter has been set. Otherwise, the administrative classes must be in the system classpath.
sun-appserv-jspc
Precompiles JSP source code into Sun Java System Application Server compatible Java code for initial invocation by Sun Java System Application Server. Use this task to speed up access to JSP pages or to check the syntax of JSP source code. You can feed the resulting Java code to the javac task to generate class files for the JSPs.
Subelements
none
Attributes
The following table describes attributes for the sun-appserv-jspc task.
Table 3-12 sun-appserv-jspc Attributes
Attribute
Default
Description
destdir
The destination directory for the generated Java source files.
srcdir
(exactly one of these is required: srcdir or webapp) The source directory where the JSP files are located.
webapp
(exactly one of these is required: srcdir or webapp) The directory containing the web application. All JSP pages within the directory are recursively parsed. The base directory must have a WEB-INF subdirectory beneath it. When webapp is used, sun-appserv-jspc hands off all dependency checking to the compiler.
verbose
2
(optional) The verbosity integer to be passed to the compiler.
classpath
(optional) The classpath for running the JSP compiler.
classpathref
(optional) A reference to the JSP compiler classpath.
uribase
/
(optional) The URI context of relative URI references in the JSP pages. If this context does not exist, it is derived from the location of the JSP file relative to the declared or derived value of uriroot. Only pages translated from an explicitly declared JSP file are affected.
uriroot
see description
(optional) The root directory of the web application, against which URI files are resolved. If this directory is not specified, the first JSP page is used to derive it: each parent directory of the first JSP page is searched for a WEB-INF directory, and the directory closest to the JSP page that has one is used. If no WEB-INF directory is found, the directory sun-appserv-jspc was called from is used. Only pages translated from an explicitly declared JSP file (including tag libraries) are affected.
package
(optional) The destination package for the generated Java classes.
failonerror
true
(optional) If true, JSP compilation fails if errors are encountered.
sunonehome
see description
(optional) The installation directory for the local Sun Java System Application Server 8 installation, which is used to find the administrative classes. If not specified, the command checks to see if the sunone.home parameter has been set. Otherwise, the administrative classes must be in the system classpath.
Example
The following example uses the webapp attribute to generate Java source files from JSP files. The sun-appserv-jspc task is immediately followed by a javac task, which compiles the generated Java files into class files. The classpath value in the javac task must be all on one line with no spaces.
<sun-appserv-jspc
destdir="${assemble.war}/generated"
webapp="${assemble.war}"
classpath="${assemble.war}/WEB-INF/classes"
sunonehome="${sunone.home}" />
<javac
srcdir="${assemble.war}/WEB-INF/generated"
destdir="${assemble.war}/WEB-INF/generated"
debug="on"
classpath="${assemble.war}/WEB-INF/classes:${sunone.home}/lib/appserv-rt.j ar:${sunone.home}/lib/appserv-ext.jar">
<include name="**/*.java"/>
</javac>sun-appserv-update
Enables deployed applications (EAR files) and modules (EJB JAR, RAR, and WAR files) to be updated and reloaded for fast iterative development. This task copies modified class files, XML files, and other contents of the archive files to the appropriate subdirectory of the domain_dir/applications directory, then touches the .reload file to cause dynamic reloading to occur.
This is a local task and must be executed on the same machine as the application server.
Subelements
none
Attributes
The following table describes attributes for the sun-appserv-update task.
Table 3-13 sun-appserv-update Attributes
Attribute
Default
Description
file
none
The component to update, which must be a valid archive.
domain
domain1
(optional) The domain in which the application has been previously deployed.
Example
The following example updates the J2EE application foo.ear, which is deployed to the default domain, domain1.
<sun-appserv-update file="foo.ear"/>
Reusable Subelements
Reusable subelements of the Ant tasks for Sun Java System Application Server 8 are as follows. These are objects upon which the Ant tasks act.
component
Specifies a J2EE component. Allows a single task to act on multiple components. The component attributes override corresponding attributes in the parent task; therefore, the parent task attributes function as default values.
Subelements
none
Attributes
The following table describes attributes for the component element.
Table 3-14 component Attributes
Attribute
Default
Description
file
none
(optional if the parent task is sun-appserv-undeploy or sun-appserv-component) The target component. If this attribute refers to a file, it must be a valid archive. If this attribute refers to a directory, it must contain a valid archive in which all components have been exploded. If upload is set to false, this must be an absolute path on the server machine.
name
file name without extension
(optional) The display name for the component.
type
determined from the file or directory name extension
(optional) The type of component. Valid types are application, ejb, web, and connector. If not specified, the file (or directory) extension is used to determine the component type: .ear for applicaton, .jar for ejb, .war for web, and .rar for connector. If it’s not possible to determine the component type using the file extension, the default is application.
force
true
(applies to sun-appserv-deploy only, optional) If true, the component is overwritten if it already exists on the server. If false, the containing element’s operation fails if the component exists.
precompilejsp
false
(applies to sun-appserv-deploy only, optional) If true, all JSPs found in an enterprise application (.ear) or web application (.war) are precompiled. This attribute is ignored for other component types.
retrievestubs
client stubs not saved
(applies to sun-appserv-deploy only, optional) The directory where client stubs are saved.
contextroot
file name without extension
(applies to sun-appserv-deploy only, optional) The context root for a web module (WAR file). This attribute is ignored if the component is not a WAR file.
verify
false
(applies to sun-appserv-deploy only, optional) If true, syntax and semantics for all deployment descriptors is automatically verified for correctness.
Examples
You can deploy multiple components using a single task. This example deploys each component to the same Sun Java System Application Server running on a remote server.
<sun-appserv-deploy password="${password}" host="greg.sun.com"
sunonehome="/opt/s1as8" >
<component file="${assemble}/simpleapp.ear"/>
<component file="${assemble}/simpleservlet.war"
contextroot="test"/>
<component file="${assemble}/simplebean.jar"/>
</sun-appserv-deploy>You can also undeploy multiple components using a single task. This example demonstrates using the archive files (EAR and WAR, in this case) and the component name and type (for the EJB component).
<sun-appserv-undeploy password="${password}">
<component file="${assemble}/simpleapp.ear"/
<component file="${assemble}/simpleservlet.war"/>
<component name="simplebean" type="ejb"/>
</sun-appserv-undeploy>You can enable or disable multiple components. This example demonstrates disabling multiple components using the archive files (EAR and WAR, in this case) and the component name and type (for the EJB component).
<sun-appserv-component action="disable" password="${password}">
<component file="${assemble}/simpleapp.ear"/>
<component file="${assemble}/simpleservlet.war"/>
<component name="simplebean" type="ejb"/>
</sun-appserv-component>fileset
Selects component files that match specified parameters. When fileset is included as a subelement, the name and contextroot attributes of the containing element must use their default values for each file in the fileset. For more information, see:
http://computing.ee.ethz.ch/sepp/ant-1.5.4-ke/manual/CoreTypes/fileset.html